
Popular categories
Looking for a yarn?


Comments / Questions (64)
![]() Queron wrote:
Queron wrote:
Je ne comprends pas comment faire après avoir terminé A1 et A2, il est très compliqué les explications ne sont pas clairs qu est ce que veut dire A5 au dessus des 22 mailles. A4 au dessus des 110 mailles suivantes
07.05.2021 - 17:10DROPS Design answered:
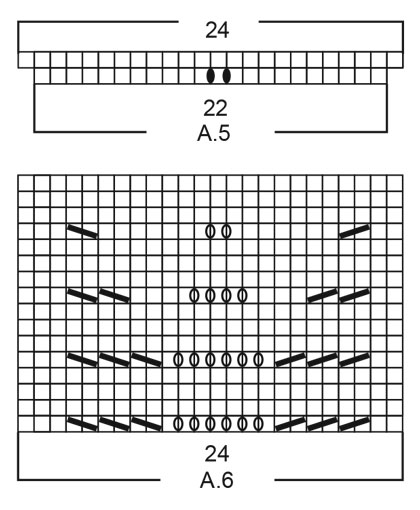
Bonjour Mme Queron, vous tricotez d'abord A.1- A.3 (en répétant A.2 entre A.1 et A.3) puis tricotez les diagrammes suivants ainsi (taille M par ex): 5 m point mousse, 2 m jersey, A.5 (= 22 m), 5 x A.4 (= 110 m), 3 x A.5 (= 66m ), 5 x A.4 (= 110m), 1 x A.5 (= 22 m), 1 m jersey, 5 m point mousse = 5+2+22+110+66+110+22+1+5= 343 m. Bon tricot!
10.05.2021 - 10:34
![]() Tabea Kaufmann wrote:
Tabea Kaufmann wrote:
Hallo ich hätte eine Frage zu dem Strickmuster. Ich bin mit der Passé fertig und gerade in der Rückreihe, in der 72 Maschen für die Ärmel stillgelegt werden sollen. Mir ist nun nicht ganz klar an welcher Stelle 8 Maschen zugenommen werden sollen. Wie macht man das?
02.03.2021 - 19:32DROPS Design answered:
Liebe Frau Kaufamann, dieses Video zeigt, wie man diese Maschen anschlägt, und auch in dieser Lektion sehen Sie, ab Bild 10, wie man die Maschen für die Ärmel stilllegt und wie man weiter strickt. Viel Spaß beim stricken!
03.03.2021 - 06:58
![]() Greetje Van Der Zee wrote:
Greetje Van Der Zee wrote:
Ik begrijp het stuk na de pas niet, wel het patroon maar er staat bij maat S dat het gebreid moet worden tot het werk 15 cm meet. 15 cm vanaf waar? De pas was 14 cm, moet ik dit stuk na de pas dan twee keer breien?
19.05.2020 - 21:46DROPS Design answered:
Dag Greetje,
Nee, je breit de pas niet 2 keer , maar je breit tot de pas 15 cm meet vanaf de opzetnaald in maat S.
22.05.2020 - 10:00
![]() Marijke wrote:
Marijke wrote:
Bij patroon A6 midden maak je 6 gaatjes door een omslag, dan heb je dus 12 steken(en minder je aan elke zijkant 2x3 steken) de volgende rij van 6 gaatjes kan je dan niet breien door om en om een omslag te maken omdat de voorgaande 6 steken er 12 zijn geworden. doe ik iets verkeerd ?
16.04.2020 - 08:34
![]() Grethe wrote:
Grethe wrote:
Hej igen. Jeg har fundet ud af det. Jeg har gjort klar til ærmerne og den bliver rigtig flot. Passer godt til sommerkjolen. :-)
13.04.2020 - 09:20
![]() Grethe wrote:
Grethe wrote:
Som nævnt, skal jeg i gang med mønster A6. Er det sådan her det skal strikkes: 5 kantm., 2 m. glatstrik, A6, A4, A6, A6, A6, A4, A6, 1 m. glatstrik, 5 kantm.
03.04.2020 - 15:41
![]() Grethe wrote:
Grethe wrote:
Hej Jeg skal nu igang med mønster A6, hvor der skal strikkes en rapport på hver side af forkanten( + 1 eller 2 masker glatstrik)? hvor mange masker glatstrik skal jeg strikke i en str. M? 1 eller 2?
01.04.2020 - 15:49DROPS Design answered:
Hej Så fint att du fant ut av det :)
16.04.2020 - 09:02
![]() Ann Veronica Marshall wrote:
Ann Veronica Marshall wrote:
Thanks for nothing !
30.03.2020 - 15:42
![]() Ann Veronica Marshall wrote:
Ann Veronica Marshall wrote:
Looking forward to knitting this pattern and it is useless . Have finished the yoke and from the start it was 2 stitches less for the medium size than was required . Now cannot continue as breaking for the next pattern just doesn’t have the required number of stitches . Please advise I would dearly love to complete this pattern for my daughter s birthday .
30.03.2020 - 15:40DROPS Design answered:
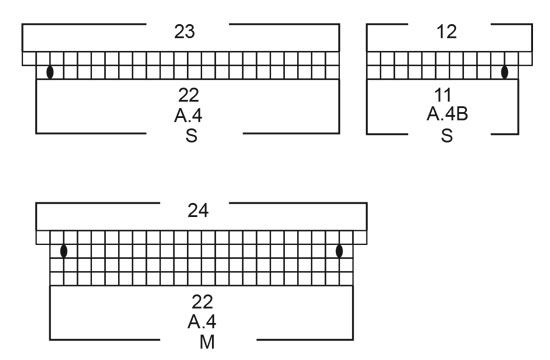
Dear Mrs Marshall, not sure how to help you, the number of stitches in M is working: you work the 163 sts as follows: 5 front band sts, 12 sts (A.1), 140 sts (= 14 x 10 sts of A.2), 1 stitch (A.3), 5 front band sts = 5+12+140+1+5=163 sts and when diagrams are done, you have: 5 front band sts, 24 sts (A.1), 308 sts (14 x 22 sts in A.2), 1 (A.3), 5 front band sts = 5+24+308+1+5= 343 sts. Happy knitting!
30.03.2020 - 17:03
![]() Lone Bugge wrote:
Lone Bugge wrote:
Det ville være dejligt hvis modellen også kunne ses bagpå. Jeg er i tvivl om, der skal strikkes A6 mønster på ryggen i afsnittet : Ryg og forstykke. Eller er det kun på forstykkerne.
17.07.2019 - 23:14DROPS Design answered:
Hei Lone. Vi har dessverre ingen bilder av ryggen av denne modellen, men i oppsrkiften står det: ......der strikkes 3 rapporter A.6 midt bag på ryggen. God Fornøyelse!
23.09.2019 - 08:18
|
|||||||||||||||||||
Spring Melt#springmeltcardi |
|||||||||||||||||||
 |
 |
||||||||||||||||||
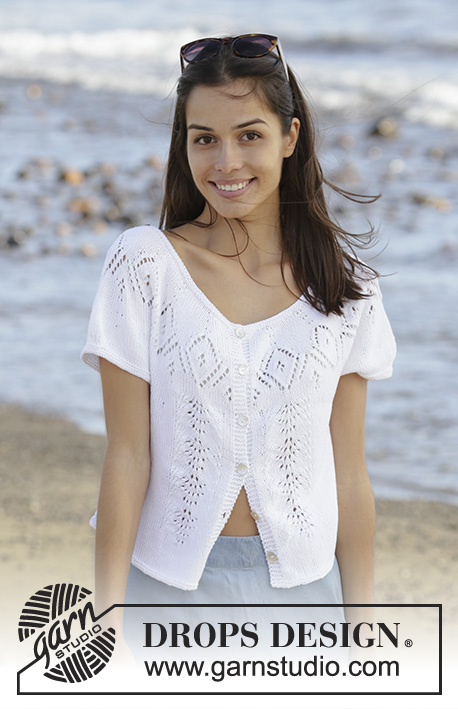
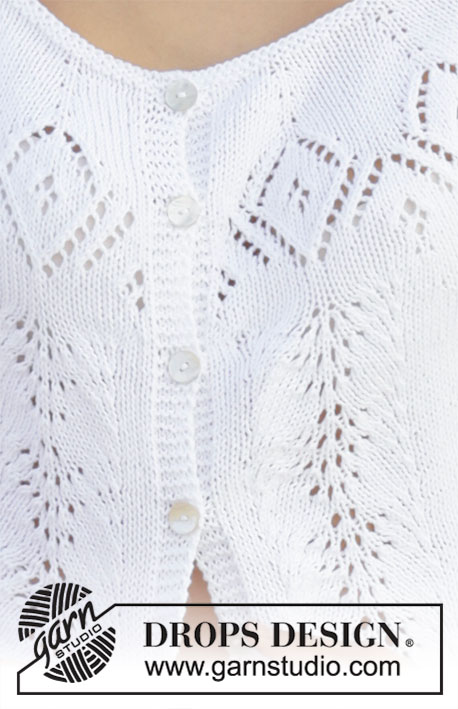
Knitted jacket with round yoke and short sleeves in DROPS Safran. The piece is worked top down with lace pattern. Sizes S - XXXL.
DROPS 199-41 |
|||||||||||||||||||
|
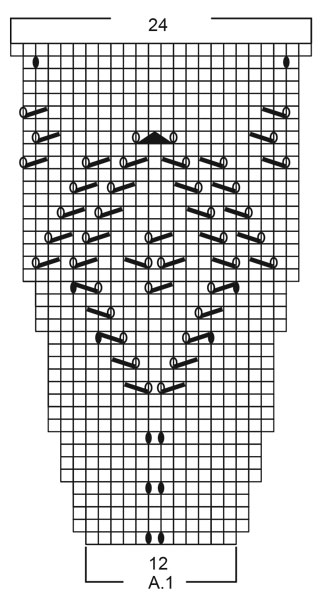
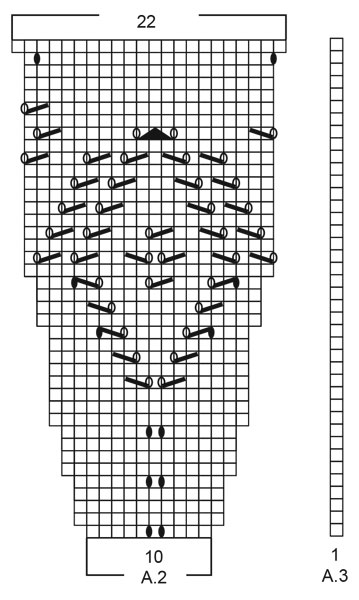
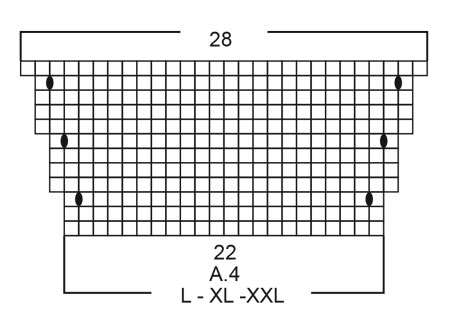
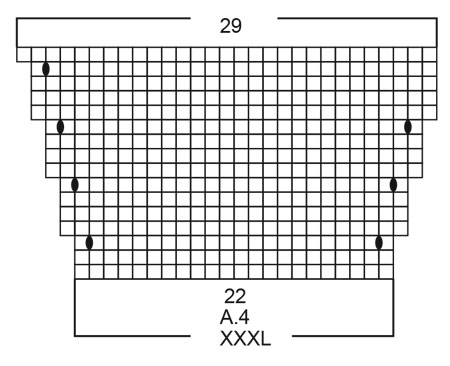
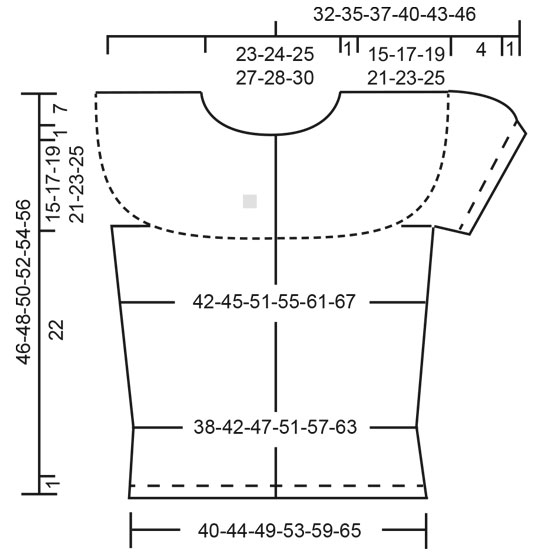
------------------------------------------------------- EXPLANATIONS FOR THE PATTERN: ------------------------------------------------------- RIDGE/GARTER STITCH (worked in the round): 1 ridge in height = 2 rounds; knit 1 round and purl 1 round. RIDGE/GARTER STITCH (worked back and forth): Knit all rows. 1 ridge in height = Knit 2 rows. PATTERN: See diagrams A.1 to A.6. Choose diagram for your size. The diagrams show all the rows in the pattern seen from the right side. INCREASE TIP (evenly spaced): To work out how to increase evenly, count the total number of stitches on the needle (e.g. 158 stitches) minus the bands (e.g. 10 stitches) and divide by the number of increases to be made (e.g. 5) = 29.6. In this example increase by making 1 yarn over after approx. each 30th stitch. On the next row knit the yarn overs twisted to avoid holes (do not increase on bands). DECREASE TIP: Decrease 1 stitch on each side of marker thread as follows: Work until there are 3 stitches left before the marker thread, knit 2 together, knit 2 (marker thread sits between these stitches), slip 1 stitch as if to knit, knit 1 and pass the slipped stitch over the knitted stitch. BUTTONHOLES: Work buttonholes on right band (when garment is worn). Work from the right side when there are 3 stitches left on row as follows: Make 1 yarn over, knit 2 together and knit the last stitch. On the next row knit the yarn over to leave a hole. First buttonhole worked on first row after the garter stitch edge for neck. Then the other 5-5-5-5-6-6 buttonholes with approx. 7-7-7½-8-7-7½ cm between each one. ------------------------------------------------------- START THE PIECE HERE: ------------------------------------------------------- JACKET - SHORT OVERVIEW OF THE PIECE: The piece is worked back and forth with circular needle, top down. The sleeves are worked in the round with short circular needle/double pointed needles. JACKET: YOKE: Cast on 153-158-163-171-178-183 stitches (including 5 band stitches on each side) with circular needle size 2.5 mm and Safran. Work 2 RIDGES – read description above. Change to circular needle size 3 mm. Then work 2 rows stocking stitch with 5 band stitches in garter stitch on each side towards mid front, AT THE SAME TIME increase 0-5-0-2-5-10 stitches evenly spaced on 1st row – read INCREASE TIP and REMEMBER BUTTONHOLES = 153-163-163-173-183-193 stitches. Now work pattern as follows: Work 5 band stitches in garter stitch, A.1 (= 12 stitches), A.2 (= 10 stitches) a total of 13-14-14-15-16-17 times, A.3 (= 1 stitch), 5 band stitches in garter stitch. Continue like this back and forth. REMEMBER THE KNITTING TENSION! When A.1 to A.3 have been completed there are 321-343-343-365-387-409 stitches on the needle. The piece measures approx. 14 cm from the cast-on edge. Now work pattern in the different sizes as follows: Sizes S, XL and XXXL: The next row is worked as follows: 5 band stitches in garter stitch, 2 stitches in stocking stitch, A.5 over the next 22 stitches, A.4 over the next 88-110-132 stitches (= 4-5-6 repeats in width). Work A.4B (= 11 stitches), A.5 over the next 66 stitches (= 3 repeats), work the last 11 stitches in A.4, A.4 over the next 88-110-132 stitches (= 4-5-6 repeats in width), A.5 over the next 22 stitches, 1 stitch in stocking stitch, 5 band stitches in garter stitch. Continue like this back and forth. When A.5 has been completed, work A.6 over each repeat of A.5; i.e. work a repeat of A.6 beside each band (+ 1 or 2 stitches in stocking stitch) and 3 repeats of A.6 mid back. When A.4 has been completed there are 341-441-511 stitches on the needle. Continue with stocking stitch, A.6 (+ 1 or 2 stitches stocking stitch) and 5 band stitches in garter stitch towards mid front until the piece measures 15-21-25 cm. Sizes M, L and XXL: The next row is worked as follows: 5 band stitches in garter stitch, 2 stitches in stocking stitch, A.5 over the next 22 stitches, A.4 over the next 110-110-132 stitches (= 5-5-6 repeats in width), work A.5 over the next 66 stitches (= 3 repeats), A.4 over the next 110-110-132 stitches (= 5-5-6 repeats in width), A.5 over the next 22 stitches, 1 stitch in stocking stitch, 5 band stitches in garter stitch. Continue like this back and forth. When A.5 has been completed, work A.6 over each repeat of A.5; i.e. work one repeat of A.6 beside each band (+ 1 or 2 stitches in stocking stitch) and there are 3 repeats of A.6 mid back. When A.4 has beeen completed, there are 373-413-469 stitches on the needle. Continue with stocking stitch, A.6 (+ 1 or 2 stitches in stocking stitch) and 5 band stitches in garter stitch towards mid front until the piece measures 17-19-23 cm. All sizes: The next row is worked as follows from the right side: Work pattern as before over the first 31 stitches, knit the next 104-120-140-154-168-189 stitches and increase at the same time 5-5-5-5-11-13 stitches evenly spaced, work pattern as before over the next 72 stitches, knit the next 104-120-140-154-168-189 stitches and increase at the same time 5-5-5-5-11-13 stitches evenly spaced, work pattern as before over the remaining 30 stitches = 351-383-423-451-491-537 stitches. Turn and work the last row on the yoke as follows (from the wrong side): Work pattern as before over the first 54-59-64-69-75-82 stitches, place the next 72-79-89-93-101-110 stitches on a thread for sleeve and cast on 8-8-10-10-12-12 new stitches on the needle, work pattern as before over the next 99-107-117-127-139-153 stitches, place the next 72-79-89-93-101-110 stitches on a thread for sleeve and cast on 8-8-10-10-12-12 new stitches on the needle, work pattern as before over the remaining 54-59-64-69-75-82 stitches. BODY: = 223-241-265-285-313-341 stitches. Insert a marker thread in the middle of the 8-8-10-10-12-12 new stitches cast on under the sleeves on each side (= 4-4-5-5-6-6 new stitches on each side of the marker thread). Continue back and forth with A.6, stocking stitch and 5 band stitches in garter stitch on each side towards mid front as before. NOTE: You work 2 stitches stocking stitch between the first 5 band stitches and A.6 at the start of the row (seen from the right side) and 1 stitch stocking stitch between A.6 and the last 5 band stitches at the end of the row (seen from the right side). When the piece measures 4 cm decrease 1 stitch on each side of the marker threads in each side – read DECREASE TIP. Decrease like this every 2 cm a total of 5 times = 203-221-245-265-293-321 stitches. When the piece measures 17 cm – adjust so that you finish after a complete repeat of A.6 in height (there are now 6 cm left to finished length), continue with stocking stitch and 5 band stitches in garter stitch on each side. When the piece measures 22 cm change to circular needle size 2.5 mm and work 2 ridges over all stitches. Cast off, but to avoid the cast-off edge being tight you can make a yarn over after each 6th stitch. Yarn overs cast off as normal stitches. SLEEVE: Place the 72-79-89-93-101-110 stitches from the thread on the one side of the piece back onto double pointed needles/short circular needle size 3 mm and knit up 1 stitch in each of the 8-8-10-10-12-12 new stitches cast on under the sleeve = 80-87-99-103-113-122 stitches. Work stocking stitch in the round for 3 cm. Now decrease stitches mid top of sleeve as follows: Work the first 30-33-35-37-41-45 stitches, knit 2 and 2 stitches together over the next 20-20-28-28-30-32 stitches (= 10-10-14-14-15-16 stitches decreased), knit the next 30-34-36-38-42-45 stitches = 70-77-85-89-98-106 stitches. Work 2 rounds stocking stitch. Change to double pointed needles size 2.5 mm and work 3 ridges. Cast off. Work the other sleeve in the same way. ASSEMBLY: Sew buttons on to left front band. |
|||||||||||||||||||
Diagram explanations |
|||||||||||||||||||
|
|||||||||||||||||||
 |
|||||||||||||||||||
 |
|||||||||||||||||||
 |
|||||||||||||||||||
 |
|||||||||||||||||||
 |
|||||||||||||||||||
 |
|||||||||||||||||||
 |
|||||||||||||||||||
 |
|||||||||||||||||||
Have you finished this pattern?Tag your pictures with #dropspattern #springmeltcardi or submit them to the #dropsfan gallery. Do you need help with this pattern?You'll find 26 tutorial videos, a Comments/Questions area and more by visiting the pattern on garnstudio.com. © 1982-2026 DROPS Design A/S. We reserve all rights. This document, including all its sub-sections, has copyrights. Read more about what you can do with our patterns at the bottom of each pattern on our site. |
|||||||||||||||||||


With over 40 years in knitting and crochet design, DROPS Design offers one of the most extensive collections of free patterns on the internet - translated to 17 languages. As of today we count 324 catalogues and 12245 patterns translated into English (UK/cm). 12245
We work hard to bring you the best knitting and crochet have to offer, inspiration and advice as well as great quality yarns at incredible prices! Would you like to use our patterns for other than personal use? You can read what you are allowed to do in the Copyright text at the bottom of all our patterns. Happy crafting!
Post a comment to pattern DROPS 199-41
We would love to hear what you have to say about this pattern!
If you want to leave a question, please make sure you select the correct category in the form below, to speed up the answering process. Required fields are marked *.