
Popular categories
Looking for a yarn?


Comments / Questions (34)
![]() Kathleen wrote:
Kathleen wrote:
On the sleeves I cast on 47 stitches worked two ridges in garter stitch, knit 1Edge stitch in garter stitch, knit 5, knit A1, then it says to work stockenette? How many? And if I do there won’t be enough stitches to continue the pattern to finish this first row. Please explain
15.11.2020 - 02:43DROPS Design answered:
Hi Kathleen, After the ridges the next row is : 1 edge stitch, 5 stitches in stocking stitch, A.1, then 1 stitch in stocking stitch, A.1, then 5 stitches in stocking stitch and 1 edge stitch. Happy knitting!
15.11.2020 - 11:24
![]() Kathleen wrote:
Kathleen wrote:
How do you continue the pattern after bind off of the 9 neck stitches? not enough stitches left to follow the pattern please explain
31.10.2020 - 16:57DROPS Design answered:
Dear Kathleen, when there is not enough stitches for a whole repeat of the pattern, the stitches are knitted with stickinett stitch. Happy Knitting!
31.10.2020 - 18:34
![]() Kathleen wrote:
Kathleen wrote:
I have the 17 stitches on the thread but unsure of where I start the bind off . by the stitches nearest the thread? Or start the bind off at the end where the shoulder will be? And when do I start the 9 stitches in stockenette while still doing the bind off or after?
21.10.2020 - 02:44DROPS Design answered:
Dear Kathleen, you mean for neck/shoulders? After you have slipped the 17 sts on a thread, you continue each shoulder separately, this means you will cast off for neck at the beginning of the row starting from neck (from RS for the left shoulder/front piece and from WS for the right shoulder/front piece) - start working 9 sts towards neck when you have divided piece for neck (these 9 sts will be decreased for neck). Happy knitting!
21.10.2020 - 08:43
![]() Doris Elgaard wrote:
Doris Elgaard wrote:
Savner opskrifter på damebluser til pind 2 1/2 eller 3 ? til omregning ville det være dejligt at man kunne skrive den ønskede pindestørrelse i stedet for garn, da man ikke altid kan se om det garn man vælger er tyndere eller tykkere ? venlig hilsen Doris
25.04.2020 - 11:15DROPS Design answered:
Hei Doris. Om du bruker søkefeltet: Finn oppskrifter! Kan du velge garngruppe A (pinnenr. 2,5-3). Du vil da få opp mange oppskrifter med tynne pinner, velg derfra hvilken kategori, strikke/hekle osv. mvh DROPS design
27.04.2020 - 14:48
![]() Sara wrote:
Sara wrote:
Er kommet til lukning til ærmekuppel, men forstår ikke helt lukketippet, for hvis man strikker de yderste 9 masker glatstrik, får man så ikke for mange masker i A.1??? Når der strikkes glatstrik i de yderste 9 masker, men der stadig slås om 6 gange i A1??
15.04.2020 - 11:29DROPS Design answered:
Hej Sara, hvis du strikker de yderste 9 masker i A.1 i glatstrik, så vil du stadigvæk have 3 omslag og 3 indtagninger i den anden side af diagrammet. God fornøjelse!
21.04.2020 - 14:50
![]() Alex wrote:
Alex wrote:
Hallo, und danke für die tolle Anleitung. Ich bin bei der Stelle angekommen, wo man für die Armausschnitte abkettet. Nun verstehe ich leider nicht, was dieser Satz bedeuten soll: "Im Muster, glatt rechts und mit je 1 Rand-Masche kraus rechts beidseitig weiterstricken." Für Hilfe wäre ich sehr dankbar. Liebe Grüße!
15.04.2020 - 10:41DROPS Design answered:
Liebe Alex, nachdem alle Maschen für Armausschnitte abgekettet sind, stricken Sie weiter wie zuvor, dh die glatt recht gestrickten Maschen stricken Sie glatt rechts, die Maschen im Muster wie zuvor, und dazu 1 Randmasche krausrechts beidseitig. Viel Spaß beim stricken!
15.04.2020 - 10:54
![]() Hedvig Kristine Aarnes wrote:
Hedvig Kristine Aarnes wrote:
Hei, Er det korrekt at fjerde pinne skal strikkes vrang fra vrangen? Jeg har strikket bølgemønster flere ganger før, da har pinnen etter pinnen med fellinger og kast blitt strikket rett fra vrangen. Det er vanskelig å se på bildet, men ser slik ut også her. Er takknemlig for raskt svar!
29.01.2020 - 22:26DROPS Design answered:
Hej Hedvig, det her bølgemønster strikkes helt i glatstrik. Synes du det er pænere med en pind ret fra vrangen efter hulmønteret, så gør du bare det :)
10.02.2020 - 16:39
![]() Hanna Sahlström wrote:
Hanna Sahlström wrote:
Hei! Når jeg har felt av til ermene etter 30cm, så står det at jeg skal fortsette "mønsteret med glattstrikk og en kantmaskrille i hver side". Der det var glattstrikk har jeg jo felt av nå. Skal jeg strikke glattstrikk over det 87 maskene som er kvar, eller skal jeg strikke A1? Det står og på bakstykket at bakstykket skal strikkes som bakstykket. Mener dere framstykket?
29.01.2020 - 16:47DROPS Design answered:
Hej Hanna, du fortsætter mønsteret og strikker glatstrik over de masker som ikke går op. Ja du strikker bagstykket som forstykket men lukker først af til hals når arb måler 42-44-46-48-50-52 cm. God fornøjelse!
10.02.2020 - 16:44
![]() Cornelia Rack wrote:
Cornelia Rack wrote:
Sind die MaschenAngaben korrekt. Mein Teil wird riesig, wenn ich für die Größe L 123 M. stricke. Selbst bei 103 M. wird das Teil größer als 53cm.
21.11.2019 - 20:52DROPS Design answered:
Liebe Frau Rack, stimmt Ihre Maschenprobe? Man braucht mehr Maschen in A.1 als wenn glatt rechts gestrickt wegen dem Wellenmuster. Viel Spaß beim stricken!
22.11.2019 - 08:09
![]() Elena wrote:
Elena wrote:
Estoy equivocada ,no coinciden las medidas laterales del patrón ,con las medidas de la explicación ,por ejemplo la altura del comienzo de la sisa en el delantero
21.10.2019 - 02:46DROPS Design answered:
Hola Elena. Las medidas son correctas. Por ejemplo para la talla S, el largo total es 46 cm, el largo hasta la sisa 46-16 = 30 cm. Según el patrón " Cuando la labor mida 30-31-32-33-34-35 cm cerrar para las sisas...." ( el primer número es para la talla S).
21.10.2019 - 23:49
|
|||||||||||||
September Rose#septemberrosesweater |
|||||||||||||
 |
 |
||||||||||||
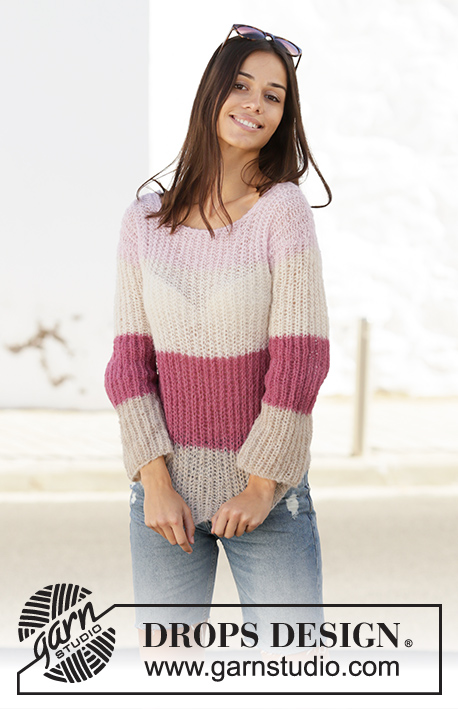
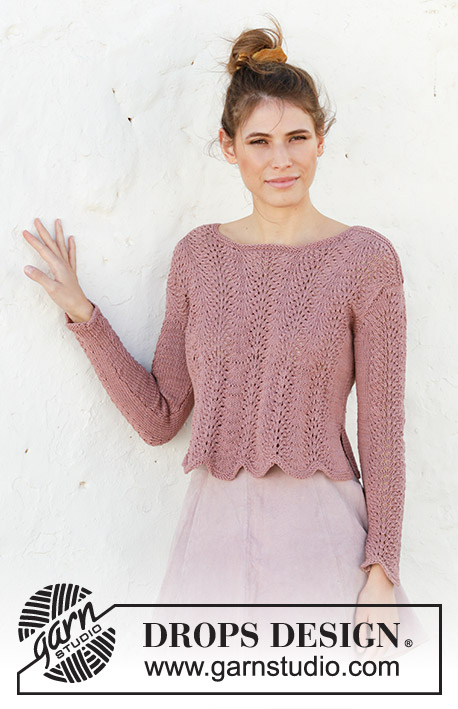
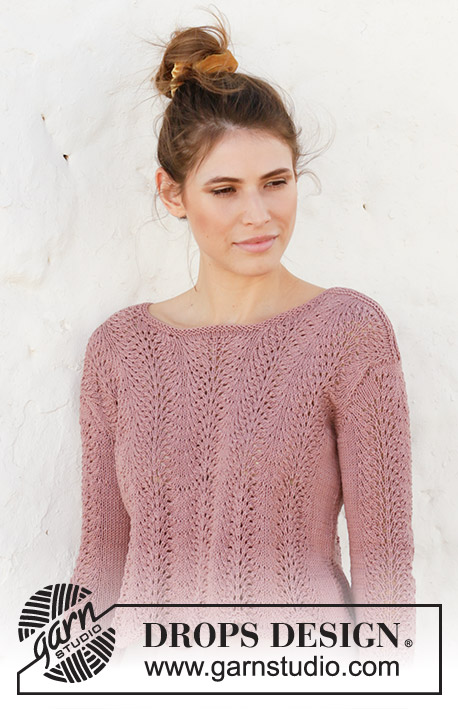
Knitted jumper with wave pattern and split in sides. Worked in DROPS Muskat. Sizes S - XXXL.
DROPS 202-29 |
|||||||||||||
|
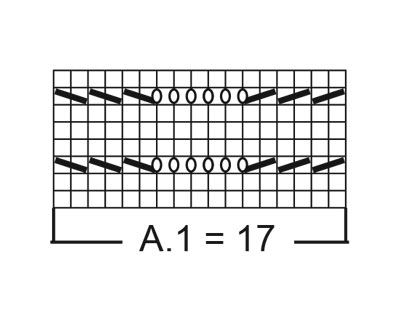
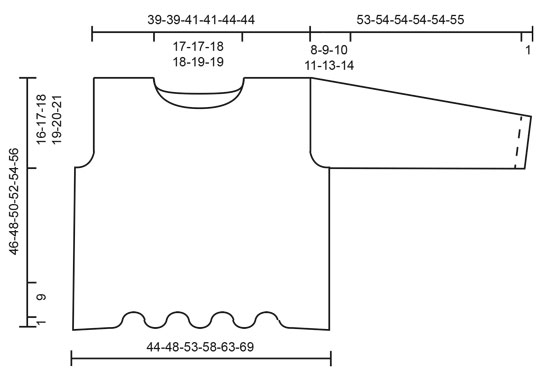
------------------------------------------------------- EXPLANATIONS FOR THE PATTERN: ------------------------------------------------------- RIDGE/GARTER STITCH (worked in the round): 1 ridge = 2 rounds. Knit 1 round and purl 1 round. RIDGE/GARTER STITCH (worked back and forth): 1 ridge = Knit 2 rows. PATTERN: See diagram A.1. The diagram shows all rows in the pattern seen from the right side. INCREASE TIP (for sleeves): All increases worked from the right side! Increase 1 stitch by making 1 yarn over between 2 stitches; on next row purl the yarn over twisted to avoid a hole. DECREASE TIP FOR SLEEVES: The decreases for the sleeve cap will affect the stitches in A.1 after a while. When you start to decrease in A.1, work the outermost 9 stitches in A.1 (towards the decreases) in stocking stitch and the remaining stitches according to A.1. ------------------------------------------------------- START THE PIECE HERE: ------------------------------------------------------- JUMPER - SHORT OVERVIEW OF THE PIECE: The piece is worked back and forth with circular needle in sections, which are sewn together to finish. The piece is worked bottom up. The sleeves are worked back and forth with circular needle. FRONT PIECE: Cast on (slightly loosely) 103-113-123-136-146-158 stitches with circular needle size 4 mm and Muskat. Work 2 RIDGES – see description above. Work pattern from the right side as follows: 3 stitches in garter stitch, 6-11-16-14-19-25 stitches in stocking stitch, A.1 a total of 5-5-5-6-6-6 times, 6-11-16-14-19-25 stitches in stocking stitch and 3 stitches in garter stitch. Continue back and forth like this until the piece measures 10 cm. At the end of each of the next 2 rows cast on 1 stitch (mark split in sides) = 105-115-125-138-148-160 stitches. REMEMBER THE KNITTING TENSION! Now continue the pattern from the right side as follows: 1 edge stitch in garter stitch, 9-14-19-17-22-28 stitches in stocking stitch, A.1 a total of 5-5-5-6-6-6 times, 9-14-19-17-22-28 stitches in stocking stitch and 1 edge stitch in garter stitch. When the piece measures 30-31-32-33-34-35 cm cast off for armholes every 2nd row on each side as follows: 3-6-8-7-9-11 stitches 1 time, 2 stitches 2-3-3-3-4-4 times and 1 stitch 2-2-3-3-4-5 times = 87-87-91-106-106-112 stitches. Continue the pattern with stocking stitch and 1 edge stitch in garter stitch on each side. When the piece measures 36-38-40-41-43-45 cm place the middle 17-17-17-18-18-18 stitches on a thread for neck and each shoulder is finished separately. Now cast off for neck and the outermost 9 stitches towards the neck are not continued according to A.1 but in stocking stitch – cast off on each row from the neck as follows: Cast off 3 stitches 1 time, 2 stitches 2 times and 1 stitch 1 time. When the piece measures 45-47-49-51-53-55 cm work 2 ridges over all stitches. Cast off, but make sure the cast-off edge is not tight. Work the other shoulder in the same way. BACK PIECE: Cast on and work as front piece, but begin to cast off for neck when piece measures 42-44-46-48-50-52 cm. SLEEVE: The sleeve is worked back and forth with circular needle. Cast on (slightly loosely) 41-45-47-49-51-53 stitches with circular needle size 4 mm and Muskat. Work 2 ridges. Then work pattern with the first row as follows from the right side: 1 edge stitch in garter stitch, 2-4-5-6-7-8 stitches in stocking stitch, work A.1, 1 stitch in stocking stitch, work A.1, 2-4-5-6-7-8 stitches in stocking stitch, and 1 edge stitch in garter stitch. When the piece measures 8-8-8-7-5-5 cm increase 1 stitch on each side, inside the 1 edge stitch in garter stitch – read INCREASE TIP! Increase like this every 3-3-3-2-2-2 cm a total of 8-8-8-11-14-15 times and then every 4-4-2-3-3-1 cm a total of 3-3-5-4-2-3 times = 63-67-73-79-83-89 stitches. When the piece measures 45-45-44-43-41-41 cm cast off for sleeve cap at the beginning of each row – READ DECREASE TIP FOR SLEEVE ABOVE - on each side as follows: Cast off 4 stitches 1 time, 2 stitches 4-4-5-5-5-5 times, 1 stitch 1-2-3-5-7-9 times and 2 stitches 5-5-5-5-5-5 times = 17-19-19-21-21-23 stitches. Cast off the remaining stitches. The sleeve measures approx. 53-54-54-54-54-55 cm. Work the other sleeve in the same way. ASSEMBLY: Sew shoulder seams with grafting stitches. Sew sleeves to body inside the cast-off edge on sleeves and the 1 edge stitch in garter stitch on body. Sew sleeve seams and then continue down the side seams as far as the split (sew inside the 1 edge stitch in garter stitch on each side). NECK: The neck is worked in the round with short circular needle. Knit up from the right side approx. 95-105 stitches (including stitches from thread in front) with short circular needle size 4 mm. Work 2 RIDGES in the round – see description above. Cast off. |
|||||||||||||
Diagram explanations |
|||||||||||||
|
|||||||||||||
 |
|||||||||||||
 |
|||||||||||||
Have you finished this pattern?Tag your pictures with #dropspattern #septemberrosesweater or submit them to the #dropsfan gallery. Do you need help with this pattern?You'll find 28 tutorial videos, a Comments/Questions area and more by visiting the pattern on garnstudio.com. © 1982-2026 DROPS Design A/S. We reserve all rights. This document, including all its sub-sections, has copyrights. Read more about what you can do with our patterns at the bottom of each pattern on our site. |
|||||||||||||


With over 40 years in knitting and crochet design, DROPS Design offers one of the most extensive collections of free patterns on the internet - translated to 17 languages. As of today we count 324 catalogues and 12245 patterns translated into English (UK/cm). 12245
We work hard to bring you the best knitting and crochet have to offer, inspiration and advice as well as great quality yarns at incredible prices! Would you like to use our patterns for other than personal use? You can read what you are allowed to do in the Copyright text at the bottom of all our patterns. Happy crafting!
Post a comment to pattern DROPS 202-29
We would love to hear what you have to say about this pattern!
If you want to leave a question, please make sure you select the correct category in the form below, to speed up the answering process. Required fields are marked *.