
Popular categories
Looking for a yarn?


Comments / Questions (58)
![]() Adele Woolley wrote:
Adele Woolley wrote:
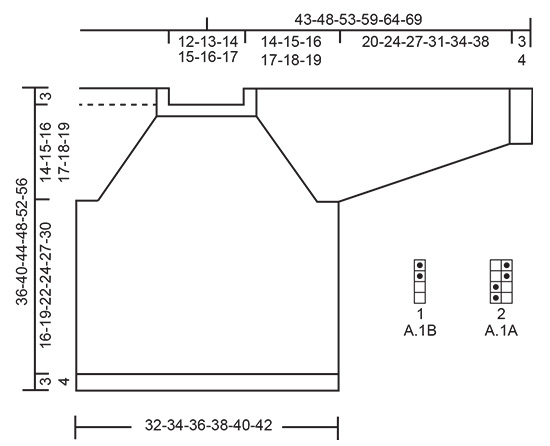
HI there. I have just started the yoke on this sweater. I am very confused about the knitting diagram. I have done the first round (reading right to left on the bottom row of A.1 A and then A. 1B. Am just about to start the second row (where I also have to inc an additional stitch either side of the markers) Q 1: Do I now read left to right on the second row of A.1A (5x) followed by left to right on second row of knitting diagram so (P,K ) x5, Kx1 and so on? Q2: are there 2 inc every 2nd row?
09.03.2025 - 06:04DROPS Design answered:
Dear Adele, this piece is worked in the round. That means that all rounds are on the same side (right side) and the charts are read from right to left always. Round 2 of the charts is worked exactly the same as round 1 (A.1A is Knit 1, purl 1; A.1B is knitted). Then, Round 3 is worked opposite in both: A.1A will be purl 1, knit 1; A.1B is purled. For the raglan, you increase on each side of each marker (so 8 stitches increased in total per round) every 2nd round. Happy knitting!
09.03.2025 - 18:19
![]() Mansikkamummu wrote:
Mansikkamummu wrote:
Anteeksi kysymys. Löysin piirrokset.
02.01.2025 - 14:48
![]() Mansikkamummu wrote:
Mansikkamummu wrote:
Ohjeesta puuttuu piirros A1.A ja A1.B
02.01.2025 - 14:35DROPS Design answered:
Hei, piirrokset ovat mittapiirroksen oikealla puolella.
02.01.2025 - 18:16
![]() Ana Margarita wrote:
Ana Margarita wrote:
Cual es el diagrama A1 no aparece en el patrón solo A1b y A1a
08.12.2024 - 16:11DROPS Design answered:
Hola Ana, A.1 quiere decir tanto A.1a como A.1b, es decir, trabajas ambos diagramas en las mangas.
08.12.2024 - 17:39
![]() Birgit wrote:
Birgit wrote:
Hej jag stickar mönstret ” blue august i storlek 7/8 år Vad menas att mäta från uppläggningskant på oket ? Är det hela arbetet som ska va 17 cm eller ska det va 20 cm Får inte ihop det med teckningens mått Tacksam för svar Mäter
22.10.2024 - 11:43DROPS Design answered:
Hej Birgit. Hela arbetet ska vara 17 cm. Mvh DROPS Design
23.10.2024 - 13:42
![]() Andrea wrote:
Andrea wrote:
Hej jeg er super forvirret over hvordan jeg laver udtagninger, og samtidig holder mønsteret. Når jeg laver en udtagning, og inkluderer den i mønsteret, rykker jeg jo mønsterets start med en maske, og kommer derved til at strikke ret over ret og vrang over vrang, når jeg burde have strikket vrang over ret og ret over vrang (som mønsteret A1 viser), og får derfor ikke dette slags perlemønster eller hvad det hedder. Håber i kan hjælpe. Hilsen Andrea
03.10.2024 - 21:42DROPS Design answered:
Hei Andrea. Start/slutt på omgangen skal være den samme hele tiden. Husk å øke til raglan, før og etter merket slik det står forklart under RAGLAN. Altså når f.eks første omgang strikkes og det økes til raglan, må man lese teksten til første omgang samtidig lese hvordan raglan strikkes før og etter merket. Da vil raglan økningene og perlestrikk på ermene stemme. mvh DROPS Design
15.10.2024 - 11:20
![]() Mina wrote:
Mina wrote:
Ich stricke den Pulli in Größe 11/12. Die Ärmellänge ab Teilung soll 38cm + 4cm Bündchen betragen. Ist das ein Fehler? Es erscheint mir extrem lang? Ich stricke für mich Pullis in Größe S und habe eine Ärmellänge von max. 42cm. Welche Erfahrungen haben andere Stricker?
12.07.2024 - 11:47DROPS Design answered:
Liebe Mina, die Ärmellänge entspricht den üblichen Maßen bei Raglanpullis für diese Größe. Sie können den Ärmel aber auch ganz gut an die Maße des Kindes anpassen, da ja von oben nach unten gestrickt wird. Viel Spaß beim Weiterstricken!
15.07.2024 - 22:44
![]() Roussel wrote:
Roussel wrote:
Bonjour je reviens vers vous car j’ai un petit souci le corps du pull jersey quand je le met à plat il y a une différence de longueur j’avais tricoter les côtes mais j’ai redéfait l’ouvrage sur quelques rangs pouvez vous m’aider dans ma démarche quand je mesure sous la manche de chaque côté de mon ouvrage il y a un décalage de plus D’un centimètre Cordialement Mme Roussel
01.07.2024 - 21:24
![]() Roussel wrote:
Roussel wrote:
Si je relève les6mailles sous la manche ensuite il me faut mettre mes 57 mailles sur quatre aiguilles avant de pouvoir les tricoter c’est seulement quand toutes mes mailles seront relevées que je pourrais tricoter mon premier tour qui commence par les trois premières mailles des 6mailles montées et pourquoi je dois commencer par les trois dernières pouvez m’aider j’ai du mal à saisir l’explication merci encore pour votre patience Cordialement Mme Roussel
24.05.2024 - 11:19DROPS Design answered:
Bonjour Mme Roussel, ce petit décalage ne se verra pas à la fin, mais s'il vous dérange, commencez par relever 1 maille dans chacune des 3 mailles avant les 57 mailles, tricotez ensuite les 57 mailles en point fantaisie comme avant et relevez 1 maile dans chacune des 3 mailles sous la manche, placez votre marqueur et continuez ainsi, en rond, à partir du milieu de ces 6 mailles. Bon tricot!
24.05.2024 - 13:35
![]() Roussel wrote:
Roussel wrote:
Pardonnez-moi si j’ai bien compris je tricote d’abord les 6 mailles de dessous la manche et les 57 mailles ensuite donc les mailles du début de rang sont les 6mailles du dessous des manches??? Merci mais j’ai du mal à comprendre Cordialement Mme Roussel
23.05.2024 - 22:05DROPS Design answered:
Bonjour Mme Roussel, si vous commencez par relever 1 maille dans chacune des 6 mailles montées, sous la manche, continuez ensuite à tricoter les 57 mailles en attente, tricotez les 3 premières des 6 mailles montées (incorporez-les au point fantaisie), mettez un marqueur = vos tours commencent désormais ici. Tricotez maintenant la manche en rond, en commençant par les 3 dernières des 6 mailles relevées sous la manche. Bon tricot!
24.05.2024 - 08:22
|
|||||||
Blue August#blueaugustsweater |
|||||||
 |
 |
||||||
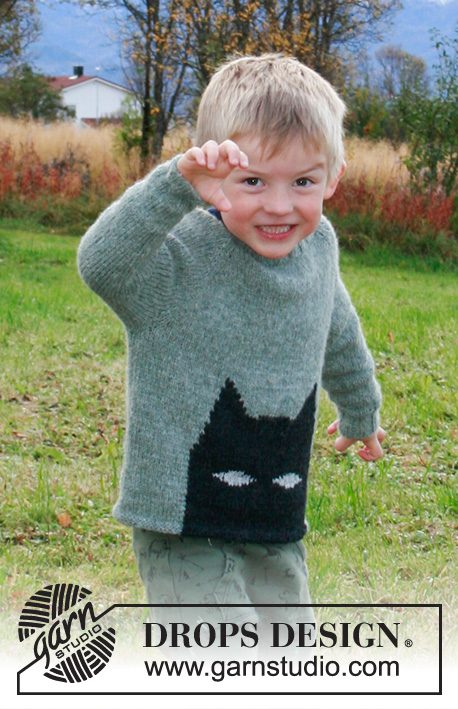
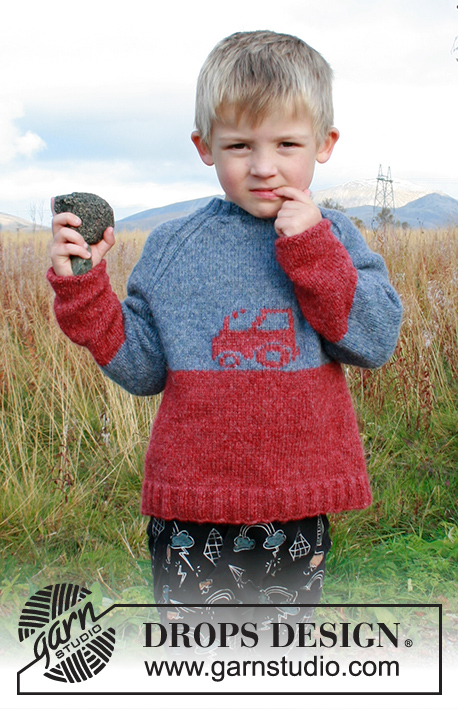
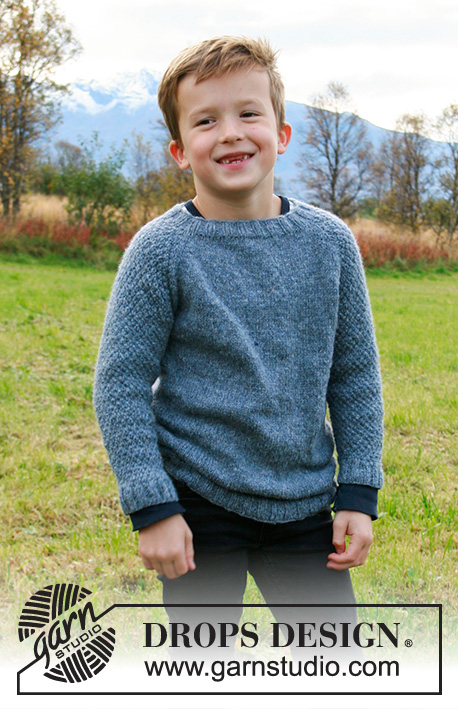
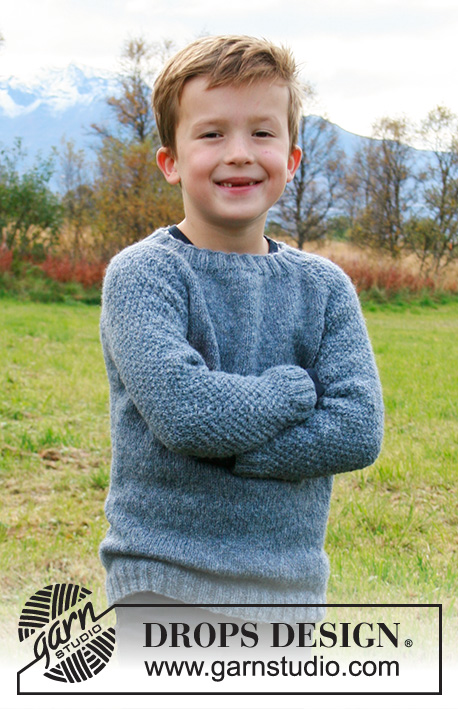
Knitted jumper for children in DROPS Sky. The piece is worked top down with raglan and double moss stitch on sleeves. Sizes 2-12 years.
DROPS Children 34-17 |
|||||||
|
------------------------------------------------------- EXPLANATIONS FOR THE PATTERN: ------------------------------------------------------- INCREASE TIP: To work out how to increase evenly, count the total number of stitches on the needle (e.g. 76 stitches) and divide by the number of increases to be made (e.g. 14) = 5.4. In this example, increase by making 1 yarn over after alternately each 5th and 6th stitch. On the next round work the yarn overs twisted to avoid holes PATTERN (for sleeves): See diagram A.1. RAGLAN: Increase for raglan in every transition between front/back piece and sleeves as explained below: Increase after the marker like this: knit 1, make 1 yarn over. Increase before the marker thread like this: work until 1 stich remain before the marker, make 1 yarn over, knit 1. You increase 2 stitches at each marked, and a total of 8 stitches on the round. On the next round work the yarn overs twisted to avoid holes. Then work the new stitches in stocking stitch on front and back pieces and in A.1 on both sleeves. DECREASE TIP (for mid under sleeves): Decrease 1 stitch on each side of the marker thread as follows: Work until there are 2 stitches left before the marker thread, slip 1 stitch as if to knit, knit 1 and pass the slipped stitch over the knitted stitch, marker thread, knit 2 together (2 stitches decreased). ------------------------------------------------------- START THE PIECE HERE: ------------------------------------------------------- JUMPER - SHORT OVERVIEW OF THE PIECE: Neck and yoke are worked in the round with circular needle, top down. The yoke is divided for body and sleeves. The body is continued in the round with circular needle. The sleeves are worked in the round with double pointed needles, top down. NECK: Cast on 76-80-84-88-92-96 stitches with short circular needle size 3 mm and jeans blue. Knit 1 round then work rib in the round (knit 2/ purl 2) for 3 cm. Knit 1 round where you increase 14 stitches evenly spaced in all sizes – read INCREASE TIP = 90-94-98-102-106-110 stitches. Then work the yoke as described below. YOKE: Change to circular needle size 4 mm. Insert 4 markers in the piece as described below (without working the stitches). The markers will be used when increasing to raglan. Insert 1 marker at the beginning of the round, count 13 stitches (= sleeve), insert 1 marker before the next stitch, count 32-34-36-38-40-42 stitches (= front piece), insert 1 marker before the next stitch, count 13 stitches (= sleeve) and insert 1 marker before the next stitch. There are 32-34-36-38-40-42 stitches left after the last marker on the back piece. The first round is worked as follows: increase for RAGLAN after marker – read explanation above, work A.1A over the next 10 stitches (= 5 repeats of 2 stitches), A.1B (= 1 stitch), increase to raglan on each side of marker, work stocking stitch on front piece until there is 1 stitch left before the marker, increase to raglan on each side of marker, work A.1A over the next 10 stitches (= 5 repeats of 2 stitches), work A.1B (= 1 stitch), increase to raglan on each side of marker, work stocking stitch on back piece until 1 stitch remains before marker thread at beginning of round and increase for raglan before the marker (= 8 stitches increased). Continue this pattern with A.1 on both sleeves, stocking stitch on front and back pieces and 2 stitches in stocking stitch along each raglan-line (1 stitch on each side of each marker). REMEMBER THE KNITTING TENSION! AT THE SAME TIME increase to raglan every 2nd round a total of 16-17-18-19-20-21 times on both sides of the 4 markers (including the first increase described above) = 218-230-242-254-266-278 stitches. Continue the pattern without increasing until the piece measures 14-15-16-17-18-19 cm from the cast-on edge. Now divide the yoke for body and sleeves on the next round as follows: Start 1 stitch before the marker at the beginning of the round (i.e. slip the first stitch on right needle onto left needle), place the first 47-49-51-53-55-57 stitches on 1 thread for sleeve (the 2 stitches in stocking stitch in the raglan line are now part of the sleeve), cast on 6 new stitches on needle (= in side under sleeve), work 62-66-70-74-78-82 stitches in stocking stitch (= front piece), place the next 47-49-51-53-55-57 stitches on 1 thread for sleeve, cast on 6 new stitches on needle (= in side under sleeve) and work 62-66-70-74-78-82 stitches in stocking stitch (= back piece). Body and sleeves are finished separately. THE PIECE IS NOW MEASURED FROM HERE! BODY: = 136-144-152-160-168-176 stitches. Work stocking stitch in the round until the piece measures 16-19-22-24-27-30 cm from the division (or to desired length; there is approx. 3-3-3-4-4-4 cm left to finished length). Knit 1 round where you increase 8 stitches evenly spaced in all sizes = 144-152-160-168-176-184 stitches. Change to circular needle size 3 mm and work rib in the round (= knit 2/ purl 2) for 3-3-3-4-4-4 cm. Loosely cast off with knit over knit and purl over purl. The jumper measures approx. 36-40-44-48-52-56 cm from the shoulder down. SLEEVE: Place the 47-49-51-53-55-57 stitches from the thread on the one side of the piece on double pointed needles size 4 mm and knit up 1 stitch in each of the 6 stitches cast on under the sleeve = 53-55-57-59-61-63 stitches. Insert 1 marker thread in the middle of these 6 stitches. Allow the marker thread to follow your work onwards; it will be used when decreasing mid under sleeve. Start the round by the marker thread and work A.1 in the round (make sure you start on the right row in the diagram to match where you stopped on the yoke). When the sleeve measures 3 cm from the division decrease 2 stitches mid under sleeve – read DECREASE TIP. Decrease like this every 2-2½-3-3½-4-4½ cm a total of 8 times in all sizes = 37-39-41-43-45-47 stitches. Continue A.1 until the sleeve measures 20-24-27-31-34-38 cm from the division (or to required length; there is approx. 3-3-3-4-4-4 cm left to finished length). Knit 1 round where you increase 3-5-3-5-3-5 stitches evenly spaced = 40-44-44-48-48-52 stitches. Change to double pointed needles size 3 mm and work rib in the round (= knit 2/ purl 2) for 3-3-3-4-4-4 cm. Loosely cast off with knit over knit and purl over purl. The sleeve measures approx. 23-27-30-35-38-42 cm from the division. Work the other sleeve in the same way. |
|||||||
Diagram explanations |
|||||||
|
|||||||
 |
|||||||
Have you finished this pattern?Tag your pictures with #dropspattern #blueaugustsweater or submit them to the #dropsfan gallery. Do you need help with this pattern?You'll find 24 tutorial videos, a Comments/Questions area and more by visiting the pattern on garnstudio.com. © 1982-2026 DROPS Design A/S. We reserve all rights. This document, including all its sub-sections, has copyrights. Read more about what you can do with our patterns at the bottom of each pattern on our site. |
|||||||


With over 40 years in knitting and crochet design, DROPS Design offers one of the most extensive collections of free patterns on the internet - translated to 17 languages. As of today we count 324 catalogues and 12245 patterns translated into English (UK/cm). 12245
We work hard to bring you the best knitting and crochet have to offer, inspiration and advice as well as great quality yarns at incredible prices! Would you like to use our patterns for other than personal use? You can read what you are allowed to do in the Copyright text at the bottom of all our patterns. Happy crafting!
Post a comment to pattern DROPS Children 34-17
We would love to hear what you have to say about this pattern!
If you want to leave a question, please make sure you select the correct category in the form below, to speed up the answering process. Required fields are marked *.