


Komentáře / Otázky (49)
![]() Adele Woolley napsala:
Adele Woolley napsala:
HI there. I have just started the yoke on this sweater. I am very confused about the knitting diagram. I have done the first round (reading right to left on the bottom row of A.1 A and then A. 1B. Am just about to start the second row (where I also have to inc an additional stitch either side of the markers) Q 1: Do I now read left to right on the second row of A.1A (5x) followed by left to right on second row of knitting diagram so (P,K ) x5, Kx1 and so on? Q2: are there 2 inc every 2nd row?
09.03.2025 - 06:04Odpověď DROPS Design :
Dear Adele, this piece is worked in the round. That means that all rounds are on the same side (right side) and the charts are read from right to left always. Round 2 of the charts is worked exactly the same as round 1 (A.1A is Knit 1, purl 1; A.1B is knitted). Then, Round 3 is worked opposite in both: A.1A will be purl 1, knit 1; A.1B is purled. For the raglan, you increase on each side of each marker (so 8 stitches increased in total per round) every 2nd round. Happy knitting!
09.03.2025 - 18:19
![]() Mansikkamummu napsala:
Mansikkamummu napsala:
Anteeksi kysymys. Löysin piirrokset.
02.01.2025 - 14:48
![]() Mansikkamummu napsala:
Mansikkamummu napsala:
Ohjeesta puuttuu piirros A1.A ja A1.B
02.01.2025 - 14:35Odpověď DROPS Design :
Hei, piirrokset ovat mittapiirroksen oikealla puolella.
02.01.2025 - 18:16
![]() Ana Margarita napsala:
Ana Margarita napsala:
Cual es el diagrama A1 no aparece en el patrón solo A1b y A1a
08.12.2024 - 16:11Odpověď DROPS Design :
Hola Ana, A.1 quiere decir tanto A.1a como A.1b, es decir, trabajas ambos diagramas en las mangas.
08.12.2024 - 17:39
![]() Birgit napsala:
Birgit napsala:
Hej jag stickar mönstret ” blue august i storlek 7/8 år Vad menas att mäta från uppläggningskant på oket ? Är det hela arbetet som ska va 17 cm eller ska det va 20 cm Får inte ihop det med teckningens mått Tacksam för svar Mäter
22.10.2024 - 11:43Odpověď DROPS Design :
Hej Birgit. Hela arbetet ska vara 17 cm. Mvh DROPS Design
23.10.2024 - 13:42
![]() Andrea napsala:
Andrea napsala:
Hej jeg er super forvirret over hvordan jeg laver udtagninger, og samtidig holder mønsteret. Når jeg laver en udtagning, og inkluderer den i mønsteret, rykker jeg jo mønsterets start med en maske, og kommer derved til at strikke ret over ret og vrang over vrang, når jeg burde have strikket vrang over ret og ret over vrang (som mønsteret A1 viser), og får derfor ikke dette slags perlemønster eller hvad det hedder. Håber i kan hjælpe. Hilsen Andrea
03.10.2024 - 21:42Odpověď DROPS Design :
Hei Andrea. Start/slutt på omgangen skal være den samme hele tiden. Husk å øke til raglan, før og etter merket slik det står forklart under RAGLAN. Altså når f.eks første omgang strikkes og det økes til raglan, må man lese teksten til første omgang samtidig lese hvordan raglan strikkes før og etter merket. Da vil raglan økningene og perlestrikk på ermene stemme. mvh DROPS Design
15.10.2024 - 11:20
![]() Mina napsala:
Mina napsala:
Ich stricke den Pulli in Größe 11/12. Die Ärmellänge ab Teilung soll 38cm + 4cm Bündchen betragen. Ist das ein Fehler? Es erscheint mir extrem lang? Ich stricke für mich Pullis in Größe S und habe eine Ärmellänge von max. 42cm. Welche Erfahrungen haben andere Stricker?
12.07.2024 - 11:47Odpověď DROPS Design :
Liebe Mina, die Ärmellänge entspricht den üblichen Maßen bei Raglanpullis für diese Größe. Sie können den Ärmel aber auch ganz gut an die Maße des Kindes anpassen, da ja von oben nach unten gestrickt wird. Viel Spaß beim Weiterstricken!
15.07.2024 - 22:44
![]() Roussel napsala:
Roussel napsala:
Bonjour je reviens vers vous car j’ai un petit souci le corps du pull jersey quand je le met à plat il y a une différence de longueur j’avais tricoter les côtes mais j’ai redéfait l’ouvrage sur quelques rangs pouvez vous m’aider dans ma démarche quand je mesure sous la manche de chaque côté de mon ouvrage il y a un décalage de plus D’un centimètre Cordialement Mme Roussel
01.07.2024 - 21:24
![]() Roussel napsala:
Roussel napsala:
Si je relève les6mailles sous la manche ensuite il me faut mettre mes 57 mailles sur quatre aiguilles avant de pouvoir les tricoter c’est seulement quand toutes mes mailles seront relevées que je pourrais tricoter mon premier tour qui commence par les trois premières mailles des 6mailles montées et pourquoi je dois commencer par les trois dernières pouvez m’aider j’ai du mal à saisir l’explication merci encore pour votre patience Cordialement Mme Roussel
24.05.2024 - 11:19Odpověď DROPS Design :
Bonjour Mme Roussel, ce petit décalage ne se verra pas à la fin, mais s'il vous dérange, commencez par relever 1 maille dans chacune des 3 mailles avant les 57 mailles, tricotez ensuite les 57 mailles en point fantaisie comme avant et relevez 1 maile dans chacune des 3 mailles sous la manche, placez votre marqueur et continuez ainsi, en rond, à partir du milieu de ces 6 mailles. Bon tricot!
24.05.2024 - 13:35
![]() Roussel napsala:
Roussel napsala:
Pardonnez-moi si j’ai bien compris je tricote d’abord les 6 mailles de dessous la manche et les 57 mailles ensuite donc les mailles du début de rang sont les 6mailles du dessous des manches??? Merci mais j’ai du mal à comprendre Cordialement Mme Roussel
23.05.2024 - 22:05Odpověď DROPS Design :
Bonjour Mme Roussel, si vous commencez par relever 1 maille dans chacune des 6 mailles montées, sous la manche, continuez ensuite à tricoter les 57 mailles en attente, tricotez les 3 premières des 6 mailles montées (incorporez-les au point fantaisie), mettez un marqueur = vos tours commencent désormais ici. Tricotez maintenant la manche en rond, en commençant par les 3 dernières des 6 mailles relevées sous la manche. Bon tricot!
24.05.2024 - 08:22
|
|||||||
Blue August#blueaugustsweater |
|||||||
 |
 |
||||||
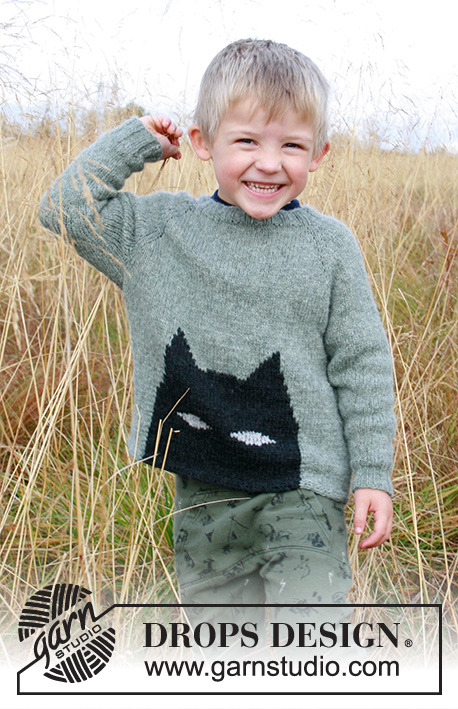
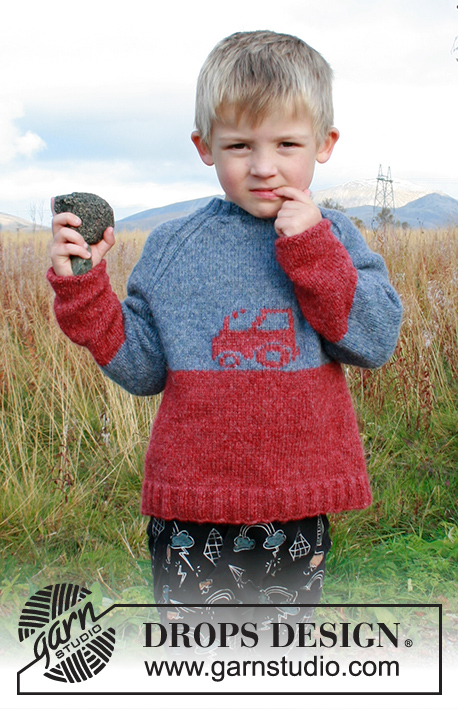
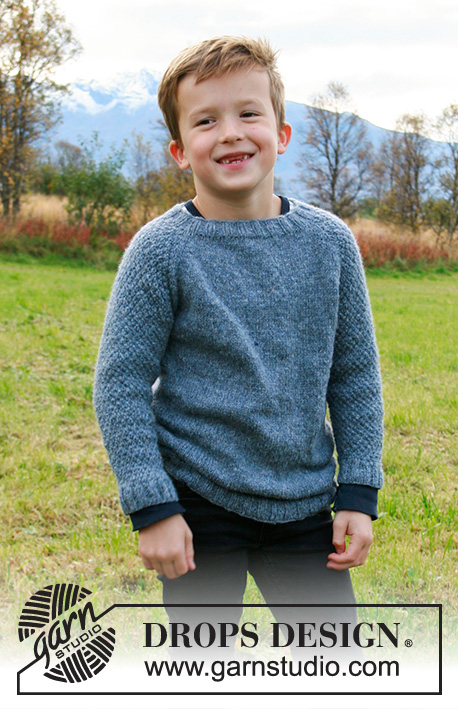
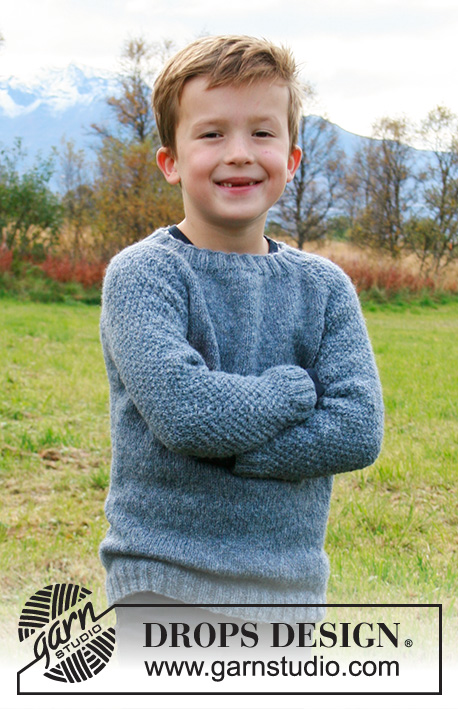
Dětský raglánový pulovr s rukávy s perličkovým vzorem, pletený shora dolů z příze DROPS Sky. Velikost 2-12 let.
DROPS Children 34-17 |
|||||||
|
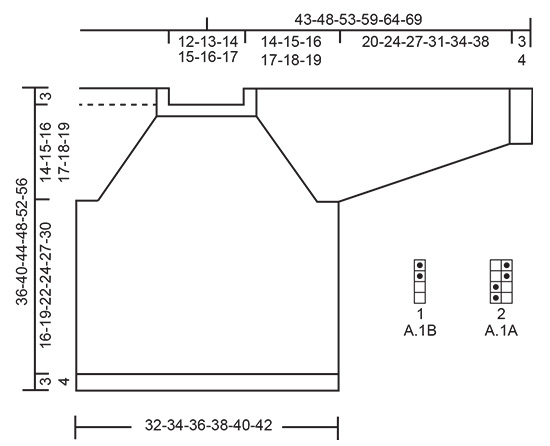
------------------------------------------------------- VYSVĚTLIVKY: ------------------------------------------------------ TIP - PŘIDÁVÁNÍ: Abychom vypočítali, v jakých rozestupech máme přidávat, vydělíme celkový počet ok na jehlici (např. 76 ok) počtem ok, která potřebujeme přidat (tj. 14), takže 76 : 14 = 5,4. V tomto případě tedy přidáme střídavě za každým 5. a 6. okem. Přidáváme nahozením a v následující kruhové řadě pleteme nahození za zadní nit, aby se v pletenině netvořily dírky. VZOR (rukávy): Viz schéma A.1. RAGLÁNOVÉ ZKOSENÍ: Přidáváme na obou stranách každého raglánového “švu”, tj. ve všech místech, kde se stýkají rukávy s trupem. Přidáváme nahozením, takto: ZA značkou: 1 oko upleteme hladce, 1x nahodíme. PŘED značkou: pleteme až po poslední 1 oko před značkou, 1x nahodíme, 1 oko upleteme hladce. U každé značky tedy přidáme 2 oka, tj. celkem v jedné kruhové řadě přidáme vždy 8 ok. V následující kruhové řadě pleteme nahození za zadní nit, aby se v pletenině netvořily dírky. Nová oka pak zapracujeme do vzoru (tj. na předním a zadním dílu je pleteme lícovým žerzejem, na rukávech vzorem A.1). TIP - UJÍMÁNÍ (rukávy, podpaží): Ujímáme 1 oko na každé straně značky, takto – začínáme 2 oka před značkou: 1 oko sejmeme hladce, 1 upleteme hladce a sejmuté přes ně přetáhneme, sejmeme značku, 2 oka spleteme hladce (= ujmuli jsme 2 oka). ------------------------------------------------------- POPIS PRÁCE: ---------------------------------------------------------- PULOVR - JAK BUDEME POSTUPOVAT: Pleteme v kruhových řadách shora dolů. Rukávy pleteme v kruhových řadách na ponožkových jehlicích, také shora dolů. LEM PRŮKRČNÍKU: Na krátkou kruhovou jehlici č.3 nahodíme džínově modrou přízí 76-80-84-88-92-96 ok a upleteme 1 kruhovou řadu hladce. Pokračujeme v kruhových řadách pružným vzorem 2/2 (tj. střídáme 2 oka hladce, 2 obrace). Ve výši 3 cm upleteme 1 kruhovou řadu hladce a SOUČASNĚ přidáme rovnoměrně 14 ok (platí pro všechny velikosti) – viz TIP - PŘIDÁVÁNÍ = 90-94-98-102-106-110 ok. Pak pleteme sedlo podle popisu níže. SEDLO: Pleteninu převedeme na kruhovou jehlici č.4. Označíme si raglánové “švy” - do pleteniny vložíme 4 značky, takto – oka nepleteme, jen vkládáme značky: První značkou označíme začátek kruhové řady, napočítáme 13 ok (= rukáv), před následující oko vložíme značku, napočítáme 32-34-36-38-40-42 ok (= přední díl), vložíme značku, napočítáme 13 ok (= rukáv) a vložíme poslední značku. Za touto poslední značkou leží 32-34-36-38-40-42 ok zadního dílu. První kruhovou řadu pleteme takto: za značkou přidáme pro RAGLÁN – viz výše, 10 ok upleteme vzorem A.1A (= 5 sekvencí vzoru po 2 okách), pak vzor A.1B (= 1 oko), přidáme pro raglán na každé straně značky, přední díl pleteme lícovým žerzejem až po poslední 1 oko před značkou, přidáme pro raglán na každé straně značky, následujících 10 ok upleteme vzorem A.1A (= 5 sekvencí vzoru po 2 okách), vzor A.1B (= 1 oko), přidáme pro raglán na každé straně značky, zadní díl pleteme lícovým žerzejem až po poslední 1 oko před značkou na začátku kruhové řady a před touto značkou přidáme pro raglán (= přidali jsme celkem 8 ok). V tomto rozvržení vzorů pokračujeme, tj. oba rukávy pleteme vzorem A.1, přední a zadní díl lícovým žerzejem a podél každého raglánového „švu“ pleteme 2 oka lícovým žerzejem (= 1 oko na každé straně značky). SOUČASNĚ přidáváme pro raglán v každé 2. kruhové řadě, celkem 16-17-18-19-20-21x na obou stranách všech 4 značek (včetně prvního přidání, které je popsáno výše) = 218-230-242-254-266-278 ok. Dál pokračujeme v pletení vzoru, ale už nepřidáváme, a to až do výše 14-15-16-17-18-19 cm (od počáteční, nahozené řady). V následující kruhové řadě rozdělíme pleteninu na jednotlivé díly, takto – začínáme 1 oko před značkou na začátku kruhové řady (tj. první oko sejmeme z pravé jehlice na levou jehlici): prvních 47-49-51-53-55-57 ok odložíme na pomocnou jehlici (= rukáv; tj. 2 oka pletená lícovým žerzejem v raglánovém „švu“ jsou nyní součástí rukávu), nahodíme 6 nových ok (= podpaží), 62-66-70-74-78-82 ok upleteme lícovým žerzejem (= přední díl), dalších 47-49-51-53-55-57 ok odložíme na pomocnou jehlici (= rukáv), nahodíme 6 nových ok (= podpaží) a 62-66-70-74-78-82 ok upleteme lícovým žerzejem (= zadní díl). Trup a rukávy dokončíme odděleně. NYNÍ MĚŘÍME DÍL OD TOHOTO MÍSTA! TRUP: = 136-144-152-160-168-176 ok. Pleteme v kruhových řadách lícovým žerzejem až do výše 16-19-22-24-27-30 cm od podpaží (ppř. do jiné libovolné výšky; do ukončení práce nám zbývá doplést asi 3-3-3-4-4-4 cm výšky). Upleteme 1 kruhovou řadu hladce a SOUČASNĚ přidáme rovnoměrně 8 ok (platí pro všechny velikosti) = 144-152-160-168-176-184 ok. Pleteninu převedeme na kruhovou jehlici č.3 a pleteme v kruhových řadách lem pružným vzorem 2/2 (= pleteme střídavě 2 oka hladce, 2 obrace). Když je lem vysoký 3-3-3-4-4-4 cm, všechna oka volně dle vzoru uzavřeme. Pulovr měří asi 36-40-44-48-52-56 cm (od ramene). RUKÁV: Odložených 47-49-51-53-55-57 ok jednoho rukávu vrátíme z pomocné jehlice zpět na ponožkové jehlice č.4 a navíc k nim nabereme po 1 oku z každého ze 6 nových ok v podpaží = 53-55-57-59-61-63 ok. Doprostřed 6 ok v podpaží vložíme značku – kruhová řada začíná zde. Pleteme v kruhových řadách vzorem A.1 (dbáme na to, abychom začali lícovou řadou tak, aby vzor plynule navazoval na vzor sedla). Ve výši 3 cm od podpaží ujmeme na každé straně značky 1 oko – viz TIP - UJÍMÁNÍ. Takto ujímáme vždy po 2-2,5-3-3,5-4-4,5 cm výšky, celkem 8x (platí pro všechny velikosti) = 37-39-41-43-45-47 ok. Pokračujeme vzorem A.1 až do výše 20-24-27-31-34-38 cm od podpaží (ppř. do jiné, libovolné výšky; do ukončení práce nám zbývá doplést asi 3-3-3-4-4-4 cm výšky). Upleteme 1 kruhovou řadu hladce a SOUČASNĚ přidáme rovnoměrně 3-5-3-5-3-5 ok = 40-44-44-48-48-52 ok. Pleteninu převedeme na ponožkové jehlice č.3 a pleteme v kruhových řadách lem pružným vzorem 2/2. Když je lem vysoký 3-3-3-4-4-4 cm, všechna oka volně dle vzoru uzavřeme. Rukáv měří asi 23-27-30-35-38-42 cm (od podpaží). Stejným způsobem upleteme i druhý rukáv. |
|||||||
Vysvětlivky ke schématu |
|||||||
|
|||||||
|
|||||||
Dokončili jste tento model?Pak označte své fotky tagem #dropspattern #blueaugustsweater nebo je pošlete do galerie #dropsfan. Potřebujete s tímto návodem poradit?Otevřete-li si návod na stránce garnstudio.com, najdete tam 24 výukových video-ukázek, Komentáře/Dotazy a další užitečné informace. © 1982-2025 DROPS Design A/S. Vyhrazujeme si veškerá práva. Tento dokument, včetně všech jeho dílčích částí, podléhá autorským právům. Podrobnější komentář k možnostem užití našich návodů najdete dole pod každým návodem na našich stránkách. |
|||||||


V oblasti pletené a háčkované módy působí DROPS Design více než 40 let. Díky tomu vám můžeme nabídnout jednu z nejrozsáhlejších kolekcí modelů s bezplatnými návody dostupnými na internetu - navíc v 17 jazycích. K dnešnímu dni máme na 314 katalogů a 11822 návodů celkem - z nich je už 7048 dostupných v [češtině].
Přidejte komentář k návodu DROPS Children 34-17
Rádi bychom věděli, co si o tomto modelu myslíte!
Pokud se chcete na něco zeptat, dbejte prosím na to, abyste ve formuláři níže vybrali správnou kategorii - díky tomu se dříve dozvíte, co potřebujete vědět. Povinná pole jsou označena *.