
Popular categories
Looking for a yarn?


Comments / Questions (132)
![]() Deb L’Heureux wrote:
Deb L’Heureux wrote:
Although this is a gorgeous sweater, your instructions leave me baffled, there is nothing straightforward or sequential about them. I am experienced knitter but have stayed away from Drops because of this and now will continue to do so. Sure am glad I didn’t have to pay for this pattern. So sad. Curious, was this translated from another language?
17.01.2022 - 22:24
![]() Consuelo Demajaux wrote:
Consuelo Demajaux wrote:
Bonsoir Pourquoi les explications du modèle Agnès ne donne aucune indication sur la fin des rangs avant les 5 mailles de la bande de finition Merci de votre réponse Cordialement
25.11.2021 - 00:31DROPS Design answered:
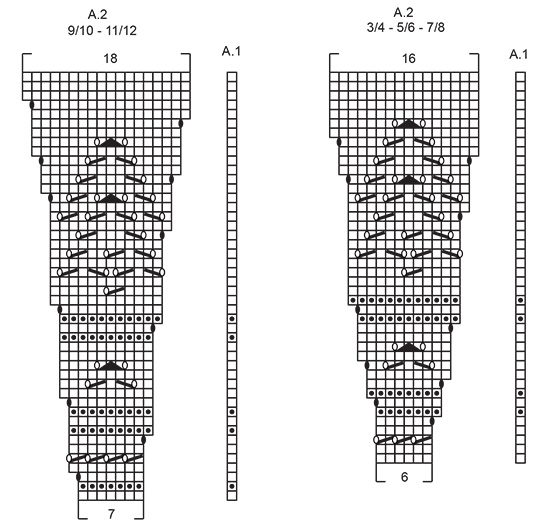
Bonjour Mr Demajaux, dans ce modèle, vous tricotez: 5 mailles de bordure devant au point mousse, A.1 (= 1 m qui permet au motif d'être symétrique), puis vous répétez A.2 le nombre de fois indiqué pour la taille (13 à 15 fois) et terminez par 5 mailles de bordure devant au point mousse. Sur l'envers, lisez les diagrammes de gauche à droite en répétant d'abord A.2 puis en terminant par A.1. Bon tricot!
25.11.2021 - 09:11
![]() Anne Lister wrote:
Anne Lister wrote:
Can you please verify that you only need 150 gm of 8 ply wool for a cardigan for a 5 year old girl? Thank you
04.11.2021 - 23:48DROPS Design answered:
Dear Mrs Lister, in size 5/6 years, you need 150 g DROPS Sky - but you might require more using another yarn; use our yarn converter or read more here. Happy knitting!
05.11.2021 - 07:08
![]() Mira wrote:
Mira wrote:
This is the link to a Russian store that posts Drops patterns in Russian. I wonder if this is legitimate?agnes cardigan - 5motkov.ru/blog/view/2674/
04.11.2021 - 08:41
![]() Rachel Steiner wrote:
Rachel Steiner wrote:
Work A1 over one stitch, A2 a total of 14 times - ... Does that mean both A1 AND A2 14 times. Or does the comma mean only A2 14 times
21.10.2021 - 11:25DROPS Design answered:
Dear Mrs Steiner, A.1 will be worked one time and A.2 will be repeated 14 times - A.1 is wokred at the beg of row from RS/end of row from WS to make the pattern starting and ending the same way. Happy knitting!
21.10.2021 - 13:12
![]() Sanity wrote:
Sanity wrote:
I love how this pattern looks, hate how it’s written, so will not be knitted by me. It’s not easy to understand at all. Give me actual line by line instructions, not these garbled messes that make no sense while referring to diagrams that make me guess if I’m even close to what the creator intended.
31.08.2021 - 00:49
![]() Jenny ANDREWS wrote:
Jenny ANDREWS wrote:
I am currently knitting your Agnes Knitted Childrens Jacket 34-9. It is really beautiful. I love the pattern. I note that there is a babys version of this called Emilia Agnes Cardigan S34-9. Can you direct me to where I may obtain this pattern.
09.07.2021 - 01:17DROPS Design answered:
Dear Jenny, unfortunately we do not have the exact same design in smaller - baby- sizes. However we do have a number of top down pieces for babies here HERE, you might find something you like. Happy Stitching!
09.07.2021 - 02:52
![]() Leena Liuttu-Hietala wrote:
Leena Liuttu-Hietala wrote:
Miten ihmeessä saan kuvion onnistumaan: viimeisen oikean kerrosrivin jälkeen olen neulonut kolmasti kuvio-ohjeen mukaan, mutta ei vain onnistu. Tulee aivan sutta! Onko ohjeessa virhe vai miten tämä on näin vaikeaa?
16.06.2021 - 21:22
![]() Xpisanthi wrote:
Xpisanthi wrote:
Hallo Strickfreunde:) Wir A1 NUR am Anfang der Hinreihe gestrickt? Und bei der Rückreihe am Ende? Bin etwas verwirrt....
11.04.2021 - 16:35DROPS Design answered:
Liebe Frau Xpisanthi, A;1 wird nur einmal am Anfang der Hinreihe gestrickt (dann wiederholen Sie A.2); bei den Rückreihen stricken Sie A.2 dann enden mi A.1 - hier lesen Sie mehr. Viel Spaß beim stricken!
12.04.2021 - 10:14
![]() Nadine wrote:
Nadine wrote:
Mir grad noch was aufgefallen. Abschluß der Ärmel soll ja 2 cm kraus rechts gestrickt werden. Da muss ich doch dann 2cm nur links stricken, da ich in runden bin oder?
10.04.2021 - 10:49DROPS Design answered:
Liebe Nadine, um Kraus rechts in Runden zu stricken wiederholen Sie 1 Runde rechts und 1 Runde links - siehe Video. Viel Spaß beim stricken!
12.04.2021 - 12:03
|
||||||||||||||||||||||
Agnes#agnescardigan |
||||||||||||||||||||||
 |
 |
|||||||||||||||||||||
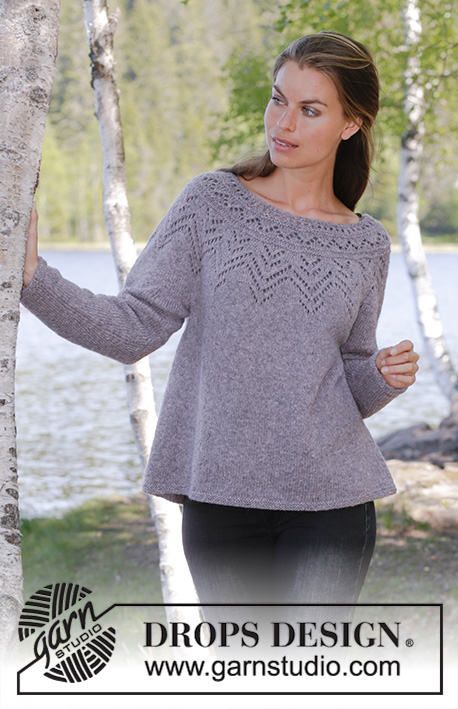
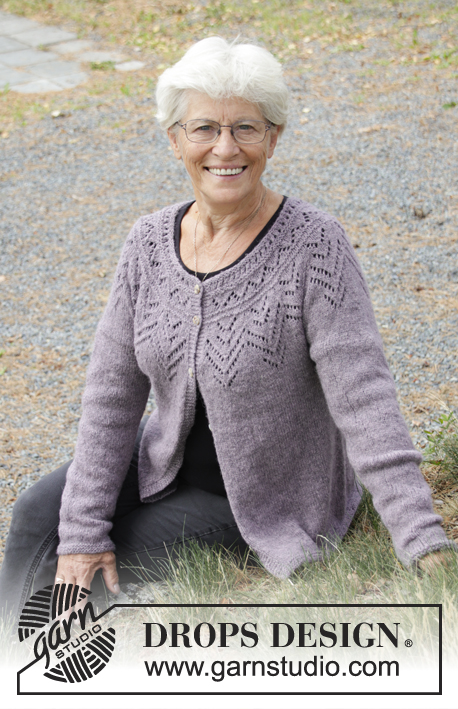
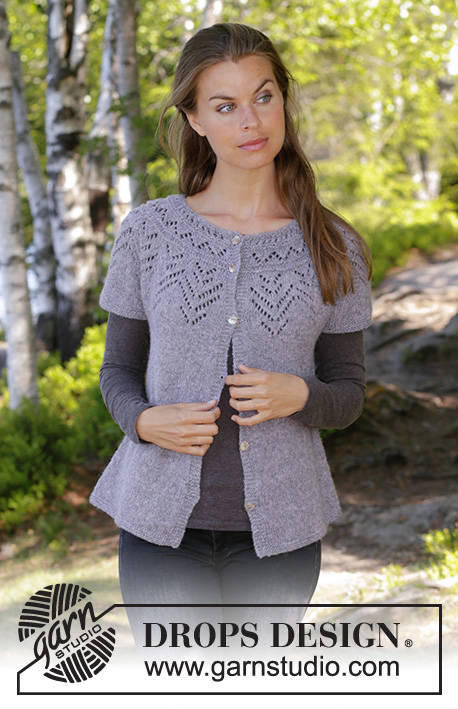
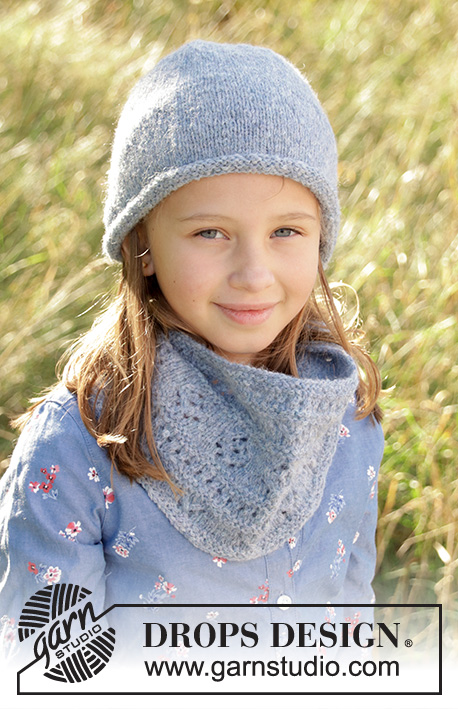
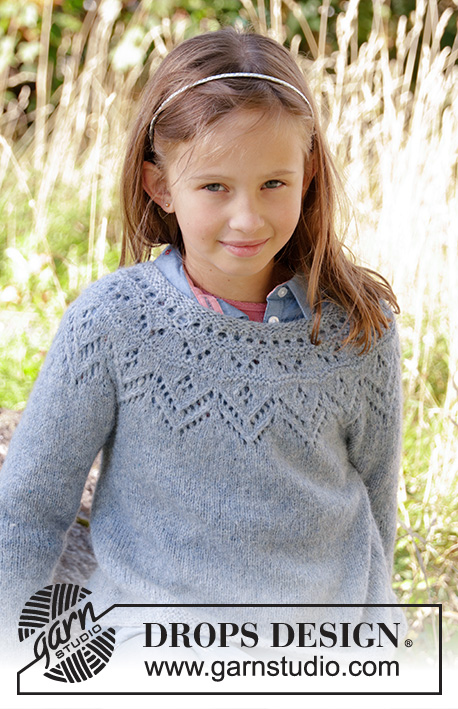
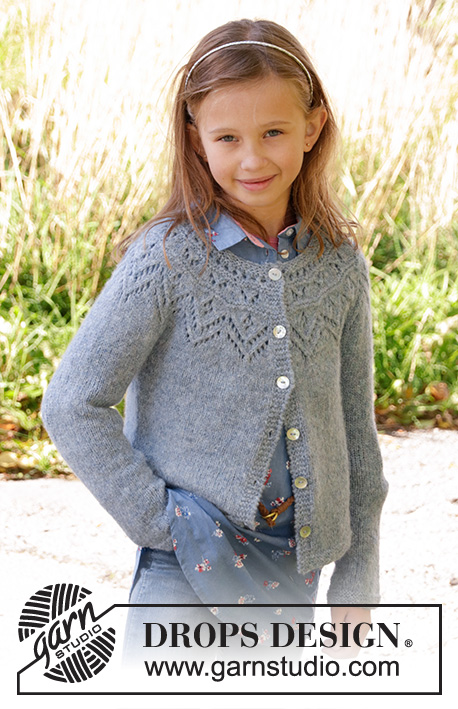
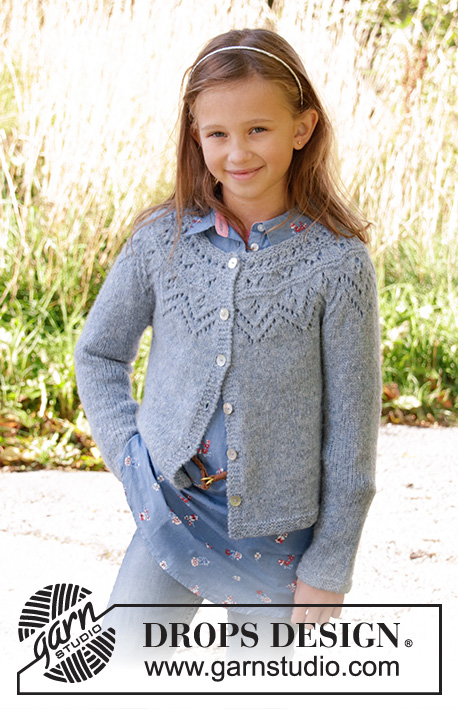
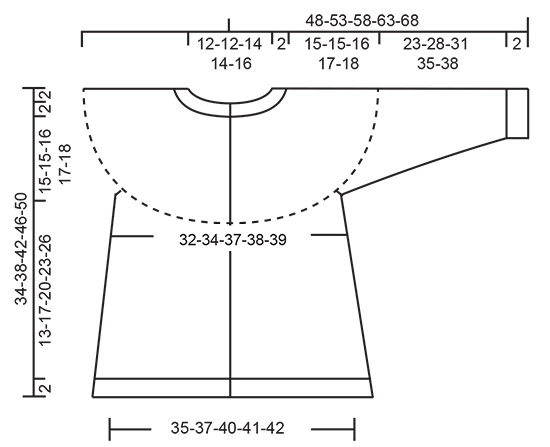
Knitted jacket for children in DROPS Sky. The piece is worked top down with round yoke, lace pattern, stocking stitch and garter stitch. Sizes 3-12 years.
DROPS Children 34-9 |
||||||||||||||||||||||
|
------------------------------------------------------- EXPLANATIONS FOR THE PATTERN: ------------------------------------------------------- RIDGE/GARTER STITCH (worked back and forth): 1 ridge = Knit 2 rows. RIDGE/GARTER STITCH (worked in the round): 1 ridge = 2 rounds. Knit 1 round and purl 1 round PATTERN: See diagrams A.1 and A.2. Choose diagram for your size. The diagrams show all the rows in the pattern seen from the right side. INCREASE TIP-1 (evenly spaced): To work out how to increase evenly, count the total number of stitches on the needle (e.g. 72 stitches) and divide by the number of increases to be made (e.g. 17) = 4.2. In this example, increase by making 1 yarn over after approx. each 4th stitch. On the next row work the yarn overs twisted to avoid holes. INCREASE TIP-2 (for sides of body): Work until there is 1 stitch left before the marker thread, 1 yarn over, knit 2 (the marker thread sits between these 2 stitches), 1 yarn over = 2 stitches increased. On the next row work the yarn overs twisted to avoid holes. Then work the new stitches in stocking stitch. DECREASE TIP (for sleeves): Decrease 1 stitch on each side of the marker thread as follows: Work until there are 3 stitches left before the marker thread, knit 2 together, knit 2 (the marker thread sits between these 2 stitches), slip 1 stitch as if to knit, knit 1 and pass the slipped stitch over the knitted stitch = 2 stitches decreased. BUTTONHOLE: Work the buttonholes on right band (when the garment is worn). 1 buttonhole = start from the wrong side and knit together the 2nd and 3rd stitch from the edge, make 1 yarn over. On the next row knit the yarn over to leave a hole. The first buttonhole is worked after approx. 1 cm from the neck edge, then the next 5-5-5-6-6 buttonholes every 5-6-6-6-7 cm. ------------------------------------------------------- START THE PIECE HERE: ------------------------------------------------------- JACKET - SHORT OVERVIEW OF THE PIECE: The piece is worked back and forth with circular needle, top down. It is divided for body and sleeves. The body is continued back and forth with circular needle. The sleeves are worked in the round with double pointed needles/short circular needle. YOKE: Cast on 72-76-80-86-92 stitches with circular needle size 4 mm and Sky. Work 2 RIDGES – see description above – remember BUTTONHOLES on right band – see description above. Knit 1 row where you increase 17-19-21-23-24 stitches evenly on row - READ INCREASE TIP-1! = 89-95-101-109-116 stitches on needle. Knit 1 row from the wrong side. Insert a marker thread on this round and measure from here. Work according to diagrams A.1 and A.2 as follows from the right side: Work 5 band stitches in GARTER STITCH, work A.1 over 1 stitch, A.2 a total of 13-14-15-14-15 times on the row and then 5 band stitches in garter stitch. REMEMBER THE KNITTING TENSION! When diagrams A.1 and A.2 have been completed in height there are 219-235-251-263-281 stitches on the row. On the next row from the right side adjust stitch count to 219-235-253-261-283 stitches. Continue working stocking stitch until the piece measures 15-15-16-17-18 cm from marker thread. The next row from the right side is worked as follows: Work 5 band stitches in garter stitch, 30-32-35-36-37 stitches in stocking stitch (= front piece), place the next 44-48-51-53-62 stitches on a thread (= sleeve), cast on 6 new stitches under the sleeve, work 61-65-71-73-75 stitches in stocking stitch (= back piece), place the next 44-48-51-53-62 stitches on a new thread (= sleeve), cast on 6 new stitches, work 30-32-35-36-37 stitches (= front piece) and 5 band stitches in garter stitch. BODY: There are 143-151-163-167-171 stitches on the needle. THE PIECE IS NOW MEASURED FROM HERE! Insert 1 marker thread in the middle of the 6 new stitches which were cast on in each side. Work stocking stitch back and forth with 5 band stitches in garter stitch on each side. When the piece measures 3 cm increase 1 stitch on each side of each marker (= 4 stitches increased) READ INCREASE TIP-2! Repeat this increase every 3-4½-5½-6½-7½ cm a total of 3 times = 155-163-175-179-183 stitches on needle. Continue working until the piece measures approx. 15-17-20-23-26 cm (or to desired length, there is approx. 2 cm until finished measurements). Work garter stitch for 2 cm. Loosely cast off with knit. Cut and fasten the thread. SLEEVE: Place the stitches from the one thread on short circular needle/double pointed needles size 4 mm (= 44-48-51-53-62 stitches) and knit up 1 new stitch in each of the 6 new stitches on the body (= 50-54-57-59-68 stitches). Insert 1 marker thread in the middle of these 6 stitches. Work stocking stitch in the round until the sleeve measures 3 cm. Now decrease 1 stitch on each side of the marker thread - READ DECREASE TIP. Continue with stocking stitch and repeat the decrease every 4-4-4-4-3½ cm until you have decreased a total of 5-6-7-8-10 times = 40-42-43-43-48 stitches on needle. Work stocking stitch until the sleeve measures 23-28-31-35-38 cm. Work garter stitch for 2 cm. Cast off with knit. Cut and fasten the strand. Work the other sleeve in the same way. ASSEMBLY: Sew buttons onto left band. |
||||||||||||||||||||||
Diagram explanations |
||||||||||||||||||||||
|
||||||||||||||||||||||
 |
||||||||||||||||||||||
 |
||||||||||||||||||||||
Have you finished this pattern?Tag your pictures with #dropspattern #agnescardigan or submit them to the #dropsfan gallery. Do you need help with this pattern?You'll find 28 tutorial videos, a Comments/Questions area and more by visiting the pattern on garnstudio.com. © 1982-2026 DROPS Design A/S. We reserve all rights. This document, including all its sub-sections, has copyrights. Read more about what you can do with our patterns at the bottom of each pattern on our site. |
||||||||||||||||||||||


With over 40 years in knitting and crochet design, DROPS Design offers one of the most extensive collections of free patterns on the internet - translated to 17 languages. As of today we count 325 catalogues and 12298 patterns translated into English (UK/cm). 12298
We work hard to bring you the best knitting and crochet have to offer, inspiration and advice as well as great quality yarns at incredible prices! Would you like to use our patterns for other than personal use? You can read what you are allowed to do in the Copyright text at the bottom of all our patterns. Happy crafting!
Post a comment to pattern DROPS Children 34-9
We would love to hear what you have to say about this pattern!
If you want to leave a question, please make sure you select the correct category in the form below, to speed up the answering process. Required fields are marked *.