
Popular categories
Looking for a yarn?


Comments / Questions (132)
![]() Pia Andersen wrote:
Pia Andersen wrote:
Der står 4 pinde retstrik= 1 pind ret og 1 pind vrang, når man man strikker på rundpind. Og i denne opskrift strikker man på rundpind, men man strikker jo ikke rundt. Så disse 4 pinde gir jo glatstrikning . Hvad skal man strikke ? Mvh Pia Andersen
18.04.2020 - 20:19DROPS Design answered:
Hej När du strikker frem og tilbage så strikker du ret på hver pind for at få retstrik. Mvh DROPS Design
20.04.2020 - 11:24
![]() Jane Nielsen wrote:
Jane Nielsen wrote:
Laver størrelse 7/8 og har 101 masker, når jeg begynder på A2+A1. Det skal strikkes 15 gange, men det giver i alt 105 + og 10 masker . Jeg kan kun lave A2+A1 13 gange. Er der fejl i opskriften. Når alle mønsterpinde er strikket har jeg 221 +10 masker. Ialt 231 masker og opskriften siger 251 masker.
07.04.2020 - 21:14DROPS Design answered:
Hej Jane Det är kun A2 du stickar totalt 15 gånger. Dvs du stickar 5 (kantm) + 1 (A1) + 90 (A2 x 15) + 5 (kantm) = 101 m. Lycka till!
16.04.2020 - 08:45
![]() LEBEAU Micheline wrote:
LEBEAU Micheline wrote:
Pour la taille 7/8 40 cm de largeur en bas me semble énorme. Moi je n 'ai que 31 cm; c est pratiquement la taille S d'un modèle femme.
18.03.2020 - 17:30DROPS Design answered:
Bonjour Mme Lebeau, si votre échantillon est juste (21 m = 10 cm), vous devez avoir 175 m en taille 7/8 ans - 5 m de bordure devant (qui se chevauchent) = 170 m donc 80 cm environ soit 40 cm de largeur totale quand le gilet est posé à plat. Bon tricot!
19.03.2020 - 10:15
![]() Maria Correa wrote:
Maria Correa wrote:
Hola, he terminado el canesu con los mismos puntos con los q empecé luego del primer aumento. No entiendo como lo terminan con 219 puntos. En el diagrama no muestra aumentos. No se cómo seguir. Gracias Enviad
10.03.2020 - 15:21DROPS Design answered:
Hola Maria. Los aumentos están incluidos en el diagrama. Es el símbolo del óvalo negro ( hacer 1 lazada entre 2 puntos; tejer la lazada retorcida en la hilera siguiente para evitar un agujero )
10.03.2020 - 23:25
![]() Nicole Petit wrote:
Nicole Petit wrote:
Je suis étonnée de la quantité de laine requise 200gr pour une taille 11/12ans, cela représente 4 pelotes de 50 gr ? Est-ce réellement suffisant ? D’habitude pour cette taille là j’ai plutôt besoin de 10 pelotes environ Est-ce une erreur ? Merci de bien vouloir m’expliquer
10.03.2020 - 11:15DROPS Design answered:
Bonjour Mme Petit, il faut effectivement 200 g DROPS Air pour ce gilet en taille 11/12 ans - pensez à bien vérifier votre échantillon en hauteur et en largeur. Si vous envisagez d'utiliser une autre qualité, utilisez notre convertisseur pour vérifier la quantité nécessaire - plus d'infos sur l'échantillon ici. Bon tricot!
10.03.2020 - 11:56
![]() Christina wrote:
Christina wrote:
Suggestion to stop garter stitch hem from flipping up ......decrease a few stitches before knitting the 2 cms hem. Garter stitch knits up wider than stocking stitch. ......I will try decreasing 5/6 stitches.
01.03.2020 - 09:42
![]() Marica wrote:
Marica wrote:
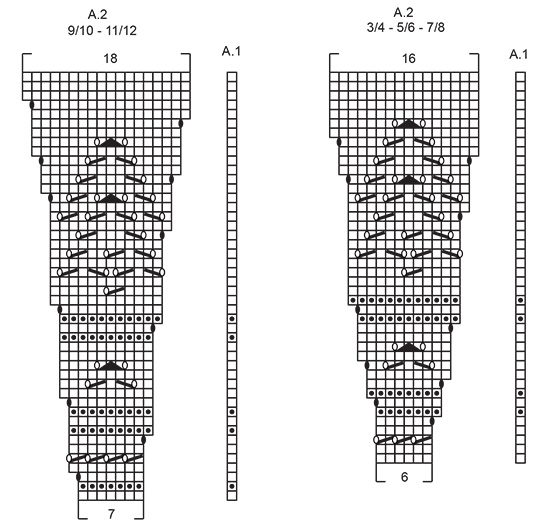
Salve, ho notato che spesso nei modelli con uno schema accanto a quello principale da ripetere ce ne è un altro di una sola m alla fine del ferro ,( come anche in questo modello , lo schema 1); mi chiedo perchè,grazie per l’attenzione
25.02.2020 - 14:50DROPS Design answered:
Buongiorno Marica. Lo schema A1 indica come lavorare la prima maglia dopo le maglie del bordo. In questo modo il motivo risulta simmetrico ai due lati. Buon lavoro!
26.02.2020 - 13:37
![]() Barbara wrote:
Barbara wrote:
Ein tolles Muster. Ich habe es gleich zweimal für meine beiden Töchter gestrickt und bin begeistert. Allerdings habe ich sehr viel mehr Wolle verbraucht als angegeben. Gestrickt mit Drops Merino Extra Fine (gleiche Garngruppe) waren es statt 200g bei Größe 11/12 Jahre fast 400g und 9/10 Jahre fast 350g.
18.11.2019 - 22:16DROPS Design answered:
Liebe Barbara, das stimmt auch so, wenn Sie eine andere Wolle benutzen, sollen Sie die Lauflänge kalkulieren, unser Garnumrechner kann Ihnen damit helfen und gibt hier 200 g Sky = 362 g Merino Extra Fine = 400 g. hier lesen Sie mehr. Viel Spaß beim stricken!
19.11.2019 - 09:21
![]() Sharon Walton wrote:
Sharon Walton wrote:
Thanks for quick response to previous question. To be clear, I am considering Row 4, ( 2nd row of 2nd ridge) at neck edge in beginning to be the wrong side, or inside of garment. First row after cast on = RS or outside of garment; second and every evenly numbered row = WS or inside of garment. So when I begin Row 4, understanding “top down” I picture work as future open circle of garment, resulting in Row 4 beginning at left band, as worn on child. Wrong? Thanks
30.10.2019 - 16:13DROPS Design answered:
Dear Mrs Walton, the first row after cast-on edge will be a RS row (= you start from RS with left front piece) so that the 4th row (= 2nd row of 2nd ridge) will be worked from WS. The buttonholes will be worked at the beginning of a WS row (= you start from WS with right front piece). Happy knitting!
04.11.2019 - 13:43
![]() Sharon Walton wrote:
Sharon Walton wrote:
Buttonhole. Instructions say for right sided buttonhole as for a girl, to put bh in while starting a WS row (while WS is facing me.) This creates buttonhole on left side of garment. Instructions wrong or am I missing something? Thanks, Sharon
29.10.2019 - 20:18DROPS Design answered:
Dear Sharon! Because we knitting from top-down, we start the row on the wrong side with the right band. Happy knitting!
30.10.2019 - 14:04
|
||||||||||||||||||||||
Agnes#agnescardigan |
||||||||||||||||||||||
 |
 |
|||||||||||||||||||||
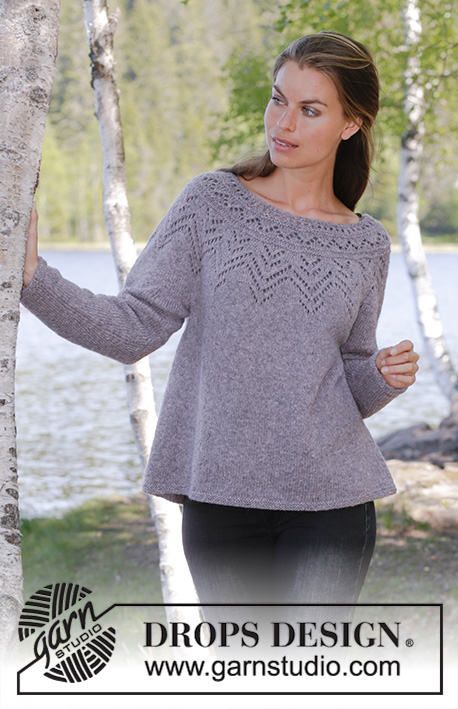
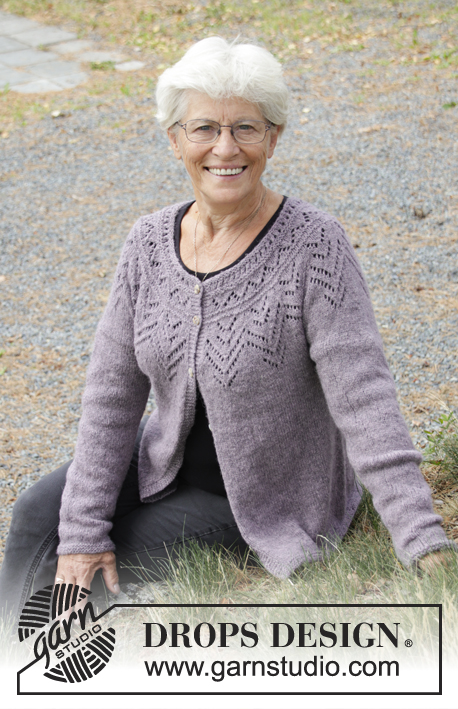
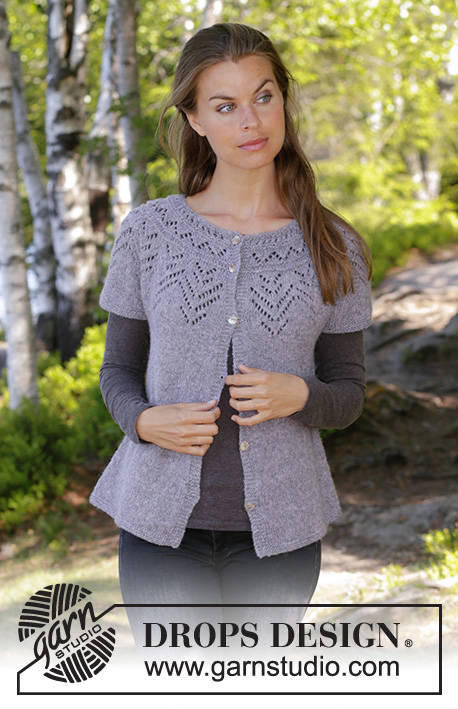
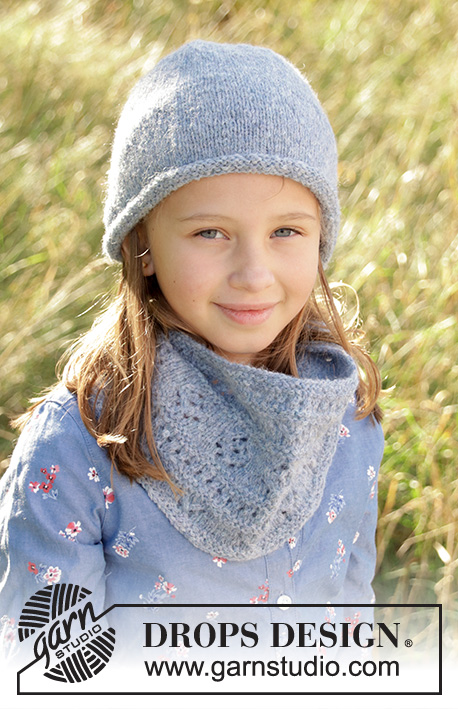
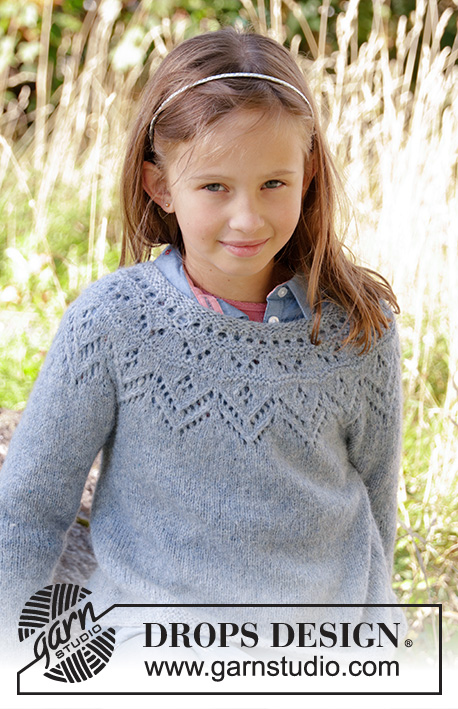
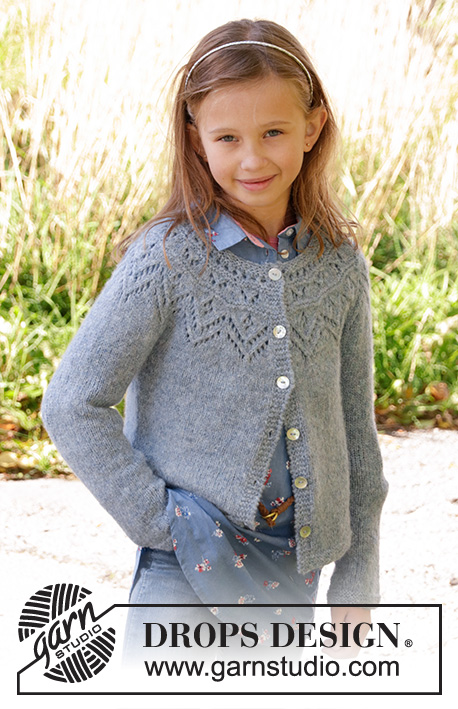
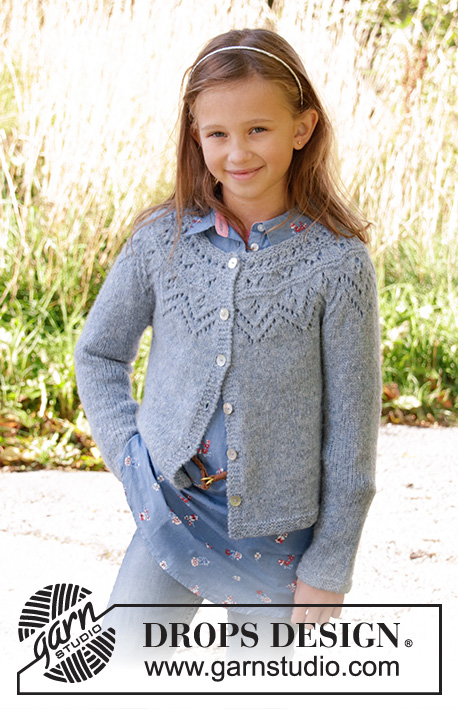
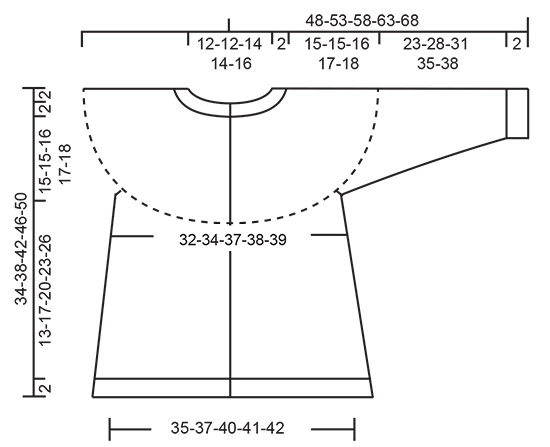
Knitted jacket for children in DROPS Sky. The piece is worked top down with round yoke, lace pattern, stocking stitch and garter stitch. Sizes 3-12 years.
DROPS Children 34-9 |
||||||||||||||||||||||
|
------------------------------------------------------- EXPLANATIONS FOR THE PATTERN: ------------------------------------------------------- RIDGE/GARTER STITCH (worked back and forth): 1 ridge = Knit 2 rows. RIDGE/GARTER STITCH (worked in the round): 1 ridge = 2 rounds. Knit 1 round and purl 1 round PATTERN: See diagrams A.1 and A.2. Choose diagram for your size. The diagrams show all the rows in the pattern seen from the right side. INCREASE TIP-1 (evenly spaced): To work out how to increase evenly, count the total number of stitches on the needle (e.g. 72 stitches) and divide by the number of increases to be made (e.g. 17) = 4.2. In this example, increase by making 1 yarn over after approx. each 4th stitch. On the next row work the yarn overs twisted to avoid holes. INCREASE TIP-2 (for sides of body): Work until there is 1 stitch left before the marker thread, 1 yarn over, knit 2 (the marker thread sits between these 2 stitches), 1 yarn over = 2 stitches increased. On the next row work the yarn overs twisted to avoid holes. Then work the new stitches in stocking stitch. DECREASE TIP (for sleeves): Decrease 1 stitch on each side of the marker thread as follows: Work until there are 3 stitches left before the marker thread, knit 2 together, knit 2 (the marker thread sits between these 2 stitches), slip 1 stitch as if to knit, knit 1 and pass the slipped stitch over the knitted stitch = 2 stitches decreased. BUTTONHOLE: Work the buttonholes on right band (when the garment is worn). 1 buttonhole = start from the wrong side and knit together the 2nd and 3rd stitch from the edge, make 1 yarn over. On the next row knit the yarn over to leave a hole. The first buttonhole is worked after approx. 1 cm from the neck edge, then the next 5-5-5-6-6 buttonholes every 5-6-6-6-7 cm. ------------------------------------------------------- START THE PIECE HERE: ------------------------------------------------------- JACKET - SHORT OVERVIEW OF THE PIECE: The piece is worked back and forth with circular needle, top down. It is divided for body and sleeves. The body is continued back and forth with circular needle. The sleeves are worked in the round with double pointed needles/short circular needle. YOKE: Cast on 72-76-80-86-92 stitches with circular needle size 4 mm and Sky. Work 2 RIDGES – see description above – remember BUTTONHOLES on right band – see description above. Knit 1 row where you increase 17-19-21-23-24 stitches evenly on row - READ INCREASE TIP-1! = 89-95-101-109-116 stitches on needle. Knit 1 row from the wrong side. Insert a marker thread on this round and measure from here. Work according to diagrams A.1 and A.2 as follows from the right side: Work 5 band stitches in GARTER STITCH, work A.1 over 1 stitch, A.2 a total of 13-14-15-14-15 times on the row and then 5 band stitches in garter stitch. REMEMBER THE KNITTING TENSION! When diagrams A.1 and A.2 have been completed in height there are 219-235-251-263-281 stitches on the row. On the next row from the right side adjust stitch count to 219-235-253-261-283 stitches. Continue working stocking stitch until the piece measures 15-15-16-17-18 cm from marker thread. The next row from the right side is worked as follows: Work 5 band stitches in garter stitch, 30-32-35-36-37 stitches in stocking stitch (= front piece), place the next 44-48-51-53-62 stitches on a thread (= sleeve), cast on 6 new stitches under the sleeve, work 61-65-71-73-75 stitches in stocking stitch (= back piece), place the next 44-48-51-53-62 stitches on a new thread (= sleeve), cast on 6 new stitches, work 30-32-35-36-37 stitches (= front piece) and 5 band stitches in garter stitch. BODY: There are 143-151-163-167-171 stitches on the needle. THE PIECE IS NOW MEASURED FROM HERE! Insert 1 marker thread in the middle of the 6 new stitches which were cast on in each side. Work stocking stitch back and forth with 5 band stitches in garter stitch on each side. When the piece measures 3 cm increase 1 stitch on each side of each marker (= 4 stitches increased) READ INCREASE TIP-2! Repeat this increase every 3-4½-5½-6½-7½ cm a total of 3 times = 155-163-175-179-183 stitches on needle. Continue working until the piece measures approx. 15-17-20-23-26 cm (or to desired length, there is approx. 2 cm until finished measurements). Work garter stitch for 2 cm. Loosely cast off with knit. Cut and fasten the thread. SLEEVE: Place the stitches from the one thread on short circular needle/double pointed needles size 4 mm (= 44-48-51-53-62 stitches) and knit up 1 new stitch in each of the 6 new stitches on the body (= 50-54-57-59-68 stitches). Insert 1 marker thread in the middle of these 6 stitches. Work stocking stitch in the round until the sleeve measures 3 cm. Now decrease 1 stitch on each side of the marker thread - READ DECREASE TIP. Continue with stocking stitch and repeat the decrease every 4-4-4-4-3½ cm until you have decreased a total of 5-6-7-8-10 times = 40-42-43-43-48 stitches on needle. Work stocking stitch until the sleeve measures 23-28-31-35-38 cm. Work garter stitch for 2 cm. Cast off with knit. Cut and fasten the strand. Work the other sleeve in the same way. ASSEMBLY: Sew buttons onto left band. |
||||||||||||||||||||||
Diagram explanations |
||||||||||||||||||||||
|
||||||||||||||||||||||
 |
||||||||||||||||||||||
 |
||||||||||||||||||||||
Have you finished this pattern?Tag your pictures with #dropspattern #agnescardigan or submit them to the #dropsfan gallery. Do you need help with this pattern?You'll find 28 tutorial videos, a Comments/Questions area and more by visiting the pattern on garnstudio.com. © 1982-2026 DROPS Design A/S. We reserve all rights. This document, including all its sub-sections, has copyrights. Read more about what you can do with our patterns at the bottom of each pattern on our site. |
||||||||||||||||||||||


With over 40 years in knitting and crochet design, DROPS Design offers one of the most extensive collections of free patterns on the internet - translated to 17 languages. As of today we count 325 catalogues and 12298 patterns translated into English (UK/cm). 12298
We work hard to bring you the best knitting and crochet have to offer, inspiration and advice as well as great quality yarns at incredible prices! Would you like to use our patterns for other than personal use? You can read what you are allowed to do in the Copyright text at the bottom of all our patterns. Happy crafting!
Post a comment to pattern DROPS Children 34-9
We would love to hear what you have to say about this pattern!
If you want to leave a question, please make sure you select the correct category in the form below, to speed up the answering process. Required fields are marked *.