
Popular categories
Looking for a yarn?


Comments / Questions (132)
![]() Christiane Jakoby wrote:
Christiane Jakoby wrote:
Ich habe mich gerade durch die anderen Fragen gelesen und mir scheint, dass nicht nur ich dieses Problem habe. Dabei wird immer auf A1 hingewiesen nur weiß ich nicht wo A1 gestrickt wird. Ist es die erste Masche der Blende ?
02.07.2020 - 13:46DROPS Design answered:
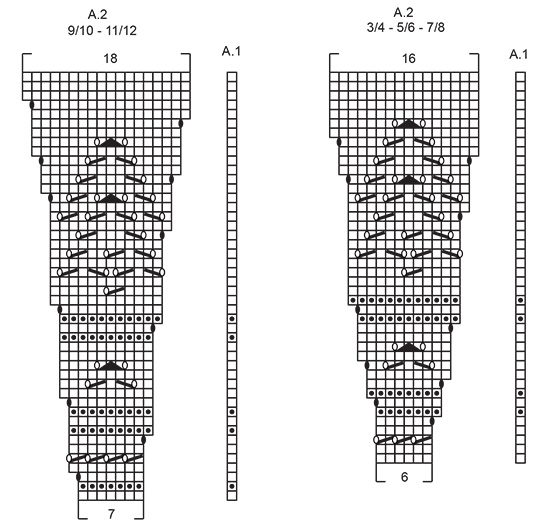
Liebe Frau Jakoby, A.1 ist die erste Masche vom Muster, dh nach den 5 Blendemaschen und vor 1. A.2 bei den Hinreihen und nach den letzten A.2 und vor den 5 letzten Blendemaschen bei den Rückreihen - siehe auch vorrige Antwort. Viel Spaß beim häkeln!
02.07.2020 - 14:01
![]() Christiane Jakoby wrote:
Christiane Jakoby wrote:
Hallo, ich stricke diese Jacke in Gr. 7/8 und möchte wissen: nach der ersten Zunahme komme ich von 80 auf 101 Ma wie beschrieben. Wenn ich aber zweimal 5 Ma für Blende und eine Rapport-Wiederholung von 15 mal habe, käme ich nur auf 100 Ma. Das verstehe ich nicht und wenn die Anzahl der Maschen nicht stimmt, kommt das Muster durcheinander. Bitte um Hilfe
02.07.2020 - 11:12DROPS Design answered:
Liebe Frau Jakoby, so stricken Sie die 101 Maschen: 5 Blendem, A.1 = 1 Masche, 15 Mal die 6 maschen in A.2, 5 Blendem = 5+ 1 + 15x15 + 5=101 M. Bei den Hinreihen wiederholen Sie A.2 (lesen Sie von links nach rechts) und enden Sie mit A.1 vor den 5 Blendem. Viel Spaß beim stricken!
02.07.2020 - 13:53
![]() Carmen wrote:
Carmen wrote:
Hola lindo el modelo, ambos diagramas dicen A2.gracias
28.06.2020 - 00:47DROPS Design answered:
Hola Carmen. Hay dos diagramas A.2 para las diferentes edades. Tienes que elegir uno de ellos según la talla que trabajes.
29.06.2020 - 21:01
![]() Patricia wrote:
Patricia wrote:
Ik vraag over vedelen van het werk omdat de stap-voor-stap instructie niet duidelijk genoeg zijn. dank je wel voor uitleggen.
13.06.2020 - 17:44DROPS Design answered:
Dag Patricia,
Het verdelen van het werk begint bij ...Brei 5 voorbiessteken in ribbelsteek, 30-32-35-36-37 steken in tricotsteek ... Er worden dan steken op hulpdraden gezet voor de mouw en onder de mouw worden steken opgezet. Je breit na het verdelen eerst het lijf heen en weer en je laat de steken voor de mouwen (die op de hulpdraden zijn gezet) rusten.
Hopelijk kun je zo verder, laat anders even weten waar je precies tegenaan loopt bij het verdelen van het werk.
18.06.2020 - 09:54
![]() Patricia wrote:
Patricia wrote:
Re Pas: Wat betekent "Voeg een markeerdraad in op deze naald en meet het werk vanaf hier. " ? Waar precies? Hoe veel markkerdraden en hoe ver van elkaar? Hoe wordt het werk verdeeld? Dank je wel.
12.06.2020 - 23:30DROPS Design answered:
Dag Patricia,
Het maakt niet zoveel uit waar (/in welke steek) precies de markeerdraad zit, het is de bedoeling dat je het werk op kan meten in de hoogte vanaf de markeerdraad die je daar plaatst.
18.06.2020 - 09:56
![]() Willeke wrote:
Willeke wrote:
Let op: Wanneer je na het breien van de pas 2 steken moet minderen dan de volgende tip. Zorg dat je aan beide zijkanten een mindering overslaat. Ik heb nu het stuk gebreit tot waar de verdeling komt van de panden en mouwen en de mindering valt op. Zo erg, dat ik mijn eigen tip maar ga toepassen... snif... zonde van al het werk. Redactie: kunnen jullie dit niet beter aangeven in het patroon voor toekomstige breisters. Zo jammer van je werk, als je er te laat achter komt.
14.05.2020 - 07:28
![]() Willeke wrote:
Willeke wrote:
Er staat een fout in patroon drops agnes (kindervest) Bij de beschrijving ontbreekt het woord "samen" ...... 1 knoopsgat = begin aan de verkeerde kant en brei de 2e en 3e steek SAMEN vanaf de rand, maak 1 omslag.
12.05.2020 - 07:54
![]() Stina Byrval wrote:
Stina Byrval wrote:
Har genlæst kommentaren dvs svaret til Jane Nielsen og ser nu, hvad I mener. Der bør nok i opskriften være en henvisning til jeres “skridt for skridt lektioner” ligesom der er henvisning til f.eks knaphul og udtagninger. Eller et NB A1 kun en gang. Så man ikke tager fejl. Man er jo kommet langt i opskriften, før fejlen i maskeantallet opdages. Så jeg synes ikke lige den del af opskriften er velskrevet.
30.04.2020 - 16:45
![]() Stina Byrval wrote:
Stina Byrval wrote:
Har et problem med opskriften svarende til Jane Nielsens (str 7/8) og jeg er ikke nybegynder udi strikning. Svaret til Jane Nielsen kan jeg ikke bruge til noget. Når man følger opskriftens ordlyd, ender man ikke med 251 masker efter mønstersektionen og heller ikke på 253. Det sidste er en af de rettelser, man kan læse. Jeg er på trøje nr 2 til den anden tvilling. Samme resulteret. Måske en oversættelsesfejl/overspringelse.
30.04.2020 - 16:27
![]() Carol wrote:
Carol wrote:
El aumento del borde del diagrama (A2) se repite en toda la hilera, o solo 1 vez al comienzo? Siempre se comienza la hilera del derecho con el A1? No puedo entender bien los diagramas!!
25.04.2020 - 23:55DROPS Design answered:
Hola Carol. Cada repetición de A.2 se repite tantas veces como se indica en el diagrama según la talla, es decir que si hay aumentos en el diagrama A.2 estos se repiten a lo largo de la fila.
28.04.2020 - 18:08
|
||||||||||||||||||||||
Agnes#agnescardigan |
||||||||||||||||||||||
 |
 |
|||||||||||||||||||||
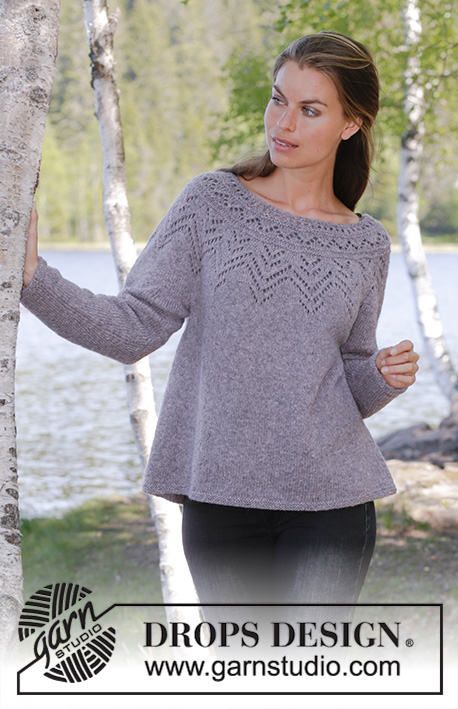
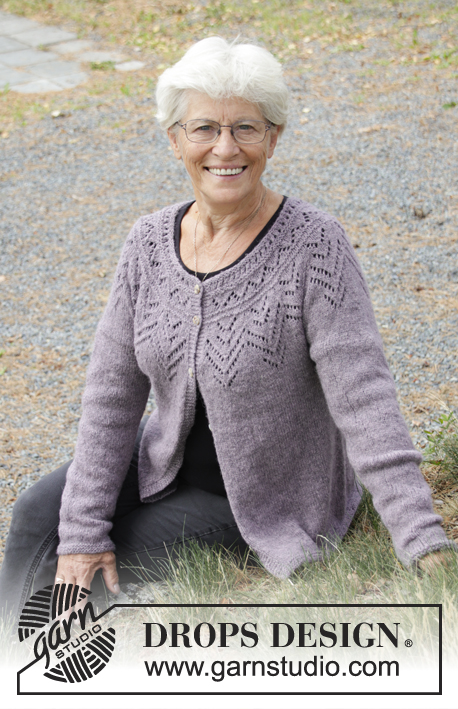
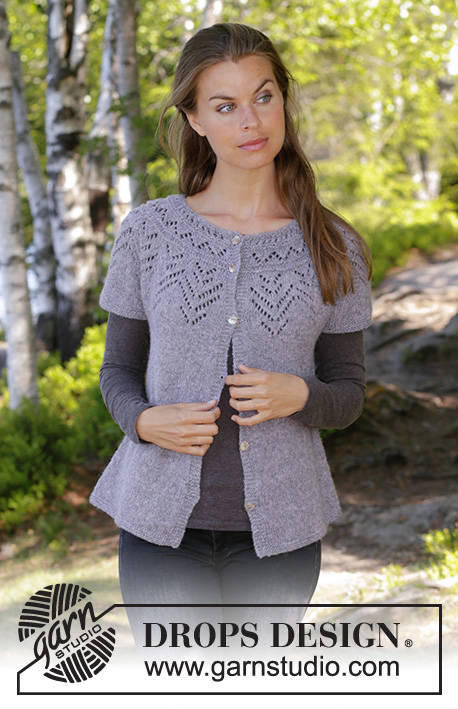
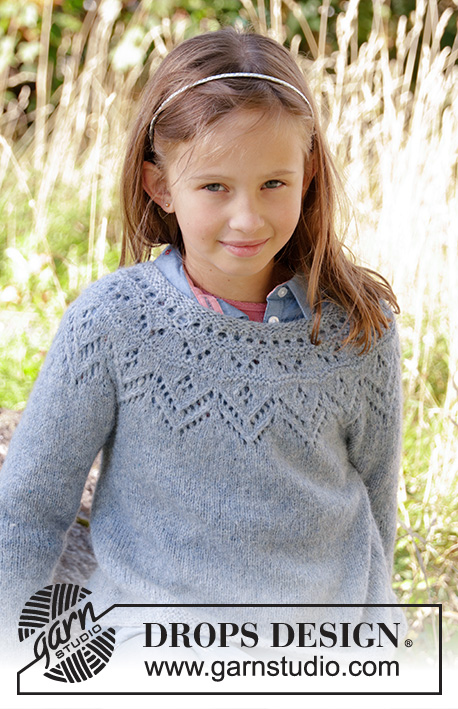
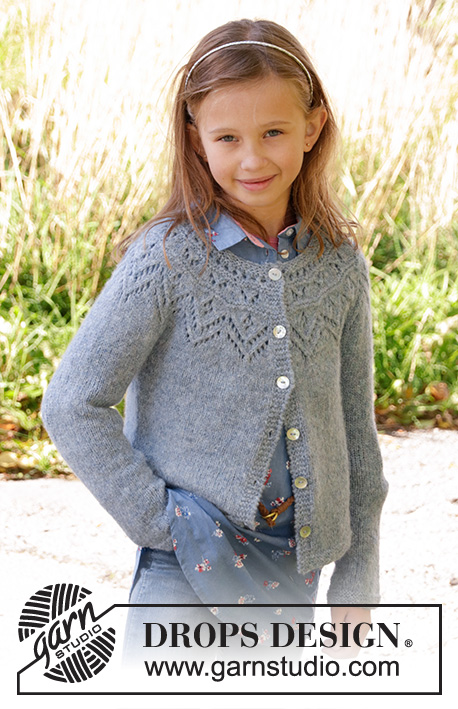
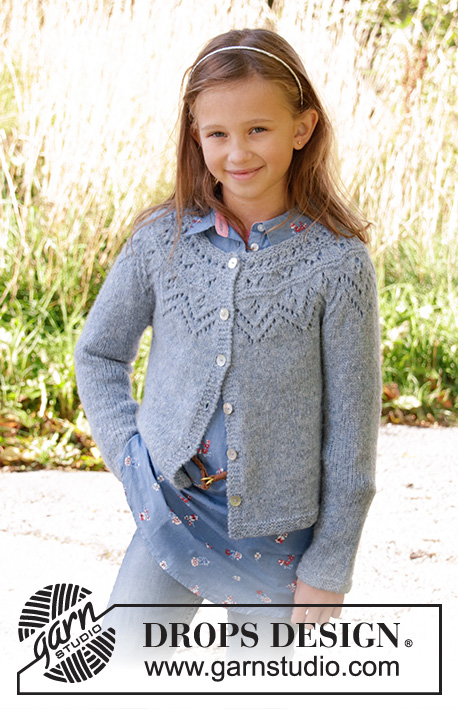
Knitted jacket for children in DROPS Sky. The piece is worked top down with round yoke, lace pattern, stocking stitch and garter stitch. Sizes 3-12 years.
DROPS Children 34-9 |
||||||||||||||||||||||
|
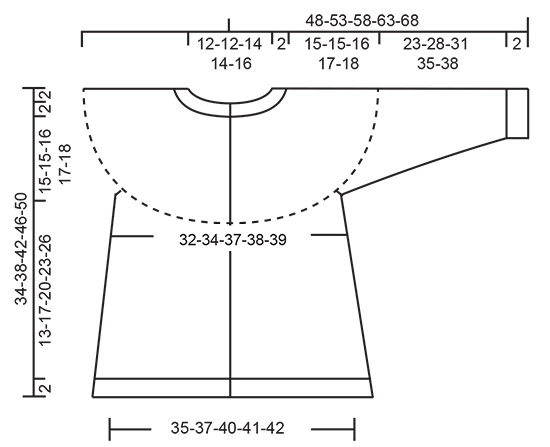
------------------------------------------------------- EXPLANATIONS FOR THE PATTERN: ------------------------------------------------------- RIDGE/GARTER STITCH (worked back and forth): 1 ridge = Knit 2 rows. RIDGE/GARTER STITCH (worked in the round): 1 ridge = 2 rounds. Knit 1 round and purl 1 round PATTERN: See diagrams A.1 and A.2. Choose diagram for your size. The diagrams show all the rows in the pattern seen from the right side. INCREASE TIP-1 (evenly spaced): To work out how to increase evenly, count the total number of stitches on the needle (e.g. 72 stitches) and divide by the number of increases to be made (e.g. 17) = 4.2. In this example, increase by making 1 yarn over after approx. each 4th stitch. On the next row work the yarn overs twisted to avoid holes. INCREASE TIP-2 (for sides of body): Work until there is 1 stitch left before the marker thread, 1 yarn over, knit 2 (the marker thread sits between these 2 stitches), 1 yarn over = 2 stitches increased. On the next row work the yarn overs twisted to avoid holes. Then work the new stitches in stocking stitch. DECREASE TIP (for sleeves): Decrease 1 stitch on each side of the marker thread as follows: Work until there are 3 stitches left before the marker thread, knit 2 together, knit 2 (the marker thread sits between these 2 stitches), slip 1 stitch as if to knit, knit 1 and pass the slipped stitch over the knitted stitch = 2 stitches decreased. BUTTONHOLE: Work the buttonholes on right band (when the garment is worn). 1 buttonhole = start from the wrong side and knit together the 2nd and 3rd stitch from the edge, make 1 yarn over. On the next row knit the yarn over to leave a hole. The first buttonhole is worked after approx. 1 cm from the neck edge, then the next 5-5-5-6-6 buttonholes every 5-6-6-6-7 cm. ------------------------------------------------------- START THE PIECE HERE: ------------------------------------------------------- JACKET - SHORT OVERVIEW OF THE PIECE: The piece is worked back and forth with circular needle, top down. It is divided for body and sleeves. The body is continued back and forth with circular needle. The sleeves are worked in the round with double pointed needles/short circular needle. YOKE: Cast on 72-76-80-86-92 stitches with circular needle size 4 mm and Sky. Work 2 RIDGES – see description above – remember BUTTONHOLES on right band – see description above. Knit 1 row where you increase 17-19-21-23-24 stitches evenly on row - READ INCREASE TIP-1! = 89-95-101-109-116 stitches on needle. Knit 1 row from the wrong side. Insert a marker thread on this round and measure from here. Work according to diagrams A.1 and A.2 as follows from the right side: Work 5 band stitches in GARTER STITCH, work A.1 over 1 stitch, A.2 a total of 13-14-15-14-15 times on the row and then 5 band stitches in garter stitch. REMEMBER THE KNITTING TENSION! When diagrams A.1 and A.2 have been completed in height there are 219-235-251-263-281 stitches on the row. On the next row from the right side adjust stitch count to 219-235-253-261-283 stitches. Continue working stocking stitch until the piece measures 15-15-16-17-18 cm from marker thread. The next row from the right side is worked as follows: Work 5 band stitches in garter stitch, 30-32-35-36-37 stitches in stocking stitch (= front piece), place the next 44-48-51-53-62 stitches on a thread (= sleeve), cast on 6 new stitches under the sleeve, work 61-65-71-73-75 stitches in stocking stitch (= back piece), place the next 44-48-51-53-62 stitches on a new thread (= sleeve), cast on 6 new stitches, work 30-32-35-36-37 stitches (= front piece) and 5 band stitches in garter stitch. BODY: There are 143-151-163-167-171 stitches on the needle. THE PIECE IS NOW MEASURED FROM HERE! Insert 1 marker thread in the middle of the 6 new stitches which were cast on in each side. Work stocking stitch back and forth with 5 band stitches in garter stitch on each side. When the piece measures 3 cm increase 1 stitch on each side of each marker (= 4 stitches increased) READ INCREASE TIP-2! Repeat this increase every 3-4½-5½-6½-7½ cm a total of 3 times = 155-163-175-179-183 stitches on needle. Continue working until the piece measures approx. 15-17-20-23-26 cm (or to desired length, there is approx. 2 cm until finished measurements). Work garter stitch for 2 cm. Loosely cast off with knit. Cut and fasten the thread. SLEEVE: Place the stitches from the one thread on short circular needle/double pointed needles size 4 mm (= 44-48-51-53-62 stitches) and knit up 1 new stitch in each of the 6 new stitches on the body (= 50-54-57-59-68 stitches). Insert 1 marker thread in the middle of these 6 stitches. Work stocking stitch in the round until the sleeve measures 3 cm. Now decrease 1 stitch on each side of the marker thread - READ DECREASE TIP. Continue with stocking stitch and repeat the decrease every 4-4-4-4-3½ cm until you have decreased a total of 5-6-7-8-10 times = 40-42-43-43-48 stitches on needle. Work stocking stitch until the sleeve measures 23-28-31-35-38 cm. Work garter stitch for 2 cm. Cast off with knit. Cut and fasten the strand. Work the other sleeve in the same way. ASSEMBLY: Sew buttons onto left band. |
||||||||||||||||||||||
Diagram explanations |
||||||||||||||||||||||
|
||||||||||||||||||||||
 |
||||||||||||||||||||||
 |
||||||||||||||||||||||
Have you finished this pattern?Tag your pictures with #dropspattern #agnescardigan or submit them to the #dropsfan gallery. Do you need help with this pattern?You'll find 28 tutorial videos, a Comments/Questions area and more by visiting the pattern on garnstudio.com. © 1982-2026 DROPS Design A/S. We reserve all rights. This document, including all its sub-sections, has copyrights. Read more about what you can do with our patterns at the bottom of each pattern on our site. |
||||||||||||||||||||||


With over 40 years in knitting and crochet design, DROPS Design offers one of the most extensive collections of free patterns on the internet - translated to 17 languages. As of today we count 325 catalogues and 12298 patterns translated into English (UK/cm). 12298
We work hard to bring you the best knitting and crochet have to offer, inspiration and advice as well as great quality yarns at incredible prices! Would you like to use our patterns for other than personal use? You can read what you are allowed to do in the Copyright text at the bottom of all our patterns. Happy crafting!
Post a comment to pattern DROPS Children 34-9
We would love to hear what you have to say about this pattern!
If you want to leave a question, please make sure you select the correct category in the form below, to speed up the answering process. Required fields are marked *.