
Popular categories
Looking for a yarn?


Comments / Questions (59)
![]() Jeanette wrote:
Jeanette wrote:
Når det avsluttes med riller, hva blir penest -siste pinne før felling i rett eller vrang? Eller spiller det ingen rolle?
19.10.2019 - 15:00DROPS Design answered:
Hei Jeanette, Vi anbefaler siste pinne i vrang. God fornøyelse!
21.10.2019 - 07:34
![]() Rosita wrote:
Rosita wrote:
Buongiorno,mi sono persa al punto che dice: Lavorare ora il diagramma A.2 (= 20-22-23-24-26-27 ripetizioni di 10 maglie)non capisco cosa devo fare?sarebbero 24 giri(io sto eseguendo xl)potete spiegarmi chiaramente cosa fare? Grazie mille!
17.10.2019 - 22:23DROPS Design answered:
Buongiorno Rosita. Nella taglia XL ha 240 m sul giro. Una ripetizione del diagramma A.2 è formata da 10 maglie. Deve lavorare il diagramma A.2 su tutte le maglie del giro, quindi 240 : 10 = 24 volte sul giro. In verticale, il diagramma A.2 viene lavorato una sola volta. Buon lavoro!
17.10.2019 - 22:44
![]() Christel Nilsson wrote:
Christel Nilsson wrote:
Hej! Nu är det dags att sticka resår men jag förstår inte instruktionerna. *1 rätmaska, 2 maskor rätstickning*, sticka*-*runt på varvet i 2 cm ? Hittade en förklaring på danska som jag inte förstod Tacksam för hjälp! /Christel
30.09.2019 - 21:15DROPS Design answered:
Hej. På varv 1 stickar du då alla maskor räta. På nästa varv stickar du 1 rät maska, 2 aviga maskor, 1 rät maska, 2 aviga maskor hela varvet. På 3:e varvet stickar du alla maskor räta igen. Så upprepar du dessa två varv. Lycka till!
01.10.2019 - 11:40
![]() Christel Nilsson wrote:
Christel Nilsson wrote:
Hej! Jag ska nu börja sticka A2. Hur skickar jag första och andra raden? Hur gör jag med maskan i den svarta rutan? Lyfter över den? Var börjar jag på andra raden när jag påbörjar blomman?
23.08.2019 - 08:02DROPS Design answered:
Hej. Du börjar att sticka A.2 direkt när varvet börjar. Den svarta rutan är ingen maska på första varvet (omslaget skapar maskan till nästa varv) så den gör du inget med. Lycka till!
23.08.2019 - 09:47
![]() Elodia wrote:
Elodia wrote:
Encore merci pour cette réponse ultra rapide. Je vais continuer le tricot pour tester l’élasticité de l'encolure et je vous tiens au courant.
10.07.2019 - 16:24
![]() Elodia wrote:
Elodia wrote:
Merci pour votre réponse rapide. je pense qu'on ne se comprend pas : si on regarde le patron, l'encolure du S mersure 16 cm or, je doute que quiconque puisse passer sa tête dans un col aussi petit ! Il semble qu'il y ait un problème dans les mesures.
10.07.2019 - 16:01DROPS Design answered:
Bonjour Elodia, les mesures sont prises ouvrage à plat, ainsi, les 16 cm de l'encolure correspondent à la largeur de l'encolure, pas à sa circonférence. Vous pouvez tout à fait ajuster le nombre de mailles à celui qui vous convient, pensez à bien ajuster pour que les tour suivants tombent justes. Bon tricot!
10.07.2019 - 16:10
![]() Elodia wrote:
Elodia wrote:
J'aimerais tricoter ce modèle mais le col me semble bien étroit, pourtant l'échantillon correspond. si je regarde des modèles similaires du groupe A, il y a plus de mailles pour le montage du col (au moins 120 pour le S). j'ai essayé un montage des mailles avec une aiguilles n°3, c'est un petit peu mieux mais pas suffisant. Que dois-je faire ?
10.07.2019 - 14:43DROPS Design answered:
Bonjour Elodia, nous ne sommes malheureusement pas en mesure de pouvoir adapter chacun de nos modèles à chaque demande, n'hésitez pas à contacter votre magasin (même par mail ou téléphone) pour toute assistance complémentaire. Bon tricot!
10.07.2019 - 15:46
![]() Tamara wrote:
Tamara wrote:
Ik begrijp de meerdering in A2 niet goed: "Meerder op de volgende tot laatste naald 12 steken verdeeld" (in maat M). Op welke naalden in patroon A2 moet ik precies deze meerdering maken? Bedankt!
12.04.2019 - 12:09DROPS Design answered:
Dag Tamara,
Het staat er inderdaad een beetje raar. Als je start met A.2, brei je 22 herhalingen van 10 steken = 220 steken. In de eerste naald van A.2 meerder je per herhaling 2 steken (zie omslagen in het telpatroon) en in naald 21 staan weer 2 omslagen waardoor je 22 herhalingen van 14 steken hebt= 308 steken. In de laatste naald meerder je nog eens 12 steken om op de 320 te komen (deze laatste 12 staan niet in het telpatroon)
16.04.2019 - 13:52
![]() Mette wrote:
Mette wrote:
Jeg gætter på at retstrik (på dansk) er vrang?
19.02.2019 - 07:35
![]() Mette wrote:
Mette wrote:
Jeg kan ikke finde nogle vejledninger/hjælp til hvordan man strikker; 1 ret og 2 retstrik (i bunden af kroppen og ærmerne). Jeg kan heller ikke summe billedet så meget ind, så jeg kan se hvordan det ser ud. Har du en vejledning til det? Evt. en film. Da jeg er nybegynder strikker.
19.02.2019 - 07:31DROPS Design answered:
Hei Mette. Det som på dansk heter retstrik = 1 omgang rett, 1 omgang vrang. Det vil si at du strikker vrangborden slik: 1 omgang = alle masker rett, 2 omgang = 1 maske rett, 2 masker vrang, 1 maske rett, 2 masker vrang osv rundt omgangen. Gjenta begge disse 2 omgangene. Du vil da få en vrangbor med 1 maske rett, 2 masker retstrikk. God fornøyelse
20.02.2019 - 15:33
|
||||||||||||||||||||||
Daisy Delight#daisydelightsweater |
||||||||||||||||||||||
 |
 |
|||||||||||||||||||||
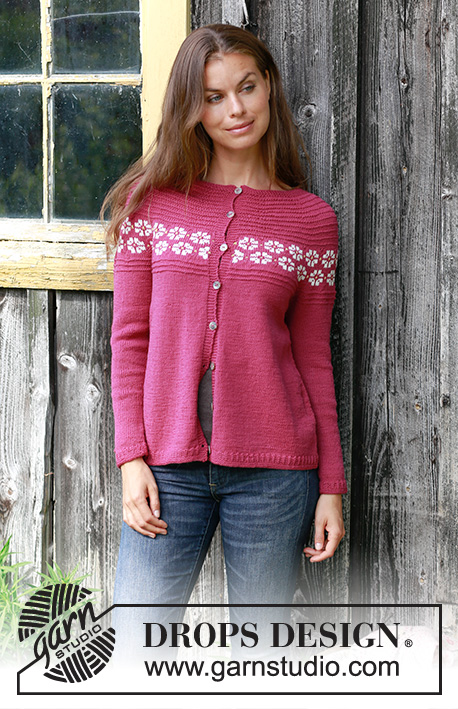
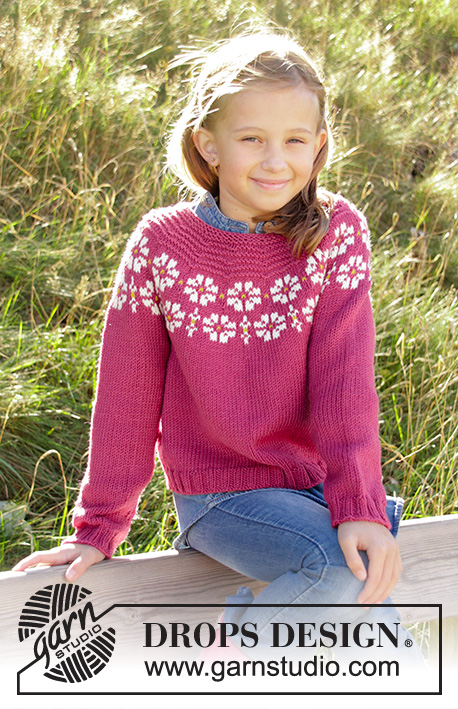
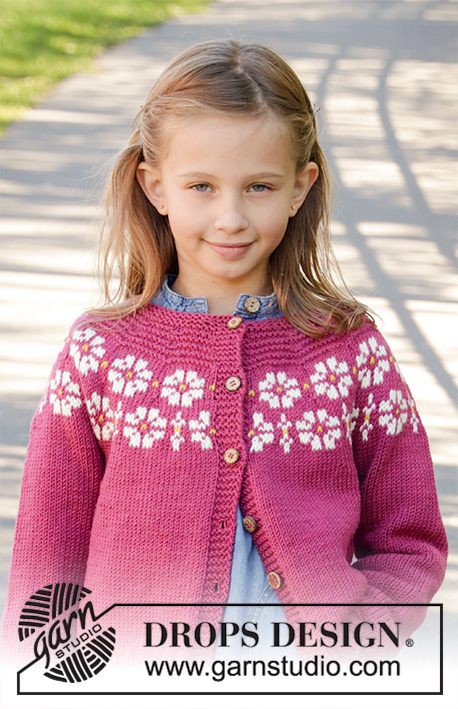
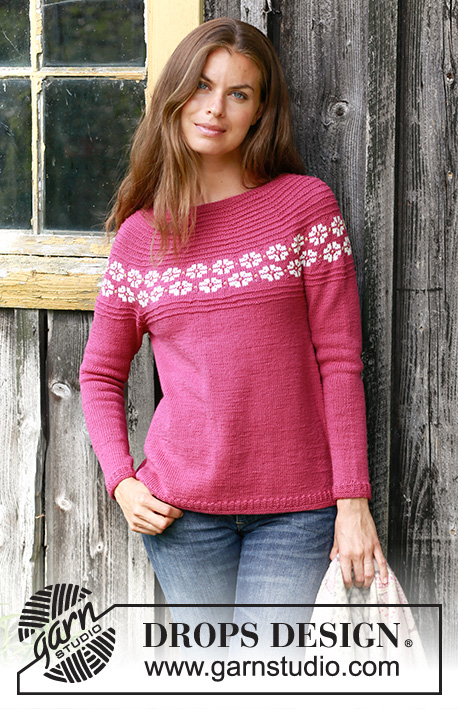
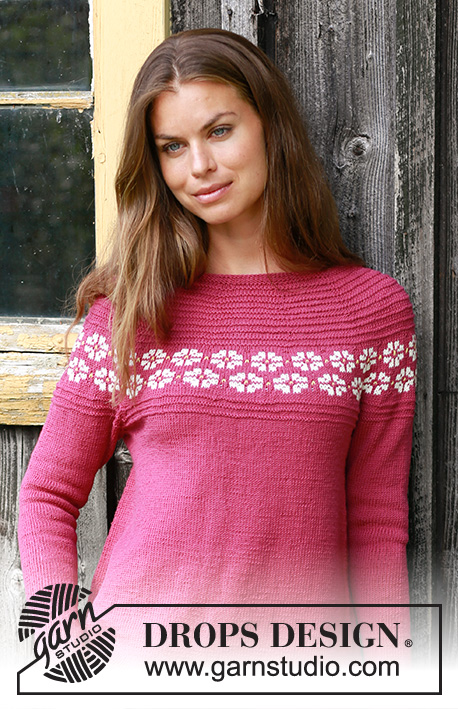
Knitted jumper with round yoke in DROPS BabyMerino. Piece is knitted top down with Nordic pattern and garter stitch. Size: S - XXXL
DROPS 196-2 |
||||||||||||||||||||||
|
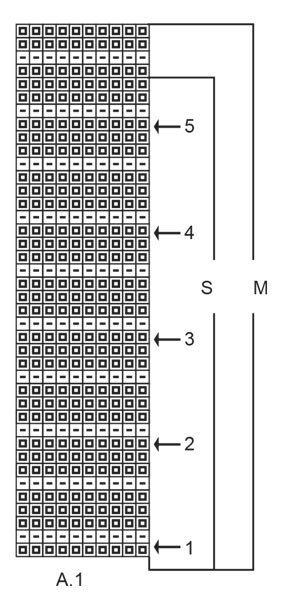
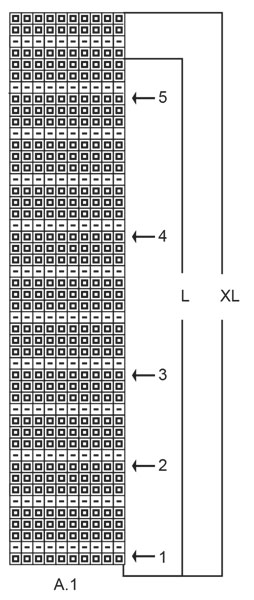
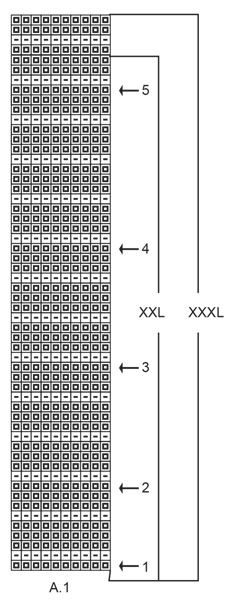
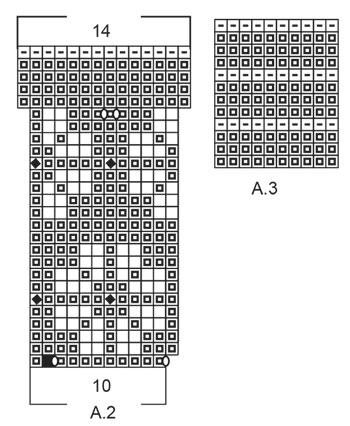
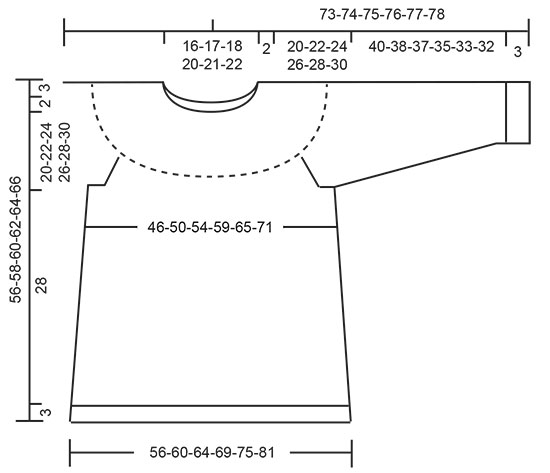
EXPLANATION FOR THE PATTERN: ---------------------------------------------------------- GARTER STITCH (worked in the round): 1 ridge = 2 rounds. Knit 1 round and purl 1 round. PATTERN: See diagrams A.1 to A.3. Choose diagram for your size (applies to A.1). KNITTING TIP: To avoid the garment losing elasticity when working pattern, it is important not to tighten the strands on back side of piece. Switch to a higher needle number when working pattern if the pattern is somewhat tight. INCREASE TIP-1 (evenly): To calculate how to increase evenly, use the total number of stitches on row (e.g. 106 stitches) and divide stitches by number of increases to be done (e.g. 4) = 26.5. In this example increase by making 1 yarn over after alternately every 26th and 27th stitch. On next round work yarn over twisted to avoid hole. INCREASE TIP-2 (applies to sides of body): Work until 8 stitches remain before marker thread, make 1 yarn over, knit 16 (marker thread is in the middle of these stitches), make 1 yarn over. On next round knit yarn over twisted to avoid holes. ELEVATION: Insert a marker thread mid back = beginning of round. Begin from right side with plum and work in stocking stitch until 8-8-8-9-9-10 stitches have been worked past marker, turn, tighten yarn and work 16-16-16-18-18-20 stitches in stocking stitch. Turn, tighten yarn and work 24-24-24-27-27-30 stitches in stocking stitch, turn, tighten yarn and work 32-32-32-36-36-40 stitches in stocking stitch, turn, tighten yarn and work until mid back. RAGLAN: Increase 1 stitch on each side of every marker thread (= 8 stitches increased on round) as follows: Work until 1 stitch remains before marker thread, make 1 yarn over, knit 2 (marker thread is between these stitches), make 1 yarn over. Repeat at the other marker threads. On next round work yarn overs twisted to avoid holes. DECREASE TIP (applies to sleeves): Decrease 1 stitch on each side of marker thread as follows: Work until 3 stitches remain before marker thread and knit 2 together, knit 2 (marker thread is between these stitches), slip 1 stitch knitwise, knit 1, pass slipped stitch over stitch worked. ---------------------------------------------------------- START THE PIECE HERE: ---------------------------------------------------------- JUMPER - SHORT OVERVIEW OF THE PIECE: Worked in the round on circular needle, top down. Work sleeves in the round on double pointed needles/a short circular needle. NECK EDGE: Cast on 106-110-115-125-130-134 stitches on a short circular needle size 2.5 mm with plum. Work 5 ridges in GARTER STITCH - read explanation above. YOKE: Switch to circular needle size 3 mm. Knit 1 round while increasing 4-10-15-15-20-26 stitches evenly - read INCREASE TIP-1 = 110-120-130-140-150-160 stitches. Knit 1 round (all stitches are knitted twisted to avoid holes). For better fit work an elevation at the back of neck so that yoke is somewhat higher on back piece. This elevation can be skipped, to make the neck the same at the front and back - read ELEVATION. Insert 9-10-10-10-11-11 marker threads in piece without working as follows: Insert first marker thread after 7-6-7-7-5-5 stitches, insert each of the next 8-9-9-9-10-10 marker threads after 12-12-13-14-14-15 stitches, 7-6-6-7-5-5 stitches remain on round after last marker thread. Move the marker threads upwards when working. Now work pattern A.1 (choose diagram for your size) the entire round – read KNITTING TIP, AT THE SAME TIME on every round with arrow in diagram increase on each side of marker threads as follows: REMEMBER THE KNITTING TENSION! ARROW-1: Increase 1 stitch on each side of every marker thread (= 18-20-20-20-22-22 stitches increased) = 128-140-150-160-172-182 stitches. ARROW-2: Increase 1 stitch on each side of every marker thread (= 18-20-20-20-22-22 stitches increased) = 146-160-170-180-194-204 stitches. ARROW-3: Increase 1 stitch on each side of every marker thread (= 18-20-20-20-22-22 stitches increased) = 164-180-190-200-216-226 stitches. ARROW-4: Increase 1 stitch on each side of every marker thread (= 18-20-20-20-22-22 stitches increased) = 182-200-210-220-238-248 stitches. ARROW-5: Increase 1 stitch on each side of every marker thread (= 18-20-20-20-22-22 stitches increased) = 200-220-230-240-260-270 stitches. When entire A.1 has been worked vertically, piece measures approx. 11-12-13-14-15-16 cm from cast-on edge and down mid front. Remove the marker threads. Now work pattern A.2 (= 20-22-23-24-26-27 repetitions of 10 stitches) in the round. On next to last round in A.2 increase 10-12-14-16-12-12 stitches evenly = 290-320-336-352-376-390 stitches. When entire A.2 has been worked vertically, piece measures approx. 19-20-21-22-23-24 cm from cast-on edge and down mid front. Now insert 4 marker threads in the piece as follows: Insert 1st marker thread after the first 45-49-51-55-60-64 stitches (= half back piece), insert 2nd marker thread after the next 55-62-66-66-68-67 stitches (= sleeve), insert 3rd marker thread after the next 90-98-102-110-120-128 stitches (= front piece) and insert 4th marker thread after the next 55-62-66-66-68-67 stitches (= sleeve). 45-49-51-55-60-64 stitches remain on round after last marker thread (= half back piece). Now work pattern A.3 in the round, at the same time on first round begin increase for RAGLAN – read explanation above. Increase like this every other round 5-6-8-10-11-13 times in total = 330-368-400-432-464-494 stitches. NOTE: When A.3 has been worked vertically 1 time, continue with stocking stitch until all increases for raglan are done and piece measures 22-24-26-28-30-32 cm from cast-on edge. Work next round as follows: 50-55-59-65-71-77 stitches in stocking stitch (= half back piece), slip the next 65-74-82-86-90-93 stitches on 1 stitch holder for sleeve, cast on 10-10-12-12-14-16 new stitches on row (= in the side under sleeve), work 100-110-118-130-142-154 stitches in stocking stitch (= front piece), slip the next 65-74-82-86-90-93 stitches on 1 stitch holder for sleeve edges, cast on 10-10-12-12-14-16 new stitches on row (= in the side under sleeve) and work the remaining 50-55-59-65-71-77 stitches in stocking stitch (= half back piece). Finish body and sleeves separately. NOW MEASURE THE PIECE FROM HERE! BODY: = 220-240-260-284-312-340 stitches. Insert 1 marker thread in each side in the middle of the 10-10-12-12-14-16 stitches cast on under each sleeve (= 110-120-130-142-156-170 stitches between marker threads). Continue in the round with plum and in stocking stitch. When piece measures 4 cm from division, increase 2 stitches in each side - read INCREASE TIP-2 (= 4 stitches increased). Increase like this approx. every 2 cm 12 times in total = 268-288-308-332-360-388 stitches. Work the new stitches in stocking stitch. When piece measures 28 cm from division, increase 8-12-13-13-15-17 stitches = 276-300-321-345-375-405 stitches. Switch to circular needle size 2.5 mm. Work rib * knit 1, 2 stitches in garter stitch *, work from *-* in the round for 2 cm. Work 2 ridges and cast off. Jumper measures approx. 56-58-60-62-64-66 cm from shoulder and down. SLEEVE: Slip the 65-74-82-86-90-93 stitches from stitch holder in one side of piece on double pointed needles or a short circular needle size 3 mm and pick in addition up 1 stitch in each of the 10-10-12-12-14-16 new stitches cast on under sleeve = 75-84-94-98-104-109 stitches. Insert 1 marker thread in the middle of the 10-10-12-12-14-16 stitches mid under sleeve and begin round here. Continue with plum and in stocking stitch. When piece measures 4 cm, decrease 2 stitches mid under sleeve - read DECREASE TIP. Decrease like this every 8th-6th-5th-4th-4th-3rd round 13-17-21-22-23-24 times in total = 49-50-52-54-58-61 stitches. Continue until piece measures 40-38-37-35-33-32 cm from division (shorter measurements in the larger sizes because of wider neck and longer yoke). Knit 1 round while increasing 2-4-5-6-5-5 stitches evenly = 51-54-57-60-63-66 stitches. Switch to double pointed needles size 2.5 mm. Now work rib * knit 1, 2 stitches in garter stitch *, work from *-* in the round for 2 cm. Work 2 ridges and cast off. Work the other sleeve the same way. |
||||||||||||||||||||||
Diagram explanations |
||||||||||||||||||||||
|
||||||||||||||||||||||
 |
||||||||||||||||||||||
 |
||||||||||||||||||||||
 |
||||||||||||||||||||||
 |
||||||||||||||||||||||
 |
||||||||||||||||||||||
Have you finished this pattern?Tag your pictures with #dropspattern #daisydelightsweater or submit them to the #dropsfan gallery. Do you need help with this pattern?You'll find 28 tutorial videos, a Comments/Questions area and more by visiting the pattern on garnstudio.com. © 1982-2026 DROPS Design A/S. We reserve all rights. This document, including all its sub-sections, has copyrights. Read more about what you can do with our patterns at the bottom of each pattern on our site. |
||||||||||||||||||||||


With over 40 years in knitting and crochet design, DROPS Design offers one of the most extensive collections of free patterns on the internet - translated to 17 languages. As of today we count 324 catalogues and 12245 patterns translated into English (UK/cm). 12245
We work hard to bring you the best knitting and crochet have to offer, inspiration and advice as well as great quality yarns at incredible prices! Would you like to use our patterns for other than personal use? You can read what you are allowed to do in the Copyright text at the bottom of all our patterns. Happy crafting!
Post a comment to pattern DROPS 196-2
We would love to hear what you have to say about this pattern!
If you want to leave a question, please make sure you select the correct category in the form below, to speed up the answering process. Required fields are marked *.