
Popular categories
Looking for a yarn?


Comments / Questions (27)
![]() Lara wrote:
Lara wrote:
Buongiorno, scusate non capisco cosa significa "Lavorare ora il diagramma A.1b sul diagramma A.1a ", potete gentilmente spiegarmi? Grazie infinite!
21.05.2020 - 15:59DROPS Design answered:
Buongiorno Lara. Vuol dire che a partire dal punto indicato, le maglie che fino ad adesso ha lavorato seguendo il diagramma A.1a , le lavora sguendo il diagramma A.1b. Buon lavoro!
21.05.2020 - 16:10
![]() Petra wrote:
Petra wrote:
Mooi patroon, goed te volgen. Alleen op plaatje heeft zijkant ook patroon in beschrijving vind ik het niet terug
25.09.2019 - 12:05
![]() Monika Brück wrote:
Monika Brück wrote:
Hallo, ich hänge bei den Zunahmen der Passe. Erst soll man 12 Maschen zunehmen,dann folgt 24,36 ....dann steht bei den 6 Zunahmen, wo der Pfeil ist bei A1 a jeweils 24 Maschen zunehmen. .??? Bin Anfängerin, deshalb wäre es lieb von ihnen mir zu erklären, welche Zunahmen denn richtig sind. Danke.
10.08.2019 - 11:52DROPS Design answered:
Liebe Frau Brück, bei jeder Runde mit einem Pfeil werden Sie Maschen zunehmen, z.B. bei der 1. Pfeil nehmen Sie 12 M in der Runde (hier lesen Sie wie man regelmäßig verteilt zunimmt, bei der nächsten Runde haben Sie dann genügend Maschen, um A.1 einmal mehr in der Runde zu wiederholen. Wenn Sie 24 M zunehmen, können Sie dann bei der nächsten Runde A.1 zweimal mehr in der Runde stricken. Viel Spaß beim stricken!
12.08.2019 - 07:29
![]() Monika Brück wrote:
Monika Brück wrote:
Hallo, ich hänge bei den Zunahmen der Passe. Erst soll man 12 Maschen zunehmen,dann folgt 24,36 ....dann steht bei den 6 Zunahmen, wo der Pfeil ist bei A1 a jeweils 24 Maschen zunehmen. .??? Bin Anfängerin, deshalb wäre es lieb von ihnen mir zu erklären, welche Zunahmen denn richtig sind. Danke.
10.08.2019 - 11:50
![]() Aline McLuckie wrote:
Aline McLuckie wrote:
I need 4mm needles. to get the tension stated in the pattern, which is very surprising as I normally knit to the correct tension according to the printed information on the ball band and pattern. I am an experienced knitter and have been knitting for almost 80 years
06.07.2019 - 18:50DROPS Design answered:
Dear Aline, everone knits differently and many different circumstance can change the gauge one knits. Don't wory about it, just use the needles with which you can manage the necessary tensions. Happy Knitting!
07.07.2019 - 17:22
![]() Inger-Lise Watsend wrote:
Inger-Lise Watsend wrote:
Hvordan strikker jeg runden der det er tatt en innhopp i mønsteret? Det er slike innhopp i alle mønsterdiagram.
05.07.2019 - 21:23DROPS Design answered:
Hej Inger-Lise, Når du kommer op til den pind i diagrammet, så vil det være helt naturligt for dig at strikke ifølge diagrammet. Da vi ikke kan tegne halvdelen af symbolet i den ene side og fortsættelsen i den anden side, så er man nødt til at lade det stikke ud i den anden side. God fornøjelse!
09.07.2019 - 10:24
![]() Marianne wrote:
Marianne wrote:
Ik begrijp de regel meerderen in de breedte niet. (pag 3): Elke keer dat u 12 steken meerdert breit u A.1 een keer in de breedte . A.1 zit 15 keer in de breedte hoe verdeel ik dan de meerderingen?
06.06.2019 - 12:36DROPS Design answered:
Dag Marianne,
Je breit A.1a over de hele naald, dus je herhaalt A.1a steeds in de breedte. Op de meerdernaald meerder je 12 steken en omdat A.1 12 steken breed is, past er na het meerderen nog een herhaling van A.1 op de naald. Op de naald met een pijl in het patroon verdeel je de meerderingen over de hele toer. Daarna komt er een ribbel in het patroon en vervolgens brei je het volgende patroon van A.1 zoals aangegeven in de beschrijving.
06.06.2019 - 13:50
![]() SusieQ wrote:
SusieQ wrote:
Beautiful sweater on a lovely lady. How sad that someone includes a form of body shaming about the model in their comment. Crafters are usually better than that.
04.06.2019 - 09:40
![]() Helga wrote:
Helga wrote:
I would like to thank Garn studio to include this older lady as model. As the population is getting older they are often forgotten. So a biggggg thank you for doing so. This is my next project it looks fantastic.
24.04.2019 - 13:29
![]() Lynda wrote:
Lynda wrote:
I’m a little surprised by a comment made that this lovely lady pictured in this photo is not of an average size. Not everyone is a size 2. We as knitters should be able to use our imagination to create beautiful pieces to share with our loved ones.
11.09.2018 - 19:20
|
||||||||||||||||||||||
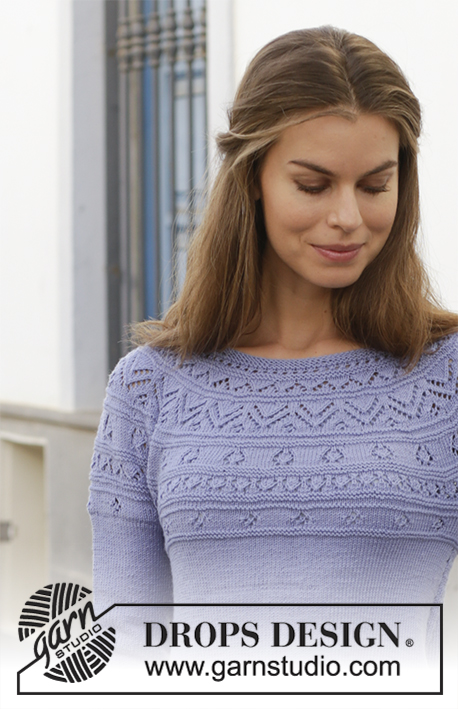
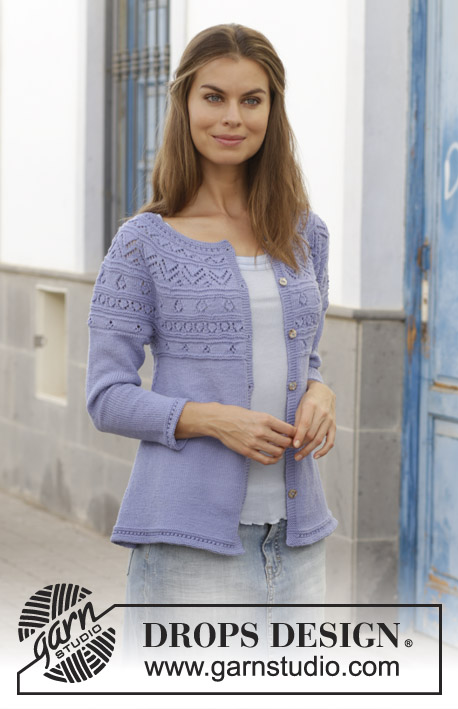
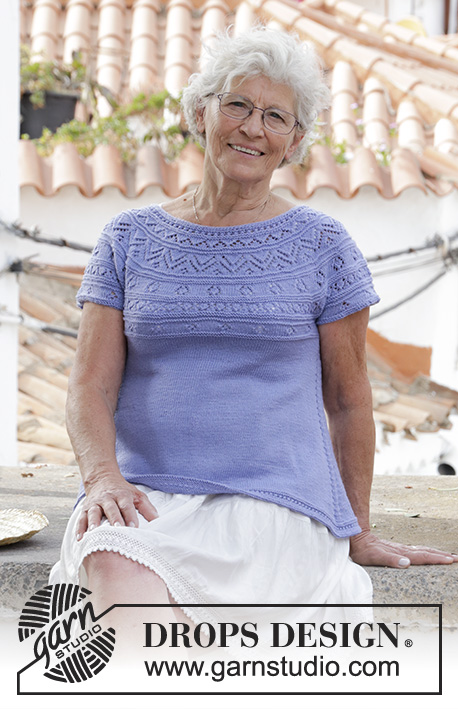
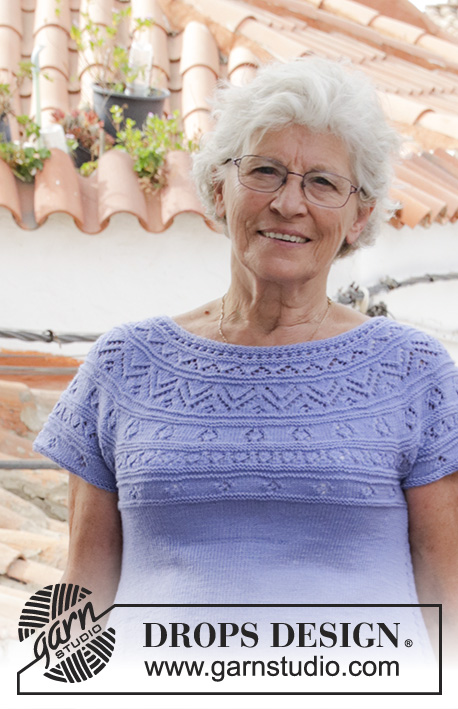
Taormina Top#taorminatop |
||||||||||||||||||||||
 |
 |
|||||||||||||||||||||
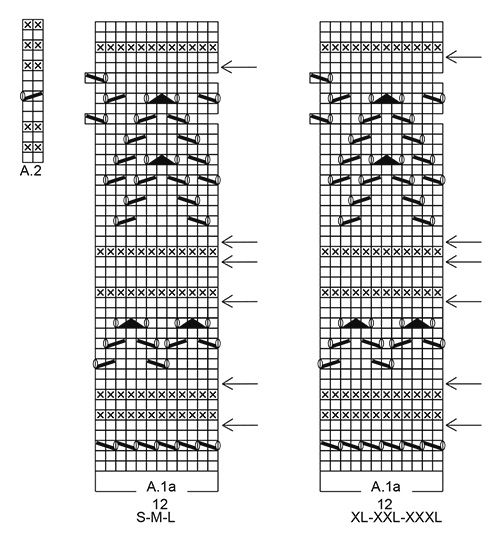
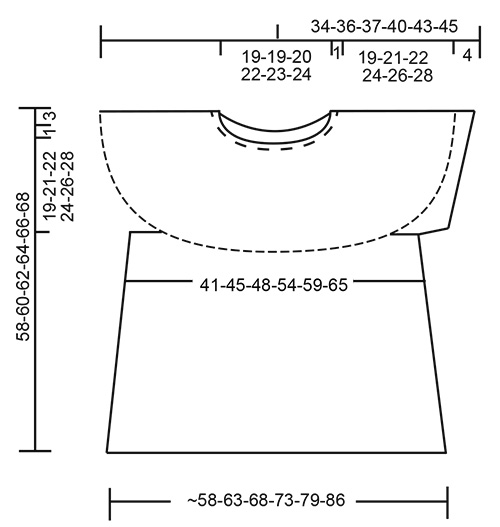
Knitted top with lace pattern, round yoke and short sleeves, worked top down. Sizes S - XXXL. The piece is worked in DROPS BabyMerino.
DROPS 186-37 |
||||||||||||||||||||||
|
INFORMATION FOR THE PATTERN: RIDGE/GARTER STITCH (worked in the round): 1 ridge = 2 rounds. Knit 1 round and purl 1 round PATTERN: See diagrams A.1 and A.2. Choose diagram for your size (applies to A.1). INCREASE TIP-1 (for increases on yoke): To work out how to increase evenly, count the total number of stitches on the needle (e.g. 116 stitches) and divide by the number of increases to be made (e.g. 16) = 7.25. In this example, increase by making 1 yarn over after approx. every 7th stitch. On the next round, work the yarn overs twisted into the pattern to avoid holes. INCREASE TIP-2 (for increases on body): Work until there are 2 stitches left before the marker thread, 1 yarn over, knit 4 stitches (the marker thread sits in the middle of these 4 stitches), 1 yarn over (= 2 stitches increased), increase like this at both marker threads (= a total of 4 stitches increased). The yarn overs are not worked twisted on the next round, there will be holes. ---------------------------------------------------------- TOP: The yoke and body are worked in the round, top down. The short sleeves are worked in the round with double pointed needles. YOKE: Cast on 116-120-126-132-139-144 stitches with circular needle size 2.5 mm and BabyMerino. The round starts mid back. Work 2 RIDGES – see description above. Knit 1 round and increase 16-24-30-36-41-36 stitches evenly on round – read INCREASE TIP-1 = 132-144-156-168-180-180 stitches. Purl 1 round (the yarn overs are worked twisted to avoid holes). REMEMBER THE KNITTING TENSION! Change to circular needle size 3 mm. Work A.1a (= 12 stitches) in the round over all stitches (= 11-12-13-14-15-15 times in width) Continue the pattern like this AT THE SAME TIME as you increase evenly on the rounds marked with an arrow in diagram A.1 as follows: Each time you increase 12 stitches, work A.1 one more time in width. Each time you increase 24 stitches, work A.1 two more times in width. Each time you increase 36 stitches, work A.1 three more times in width. INCREASE 1: Increase 24-24-24-24-24-36 stitches = 156-168-180-192-204-216 stitches. INCREASE 2: Increase 24-24-24-24-24-36 stitches = 180-192-204-216-228-252 stitches. INCREASE 3: Increase 24 stitches = 204-216-228-240-252-276 stitches. INCREASE 4: Increase 24 stitches = 228-240-252-264-276-300 stitches. INCREASE 5: Increase 24 stitches = 252-264-276-288-300-324 stitches. INCREASE 6: Increase 24 stitches = 276-288-300-312-324-348 stitches. When A.1a has been worked 1 time in height, the piece measures approx. 14 cm from the neck edge. Now work A.1b over A.1a and the increases continue as follows: INCREASE 7: Increase 12-24-24-24-24-24 stitches = 288-312-324-336-348-372 stitches. INCREASE 8: Increase 12-12-24-24-24-24 stitches = 300-324-348-360-372-396 stitches. INCREASE 9: Increase 12-12-24-24-24-24 stitches = 312-336-372-384-396-420 stitches. INCREASE 10: Increase 12-12-12-12-24-24 stitches = 324-348-384-396-420-444 stitches. The increases are now finished in sizes S, M and L, but continue in sizes XL, XXL and XXXL as follows: INCREASE 11: Increase 12-24-24 stitches = 408-444-468 stitches. INCREASE 12: Increase 12-12-24 stitches = 420-456-492 stitches. ALL SIZES: = 324-348-384-420-456-492 stitches (A.1b is now repeated 27-29-32-35-38-41 times in width). Work pattern until the piece measures 20-22-23-25-27-29 cm from the cast-on edge. Now divide the piece for body and sleeves as follows: (The stitches which do not fit into the pattern are knitted when the stitches are knitted and purled when the stitches are purled). Work pattern as before over the first 44-49-53-60-66-73 stitches (= half back piece), place the next 74-76-86-90-96-100 stitches on a thread for sleeves, cast on 10 new stitches on the needle (= side under the sleeve), insert 1 marker thread in the middle of the new stitches, work pattern as before over the next 88-98-106-120-132-146 stitches (= front piece), place the next 74-76-86-90-96-100 stitches on a thread for sleeve, cast on 10 new stitches on the needle (= side under the sleeve), insert 1 marker thread in the middle of the new stitches, work pattern as before over the last 44-49-53-60-66-73 stitches (= half back piece). Body and sleeves are finished separately. THE PIECE IS NOW MEASURED FROM HERE! BODY: = 196-216-232-260-284-312 stitches. Continue to work pattern; the stitches which do not fit into the pattern under the sleeves are knitted when the stitches are knitted and purled when the stitches are purled. When A.1b has been worked 1 time in height, the piece measures approx. 27-27-27-30-30-30 cm. Continue working in stocking stitch. On the next round increase 1 stitch on each side of each marker thread – read INCREASE TIP-2! Increase like this every 4th round until the piece measures 32-32-33-33-33-33 cm from where the body and sleeves were divided = approx. 276-300-324-348-380-412 stitches. Change to circular needle size 2.5 mm. Work A.2 in the round over all stitches. When A.2 has been worked 1 time in height, the piece measures approx. 35-35-36-36-36-36 cm from where the body and sleeves were divided and approx. 55-57-59-61-63-65 cm from the neck edge. Cast off (make sure you cast off loosely; you can use a needle 1 size larger if necessary). SLEEVE EDGE: The piece is worked in the round with double pointed needles. Place the 74-76-86-90-96-100 stitches from the thread on the one side of the piece on double pointed needles size 3 mm and knit up 1 stitch in each of the 10 stitches cast on under the sleeve = 84-86-96-100-106-110 stitches. Continue with A.1b over the stitches which fit into the pattern; the stitches which do not fit into the pattern under the sleeve are purled when the stitches are purled and knitted when the stitches are knitted. When the sleeve measures 3 cm from where it was divided from the body (adjust so that you finish neatly in relation to the pattern) change to double pointed needles size 2.5 mm and work 2 ridges. Then cast off, make sure you cast off loosely; you can use a needle 1 size larger if necessary. Work the other sleeve edge in the same way. |
||||||||||||||||||||||
Diagram explanations |
||||||||||||||||||||||
|
||||||||||||||||||||||
 |
||||||||||||||||||||||
 |
||||||||||||||||||||||
 |
||||||||||||||||||||||
Have you finished this pattern?Tag your pictures with #dropspattern #taorminatop or submit them to the #dropsfan gallery. Do you need help with this pattern?You'll find 23 tutorial videos, a Comments/Questions area and more by visiting the pattern on garnstudio.com. © 1982-2026 DROPS Design A/S. We reserve all rights. This document, including all its sub-sections, has copyrights. Read more about what you can do with our patterns at the bottom of each pattern on our site. |
||||||||||||||||||||||


With over 40 years in knitting and crochet design, DROPS Design offers one of the most extensive collections of free patterns on the internet - translated to 17 languages. As of today we count 324 catalogues and 12245 patterns translated into English (UK/cm). 12245
We work hard to bring you the best knitting and crochet have to offer, inspiration and advice as well as great quality yarns at incredible prices! Would you like to use our patterns for other than personal use? You can read what you are allowed to do in the Copyright text at the bottom of all our patterns. Happy crafting!
Post a comment to pattern DROPS 186-37
We would love to hear what you have to say about this pattern!
If you want to leave a question, please make sure you select the correct category in the form below, to speed up the answering process. Required fields are marked *.