
Popular categories
Looking for a yarn?


Comments / Questions (18)
![]() Edith wrote:
Edith wrote:
Mit jelent az SZO? Nem ertem az alabbi akat...mit jelent sikban kotve? BORDA / LUSTAKÖTÉS (oda-vissza haladva - síkban - kötve). 1 borda= 2 sima szemekkel kötött sor. ? BORDA/ LUSTAKÖTÉS: (körben kötve a kéthegyű kötőtűkön- a két ujjához.) 1 borda = 1 kör sima szemekkel, 1 kör fordított szemekkel.
23.09.2018 - 19:54DROPS Design answered:
Kedves Edit, a SZO = színe oldal. A borda a lustakötés során kialakult bordára utal, ami két sima szemekkel kötött sorból alakul ki, ugyanez körben kötve egy sima szemekkel és egy fordított szemekkel kötött sorból alakul ki. Sikeres kézimunkázást!
30.09.2018 - 09:04
![]() Fabienne wrote:
Fabienne wrote:
Bonjour, j'ai les bras plutôt courts et je voulais faire les manches un peu plus courtes (71 cm est beaucoup trop long, il me faudrait 4 cm de moins). Où est-ce que je dois faire ce "raccourci" ? Est-ce que je commence les augmentations plus tard et je les fais plus rapprochées ? Est-ce que je m'arrête plus tôt avant la fin de la manche ? Merci d'avance de vos conseils.
07.09.2018 - 12:35DROPS Design answered:
Bonjour Fabienne, les manches mesurent 42-41-40-40-38-37 cm depuis la séparation d'avec l'empiècement (71 cm depuis le milieu de l'encolure dos jusqu'au poignet) - si vous lez voulez plus courtes, vous pouvez ajuster les diminutions en les faisant plus tôt ou plus fréquemment. Vous pouvez vérifier les mesures finales d'après un vêtement similaire que vous avez et dont vous aimez la forme et ajuster en fonction. Bon tricot!
07.09.2018 - 13:52
![]() Borel wrote:
Borel wrote:
Merci pour la précision, j'avais mal compris le rang 3 et pensais qu'il fallait tricoter ensemble les mailles endroit et non séparément. Dès lors tout rentre dans l'ordre 😉. Je trouve votre site vraiment indispensable et votre rapidité de réaction très professionnelle, merci pour tout.
16.08.2018 - 09:44
![]() Christina wrote:
Christina wrote:
Die angegebene Maschenanzahl scheint wirklich nicht zu stimmen! Ich habe eine Maschenprobe gemacht (passte genau mit 10 cm) und habe dann mal die kleinste Größe begonnen (ich stricke immer Gr. S, das passte bisher immer). Als das Bündchen fertig war, habe ich mal nachgemessen - viel zu weit! Beim zweiten Anlauf habe ich 30 Maschen weniger angeschlagen, nun scheint es zu passen!
07.03.2018 - 20:20
![]() Kate Andersen wrote:
Kate Andersen wrote:
Jeg er lige blevet færdig med denne skønne cardigan. Den er bare SÅ sød altså. Kan jeg varmt anbefale til andre.
22.02.2018 - 23:05
![]() Anna wrote:
Anna wrote:
Habe die Jacke exakt nach Anleitung nachgestrickt. Sie passt nicht!!! Der Halsausschnitt oben ist viel zu weit. Schade um die Arbeit und die Vorfreude auf eine vermeintlich schöne Jacke. Es ist ein wirklich schönes Design, aber wenn obenherum alles zu weit ist, dann hilft einem leider auch das schönste Design nichts.
12.02.2018 - 23:09DROPS Design answered:
Liebe Anna, Halsausschnitt wurde noch mal kalkuliert und Anleitung stimmt. Gerne können Sie Maschenanzahl nach Ihrem Geschmack anpassen, wenn Sie ihn lieber enger wollen.
16.02.2018 - 14:45
![]() Gudrun wrote:
Gudrun wrote:
Einfacher Schnitt, aber tolle Verzierung am Ärmel. Einfach reizend. Werde ich auf jeden Fall nacharbeiten und freue mich darauf.
15.12.2017 - 15:50
![]() Véronique wrote:
Véronique wrote:
Très beau travail d'emmanchure, et couleur seyante au teint des blondes .
14.12.2017 - 09:43
|
||||||||||||||||||||||
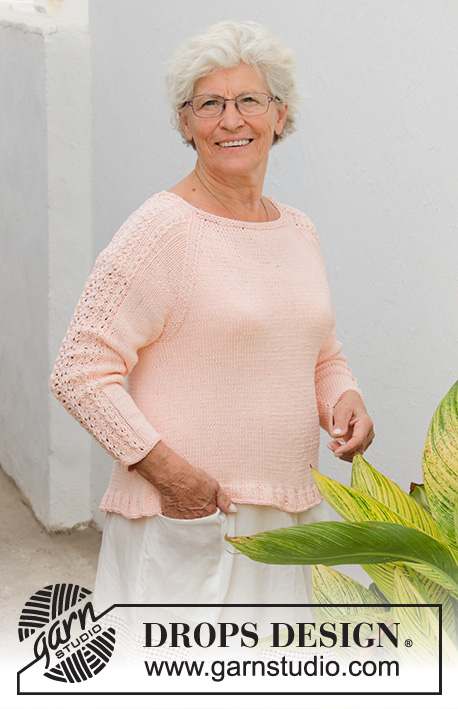
Early May#earlymaycardigan |
||||||||||||||||||||||
 |
 |
|||||||||||||||||||||
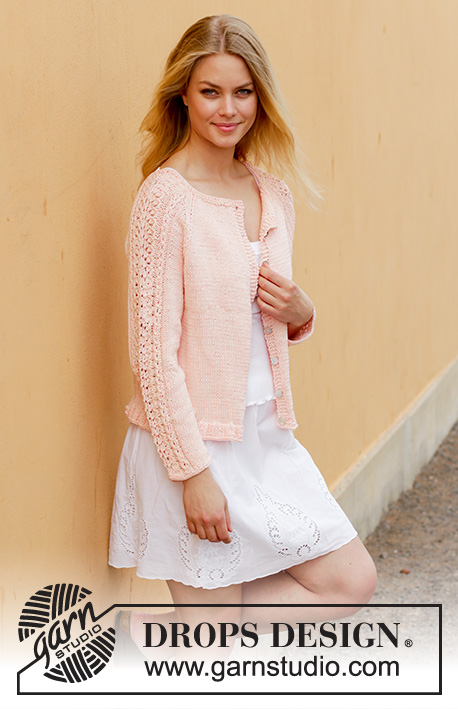
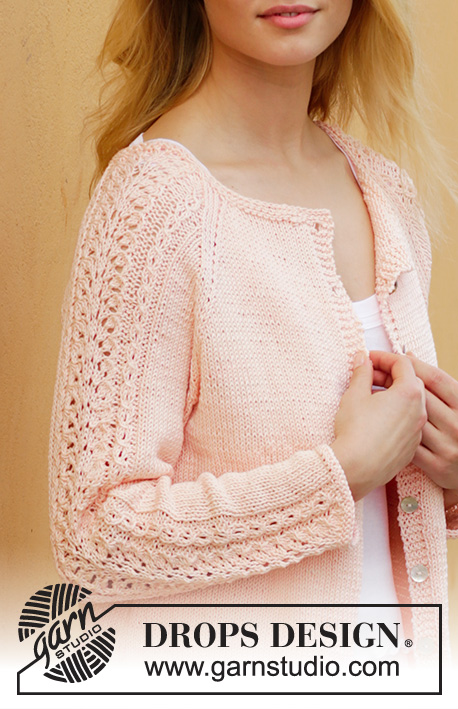
Knitted jacket with lace pattern and raglan. Sizes S - XXXL. The piece is worked in DROPS Muskat.
DROPS 187-21 |
||||||||||||||||||||||
|
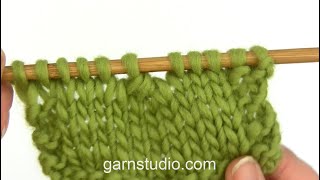
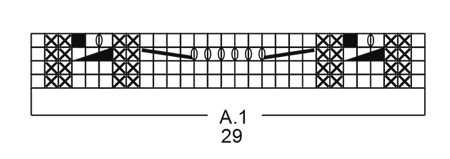
INFORMATION FOR THE PATTERN: RIDGE/GARTER STITCH (worked back and forth): 1 ridge = Knit 2 rows. RIDGE/GARTER STITCH (worked in the round - for sleeve): 1 ridge = Knit 1 round and purl 1 round. PATTERN: See diagram A.1. The diagram shows all the rows in the pattern seen from the right side. BUTTONHOLES: Work buttonholes on right band. 1 BUTTONHOLE = knit together the 3rd and 4th stitch from the edge and make 1 yarn over. Knit the yarn over on the next row = hole. Work buttonholes when the piece measures: S: 2, 8, 14, 20, 27, 34, 41 and 48 cm M: 2, 8, 15, 22, 29, 36, 43 and 50 cm L: 2, 9, 16, 23, 30, 37, 44 and 52 cm XL: 2, 9, 16, 23, 30, 38, 46 and 54 cm XXL: 2, 9, 16, 24, 32, 40, 48 and 56 cm XXXL: 2, 10, 18, 26, 34, 42, 50 and 58 cm DECREASE TIP-1: To work out how to decrease evenly, count the total number of stitches on the needle (e.g. 223 stitches), minus the bands (e.g. 10 stitches) and divide the remaining stitches by the number of decreases to be made (e.g. 29) = 7.3. In this example work approx. every 6th and 7th stitch together; do not decrease over the bands. DECREASE TIP-2 (for the sides): Start 3 stitches before the marker thread, knit 2 together, knit 2 (the marker thread sits in the middle of these 2 stitches), slip 1 stitch as if to knit, knit 1, pass the slipped stitch over the knitted stitch. INCREASE TIP (for sleeves): Work until there are 2 stitches left before the marker thread, 1 yarn over, knit 2 (the marker thread sits in the middle of these 2 stitches), 1 yarn over. On the next round knit the yarn overs twisted to avoid holes. RAGLAN: Decrease 2 stitches in each transition between body and sleeves. Decrease as follows from the right side: Start 3 stitches before the marker and work as follows: Knit 2 together, knit 2 (the marker thread sits in the middle of these 2 stitches), slip 1 stitch as if to knit, knit 1, pass the slipped stitch over. ---------------------------------------------------------- JACKET: The body is worked back and forth with circular needle, bottom up. The sleeves are worked in the round with double pointed needles, then the sleeves and body are put on same needle and the yoke is worked back and forth with decreases to raglan. BODY: Cast on 223-241-259-289-313-343 stitches (including 5 band stitches in each side) with circular needle size 3.5 mm and Muskat. Purl 1 row from the wrong side, then work as follows – from the right side: 5 stitches GARTER STITCH– see description above, rib (knit 3 /purl 3) until there are 8 stitches left on the row, knit 3 and 5 stitches in garter stitch. Work BUTTONHOLES on right band – see description above. Continue with rib until the piece measures 3 cm, knit 1 row from the right side where you decrease 29-31-33-39-39-45 stitches evenly on row – read DECREASE TIP-1 = 194-210-226-250-274-298 stitches on needle. Change to circular needle size 4 mm. Continue with stocking stitch and 5 stitches in garter stitch in each side (= bands). Insert 2 marker threads in the piece, 51-55-59-65-71-77 stitches in from each side (back piece = 92-100-108-120-132-144 stitches). REMEMBER THE KNITTING TENSION! When the piece measures 6 cm decrease 1 stitch on each side of the marker threads (= 4 stitches decreased), decrease every 7 cm a total of 4 times – read DECREASE TIP-2 = 178-194-210-234-258-282 stitches. When the piece measures 30-30-31-32-32-32 cm cast off for armholes in each side as follows: Work until there are 4-4-5-5-6-6 stitches left before the first marker thread in the side, cast off the next 8-8-10-10-12-12 stitches, work until there are 4-4-5-5-6-6 stitches before the marker thread in the other side, cast off the next 8-8-10-10-12-12 stitches and work to end of row. There are now 76-84-90-102-112-124 stitches on the back piece and 43-47-50-56-61-67 stitches on each front piece. Lay the piece to one side and work the sleeves. SLEEVE: The piece is worked in the round with double pointed needles. Cast on 47-49-51-53-55-57 stitches with double pointed needles size 4 mm and Muskat. Work 2 RIDGES – see description above. Insert 1 marker thread at the beginning of the round. Then work as follows: Knit 9-10-11-12-13-14 stitches, A.1 (= 29 stitches), knit 9-10-11-12-13-14 stitches. Continue this pattern upwards, AT THE SAME TIME when the piece measures 6-6-8-8-8-6 cm increase 1 stitch on each side of the marker thread – read INCREASE TIP. Increase every 3½-2½-1½-1½-1½-1½ cm a total of 10-14-18-18-19-20 times = 67-77-87-89-93-97 stitches. The increased stitches are worked in stocking stitch. When the piece measures 42-41-40-40-38-37 cm, (NOTE! Shorter measurements in larger sizes due to longer raglan decrease and wider neck) cast off 4-4-5-5-6-6 stitches on each side of the marker thread = 59-69-77-79-81-85 stitches. Lay the piece to one side and work the other sleeve. YOKE: Place the sleeves on the same circular needle as the body where you cast off stitches for the armholes = 280-316-344-372-396-428 stitches. Insert 1 marker in all the transitions between body and sleeves (= 4 markers). Continue with stocking stitch over the stitches on the body, garter stitch on the bands and pattern and stocking stitch as before on the sleeves, AT THE SAME TIME on the next row, start the decreases to RAGLAN – see description above (= 8 stitches decreased). Decrease every 4th row 11-10-8-8-9-8 times, then every 2nd row 7-12-17-19-20-24 times (a total of 18-22-25-27-29-32 times). After all decreases to raglan there are 136-140-144-156-164-172 stitches left on the needle. Work 2 ridges, AT THE SAME TIME on the first row of the ridges, decrease 30-30-30-36-38-42 stitches evenly – remember DECREASE TIP-1 = 106-110-114-120-126-130 stitches. Cast off. ASSEMBLY: Sew openings under the sleeves. Sew buttons onto left band. |
||||||||||||||||||||||
Diagram explanations |
||||||||||||||||||||||
|
||||||||||||||||||||||
 |
||||||||||||||||||||||
 |
||||||||||||||||||||||
Have you finished this pattern?Tag your pictures with #dropspattern #earlymaycardigan or submit them to the #dropsfan gallery. Do you need help with this pattern?You'll find 31 tutorial videos, a Comments/Questions area and more by visiting the pattern on garnstudio.com. © 1982-2026 DROPS Design A/S. We reserve all rights. This document, including all its sub-sections, has copyrights. Read more about what you can do with our patterns at the bottom of each pattern on our site. |
||||||||||||||||||||||


With over 40 years in knitting and crochet design, DROPS Design offers one of the most extensive collections of free patterns on the internet - translated to 17 languages. As of today we count 324 catalogues and 12245 patterns translated into English (UK/cm). 12245
We work hard to bring you the best knitting and crochet have to offer, inspiration and advice as well as great quality yarns at incredible prices! Would you like to use our patterns for other than personal use? You can read what you are allowed to do in the Copyright text at the bottom of all our patterns. Happy crafting!
Post a comment to pattern DROPS 187-21
We would love to hear what you have to say about this pattern!
If you want to leave a question, please make sure you select the correct category in the form below, to speed up the answering process. Required fields are marked *.