
Popular categories
Looking for a yarn?


Comments / Questions (17)
![]() Esther Lessard wrote:
Esther Lessard wrote:
Bonjour, J'aimerais faire les mitaines feutrées à un homme très grands et costaud. Est-ce possible d'avoir un patron plus grand ?
12.11.2019 - 18:43DROPS Design answered:
Bonjour Mme Lessard, vous trouverez ici tous nos modèles de moufles feutrées, parmi lesquelles vous trouverez peut-être la bonne taille ou dont vous pourrez vous inspirer si besoin. Bon tricot!
13.11.2019 - 08:43
![]() Poppy wrote:
Poppy wrote:
Hi, I love this pattern! I’m a bit confused, though. I’ve done “When piece measures 11 cm in all sizes, decrease 4 stitches evenly = 44 stitches.” But then it says to start the star at 10 cm and increase for the thumb at 11cm. Should I start the star first and then do the decrease and increase on the same line or is there a typo? Thanks, Poppy
18.03.2019 - 19:23DROPS Design answered:
Dear Poppy, thank you for writing to us. The decrease of 4 stitches is for the overall shaping of the mittens so you do it evenly distributed on the round, while increasing for the thumb happens only at one place. As the patterns says "at the same time", so you are doing the two things at the same time. I hope this helps. Happy Knitting, thi is such a lovely project!
20.03.2019 - 11:26
![]() Anneli wrote:
Anneli wrote:
Underbara vantar, jag älskar dom! Jag har stickat dom och tovat två gånger (först i 40 C och en gång till i 30 C) för att nå rätt storlek och är jättenöjd! Ett stort tack för fint garn och ett bra mönster! ❤️
29.01.2019 - 13:07
![]() Rachel Dyas wrote:
Rachel Dyas wrote:
Thank you for your reply regarding the thumb length - I can see what I have done - misread when to start the decreases so the main bit pdf the mitten is too short - have unbound and ripped back to where I made the mistake. Thank you very much for getting back to me and in future I will knit with more haste and less speed :D
22.01.2019 - 14:13
![]() Rachel Dyas wrote:
Rachel Dyas wrote:
Hi there I think I have followed the measurements for the largest size, it looks strange though, before felting is the thumb supposed to be longer than the main mitten? have I made a mistake:/
22.01.2019 - 12:48DROPS Design answered:
Dear Mrs Dyas, the thumb is not supposed to be longer than the mitten, it should measure approx. 9 cm from where you picked up the stitches and 12 cm from beg of gusset. You start to decrease for top of hand on mitten when piece measures 12 cm from the new sts cast on over thumb gusset, make sure you get the correct measurements. Happy knitting!
22.01.2019 - 12:57
![]() Ilona wrote:
Ilona wrote:
För att sticka A1 och mönster undrar jag om jag måste klippa trådarna efter varje varv?
17.01.2019 - 10:03DROPS Design answered:
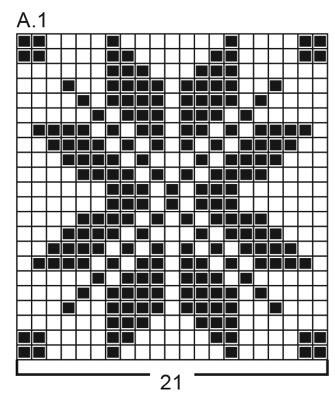
Hei Ilona. Denne votten strikker du frem og tilbake til A.1 er strikket ferdig, du trenger derfor ikke klippe tråden mellom hver omgang. Strikk med perlegrå frem til A.1, strikk med 2 farger over disse 21 masker, og fortsett med perlegrå ut omganggen. Snu, strikk med perlegrå til du kommer til A.1, strikk med 2 farger over perlegrå. Den blå tråden vil hele tiden være i den siden av A.1 du strikker fra, så du trenger ikke klippe tråden her. God fornøyelse
17.01.2019 - 15:04
![]() Catharina Österberg wrote:
Catharina Österberg wrote:
Hej, varför finns aldrig garnet att köpas i samma färg som mönstret?? Klickar på en bild på ett mönster man vill ha, men sedan finns inte garnet?
27.11.2018 - 08:28
|
|||||||
Icy Paws#icypawsmittens |
|||||||
 |
 |
||||||
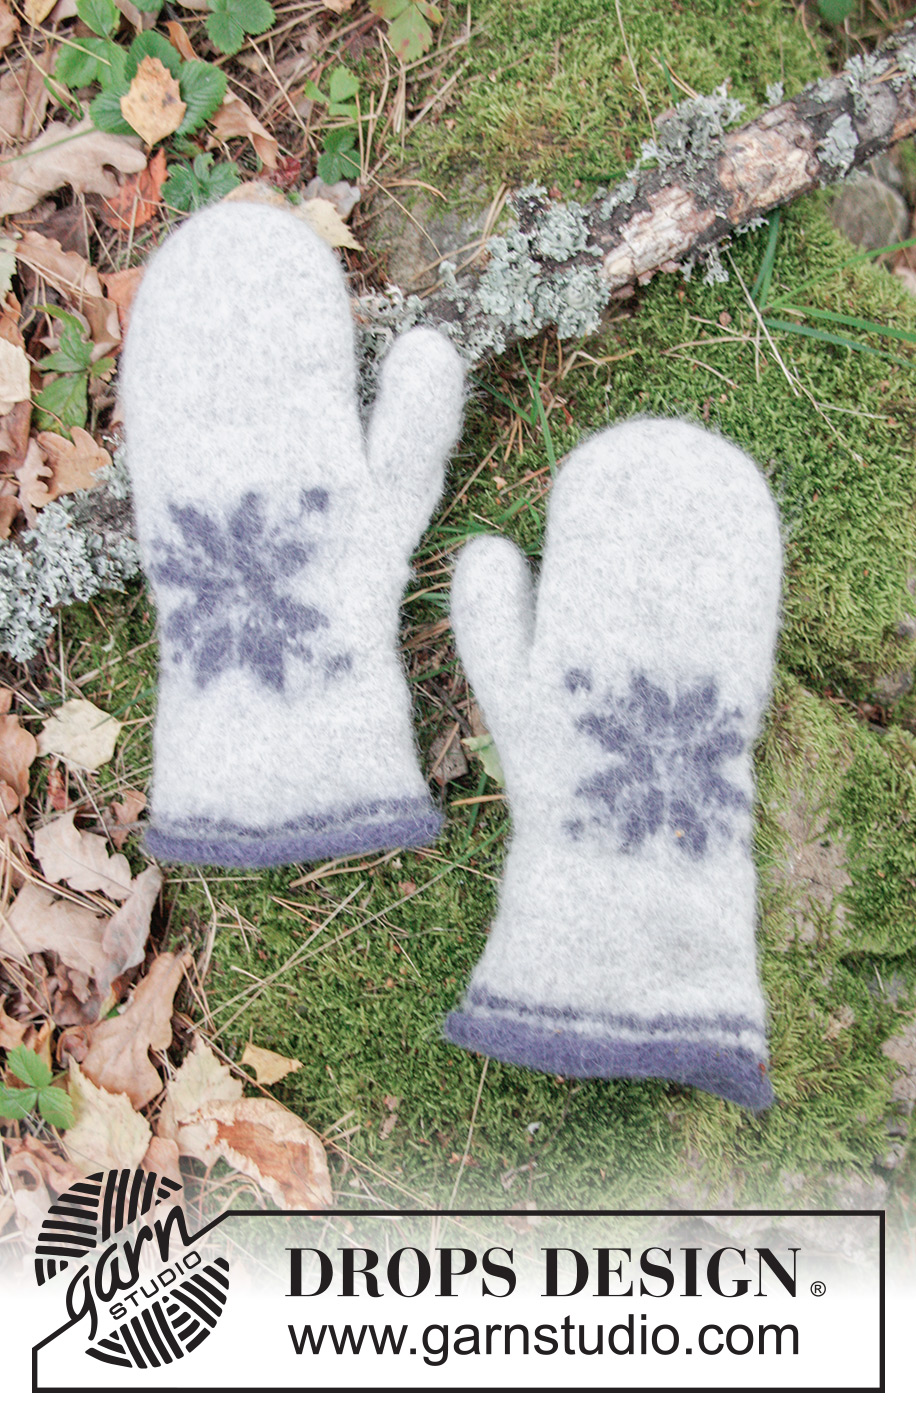
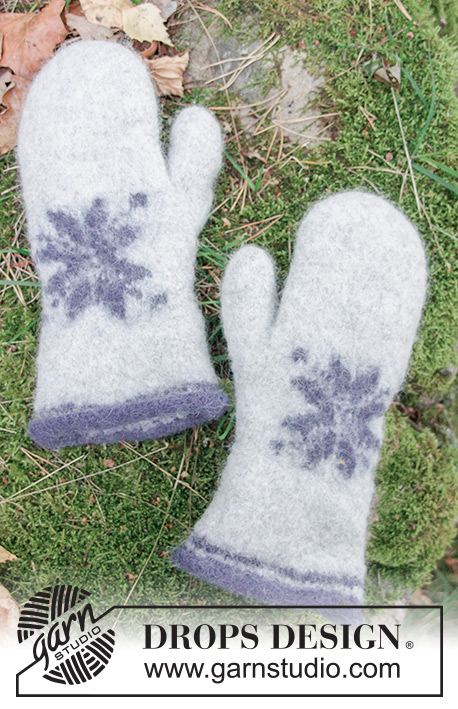
Felted mittens with star for Christmas. Piece is knitted in DROPS Lima.
DROPS Extra 0-1413 |
|||||||
|
INFORMATION FOR PATTERN: DECREASE TIP-1: To calculate how to decrease evenly, use the total number of stitches on row (e.g. 56 stitches) and divide stitches by number of decreases to be done (e.g. 4) = 14. In this example decrease by knitting every 13th and 14th stitch together. PATTERN: See diagram A.1. Work the entire pattern in stocking stitch. INCREASE TIP: Increase 1 stitch by working 2 stitches in same stitch. DECREASE TIP-2: Begin 2 stitches before stitch with marker, knit 2 together, knit stitch with marker, slip 1 stitch knitwise, knit 1, pass slipped stitch over stitch worked (= 2 stitches decreased). ---------------------------------------------------------- RIGHT MITTEN: Worked back and forth on circular needle until A.1 is done, then work the rest of mitten in the round in stocking stitch on double pointed needles. Cast on 56-56-62 stitches on circular needle size 4.5 mm with dark blue. Work 4 rows in stocking stitch back and forth. Switch to pearl grey and work 2 rows in stocking stitch while decreasing 4 stitches evenly on first row - read DECREASE TIP-1 = 52-52-58 stitches. Switch back to dark blue and work 2 rows in stocking stitch. Then work in stocking stitch and pearl grey - on first row decrease 4 stitch evenly = 48-48-54 stitches. REMEMBER THE KNITTING TENSION! When piece measures 10-11-12 cm in all sizes, decrease 4-0-2 stitches evenly = 44-48-52 stitches. READ ALL OF THE FOLLOWING SECTION BEFORE CONTINUING! Insert 1 marker in 25th-27th-29th stitch on needle (= marks thumb increase). Work a star mid on top of hand as follows: Work 0-1-2 stitches with pearl grey, work A.1 (= 21 stitches), and work with pearl grey the rest of row. Continue A.1 like this. AT THE SAME TIME increase 1 stitch on each side of stitch with marker - read INCREASE TIP (= 2 stitches increased). Increase like this outside the increased stitches every 4th row (i.e. on every other row from right side) 6-7-8 times in total = 56-62-68 stitches. After last increase slip the increased stitches + stitch with marker + 1 stitch on each side of these stitches on a stitch holder for thumb (A.1 should now be done) = 15-17-19 thumb stitches on stitch holder. Piece measures approx. 20-22-23 cm. Switch to double pointed needles size 4.5 mm. Then work mitten in the round on double pointed needles with stocking stitch and pearl grey until finished measurements. AT THE SAME TIME on first round when working in the round, cast on 3 new stitches on needle over stitches on stitch holder (= behind thumb) = 44-48-52 stitches. When piece measures 13-13-12 cm from stitches cast on behind thumb, insert 2 markers as follows: Insert 1 marker in first stitch on round and 1 marker in 23rd-25th-27th stitch on round. On next round decrease 1 stitch on both each side of both markers – read DECREASE TIP-2 (= 4 stitches decreased). Decrease like this every other round a total of 4-5-6 times and then on every round a total of 4 times in all sizes = 12 stitches remain in all sizes. Cut the yarn and pull it through the remaining stitches, tighten together and fasten. THUMB: Work the thumb with pearl grey. Slip the 15-17-19 thumb stitches on double pointed needles size 4.5 mm, pick in addition up 1 stitch in each of the 3 stitches cast on behind thumb = 18-20-22 stitches. Work in stocking stitch in the round. When thumb measures approx. 6-6½-7 cm decrease 2 stitches evenly = 16-18-20 stitches. Knit 3 rounds. On next round decrease 6-8-8 stitches evenly = 10-10-12 stitches. When thumb measures 7½-8-8½ cm, knit all stitches together two by two = 5-5-6 stitches. Cut the yarn and pull it through the remaining stitches, tighten together and fasten. LEFT MITTEN: Cast on and work as right mitten but reversed. I.e. increase for thumb on each side of the 20th-22nd-24th stitch on round and when working star mid on top of hand, work as follows: Work 22-24-26 stitches with pearl grey, work A.1 (= 21 stitches), and work 0-1-2 stitches with pearl grey. THUMB: Work thumb the same way as on right mitten. ASSEMBLY: Sew the opening along the edge of mittens - sew edge to edge in outer loop of edge stitch so that the seam is flat (sew with pearl grey). FELTING: To avoid the thumb being felted to the mitten, turn it inside out and fasten a small plastic bag/silk ribbon over the top of the thumb with a safety pin. The opening of the safety pin should point towards the tip of the thumb so it is easy to remove after felting. Turn the mitten back to the right side, with the bag/ribbon inside the thumb. The piece can be felted either in the washing machine or the tumble dryer – read description below. Remember: Subsequent washes are as for a normal wool garment. IN WASHING MACHINE: Washing machines will vary when felting. If the piece is not felted enough, it can be felted again. If it is felted too much, it can be stretched to the correct size while still wet. DO THE FOLLOWING: Lay the piece in the washing machine and use a programme of approx. 40 minutes (not a wool programme). Wash at 40 degrees without pre-wash, detergent is optional. After washing, shape the piece while it is still wet. IN TUMBLE DRYER: Felting in a tumble dryer gives good control over the degree of felting. The tumble dryer can be opened during drying to check the size of the piece. If it is not felted enough it can be thoroughly wetted and felted again. If it is felted too much it can be stretched to the correct size while still wet. DO THE FOLLOWING: Lay the piece in water so it becomes completely wet, then place it in the tumble dryer and begin the drying process. Dry to the desired size, checking regularly. |
|||||||
Diagram explanations |
|||||||
|
|||||||
 |
|||||||
Have you finished this pattern?Tag your pictures with #dropspattern #icypawsmittens or submit them to the #dropsfan gallery. Do you need help with this pattern?You'll find 24 tutorial videos, a Comments/Questions area and more by visiting the pattern on garnstudio.com. © 1982-2026 DROPS Design A/S. We reserve all rights. This document, including all its sub-sections, has copyrights. Read more about what you can do with our patterns at the bottom of each pattern on our site. |
|||||||


With over 40 years in knitting and crochet design, DROPS Design offers one of the most extensive collections of free patterns on the internet - translated to 17 languages. As of today we count 324 catalogues and 12260 patterns translated into English (UK/cm). 12260
We work hard to bring you the best knitting and crochet have to offer, inspiration and advice as well as great quality yarns at incredible prices! Would you like to use our patterns for other than personal use? You can read what you are allowed to do in the Copyright text at the bottom of all our patterns. Happy crafting!
Post a comment to pattern DROPS Extra 0-1413
We would love to hear what you have to say about this pattern!
If you want to leave a question, please make sure you select the correct category in the form below, to speed up the answering process. Required fields are marked *.