
Popular categories
Looking for a yarn?


Comments / Questions (203)
![]() Ana Portela wrote:
Ana Portela wrote:
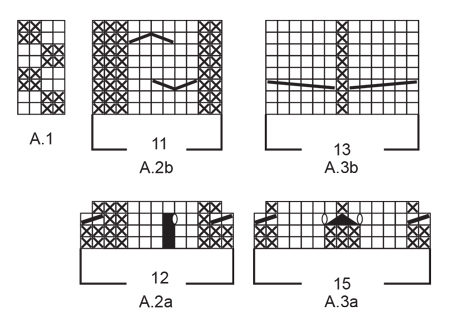
Then work rib as follows: * A.2a (= 12 sts), A.3a (= 15 sts), A.4a (= 9 sts), P 1, (K 3/P 3), repeat from (-) 6-6-7-7-8-8 times in total, K 3, P 1, A.5a (= 9 sts), A.3a, A.6a (= 12 sts), (K 3/P 3), repeat from (-) 3-4-4-6-7-10 times in total, K 3 *, repeat from *-* 1 more time on round. Repeat the first 2 round in diagram and work K over K and P over P the remaining sts until 12 rounds have been wo Can you explain me this? I thought the rib was p2 k2.
05.05.2020 - 22:45DROPS Design answered:
Dear Mrs Portela, repeat the 2 rows of the diagrams a total of 6 times in height (= you will have a total of 12 rows), while you will work the other stitches K over K and P over P as explained here. Rib are not K2/P2 all the round, rib will be worked either K3/P3 or as shown in the diagrams. Happy knitting!
06.05.2020 - 10:26
![]() Lidia wrote:
Lidia wrote:
Buongiorno, una domanda sulla parte dell'alzata del collo. Perchè se le diminuzioni sono da fare solo sul diritto del lavoro, tra un rovescio e il diritto successivo il numero di maglie da lavorare diminuisce? Ad esempio, nel ferro 2 si lavorano 81 maglie ma al ferro 3 se ne lavorano 78. Grazie
09.04.2020 - 15:39DROPS Design answered:
Buongiorno Lidia. Si lavora un numero inferiore di maglie ad ogni ferro per creare l'alzata sul dietro del collo (sono dei ferri accorciati). Le 8 maglie da diminuire, sono quelle che vanno diminuite sul diritto del lavoro, come indicato nel paragrafo apposta. Buon lavoro!
09.04.2020 - 17:09
![]() Lorene wrote:
Lorene wrote:
The turns in the neck area created holes. How do you get rid of them just below the neck rib???
28.03.2020 - 11:50DROPS Design answered:
Dear Lorene, see here how to knit the elevation - you can work the short rows with the wrap method: from the right side - with knit stitches/ from the wrong side, with purl stitches. Happy knitting!
30.03.2020 - 12:10
![]() Alma wrote:
Alma wrote:
Quand je fais les diminutions raglan devant et derrière c est bien une seule diminution sur chaque côté? Et on décide comment si on les fait plus sur la droite ou plus sur la gauche de l ouvrage? Et ensuite dans les diminutions raglan il y a écrit de faire avant et après le marqueur? Mais quel marqueur ?car moi je n’au que ceux qui séparent les manches du dos/devant...merci pour votre aide
04.03.2020 - 21:32DROPS Design answered:
Bonjour Alma, vous diminuez effectivement 1 maille au début du dos/devant/des manches et 1 maille à la fin du dos/devant/des manches, vous devez toujours avoir 2 mailles endroit (avec le marqueur au milieu) pour les lignes des raglans. Vous ne diminuez toutefois pas au même rythme sur le dos/le devant et les manches, par ex on commence par diminuer pour le dos et le devant tous les 2 tours alors qu'on ne diminuera sur les manches que tous les 4 tours, ainsi on aura 1 tour avec 4 diminutions (dos + devant) et 1 tour avec 8 diminutions (= dos, devant et manches). Bon tricot!
05.03.2020 - 10:17
![]() Lorene wrote:
Lorene wrote:
Raglan decrease. Confused on both sleeve and yoke. Is this correct decrease interpretation using S size? Yoke: R1: 17 R2: 22 R3: 17 R4: 22, etc. Sleeve: R1: 0 R2: 25 R3:0 R4: 3 R5: 0 R6: 25 R7: 0 R8: 3 The dec in the raglan sleeves at the marker is counted as part of the above. Total rounds done with raglan decrease is 8. Is the above correct?
21.02.2020 - 16:27DROPS Design answered:
Dear Lorene, in size S you will decrease for raglan: on body every other round a total of 17 times than every round a total of 13 times and at the same time you will decrease on sleeves on every 4th round a total of 4 times and on every other round a total of 16 times. Ie you will sometimes decrease 8 stitches (= body and sleeves) and sometimes decrease only 4 sts (body only). Happy knitting!
24.02.2020 - 07:50
![]() Astrid wrote:
Astrid wrote:
Ik kom hier toch nog even op het antwoord terug. Waar het mij om gaat dat A2b en A6b toch hetzelfde beeld moeten geven en dat doet het niet als ik precies het telpatroon volg. Ook bij de hieronder 'Van de #dropsfan gallery' zie je dat de kabel bij A2b ahw naar binnen loopt en bij A6b ahw naar buiten loopt. En dat is iets wat ik in ieder geval niet wil. Ik had er inmiddels voor gekozen om de kabel ahw naar buiten te laten lopen; dat geeft een rustig beeld.
21.02.2020 - 09:32
![]() Brigitte wrote:
Brigitte wrote:
Hi, Im up to the final part of the yoke where you have decreased and are moving the marker. The instructions are so confusions could you please explain them
07.02.2020 - 05:38DROPS Design answered:
Dear Brigitte, you will now work the raglan decreases as explained under RAGLAN but these decrease will be worked on a different rythm on body and on sleeves, ie you will decrease either 8 stitches (body and sleeve) or only 4 stitches (only body when dec every other round while dec every 4th round on sleeve). Happy knitting!
07.02.2020 - 08:01
![]() Astrid wrote:
Astrid wrote:
Ik brei nu A2b in de derde naald als volgt: zet 2 st op kabelnaald en houd deze ACHTER het werk, etc En de zevende naald brei je de kabel als colgt: zet 2 st op kabelnaald en houd deze VOOR het werk, etc. Dan krijg je symmetrie tov het midden ;-)
03.02.2020 - 14:17
![]() Astrid wrote:
Astrid wrote:
A2b en A6b zouden toch eigenlijk in spiegelbeeld moeten zijn? Als je precies breit zoals het bij de telpatronen staat klopt het niet. Ik denk dat de tekens voor de kabeltjes onjuist getekend zijn. Heel graag spoedig antwoord, want ik ben bezig met breien.
03.02.2020 - 12:01DROPS Design answered:
Dag Astrid,
Als ik de teltekening vergelijk met de foto dan komt in ieder geval A.6a overeen met hoe het op de foto is. A.2a is helaas niet te zien op de foto, maar hierbij loopt de vlecht a.h.w. naar binnen toe,
20.02.2020 - 20:20
![]() Claudia wrote:
Claudia wrote:
Chiedo scusa, ma se ho capito bene nella taglia s al secondo ferro diminuisco solo dal lato dav/dietro del marker e non lato manica, mentre invece al 4° giro diminuisco da entrambe i lati del marker. io pensavo si dovesse sempre dim.maglie sia da un lato che dall'altro del segnapunti , per questo non mi quadrava. grazie
23.01.2020 - 14:55DROPS Design answered:
Buongiorno Claudia. Ha capito correttamente. Sul davanti e sul dietro deve inizialmente diminuire un giro sì e uno no (per 17 volte) e poi ad ogni giro (per 13 volte); sulle maniche diminuisce un giro sì e tre giri no (per 4 volte ) e poi un giro sì e uno no (per 16 volte). Quindi non sempre, sullo stesso giro, diminuisce sia per il davanti/dietro che per le maniche. Buon lavoro!
23.01.2020 - 15:27
|
|||||||||||||||||||||||||||||||
The Rower#therowersweater |
|||||||||||||||||||||||||||||||
 |
 |
||||||||||||||||||||||||||||||
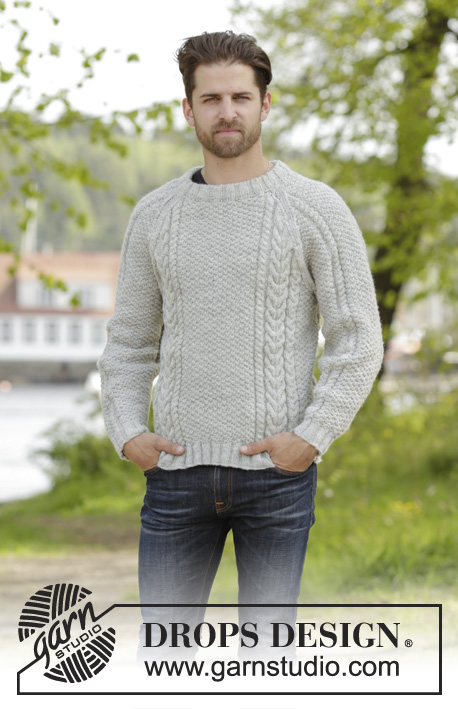
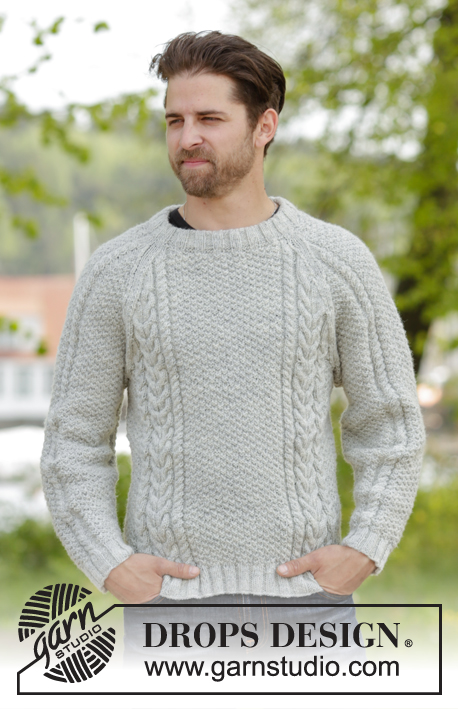
Knitted DROPS men’s jumper with cables, raglan and folding edge at the neck in Karisma. Size: S - XXXL.
DROPS 174-15 |
|||||||||||||||||||||||||||||||
|
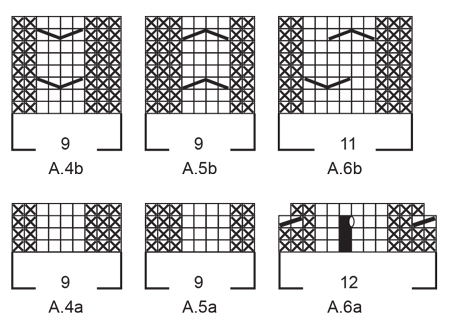
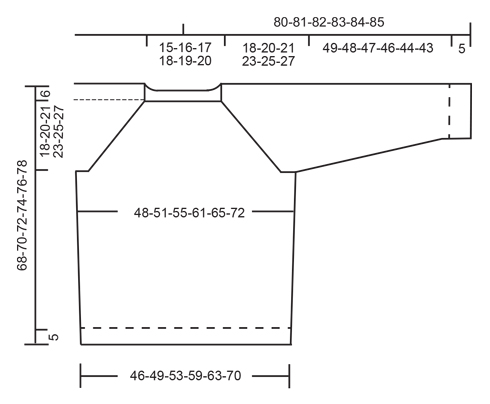
PATTERN: See diagrams A.1 to A.6. INCREASE TIP: Work until 1 st remains before marker, 1 YO, work next 2 (marker is between these sts), 1 YO. On next round work YOs twisted. Work the new sts into the pattern. DECREASE TIP 1 (applies to rib): When dec sts in rib, dec evenly by P 2 tog over sections with P in rib. DECREASE TIP 2 (applies to elevation): All dec are done from RS! Work until 4 sts remain before marker, work the next 3 K tog (= 2 sts dec), work the next 2 K (marker is in the middle of these sts), work the next 3 K twisted tog (= 2 sts dec). Repeat at the other marker. RAGLAN: Dec as follows before marker: Work until 3 sts remain before marker, K 2 tog, K 1 (marker is here). Dec as follows after marker: K 1, slip 1 st as if to K, K 1, psso NOTE: When dec sts in stocking st in diagram A.2, A.3, A.4, A.5 and A.6 (i.e. there is not enough sts for cable), continue with K over K and P over P until all sts in diagram have been dec. ---------------------------------------------------------- JUMPER: Worked in the round. BODY: Cast on 268-280-292-316-340-376 sts with Karisma on circular needle size 3.5 mm. K 1 round. Then work rib as follows: * A.2a (= 12 sts), A.3a (= 15 sts), A.4a (= 9 sts), P 1, (K 3/P 3), repeat from (-) 6-6-7-7-8-8 times in total, K 3, P 1, A.5a (= 9 sts), A.3a, A.6a (= 12 sts), (K 3/P 3), repeat from (-) 3-4-4-6-7-10 times in total, K 3 *, repeat from *-* 1 more time on round. Repeat the first 2 round in diagram and work K over K and P over P the remaining sts until 12 rounds have been worked in total. Now work as follows: * Work 3rd round in diagram over the first 36 sts, the work rib as before over the next 41-41-47-47-53-53 sts AT THE SAME TIME dec 11-7-9-9-11-11 sts evenly - READ DECREASE TIP 1, work 3rd round over the next 36 sts, then work rib as before over the next 21-27-27-39-45-63 sts AT THE SAME TIME dec 7-9-5-5-7-9 sts evenly *, repeat from *-* 1 more time on round = 220-236-252-276-292-324 sts. Work last round in diagram A.2a to A.6.a and K over K and P over P over the remaining sts in rib. Rib measures approx. 5 cm. Switch to circular needle size 4 mm. Now work pattern as follows: * Work A.2b (= 11 sts), A.3b (= 13 sts), A.4b (= 9 sts), work A.1 over the next 28-32-36-36-40-40 sts, work the first 2 sts in A.1, A.5b (= 9 sts), A.3b (= 13 sts), A.6b (= 11 sts), work A.1 over the next 12-16-20-32-36-52 sts, work the first 2 sts in A.1 *, repeat from *-* 1 more time. Continue pattern like this in the round. REMEMBER THE KNITTING TENSION When piece measures 15-15-16-16-17-17 cm, insert 2 markers in piece as follows: Insert 1st marker after 103-109-115-121-127-135 sts and 2nd marker 7-9-11-17-19-27 sts before end of round (= 110-118-126-138-146-162 sts between each of the markers). On next round inc 1 st in each side of marker in each side - Read INCREASE TIP! Repeat inc when piece measures 26-27-27-28-28-29 cm = 228-244-260-284-300-332 sts. When piece measures 44-44-45-45-45-45 cm, work as follows: Work until 5 sts remain before 1st marker, cast off the next 10 sts for armhole (= 5 sts on each side of marker), work until 5 sts remain before 2nd marker, cast off the next 10 sts for armhole (= 5 sts on each side of marker), work the remaining sts on round. There are 104-112-120-132-140-156 sts for both front and back piece. Put piece aside and knit the sleeves. SLEEVES: Worked in the round on double pointed needles/circular needle. Cast on 60-60-66-66-66-72 sts with Karisma on double pointed needles size 3.5 mm. Work rib as follows: K 3, (P 3, K 3) repeat from (-) 3-3-4-4-4-5 times in total, A.4a (= 9 sts), K 3, (P 3, K 3), repeat from (-) 3 times in total for all sizes, A.5a (= 9 sts). Continue like this and repeat the first 2 rounds in diagram until 12 rounds have been worked. Now work from the 3rd round in diagram as follows: Work rib as before over the first 21-21-27-27-27-33 sts AT THE SAME TIME dec 3-3-5-5-5-7 sts evenly, continue over A.4a as before, work rib as before over the next 21 sts AT THE SAME TIME dec 3 sts evenly in all sizes = 54-54-58-58-58-62 sts. Work last round in diagram A.4a to A.5.a and K over K and P over P over the remaining sts. Now continue as follows: K the first 9-9-11-11-11-13 sts, insert a marker here (= mid under sleeve). NOTE: This is done to re-place the start of round. The round starts here now. Change to double pointed needles size 4 mm. Work the last 3-3-1-1-1-3 sts in diagram A.1, then work entire A.1 1-1-2-2-2-2 times in width, work the first 2 sts in A.1, A.4b, work A.1 over the next 18 sts, A.5b, work A.1 2-2-2-2-2-3 times in width and finish with the first 1-1-3-3-3-1 st in A.1. Continue pattern in the round like this. When piece measures 7 cm in all sizes, beg inc under sleeve. READ INCREASE TIP. Inc like this every 12th-9th-9th-7th-6th-6th round 11-5-5-17-15-15 times and every 0-8th-8th-0-5th-5th round 0-10-10-0-4-4 times (= 11-15-15-17-19-19 times in total) = 76-84-88-92-96-100 sts. When piece measures 54-53-52-51-49-48 cm (NOTE: shorter measurements in the larger sizes because of longer yoke), cast off 10 sts mid under sleeve (= 5 sts on each side of marker) = 66-74-78-82-86-90 sts. Knit another sleeve the same way. YOKE: Slip sleeves on to same circular needle size 4 mm as body where armholes were cast off (without working them first) = 340-372-396-428-452-492 sts. Insert 1 marker in every transition between sleeves and body = 4 markers. Continue pattern as before but now work 4 K over every transition between body and sleeves (= 2 K on each side of markers). NOTE: Beg of round is at marker in transition between right sleeve and back piece. AT THE SAME TIME on first round, beg dec for RAGLAN – see explanation above! NOTE: Dec differently on body and sleeves. RAGLAN BODY: Dec like this every other round 17-20-20-22-25-26 times and every round 13-13-15-17-17-22 times (= 30-33-35-39-42-48 times in total). RAGLAN SLEEVES: Dec like this every 4th round 4-3-2-3-4-5 times and every other round 16-21-24-25-26-27 times (= 20-24-26-28-30-32 times in total). When all dec for raglan are done, 140-144-152-160-164-172 sts remain. Work 1 round with pattern as before but finish when 24 sts remain on round in all sizes (= after 2 sts after marker between front piece and right sleeve). Insert a marker here. This is now beg of round. Now work an elevation back and forth in the back of neck as follows: NOTE: Continue with pattern as before and now dec 2 sts on each side of marker in transition between sleeves and back piece (= 8 sts dec on row from RS) - READ DECREASE TIP 2! AT THE SAME TIME work back and forth as follows: ROW 1 (= RS): Work 92-94-98-102-104-108 sts (including the 8 dec sts), ROW 2 (= WS): Turn and work 81-83-87-91-93-97 sts, ROW 3: Turn and work 78-80-84-88-90-94 sts (including the 8 dec sts), ROW 4: Turn and work 67-69-73-77-79-83 sts, ROW 5: Turn and work 64-66-70-74-76-80 sts (including the 8 dec sts), ROW 6: Turn and work 53-55-59-63-65-69 sts, ROW 7: Turn and work 50-52-56-60-62-66 sts (including the 8 dec sts), ROW 8: Turn and work back to marker (= beg of round). 32 sts have been dec in total in elevation and 108-112-120-128-132-140 sts remain on round. Switch to circular needle size 3.5 mm. Now work 1 round K as follows: Work the first 14 sts and inc 1 st (= sleeve), work the next 4 sts, then work the next 24-26-30-34-36-40 sts (= back piece) while inc 3-1-3-5-3-5 sts evenly, work the next 4 sts, work the next 14 sts and inc 1 st (= sleeve), work the next 4 sts, work the next 40-42-46-50-52-56 sts (= front piece) while dec 1-3-1-5-1-5 sts evenly, work the remaining 4 sts = 112-112-124-130-136-142 sts. Now work rib as follows: P 3, K 3, P 3, K 3, P 3, K 4, (P 3, K 3), repeat from (-) 4-4-5-6-6-7 times in total, P 3, K 4, P 3, K 3, P 3, K 3, P 3, K 4, (P 3, K 3), repeat from (-) 6-6-7-7-8-8 times, P 3, K 4. Continue in the round with K over K and P over P until rib measures 7 cm. Loosely cast off. ASSEMBLY: Sew the openings under the sleeves. Fold rib at the top of neck down on inside of garment. Fasten rib to get a folding edge, make sure to avoid a tight edge. |
|||||||||||||||||||||||||||||||
Diagram explanations |
|||||||||||||||||||||||||||||||
|
|||||||||||||||||||||||||||||||
 |
|||||||||||||||||||||||||||||||
 |
|||||||||||||||||||||||||||||||
 |
|||||||||||||||||||||||||||||||
Have you finished this pattern?Tag your pictures with #dropspattern #therowersweater or submit them to the #dropsfan gallery. Do you need help with this pattern?You'll find 34 tutorial videos, a Comments/Questions area and more by visiting the pattern on garnstudio.com. © 1982-2026 DROPS Design A/S. We reserve all rights. This document, including all its sub-sections, has copyrights. Read more about what you can do with our patterns at the bottom of each pattern on our site. |
|||||||||||||||||||||||||||||||


With over 40 years in knitting and crochet design, DROPS Design offers one of the most extensive collections of free patterns on the internet - translated to 17 languages. As of today we count 324 catalogues and 12245 patterns translated into English (UK/cm). 12245
We work hard to bring you the best knitting and crochet have to offer, inspiration and advice as well as great quality yarns at incredible prices! Would you like to use our patterns for other than personal use? You can read what you are allowed to do in the Copyright text at the bottom of all our patterns. Happy crafting!
Post a comment to pattern DROPS 174-15
We would love to hear what you have to say about this pattern!
If you want to leave a question, please make sure you select the correct category in the form below, to speed up the answering process. Required fields are marked *.