
Popular categories
Looking for a yarn?


Comments / Questions (65)
![]() Marie-Laure wrote:
Marie-Laure wrote:
N'ayant pas reçu de réponse, je pense que je vais essayer d'utiliser des aiguilles circulaires ;-) Dommage, c'était l'occasion pour moi d'apprendre à tricoter avec les aiguilles double pointes. Merci et bonne journée.
08.04.2020 - 14:32DROPS Design answered:
Bonjour Marie-Laure, désolée pour la réponse tardive, rappelez-vous toujours que vous pouvez toujours consulter notre base de données de leçons et vidéos pour vous aider, et également contacter votre magasin DROPS, même par mail ou téléphone pour toute assistance complémentaire. Bon tricot!
09.04.2020 - 16:48
![]() Marie-Laure wrote:
Marie-Laure wrote:
Bonjour, Je tricote le pull Carter. J'ai fini le devant et le dos. Je suis sur le point de reprendre les manches qui sont sur des arrêts de mailles (grosses épingles à nourrices). Je n'ai jamais tricoté avec des aiguilles à doubles pointes (seul. circulaires). J'ai regardé votre vidéo mais je ne sais pas comment m'y prendre pour les relever (combien de mailles par aiguille etc.) et monter les 8 nouvelles mailles sous la manche. Pourriez-vous m'expliquer svp ? Merci d'avance.
04.04.2020 - 16:35DROPS Design answered:
Bonjour Marie-Laure, cette leçon montre comment tricoter les manches (à partir du point 17). Vous pouvez utiliser une petite aiguille circulaire (comme dans la leçon) ou bien des aiguilles doubles pointes (cf à partir du time code 09:39 dans cette vidéo d'un pull tricoté de haut en bas). Bon tricot!
09.04.2020 - 13:18
![]() Fatmé Marquise wrote:
Fatmé Marquise wrote:
Hello ,,, for the body decreases after 4 cm ; the second decrease is after 14 cm +the 4 cm that means 18 cm or the 4cm is not included ,,, I’m a bit confused... please help me .. thank you .
02.04.2020 - 20:52DROPS Design answered:
Dear Mrs Marquise, the first decrease on body will be worked after 4 cm from the division and the next decreased after 14 more cm, ie 18 cm from the division, and the next one after 14 more cm ie 32 cm after division. Happy knitting!
03.04.2020 - 07:43
![]() Marie-Laure wrote:
Marie-Laure wrote:
Bonjour, J'ai commencé à tricoter le modèle Carter en taille S et je dois commencer à augmenter pour le raglan dos/devant. Selon les explications, il faut augmenter "0 fois au total tous les tours, puis 28 fois tous les 2 tours". Cela veut-il dire que je commence directement les 28 augmentations tous les 2 tours ? Merci d'avance pour vos éclaircissements.
25.08.2019 - 20:20DROPS Design answered:
Bonjour Marie-Laure! En taille S vous commencez directement par les 28 augmentations tous les 2 tours. Bon tricot!
26.08.2019 - 09:02
![]() Morgan wrote:
Morgan wrote:
Hej, Jag förstår inte hur jag ska sticka början på tröjan. Efter ökningen så skall det stickas både förhöjning i ryggen och som jag förstår det även ett antal hela varv. Som jag fattar det kommer förhöjningen rakt in i A.1. Ska jag sticka 8 m, vända, sticka 16 tilllbaka och sen vända och sticka ett helt varv med mönster och allt? Är det så jag ska tolka beskrivningen. Och hur många varv totalt skall stickas innan ökningen till raglan?
25.06.2019 - 01:20DROPS Design answered:
Hei Morgan. Du skal strikke dette samtidig. Etter omgangen med økinger strikkes forhøyning midt bak som forklart: strikk de første 8 maskene, snu og strikk 16 masker fra vrangen, snu og strikk 24 masker fra retten osv til du har strikket over 64 masker. Siden bakstykket kun går over 34-37-41-48-54-67 masker vil forhøyningen gå over deler av ermene (unntatt str XXXL), og raglanlinjene. Når du kommer dit, skal du strikke A.1 over raglanlinjene som forklart. Det kan lønne seg å sette merker ved hver A.1 så holder du lettere oversikt. Når forhøyningen er ferdig, strikkes over alle masker som forklart på starten. God fornøyelse
26.06.2019 - 08:32
![]() Barbara wrote:
Barbara wrote:
Buongiorno, ho ripreso le maglie lasciate in attesa delle maniche ma non riesco a capire come far scomparire il diagramma A1 sottomanica . In particolare: " proseguire con il diagramma A.1 come segue: aumentare facendo 1 m gettata prima del diagramma A.1 verso il centro della manica, lavorare 2 m insieme a dir dopo il diagramma A.1 verso il sotto manica (quindi le 8 nuove m avviate sotto la manica). In questo modo i diagrammi A.1 ai lati della manica, si uniscono e scompaiono nel sotto manica"
04.04.2019 - 08:05DROPS Design answered:
Buongiorno Barbara, deve lavorare come indicato: lavorando 2 maglie insieme dopo il diagramma A.1, e continuando con queste diminuzioni, il diagramma A. 1 scomparirà gradualmente. Buon lavoro!
04.04.2019 - 08:39
![]() Rossella wrote:
Rossella wrote:
Per gli aumenti per il raglan quando viene detto di aumentare ogni 2 giri significa fare un giro senza aumenti e il secondo giro aumentare o fare due giri senza aumenti e aumentare il terzo?
28.01.2019 - 20:47DROPS Design answered:
Buongiorno Rosella. Lavora un giro senza aumenti e al secondo giro aumenta. Buon lavoro!
28.01.2019 - 21:06
![]() Filippo wrote:
Filippo wrote:
Non riesco a trovare i ferri a doppia punta da 40 cm per fare le maniche, si possono usare quelli da 30 cm o altri tipi di ferri?
23.01.2019 - 22:24DROPS Design answered:
Buonasera Filippo. Può usare i ferri da 30 cm oppure anche ferri circolari. Buon lavoro!
23.01.2019 - 23:36
![]() Joe73 wrote:
Joe73 wrote:
Guten Tag, für die Ärmel : man macht Umschläge und Abnahmen „bis alle M von beiden A1 weg sind“ Dann steht „bei einer Länge von 4 cm beidseitig des Markierer je 1 M abnehmen“. Wenn ich alle M von A1 abgenommen habe, ist die Länge mehr als 4 cm. Muss ich beide Abnahmeprozesse gleichzeitig machen? Danke!
07.12.2018 - 13:02DROPS Design answered:
Liebe Joe73, auch wenn Sie mahr als 4 cm brauchen, um A.1 abzunehmen, beginnen Sie die Abnahmen für den Ärmel immer nach 4 cm, sonnst könnte die Ärmel zu breit sein. Viel Spaß beim stricken!
07.12.2018 - 14:36Edw wrote:
Bonjour, Je suis arrivée aux manches mais je ne comprends pas trop les explications des jetés et les 2 m ensembles afin que les A1 se rejoignent ... à quel moment faut il faire ça ? Il y a qu’un jeté et qune diminution (2 m ensembles) à faire (soit après et avantage les 8 m rajoutées ) ? Ou bien faut le faire entre chaque A1? Merci pour votre aide
06.10.2018 - 21:07DROPS Design answered:
Bonjour Edw, sous les manches, vous allez augmenter le nombre de mailles en jersey et diminuer le nombre de mailles tricotées dans A.1: faites 1 jeté avant le A.1 en fin de tour (= on augmente le nombre de m jersey), tricotez jusqu'à 2 m avant le marqueur, diminuez 1 m, marqueur, diminuez 1 m, tricotez les mailles restantes de A.1 et faites 1 jeté avant le jersey = vous augmentez 2 m par tour (côté jersey) et diminuez 2 m (celles de A.1, au milieu sous la manche). Bon tricot!
08.10.2018 - 08:42
|
|||||||
Carter |
|||||||
 |
 |
||||||
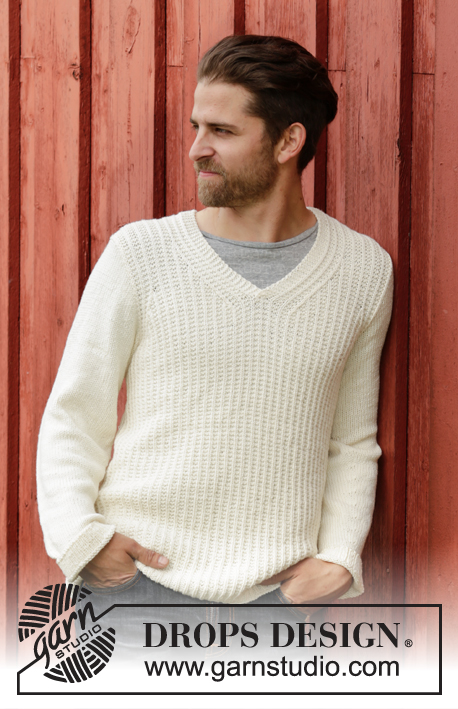
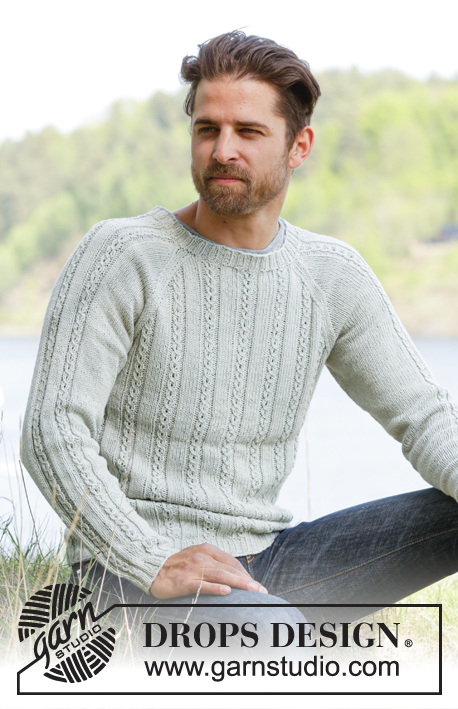
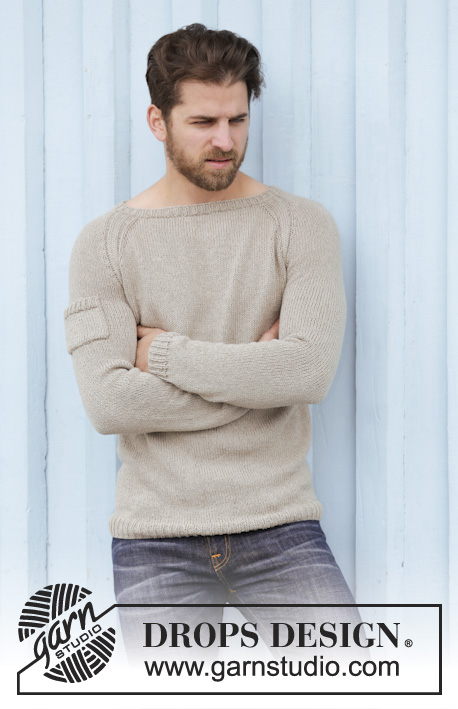
Men's knitted jumper in DROPS Belle, with raglan and worked top down. Size: S - XXXL.
DROPS Extra 0-1131 |
|||||||
|
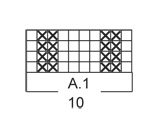
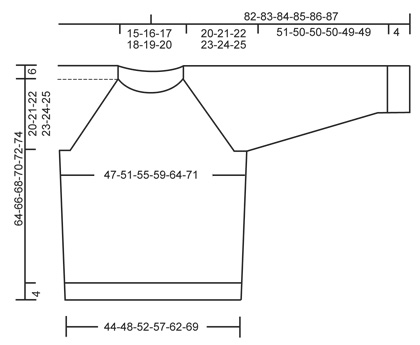
GARTER ST (back and forth): K all rows. 1 ridge = 2 rows K. RAGLAN: Inc for raglan by working a YO on each side of A.1 in every raglan. On next round K YOs twisted to avoid holes. PATTERN: See diagram A.1. DECREASE TIP: Dec 1 st before marker as follows: Work until 2 sts remain before marker, slip 1 st as if to K, K 1, psso. Dec 1 st after marker as follows: K 2 tog. ---------------------------------------------------------- JUMPER: Worked in the round on circular needle, top down. Cast on 114-117-120-123-126-129 sts on circular needle size 3.5 mm with Belle. K 1 round. Then work rib (= K 1/P 2). Switch to circular needle size 4 mm when piece measures 2 cm. Now continue piece in stocking st. On first round dec 18-17-16-15-14-13 sts evenly = 96-100-104-108-112-116 sts (this is done to give the garment better shape). On next round, inc 24-26-30-40-48-70 sts evenly = 120-126-134-148-160-186 sts. Insert 1 marker at beg of round = mid back. On next round work as follows from mid back: K 17-18-20-24-27-33 (= half back piece), A.1, K 6, A.1 (= sleeve), K 34-37-41-48-54-67 (= front piece), A.1, K 6, A.1 (= sleeve ), K 17-19-21-24-27-34 (= half back piece). Continue pattern like this while AT THE SAME TIME working an elevation in the back as follows: Work 8 sts past marker, turn, tighten yarn and work 16 sts back, turn, tighten yarn and work 24 sts, turn, continue to work 8 sts more for every turn until a total of 64 sts have been worked after last turn, turn and work 1 round over all sts until mid back again. On next round start inc for RAGLAN – see explanation above - NOTE: Inc differently on body and sleeves. REMEMBER THE KNITTING TENSION RAGLAN BODY: Inc every round 0-4-4-4-4-4 times in total, then every other round 28-27-29-30-32-33 times. There are 90-99-107-116-126-141 sts on front and back piece. RAGLAN SLEEVE: Inc every other round 16-19-21-22-24-27 times, then every 4th round 6-5-5-5-5-4 times. There are 70-74-78-80-84-88 sts for each sleeve. When all inc are done there are 320-346-370-392-420-458 sts on needle. On next round, work as follows: K 45-49-53-58-63-70, slip the next 70-74-78-80-84-88 sts on a stitch holder for sleeve, cast on 8 new sts under sleeve (insert a marker in the middle of these new sts), K 90-99-107-116-126-141, slip the next 70-74-78-80-84-88 sts on a stitch holder for sleeve, cast on 8 new sts under sleeve (insert a marker in the middle of these new sts), K 45-50-54-58-63-71 = 196-214-230-248-268-298 sts. NOW MEASURE PIECE FROM HERE! BODY: When piece measures 4 cm, dec 1 st on each side of markers in the side - READ DECREASE TIP (= 4 sts dec). Repeat dec every 14-14-14-30-30-30 cm 2-2-2-1-1-1 more times = 184-202-218-240-260-290 sts. When piece measures 42-43-44-45-46-47 cm, K 1 round while AT THE SAME TIME inc 20-17-16-15-16-13 sts evenly = 204-219-234-255-276-303 sts. Switch to circular needle size 3.5 mm. Work rib = K 1/P 2. When rib measures 4 cm, loosely cast off K over K and P over P. SLEEVE: Worked in the round on double pointed needles. Slip the 70-74-78-80-84-88 sts from stitch holder back on double pointed needles size 4 mm. Cast on 8 new sts under sleeve, insert 1 marker in the middle of the new sts = 78-82-86-88-92-96 sts. NOW MEASURE PIECE FROM HERE! Work in stocking st AT THE SAME TIME continue A.1 as follows: Inc 1 YO before A.1 up towards middle of sleeve, K 2 tog after A.1 towards under sleeve (i.e. the 8 new sts cast on under sleeve). This is done so that A.1 meets under sleeve and disappears, repeat dec every other round until all sts in both A.1 are gone. K YO twisted on next round, it should not make holes. When piece measures 4 cm, dec 1 st on each side of marker - READ DECREASE TIP. Repeat dec every 3½-3½-3-3-2½-2½ cm 11-12-13-13-14-15 more times = 54-56-58-60-62-64 sts. Work in stocking st until piece measures 51-50-50-50-49-49 cm. K 1 round while AT THE SAME TIME inc 6-4-5-3-4-2 sts evenly = 60-60-63-63-66-66 sts. Switch to double pointed needles size 3.5 mm and work rib = K 1/P 2. Cast off when piece measures 55-54-54-54-53-53 cm (shorter measurements in the larger sizes because of wider shoulders). Work the other sleeve the same way. POCKET: Cast on 23 sts (incl 1 edge st in each side) on double pointed needles size 4 mm with Belle. Continue in stocking st back and forth with 1 edge st in GARTER ST - see explanation above - in each side of piece. When piece measures 8 cm, adjust so that next row is from WS, inc 4 sts evenly from WS = 27 sts. Switch to double pointed needles size 3.5 mm and work as follows from RS: 1 edge st in garter st, rib = K 1/P 2 until 2 sts remain, finish with K 1 and 1 edge st in garter st. When piece measures 10 cm, cast off K over K and P over P. ASSEMBLY: Sew the openings under the sleeves. Sew the pocket on the left sleeve, approx 45 cm from cast off edge. |
|||||||
Diagram explanations |
|||||||
|
|||||||
 |
|||||||
 |
|||||||
Have you finished this pattern?Tag your pictures with #dropspattern or submit them to the #dropsfan gallery. Do you need help with this pattern?You'll find 25 tutorial videos, a Comments/Questions area and more by visiting the pattern on garnstudio.com. © 1982-2026 DROPS Design A/S. We reserve all rights. This document, including all its sub-sections, has copyrights. Read more about what you can do with our patterns at the bottom of each pattern on our site. |
|||||||


With over 40 years in knitting and crochet design, DROPS Design offers one of the most extensive collections of free patterns on the internet - translated to 17 languages. As of today we count 324 catalogues and 12245 patterns translated into English (UK/cm). 12245
We work hard to bring you the best knitting and crochet have to offer, inspiration and advice as well as great quality yarns at incredible prices! Would you like to use our patterns for other than personal use? You can read what you are allowed to do in the Copyright text at the bottom of all our patterns. Happy crafting!
Post a comment to pattern DROPS Extra 0-1131
We would love to hear what you have to say about this pattern!
If you want to leave a question, please make sure you select the correct category in the form below, to speed up the answering process. Required fields are marked *.