
Looking for a yarn?


Comments / Questions (27)
![]() Ina Van Velzen wrote:
Ina Van Velzen wrote:
Goedemiddag ,als ik drops 237-9 wil gaan breien op de magic loop manier brei je dan ook de voor en achterpand apart .? Blijft de totale uitleg van het patroon hetzelfde?. Evenveel steken opzetten? U begrijpt wel dat ik er moeite mee heb. Graag enig uitleg over bovenstaande. Met vriendelijke groet, ina.
22.09.2022 - 16:33DROPS Design answered:
Dag Ina,
De magic loop is een truucje wat je kunt gebruiken wanneer je rondbreinaald net iets te lang is voor de steken die je op de naald hebt. Er verandert verder niets aan het patroon.
24.09.2022 - 12:28
![]() Sandra Ring wrote:
Sandra Ring wrote:
Vielen Dank für diese schöne Anleitung! Leider sieht man auf den Fotos den Rippenbund nicht. Ich will es dennoch wagen und probiere erst mit anderer Wolle. Habe nur ein Problem mit den Diagrammen, da stehen keine Zahlen vor den Reihen und ich weiß nicht ob ich zb bei A1 10 oder 20 Reihen Bund stricke oder bei A3, ob ich 5 oder 10 Reihen bis zum nächsten Kreuzen stricke. Sind auf den Diagrammen nur die Hinreihen abgebildet? LG
18.09.2022 - 19:07DROPS Design answered:
Liebe Frau Ring, alle Reihen sind in den Diagrammen gezeichnet, dh 1 Kästchen = 1 Masche x 1 Reihe, so ist A.1 10 Reihen, A.2 8 Reihen, usw. Viel Spaß beim stricken!
19.09.2022 - 10:48
![]() Diana wrote:
Diana wrote:
Funktioniert es auch, wenn man an der Schulter normal abkettet ohne I-Cord-Rand?
07.09.2022 - 12:17DROPS Design answered:
Liebe Diana, wahrscheinlich, der I-Cord-Rand macht eine schöne Fertigstellung bei den Schultern - dieses Video zeigt, wie er gestrickt wird, es kann Ihnen sicher weiterhelfen. Viel Spaß beim stricken!
07.09.2022 - 13:19
![]() Timea wrote:
Timea wrote:
Maple hug
05.08.2022 - 15:49
![]() Kim Miller wrote:
Kim Miller wrote:
Cable me a honeycomb
04.08.2022 - 22:50
![]() Helen Balshen wrote:
Helen Balshen wrote:
Iced coffee
04.08.2022 - 22:11
![]() Eva wrote:
Eva wrote:
Maple waffle
04.08.2022 - 14:48
|
||||||||||||||||
Cracked Walnuts Short Sleeve#crackedwalnutsshortsleeve |
||||||||||||||||
 |
 |
|||||||||||||||
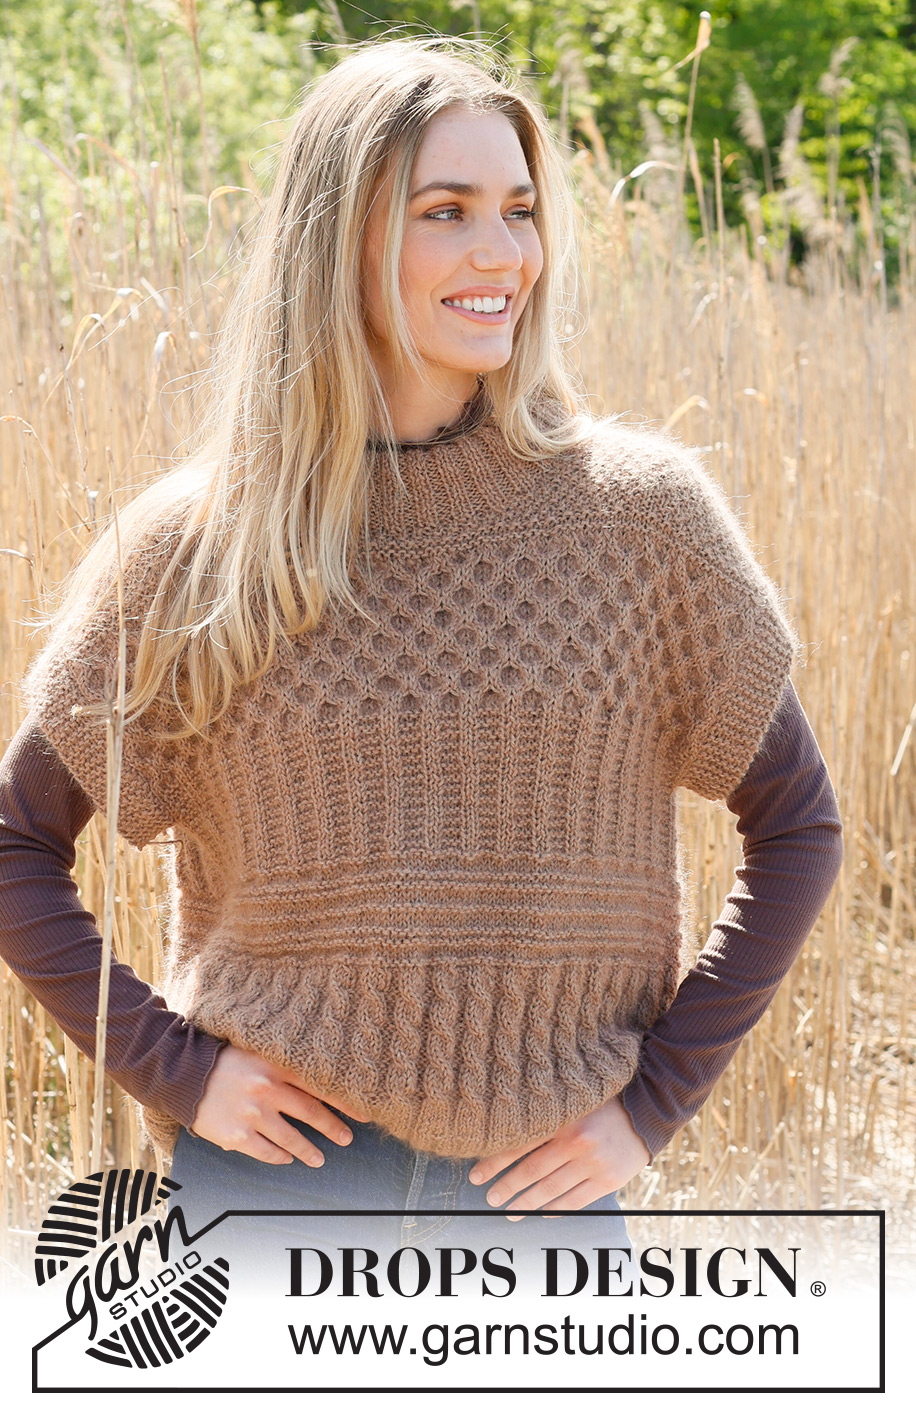
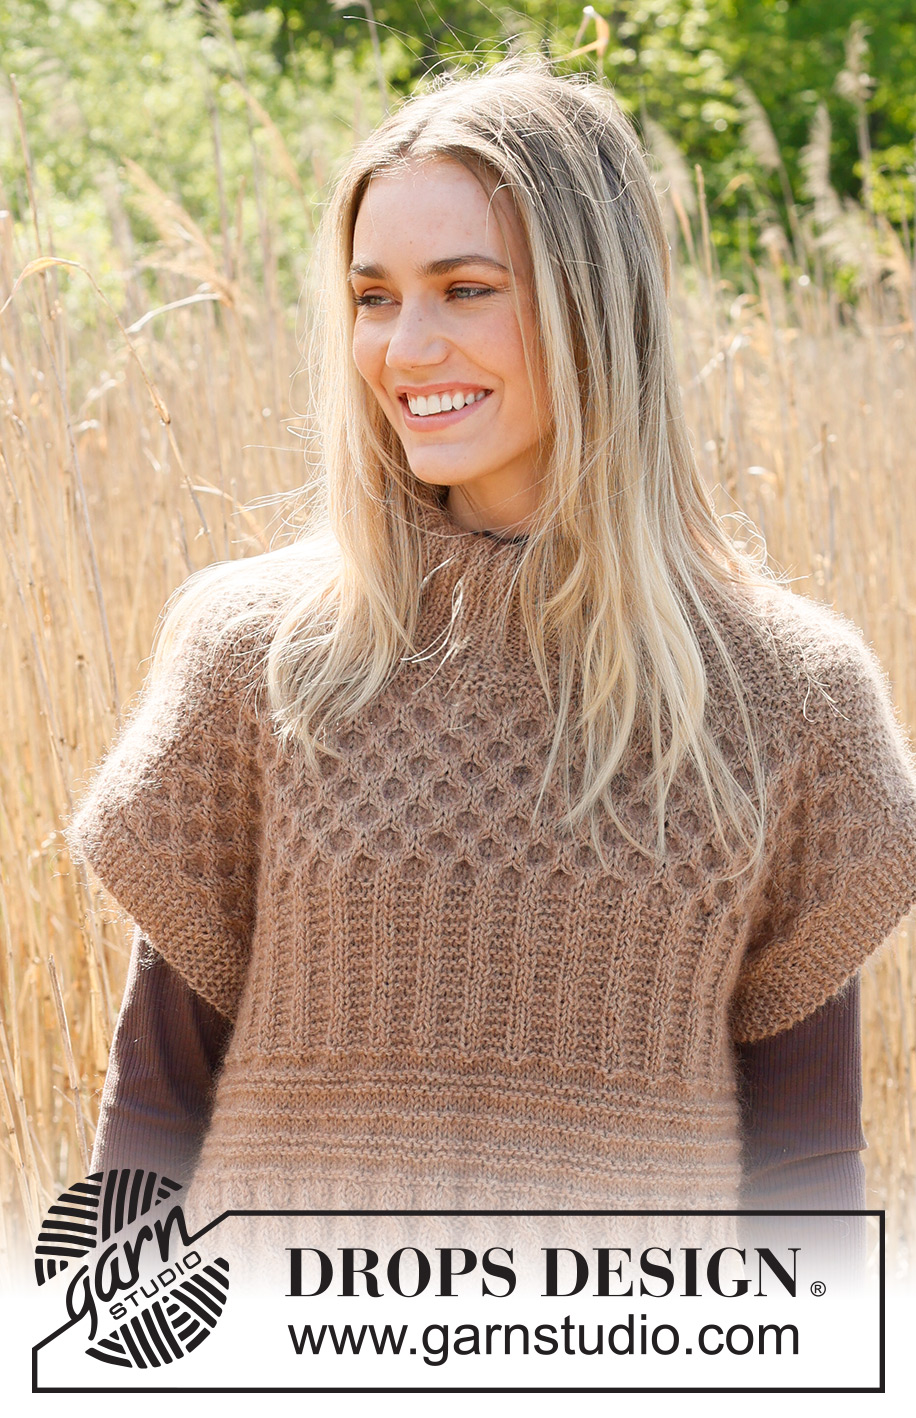
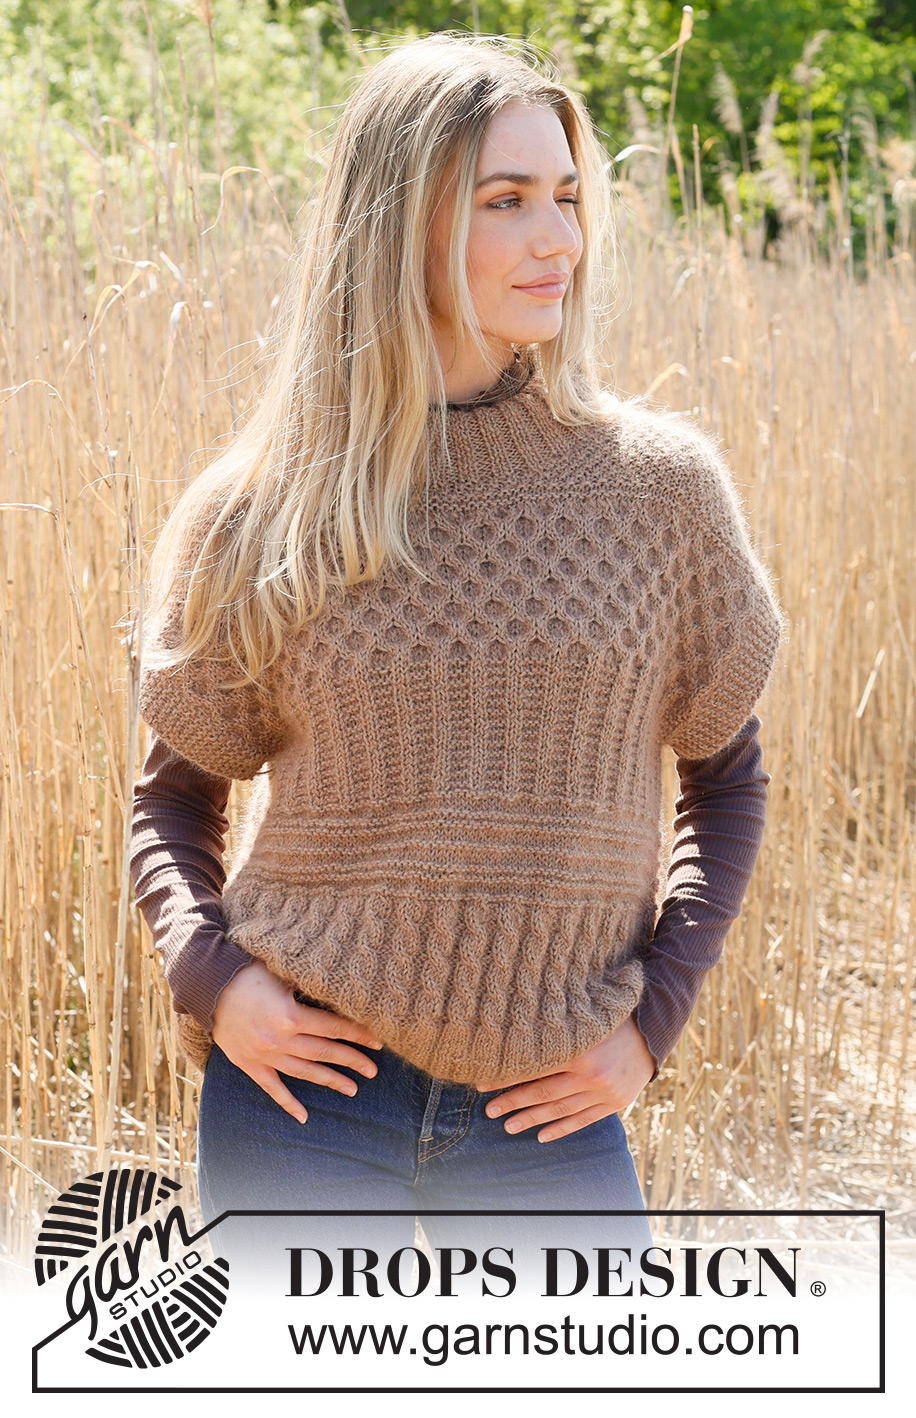
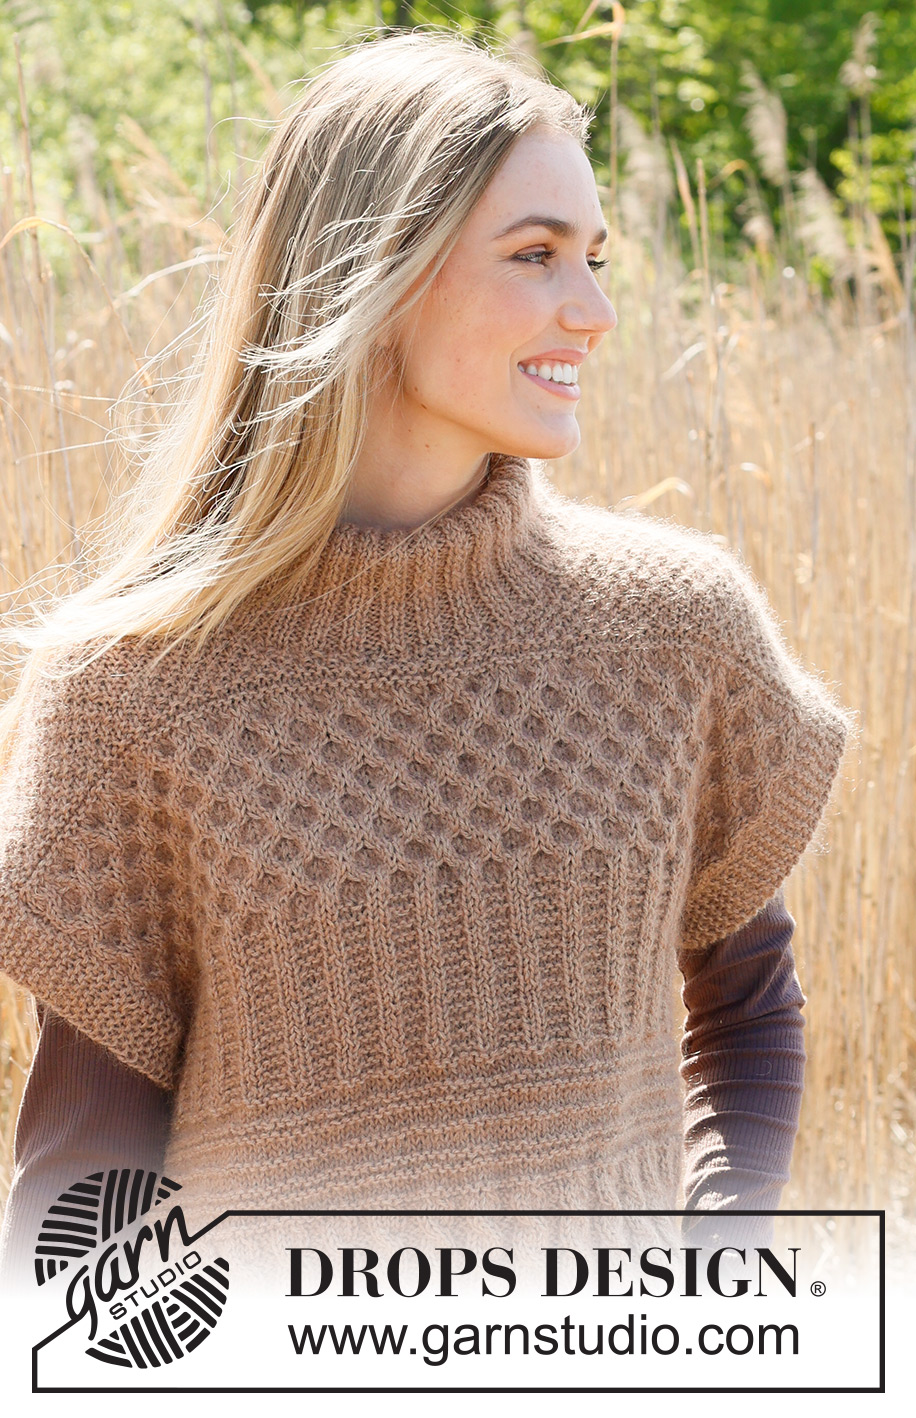
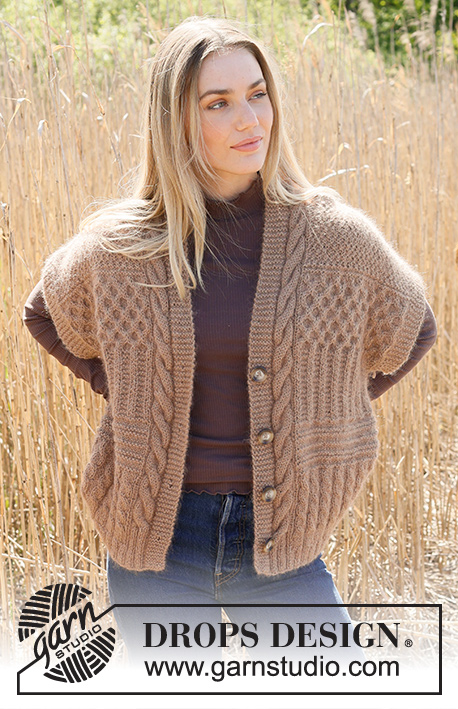
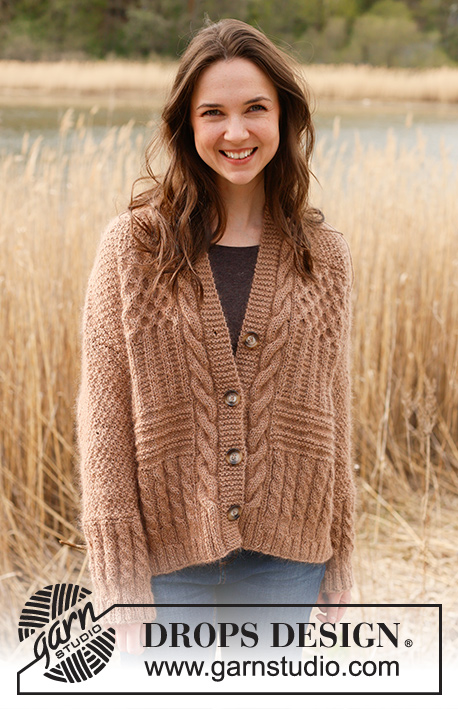
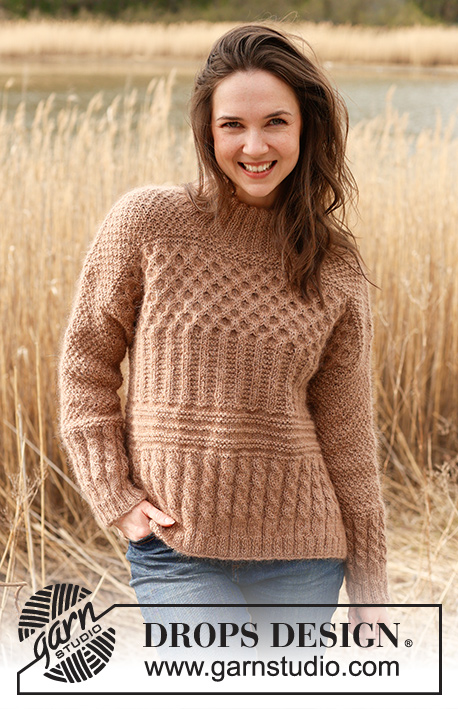
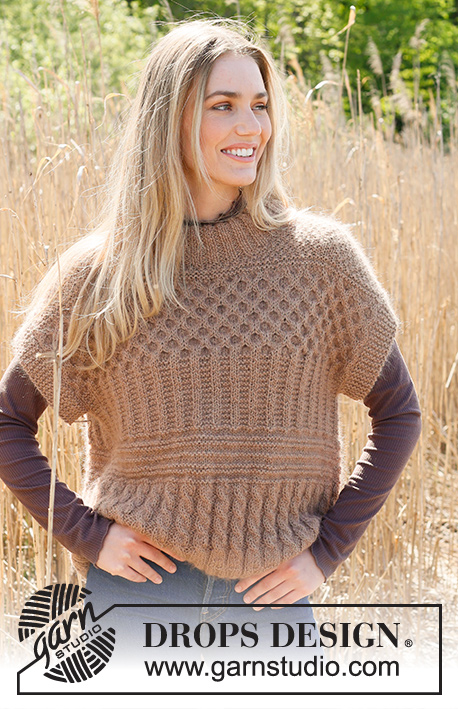
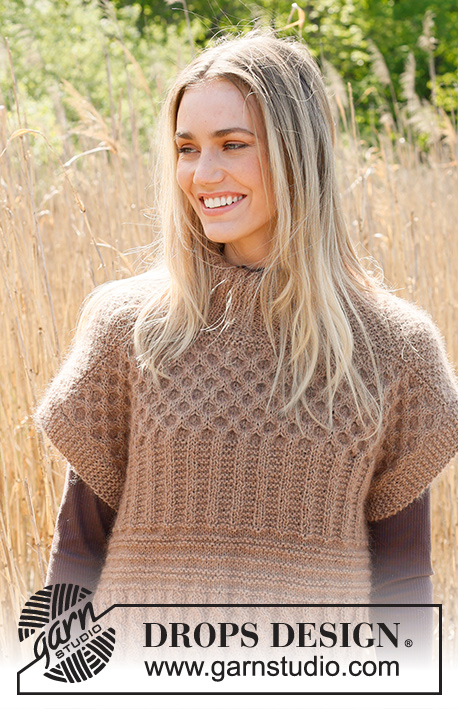
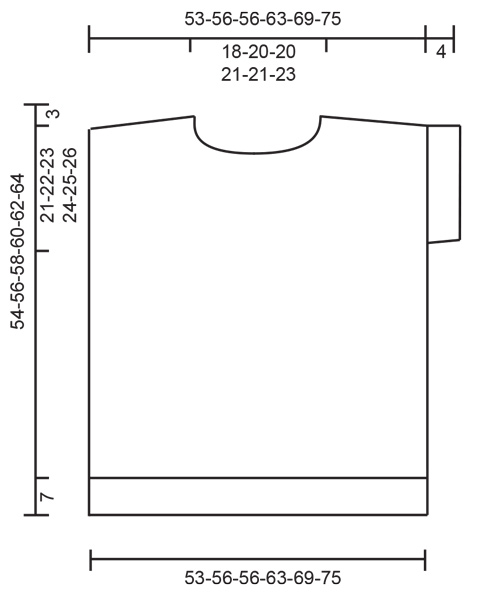
Knitted vest in DROPS Kid-Silk and DROPS Puna / DROPS Merino Extra Fine. Piece is knitted bottom up with textured pattern, ridges, cables, double neck and rib. Size XS – XXL.
DROPS 237-9 |
||||||||||||||||
|
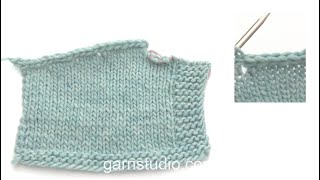
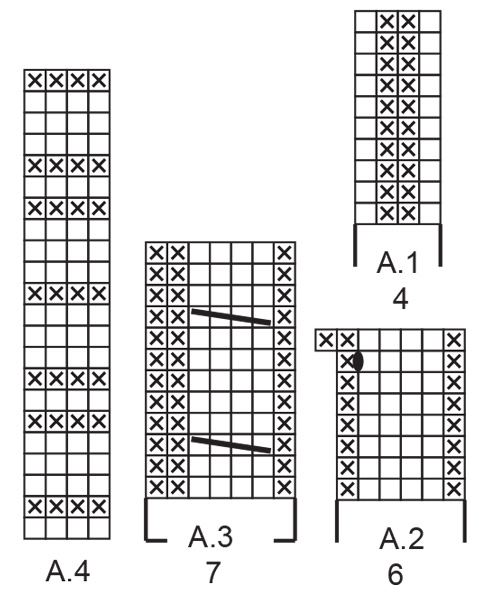
---------------------------------------------------------- EXPLANATION FOR THE PATTERN: ---------------------------------------------------------- GARTER STITCH (back and forth): Knit all rows. 1 ridge vertically = knit 2 rows. PATTERN: See diagrams A.1 to A.8. Diagrams show all rows in pattern seen from the right side. KNIT TOGETHER: FROM RIGHT SIDE: Slip 1 stitch knitwise, knit 1, pass slipped stitch over stitch worked. FROM WRONG SIDE: Purl 2 together. STOCKING STITCH: When working from wrong side, purl and when working from right side, knit. ---------------------------------------------------------- START THE PIECE HERE: ---------------------------------------------------------- VEST – SHORT SUMMARY OF PIECE: Work front and back piece back and forth separately. Finish with a double neck. BACK PIECE: Cast on 98-110-110-122-134-146 stitches on circular needle size 4 mm with 1 strand of each quality (2 strands). Purl 1 row from wrong side. Work next row as follows from right side: 1 edge stitch in GARTER STITCH – read explanation above, work A.1 until 1 stitch remain, 1 stitch in garter stitch. When A.1 has been worked 1 time vertically, work pattern as follows: 1 edge stitch in garter stitch, work A.2 until 1 stitch remains, 1 edge stitch in garter stitch. When A.2 has been worked 1 time vertically, there are 114-128-128-142-156-170 stitches on needle. Switch to circular needle size 5.5 mm. Work pattern as follows: 1 edge stitch in garter stitch, work A.3 until 1 stitch remains, 1 edge stitch in garter stitch. REMEMBER THE KNITTING TENSION! Repeat A.3 vertically until piece measures 16-17-19-19-21-22 cm. Work pattern, begin from right side as follows: 1 edge stitch in garter stitch, work A.4 until 1 stitch remains and decrease at the same time 27-36-36-40-44-48 stitches evenly, 1 edge stitch in garter stitch = 87-92-92-102-112-122 stitches. When A.4 has been worked 1 time vertically, work pattern as follows: 1 edge stitch in garter stitch, work A.5 until 1 stitch remains, 1 edge stitch in garter stitch. Repeat A.5 vertically. When piece measures 30-31-32-33-34-35 cm, cast on 6 new stitches at the end of the next 2 rows = 99-104-104-114-124-134 stitches. Work the new stitches in garter stitch until finished measurements. Continue pattern like this until piece measures 33-35-36-38-39-41 cm. Work pattern, begin from right side as follows: 7 stitches in garter stitch, work A.6 until 7 stitches remain, 7 stitches in garter stitch. When A.6 has been worked 1 time vertically, there are 150-158-158-174-190-206 stitches on needle. Work pattern as follows: 7 stitches in garter stitch, work A.7 until 7 stitches remain, 7 stitches in garter stitch. Work A.7 3 times in total vertically. Piece measures approx. 45-47-48-50-51-53 cm. Work pattern as follows: 7 stitches in garter stitch, work A.8 until 7 stitches remain and decrease at the same time 51-54-54-60-66-72 stitches evenly, 7 stitches in garter stitch = 99-104-104-114-124-134 stitches. When A.8 has been worked 1 time vertically, work A.8a vertically until finished measurements. When piece measures 49-51-53-55-57-59 cm, cast off the middle 27-30-30-32-32-34 stitches for neck and finish each shoulder (36-37-37-41-46-50 stitches) separately. On next row from neck cast off 1 stitch at the beginning of row = 35-36-36-40-45-49 stitches. On next towards the neck cast off the first 7 stitches = 28-29-29-33-38-42 stitches. Then work diagonal shoulder, begin on next row from the neck as follows: * Work pattern as before until 7-7-7-8-9-10 stitches remain, turn and work back *, work from *-* 3 times in total. I.e. work 7-7-7-8-9-10 stitches less on every row from the neck. On last row towards neck, cast on 2 new stitches at the end of row = 30-31-31-35-40-44 stitches. Now work and cast off with an edge over shoulder stitches. Work stitches cast on with shoulder stitches as follows: Work * 1 stitch in STOCKING STITCH – read explanation above, work next stitch together with first/next stitch from shoulder – read KNIT TOGETHER, pass the 2 stitches back on the needle they came from with strand on wrong side of piece, make sure not to tighten yarn too much *, work from *-* until all stitches from shoulder have been worked together with the 2 new stitches that were cast on. Cast off the 2 stitches. Work the other shoulder the same way. FRONT PIECE: Cast on and work as back piece until piece measures 46-48-49-51-52-54 cm = 99-104-104-114-124-134 stitches. Now slip the middle 15-18-18-20-20-22 stitches on a thread for neck and finish each shoulder (42-43-43-47-52-56 stitches) separately. Now cast off stitches for neck on every row from neck as follows: Cast off 2 stitches 2 times in total and 1 stitch 3 times in total = 35-36-36-40-45-49 stitches remain on shoulder. Then work each shoulder as on back piece. ASSEMBLY: Sew shoulder seams inside 1 stitch on edge and sew stitches in garter stitch together. Sew side seams inside 1 edge stitch. DOUBLE COLLAR: Begin in one shoulder seam, pick up approx. 76 to 104 stitches around the neck (including stitches on thread) from right side, on a short circular needle size 4 mm with 1 strand in each quality. Number of stitches must be divisible by 4. Work rib (purl 2/knit 2) over all stitches. When neck measures 14 cm, cast off with knit over knit and purl over purl with circular needle size 5.5 mm (make sure to avoid a tight cast neck-off edge). Fold the rib down on inside of garment. Fasten rib to get a double neck edge. To avoid a tight neck edge that sticks out it is important to keep the seam elastic. |
||||||||||||||||
Diagram explanations |
||||||||||||||||
|
||||||||||||||||
 |
||||||||||||||||
 |
||||||||||||||||
 |
||||||||||||||||
Have you finished this pattern?Tag your pictures with #dropspattern #crackedwalnutsshortsleeve or submit them to the #dropsfan gallery. Do you need help with this pattern?You'll find 33 tutorial videos, a Comments/Questions area and more by visiting the pattern on garnstudio.com. © 1982-2025 DROPS Design A/S. We reserve all rights. This document, including all its sub-sections, has copyrights. Read more about what you can do with our patterns at the bottom of each pattern on our site. |
||||||||||||||||


With over 40 years in knitting and crochet design, DROPS Design offers one of the most extensive collections of free patterns on the internet - translated to 17 languages. As of today we count 320 catalogues and 12094 patterns translated into English (UK/cm). 12094
We work hard to bring you the best knitting and crochet have to offer, inspiration and advice as well as great quality yarns at incredible prices! Would you like to use our patterns for other than personal use? You can read what you are allowed to do in the Copyright text at the bottom of all our patterns. Happy crafting!
Post a comment to pattern DROPS 237-9
We would love to hear what you have to say about this pattern!
If you want to leave a question, please make sure you select the correct category in the form below, to speed up the answering process. Required fields are marked *.