
Popular categories
Looking for a yarn?


Comments / Questions (45)
![]() Nicole wrote:
Nicole wrote:
Muss ich die Umschläge auch rechts stricken? Ich finde, dass ergibt riesengroße Löcher , zumindest bei mir
14.04.2021 - 00:35DROPS Design answered:
Liebe Nicole, die Raglanzunahmen werden bei den Rückreihen links verschränkt gestrickt, um Löcher zu vermeiden; bei dem Lochmuster (Diagrammen) werden sie rechts gestrickt, damit Löcher entstehen. Viel Spaß beim stricken!
14.04.2021 - 07:35
![]() Vigdis Johansen wrote:
Vigdis Johansen wrote:
Har dere drops katalog 38 baby kan jeg få kjøpe en
13.04.2021 - 09:42
![]() Vigdis Johansen wrote:
Vigdis Johansen wrote:
Finnes katalog 38 baby
12.04.2021 - 16:42DROPS Design answered:
Hej Vigdis. DROPS Baby & Children 38 innehåller både barn och baby oppskrifter. Mvh DROPS Design
13.04.2021 - 07:30
![]() Sonja Wietasch wrote:
Sonja Wietasch wrote:
Little Miss Daisy ist das Muster Runden übergreifend da die Maschenzahl mit Muster nicht übereinstimmt
11.04.2021 - 20:20DROPS Design answered:
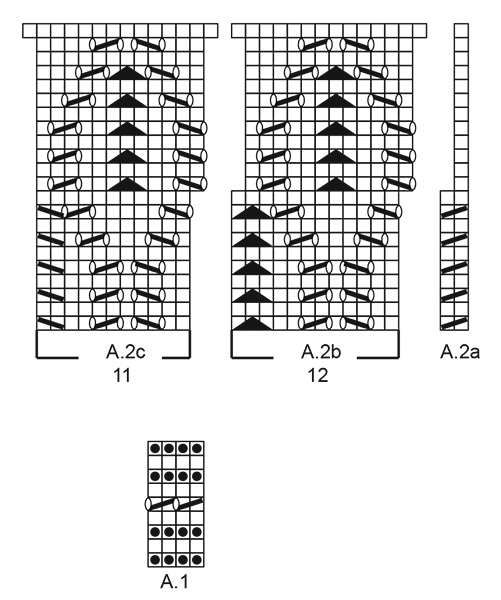
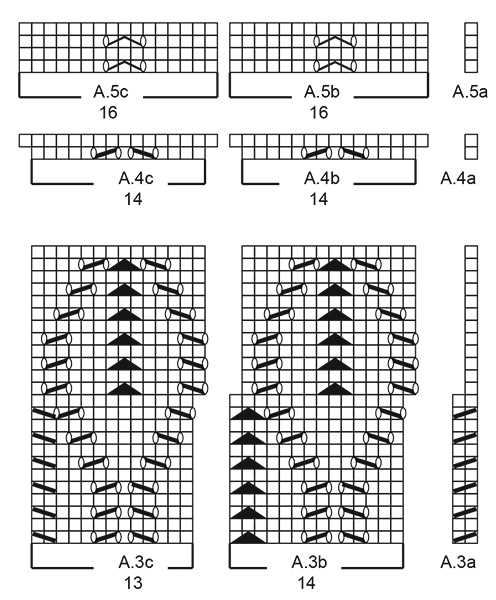
Liebe Frau Wietasch, die Diagramme A.2-A.3-A.4 werden alle so in Runden gestrickt: mi a Runden anfangen, b wiederholen und Runden mt c enden - siehe schriftliche Erklärung für jede Größe. Viel Spaß beim stricken!
12.04.2021 - 11:04
![]() Lidia Postiglione wrote:
Lidia Postiglione wrote:
Io non so lavorare con i ferri circolari perchè non mettete anche la spiegazione con i ferri normali e dal basso in alto?Grazie Lidia Postiglione
07.04.2021 - 11:41DROPS Design answered:
Buongiorno Lidia, ogni modello presenta una struttura e una lavorazione particolare e non ci è possibile riadattare le spiegazioni alle singole richieste. Sul nostro sito però può trovare altri modelli lavorati in piano o con costruzioni dal basso verso l'alto. Buon lavoro!
07.04.2021 - 14:11
|
||||||||||||||||||||||
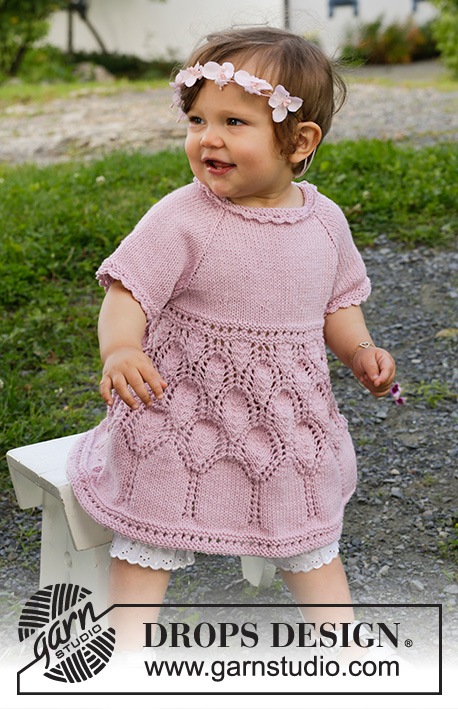
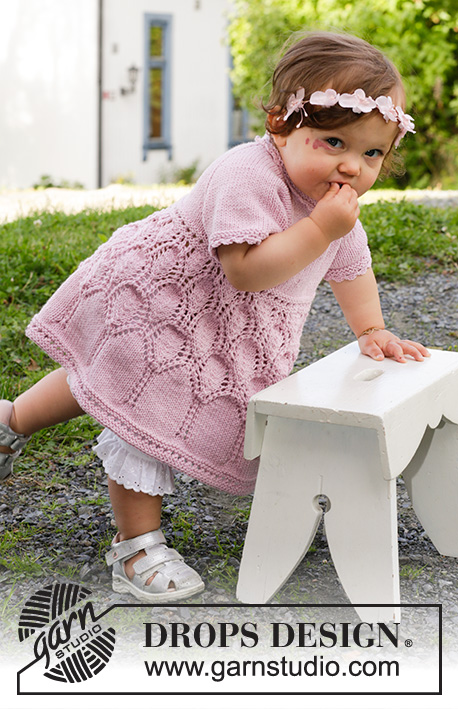
Little Miss Daisy#littlemissdaisydress |
||||||||||||||||||||||
 |
 |
|||||||||||||||||||||
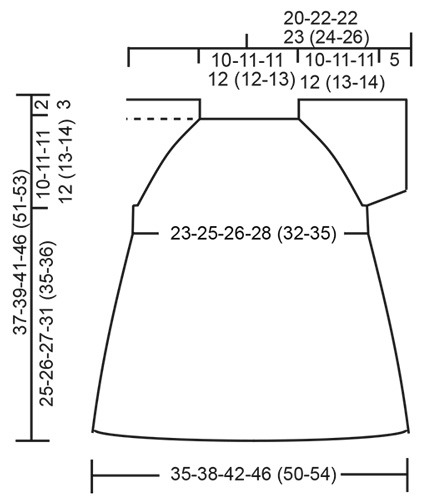
Knitted dress for babies and children in DROPS Cotton Merino. The piece is worked top down with raglan and lace pattern. Sizes 0 – 4 years.
DROPS Baby & Children 38-2 |
||||||||||||||||||||||
|
------------------------------------------------------- EXPLANATIONS FOR THE PATTERN: ------------------------------------------------------- RIDGE/GARTER STITCH (worked in the round): 1 ridge in height = 2 rounds; Knit 1 round and purl 1 round. RIDGE/GARTER STITCH (worked back and forth): Knit all rows. 1 ridge in height = Knit 2 rows. PATTERN: See diagrams A.1 to A.5. DECREASE TIP (for sleeves): Decrease 1 stitch on either side of the marker thread as follows: Start 3 stitches before the marker thread, knit 2 together, knit 2 (marker thread sits between these 2 stitches), slip 1 stitch as if to knit, knit 1 and pass the slipped stitch over the knitted stitch (2 stitches decreased). RAGLAN: All increases are on rows from the right side. Increase on each side of the stitch with the marker-thread as follows: Start just before the marker-thread stitch, make 1 yarn over, knit 1 (= marker-thread stitch), 1 yarn over (= 2 stitches increase). On the next row purl the yarn overs twisted to avoid holes. BUTTONHOLES: Work buttonholes on the right band (when the garment is worn). 1 buttonhole = knit together the third and fourth stitch from the edge and make 1 yarn over. On the next row knit the yarn over to leave a hole. Work buttonholes when the piece measures: 0/1: 2, 5 and 8 cm. 1/3: 2, 5 and 8 cm. 6/9: 2, 5 and 8 cm. 12/18: 2, 6 and 10 cm. 2: 2, 6 and 10 cm. 3/4: 2, 6 and 10 cm. CASTING-OFF TIP: To avoid the cast-off edge being tight you can cast off with a larger size needle. If the edge is still tight, make 1 yarn over after approx. each 4th stitch at the same time as casting off; the yarn overs are cast off as normal stitches. ------------------------------------------------------- START THE PIECE HERE: ------------------------------------------------------- DRESS – SHORT OVERVIEW OF THE PIECE: The piece is worked top down. You work back and forth, from mid-back, until the bands are finished, then the piece is completed in the round. NECK: Cast on 62-66-70-74 (78-84) stitches with circular needle size 3 mm and Cotton Merino. Work 2 RIDGES back and forth – read description above. Now insert 4 marker threads (starting mid-back – NOTE: WITHOUT working the stitches) as follows: Skip the first 11-12-12-13 (13-14) stitches (= right back piece), insert 1 marker thread in the next stitch, skip 9-9-11-11 (13-14) stitches (= sleeve), insert 1 marker thread in the next stitch, skip 18-20-20-22 (22-24) stitches (= front piece), insert 1 marker thread in the next stitch, skip 9-9-11-11 (13-14) stitches (= sleeve) and insert 1 marker thread in the next stitch; there are 11-12-12-13 (13-14) stitches left after the last marker thread (left back piece). YOKE: READ THE WHOLE SECTION BEFORE CONTINUING! Change to circular needle size 4 mm and continue with stocking stitch, back and forth, with the 3 outermost stitches on each side in garter stitch (= bands). REMEMBER THE KNITTING TENSION and BUTTONHOLES on the right band – read description above. AT THE SAME TIME on the first row from the right side, increase to RAGLAN on each side of the 4 marker threads – read description above (= 8 stitches increased). Increase like this on every row from the right side a total of 11-13-13-14 (16-17) times = 150-170-174-186 (206-220) stitches. Continue with stocking stitch and 3 band stitches in garter stitch on each side until the piece measures 10-11-11-12 (13-14) cm. On the next row from the right side, divide for the body and sleeves as follows: Work 23-26-26-28 (32-34) stitches as before (= half back piece), place the next 32-36-38-40 (42-44) stitches on 1 thread for the sleeve, cast on 6-6-8-8 (8-8) new stitches on the needle (= under the sleeve), work the next 40-46-46-50 (58-64) stitches as before (= front piece), place the next 32-36-38-40 (42-44) stitches on 1 thread for the sleeve, cast on 6-6-8-8 (8-8) new stitches on the needle (= under the sleeve), work the remaining 23-26-26-28 (32-34) stitches as before (= half back piece). Body and sleeves are finished separately. BODY: = 98-110-114-122 (138-148) stitches. Insert 1 marker – THE PIECE IS NOW MEASURED FROM HERE! Start mid-back and lay the 3 stitches on the left band under the 3 stitches on the right band (i.e. buttonhole-band is on top). Knit 1 round over all stitches and AT THE SAME TIME knit the band stitches together 2 and 2 = 95-107-111-119 (135-145) stitches. Continue with stocking stitch in the round for 1-2-2-3 (3-3) cm. On the next round adjust the number of stitches to 96-108-112-120 (136-144) stitches. Change to circular needle size 3 mm and work A.1 in the round. When A.1 has been completed, change to circular needle size 4 mm. Knit 1 round and increase 13-13-21-25 (21-25) stitches evenly spaced = 109-121-133-145 (157-169) stitches. Continue in the round as follows: Work A.2a (= 2 stitches), A.2b (= 12 stitches) over 96-108-120-132 (144-156) stitches (= a total of 8-9-10-11 (12-13) times) and finish with A.2c (= 11 stitches). Continue this pattern. When A.2 has been worked 1 time in height you have increased 2 stitches in each repeat of the pattern = 127-141-155-169 (183-197) stitches. Continue the pattern but with A.3 over A.2 as follows: Work A.3a (= 2 stitches), A.3b (= 14 stitches) over 112-126-140-154 (168-182) stitches (= a total of 8-9-10-11 (12-13) times) and finish with A.3c (= 13 stitches). Continue this pattern. When A.3 has been completed 1-1-1-1 (2-2) times in height (or to desired length), work A.4 over A.3 as follows: A.4a (= 1 stitch), A.4b (= 14 stitches) over 112-126-140-154 (168-182) stitches (= a total of 8-9-10-11 (12-13) times) and finish with A.4c (= 14 stitches). After A.4 there are 145-161-177-193 (209-225) stitches on the needle. Now work A.5 as follows: A.5a (= 1 stitch), A.5b (= 16 stitches) over 128-144-160-176 (192-208) stitches (= a total of 8-9-10-11 (12-13) times) and finish with A.5c (= 16 stitches). When you have worked 3-3-4-7 (3-4) cm of A.5, work 4 rounds of stocking stitch over all stitches. Change to circular needle size 3 mm and work A.1 over all stitches (NOTE: On round 5 in A.1 knit the last stitch on the round). Cast off when A.1 has been worked 1 time in height – read CASTING-OFF TIP! The dress measures approx. 37-39-41-46 (51-53) cm from the shoulder down. SHORT SLEEVE: Place the 32-36-38-40 (42-44) stitches from the thread on the one side of the piece onto double pointed needles size 4 mm and knit up 1 stitch in each of the 6-6-8-8 (8-8) stitches cast on under the sleeve = 38-42-46-48 (50-52) stitches Insert 1 marker thread in the middle of the new stitches (= beginning of the round) – THE PIECE IS NOW MEASURED FROM HERE! Work stocking stitch in the round. When the piece measures 1½ cm, decrease 2 stitches under the sleeve – read DECREASE TIP. Decrease like this every 2 cm a total of 2 times = 34-38-42-44 (46-48) stitches. Continue working until the sleeve measures 4 cm. Change to double pointed needles size 3 mm and work 2 ridges, before casting off with knit. Work the other sleeve in the same way. PICOT-EDGE: Work a picot-edge around both sleeves using crochet hook size 3 mm as follows: 1 double crochet in the first stitch, * 3 chain stitches, 1 treble crochet in the first chain stitch worked, skip 2 stitches on the sleeve, 1 double crochet in the next stitch *, work from *-*, and finish the round with 1 slip stitch in the first double crochet at the beginning of the round. Work similar edging on the neck, in the transition between the ridges and the stocking stitch on the yoke – NOTE: Work the edge top down. ASSEMBLY: Sew the buttons onto the left band. |
||||||||||||||||||||||
Diagram explanations |
||||||||||||||||||||||
|
||||||||||||||||||||||
 |
||||||||||||||||||||||
 |
||||||||||||||||||||||
 |
||||||||||||||||||||||
Have you finished this pattern?Tag your pictures with #dropspattern #littlemissdaisydress or submit them to the #dropsfan gallery. Do you need help with this pattern?You'll find 33 tutorial videos, a Comments/Questions area and more by visiting the pattern on garnstudio.com. © 1982-2026 DROPS Design A/S. We reserve all rights. This document, including all its sub-sections, has copyrights. Read more about what you can do with our patterns at the bottom of each pattern on our site. |
||||||||||||||||||||||


With over 40 years in knitting and crochet design, DROPS Design offers one of the most extensive collections of free patterns on the internet - translated to 17 languages. As of today we count 324 catalogues and 12245 patterns translated into English (UK/cm). 12245
We work hard to bring you the best knitting and crochet have to offer, inspiration and advice as well as great quality yarns at incredible prices! Would you like to use our patterns for other than personal use? You can read what you are allowed to do in the Copyright text at the bottom of all our patterns. Happy crafting!
Post a comment to pattern DROPS Baby & Children 38-2
We would love to hear what you have to say about this pattern!
If you want to leave a question, please make sure you select the correct category in the form below, to speed up the answering process. Required fields are marked *.