
Popular categories
Looking for a yarn?


Comments / Questions (41)
![]() Sofia Broborg wrote:
Sofia Broborg wrote:
Har Drops ngn video som visar hur man gör när man stickar ihop de två sprundkanterna med 3 kantmaskor vardera? Många vet INTE hur man gör då, i denna och andra beskrivningar med knäppta sprund. Maskorna sitter ju på stickor med spetsarna mot varandra. Går det att göra ett förtydligande i mönstret om att de 3 m som ska ligga under/bakom behöver sättas på en hjälpsticka för man ska att kunna sticka ihop de 3+3 kantmaskorna. En video om det vore oxå bra om det inte redan finns.
28.04.2025 - 12:16DROPS Design answered:
Hei Sofia. Takk for ditt innspill. Vi legger til ditt ønske i vår videoønskeliste. mvh DROPS Design
05.05.2025 - 11:52
![]() Sofia Broborg wrote:
Sofia Broborg wrote:
Har Drops ngn video som visar hur man gör när man stickar ihop de två sprundkanterna med 3 kantmaskor vardera? Många vet hur man gör då, i denna och andra beskrivningar med knäppta sprund. Maskorna sitter ju på stickor med spetsarna mot varandra. Går det att göra ett förtydligande i mönstret om att de 3 m som ska ligga under/bakom behöver sättas på en hjälpsticka för man ska att kunna sticka ihop de 3+3 kantmaskorna. En video om det vore oxå bra om det inte redan finns.
28.04.2025 - 12:12
![]() Mona Bak wrote:
Mona Bak wrote:
Kan ikke få startet på A2a, A2b og A2c på little miss daisy kjolen Hvordan får jeg startet???
26.03.2025 - 12:07DROPS Design answered:
Hej Mona, du starter med A.2 a i nederste højre hjørne, fortsætter med A.2b i nederste højre hjørne og afslutter med A.2c som også strikkes fra nederste højre hjørne. Du strikker hver maske ifølge symbolet som der står i symbolforklaringen :)
27.03.2025 - 13:58
![]() Simon wrote:
Simon wrote:
Hej! Jag har samma problem som många andra verkar ha. Förstår jag det rätt om man endast ska sticka A2a EN GÅNG i börjar av varje varv? INTE före varje A2b?
06.09.2024 - 10:57DROPS Design answered:
Hej Simon, ja så det stemmer med 2+96+11= 109 m i den mindste størrelse :)
06.09.2024 - 11:53
![]() Dorthe Sund wrote:
Dorthe Sund wrote:
Når man strikker a2, bliver der en maske mindre pr. Pind. Der er jo kun 1 maske tilbage efter a2 a. Det er forkert.
03.07.2024 - 11:49
![]() Susan Smith wrote:
Susan Smith wrote:
I very much appreciate, the free baby patterns, great selection Thank you
06.04.2024 - 21:14
![]() Laura wrote:
Laura wrote:
Buongiorno, perché non c’è la taglia 3/6 mesi? Grazie Buona giornata.
06.04.2024 - 21:00DROPS Design answered:
Buonasera Laura, se preferisce può lavorare anche una taglia intermedia tra quelle indicate aggiustando il numero di maglie e la lavorazione. Buon lavoro!
07.04.2024 - 23:51
![]() Line Albriktsen wrote:
Line Albriktsen wrote:
Jeg får ikke mønsteret til å bli som på bildet. Skal man strikke først A2a (2 masker) en gang, A2b (12masker) 9 ganger og så A2c (11 masker) 1 gang? Når jeg da har strikker en omgang rett og skal begynne på A2a igjen så er det bare 1 maske. Skal man strikke sammen siste masken fra A2c med A2a? Altså flytte maskemarkøren som markerer begynnelsen på omgangen?
29.03.2024 - 14:16DROPS Design answered:
Hej Line, du skal have lige så mange udtagninger som indtagninger, A.2b stemmer med antal og A.2c og A.2a stemmer med antal når du strikker dem lige efter hinanden :)
05.04.2024 - 11:22
![]() Linda Pontard wrote:
Linda Pontard wrote:
Bonjour merci beaucoup pour votre réponse. Bonne journée.
19.01.2024 - 11:23
![]() Linda Pontard wrote:
Linda Pontard wrote:
Bonjour, quand vous placer les marqueurs la maille qui a le marqueur compte pour le groupe suivant ou faut il compter après pour le groupe de mailles a séparer. Je suis en train de placer les marqueurs. Merci
18.01.2024 - 17:09DROPS Design answered:
Bonjour Mme Pontard, les fils marqueurs des raglans sont placés chacun dans une maille, pas entre les mailles, ils viennent donc en plus de chaque "groupe": demi-dos, marqueur, manche, marqueur, devant, marqueur, manche, marqueur, demi-dos. Bon tricot!
19.01.2024 - 08:58
|
||||||||||||||||||||||
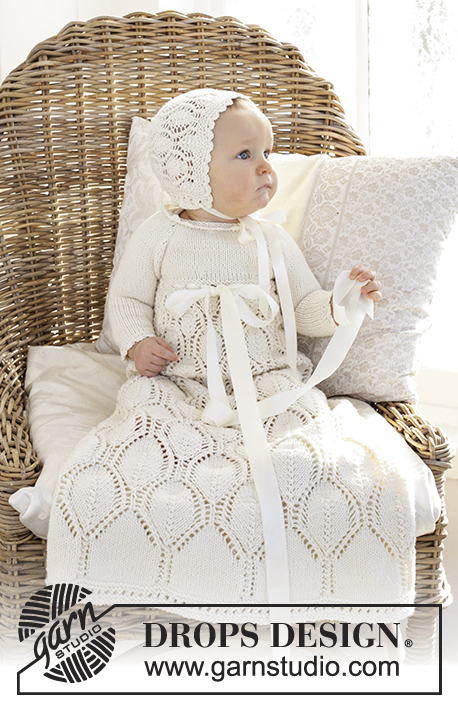
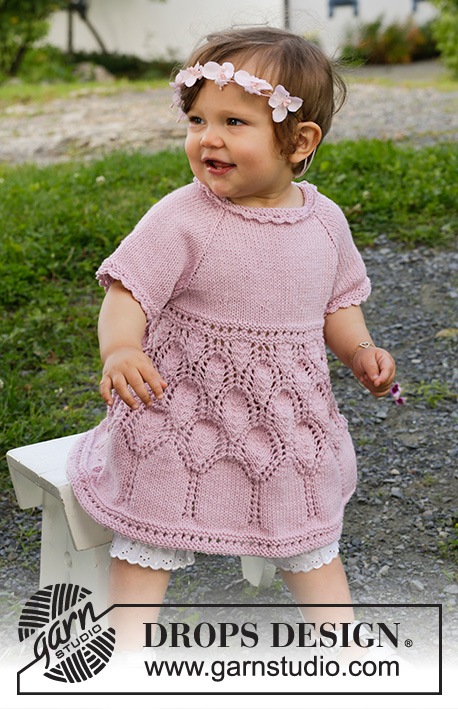
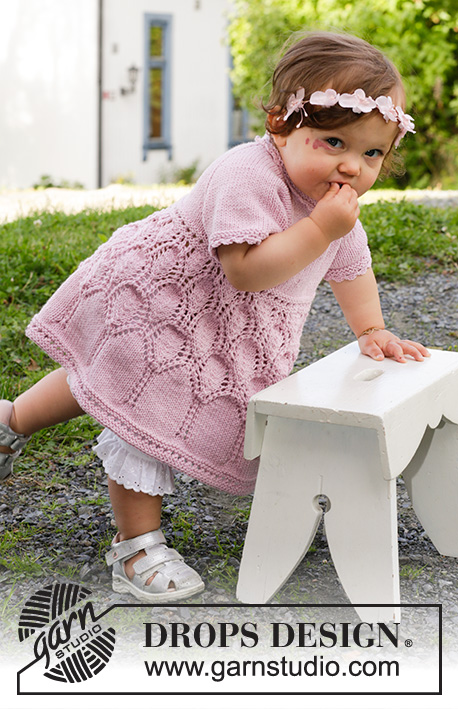
Little Miss Daisy#littlemissdaisydress |
||||||||||||||||||||||
 |
 |
|||||||||||||||||||||
Knitted dress for babies and children in DROPS Cotton Merino. The piece is worked top down with raglan and lace pattern. Sizes 0 – 4 years.
DROPS Baby & Children 38-2 |
||||||||||||||||||||||
|
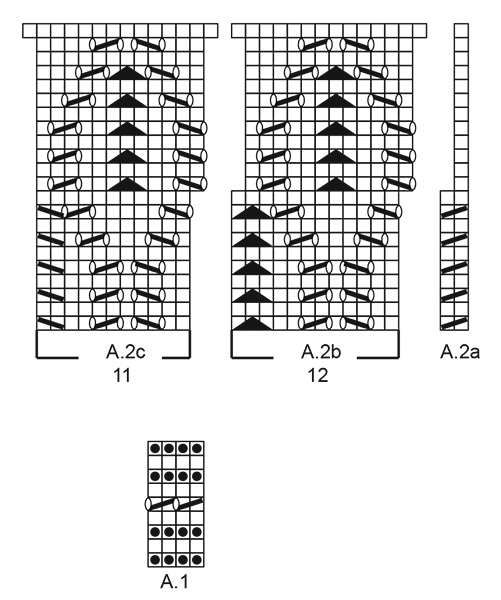
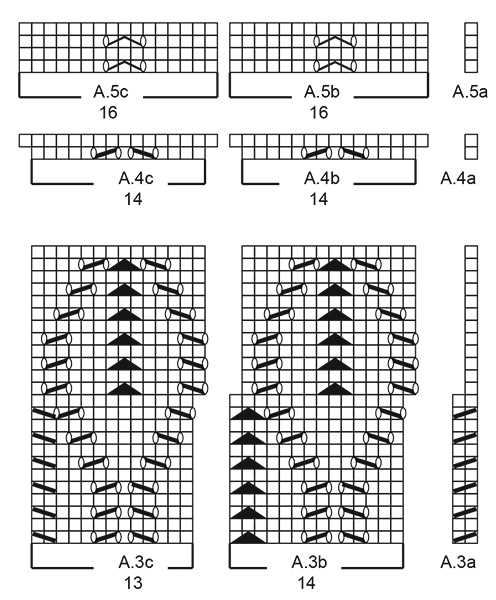
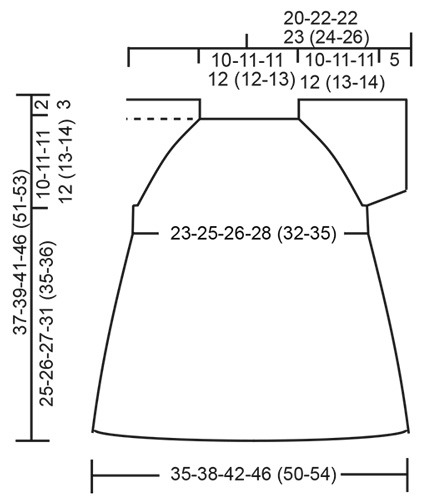
------------------------------------------------------- EXPLANATIONS FOR THE PATTERN: ------------------------------------------------------- RIDGE/GARTER STITCH (worked in the round): 1 ridge in height = 2 rounds; Knit 1 round and purl 1 round. RIDGE/GARTER STITCH (worked back and forth): Knit all rows. 1 ridge in height = Knit 2 rows. PATTERN: See diagrams A.1 to A.5. DECREASE TIP (for sleeves): Decrease 1 stitch on either side of the marker thread as follows: Start 3 stitches before the marker thread, knit 2 together, knit 2 (marker thread sits between these 2 stitches), slip 1 stitch as if to knit, knit 1 and pass the slipped stitch over the knitted stitch (2 stitches decreased). RAGLAN: All increases are on rows from the right side. Increase on each side of the stitch with the marker-thread as follows: Start just before the marker-thread stitch, make 1 yarn over, knit 1 (= marker-thread stitch), 1 yarn over (= 2 stitches increase). On the next row purl the yarn overs twisted to avoid holes. BUTTONHOLES: Work buttonholes on the right band (when the garment is worn). 1 buttonhole = knit together the third and fourth stitch from the edge and make 1 yarn over. On the next row knit the yarn over to leave a hole. Work buttonholes when the piece measures: 0/1: 2, 5 and 8 cm. 1/3: 2, 5 and 8 cm. 6/9: 2, 5 and 8 cm. 12/18: 2, 6 and 10 cm. 2: 2, 6 and 10 cm. 3/4: 2, 6 and 10 cm. CASTING-OFF TIP: To avoid the cast-off edge being tight you can cast off with a larger size needle. If the edge is still tight, make 1 yarn over after approx. each 4th stitch at the same time as casting off; the yarn overs are cast off as normal stitches. ------------------------------------------------------- START THE PIECE HERE: ------------------------------------------------------- DRESS – SHORT OVERVIEW OF THE PIECE: The piece is worked top down. You work back and forth, from mid-back, until the bands are finished, then the piece is completed in the round. NECK: Cast on 62-66-70-74 (78-84) stitches with circular needle size 3 mm and Cotton Merino. Work 2 RIDGES back and forth – read description above. Now insert 4 marker threads (starting mid-back – NOTE: WITHOUT working the stitches) as follows: Skip the first 11-12-12-13 (13-14) stitches (= right back piece), insert 1 marker thread in the next stitch, skip 9-9-11-11 (13-14) stitches (= sleeve), insert 1 marker thread in the next stitch, skip 18-20-20-22 (22-24) stitches (= front piece), insert 1 marker thread in the next stitch, skip 9-9-11-11 (13-14) stitches (= sleeve) and insert 1 marker thread in the next stitch; there are 11-12-12-13 (13-14) stitches left after the last marker thread (left back piece). YOKE: READ THE WHOLE SECTION BEFORE CONTINUING! Change to circular needle size 4 mm and continue with stocking stitch, back and forth, with the 3 outermost stitches on each side in garter stitch (= bands). REMEMBER THE KNITTING TENSION and BUTTONHOLES on the right band – read description above. AT THE SAME TIME on the first row from the right side, increase to RAGLAN on each side of the 4 marker threads – read description above (= 8 stitches increased). Increase like this on every row from the right side a total of 11-13-13-14 (16-17) times = 150-170-174-186 (206-220) stitches. Continue with stocking stitch and 3 band stitches in garter stitch on each side until the piece measures 10-11-11-12 (13-14) cm. On the next row from the right side, divide for the body and sleeves as follows: Work 23-26-26-28 (32-34) stitches as before (= half back piece), place the next 32-36-38-40 (42-44) stitches on 1 thread for the sleeve, cast on 6-6-8-8 (8-8) new stitches on the needle (= under the sleeve), work the next 40-46-46-50 (58-64) stitches as before (= front piece), place the next 32-36-38-40 (42-44) stitches on 1 thread for the sleeve, cast on 6-6-8-8 (8-8) new stitches on the needle (= under the sleeve), work the remaining 23-26-26-28 (32-34) stitches as before (= half back piece). Body and sleeves are finished separately. BODY: = 98-110-114-122 (138-148) stitches. Insert 1 marker – THE PIECE IS NOW MEASURED FROM HERE! Start mid-back and lay the 3 stitches on the left band under the 3 stitches on the right band (i.e. buttonhole-band is on top). Knit 1 round over all stitches and AT THE SAME TIME knit the band stitches together 2 and 2 = 95-107-111-119 (135-145) stitches. Continue with stocking stitch in the round for 1-2-2-3 (3-3) cm. On the next round adjust the number of stitches to 96-108-112-120 (136-144) stitches. Change to circular needle size 3 mm and work A.1 in the round. When A.1 has been completed, change to circular needle size 4 mm. Knit 1 round and increase 13-13-21-25 (21-25) stitches evenly spaced = 109-121-133-145 (157-169) stitches. Continue in the round as follows: Work A.2a (= 2 stitches), A.2b (= 12 stitches) over 96-108-120-132 (144-156) stitches (= a total of 8-9-10-11 (12-13) times) and finish with A.2c (= 11 stitches). Continue this pattern. When A.2 has been worked 1 time in height you have increased 2 stitches in each repeat of the pattern = 127-141-155-169 (183-197) stitches. Continue the pattern but with A.3 over A.2 as follows: Work A.3a (= 2 stitches), A.3b (= 14 stitches) over 112-126-140-154 (168-182) stitches (= a total of 8-9-10-11 (12-13) times) and finish with A.3c (= 13 stitches). Continue this pattern. When A.3 has been completed 1-1-1-1 (2-2) times in height (or to desired length), work A.4 over A.3 as follows: A.4a (= 1 stitch), A.4b (= 14 stitches) over 112-126-140-154 (168-182) stitches (= a total of 8-9-10-11 (12-13) times) and finish with A.4c (= 14 stitches). After A.4 there are 145-161-177-193 (209-225) stitches on the needle. Now work A.5 as follows: A.5a (= 1 stitch), A.5b (= 16 stitches) over 128-144-160-176 (192-208) stitches (= a total of 8-9-10-11 (12-13) times) and finish with A.5c (= 16 stitches). When you have worked 3-3-4-7 (3-4) cm of A.5, work 4 rounds of stocking stitch over all stitches. Change to circular needle size 3 mm and work A.1 over all stitches (NOTE: On round 5 in A.1 knit the last stitch on the round). Cast off when A.1 has been worked 1 time in height – read CASTING-OFF TIP! The dress measures approx. 37-39-41-46 (51-53) cm from the shoulder down. SHORT SLEEVE: Place the 32-36-38-40 (42-44) stitches from the thread on the one side of the piece onto double pointed needles size 4 mm and knit up 1 stitch in each of the 6-6-8-8 (8-8) stitches cast on under the sleeve = 38-42-46-48 (50-52) stitches Insert 1 marker thread in the middle of the new stitches (= beginning of the round) – THE PIECE IS NOW MEASURED FROM HERE! Work stocking stitch in the round. When the piece measures 1½ cm, decrease 2 stitches under the sleeve – read DECREASE TIP. Decrease like this every 2 cm a total of 2 times = 34-38-42-44 (46-48) stitches. Continue working until the sleeve measures 4 cm. Change to double pointed needles size 3 mm and work 2 ridges, before casting off with knit. Work the other sleeve in the same way. PICOT-EDGE: Work a picot-edge around both sleeves using crochet hook size 3 mm as follows: 1 double crochet in the first stitch, * 3 chain stitches, 1 treble crochet in the first chain stitch worked, skip 2 stitches on the sleeve, 1 double crochet in the next stitch *, work from *-*, and finish the round with 1 slip stitch in the first double crochet at the beginning of the round. Work similar edging on the neck, in the transition between the ridges and the stocking stitch on the yoke – NOTE: Work the edge top down. ASSEMBLY: Sew the buttons onto the left band. |
||||||||||||||||||||||
Diagram explanations |
||||||||||||||||||||||
|
||||||||||||||||||||||
|
||||||||||||||||||||||
|
||||||||||||||||||||||
|
||||||||||||||||||||||
Have you finished this pattern?Tag your pictures with #dropspattern #littlemissdaisydress or submit them to the #dropsfan gallery. Do you need help with this pattern?You'll find 33 tutorial videos, a Comments/Questions area and more by visiting the pattern on garnstudio.com. © 1982-2025 DROPS Design A/S. We reserve all rights. This document, including all its sub-sections, has copyrights. Read more about what you can do with our patterns at the bottom of each pattern on our site. |
||||||||||||||||||||||


With over 40 years in knitting and crochet design, DROPS Design offers one of the most extensive collections of free patterns on the internet - translated to 17 languages. As of today we count 314 catalogues and 11822 patterns translated into English (UK/cm).
We work hard to bring you the best knitting and crochet have to offer, inspiration and advice as well as great quality yarns at incredible prices! Would you like to use our patterns for other than personal use? You can read what you are allowed to do in the Copyright text at the bottom of all our patterns. Happy crafting!
Post a comment to pattern DROPS Baby & Children 38-2
We would love to hear what you have to say about this pattern!
If you want to leave a question, please make sure you select the correct category in the form below, to speed up the answering process. Required fields are marked *.