
Popular categories
Looking for a yarn?


Comments / Questions (24)
![]() Carol wrote:
Carol wrote:
I love this pattern. The helps you have linked to the different parts have been very good. The only thing I have done differently is using the magic loop for the sleeves instead of double pointed needle. That works much better for me.
06.06.2025 - 18:03
![]() Pauline wrote:
Pauline wrote:
Hi! I have tried knitting the yoke twice in 2 different sizes and it always turns too big. I am obviously using the right needles and yarn and have checked the knitting tension. Still the size 2 turned out to have a yoke that is also way too long (apart form large). Any ideas for help? Thank you
17.10.2024 - 23:03DROPS Design answered:
Dear Pauline, you might have more than the 28 rows for 10 cm if the yoke is longer than the expected 15-15-16-17-18-19 cm (measurement to divide at), you can then adjust by increasing on other places in the diagram, make just sure you still have the correct number of sts to repeat the diagram over, and divide piece at the requested measurement for the choosen size. Happy knitting!
18.10.2024 - 08:29
![]() Linda Raddstad wrote:
Linda Raddstad wrote:
Jeg forstår ikke oppskriften på Lillesand jakken der det står strikk A1 til det gjenstår 2 masker på pinnen(=44 45 46 48 49 50 rapporter a 2 masker).Så strikke A2.Får ikke det til å stemne med mønsteret.
23.08.2023 - 08:08DROPS Design answered:
Hei Linda. Se vårt svar til deg på ditt forrige spørsmål. mvh DROPS Design
28.08.2023 - 11:47
![]() Linda Raddstad wrote:
Linda Raddstad wrote:
Jeg forstår ikke oppskriften på Lillesand jakken der det står strikk A1 til det gjenstår 2 masker på pinnen(=44 45 46 48 49 50 rapporter a 2 masker).Så strikke A2.Får ikke det til å stemne med mønsteret.Håper på svar
23.08.2023 - 08:07DROPS Design answered:
Hei Linda. Etter halskanten skal det nå strikkes bærestykket. Strikk 1 kantmaske, deretter strikkes A.1 til det gjenstår 2 masker, strikk A.2 og avslutt med 1 kantmaske i riller. Ved at du strikker A.2 (A.2 består av 1 maske), vil mønsteret starter og slutter likt i hver side mot midt foran. Eller er det noe annet du ikke får til å stemme? Husk å oppgi hvilken str. du strikker. mvh DROPS Design
28.08.2023 - 11:47
![]() Roz wrote:
Roz wrote:
Work on the Lillesand pattern and have done the yoke and band to the point where I am to start Arrow 5 . My question is that I completed the band to this point using size 3 mm needles. How I want to join the body. I work the band at the same time. My question is for the yoke and body you use 4 mm needles….do I use the 4mm needles for the band as well since the body and band are now worked together?
25.06.2023 - 20:09DROPS Design answered:
Hi Roz, Yes, the bands are also worked with size 4 mm needles, which is in fact the case for the bands after the neck as well. If there is a notable difference on the bands after changing needles, it might be an idea to unpick back to the neck but hopefully it will be ok. Happy knitting!
26.06.2023 - 06:52
![]() Roz wrote:
Roz wrote:
I am working on the yoke and starting the pattern. The first row of pattern (A1 &A2) would it be done as a straight dark color? 2nd row 1 dark, 1 light, 2 dark, 1 light, 2 dark,repeat.. when I look at the photo the first row of pattern looks like it has a light color between the dark? The instructions are confusing as it states work A1 until 2 sts are left (46 repeats) of 2 sts work A2. This is confusing as A1 & A2 are one color so the row would be all dark??
11.06.2023 - 12:11DROPS Design answered:
Dear Roz, when working the diagrams you will repeat A.1 in width until 2 stitches remain at the end of the row, then work the stitch in A.2 (so that the pattern will be symmetrical on each side), and end with 1 stitch garter stitch; from WS work A.2 then repeat A.1 - ie A.2 will always be worked only one time: at the end of the right side rows and at the beginning of the wrong side rows. Happy knitting!
12.06.2023 - 08:46
![]() Josie wrote:
Josie wrote:
Bonjour, ce modèle est vraiment magnifique ! Puis Je l'adapter pour un petit garçon à qui je voudrais l'offrir ? Et si oui, les boutonnieres changent elles de côté ou est-ce que ce n'est pas important en 2 ans ? Merci pour votre travail, j'apprécie beaucoup votre aide. Je fais le pull siberia à mon mari en soft tweed.
06.10.2022 - 10:20DROPS Design answered:
Bonjour Josie, vous pouvez tout à fait le tricoter pour un garçon, ce modèle commence en 2 ans justement. Pour les boutonnières, à vous de choisir de quel côté vous préférez les mettre pour le garçon. Bon tricot!
06.10.2022 - 11:28
![]() Ania wrote:
Ania wrote:
Zaczynamy w końcu od karczku czy wykończenia dekoltu? Z opisu wynika ,że z od wykończenia. Natomiast jak już mamy narzucone oczka jesteśmy na prawej stronie z automatu, tak więc jak zrobić 1szy rząd na lewej stronie czy o co dokładnie z tym chodzi? Jestem początkująca i dla mnie to nie jest jasne niestety.
09.05.2022 - 02:45DROPS Design answered:
Witaj Aniu,zaczynamy od wykończenia dekoltu. Najpierw narzucasz oczka, następnie 1-szy rząd przerabiasz na lewej stronie robótki (to jest oczywiście umowne). Żeby się nie pogubić, zawsze wkładam marker na prawej stronie robótki. Powodzenia. Nie wahaj się pisać, gdy będziesz miała problemy. Zaglądaj też do instrukcji video. Pozdrawiamy!
09.05.2022 - 10:05
![]() Nicole Studer wrote:
Nicole Studer wrote:
Guten Abend:) Ich bin neu hier und das ist meine erste Jacke. Ich würde gerne das Garn für die Lillesand Jacke bestellen. Die Größe wäre 92. Wieviel Garn bräuchte ich dann? Vielen Dank und Mit freundlichen Grüßen Nicole Studer
08.05.2022 - 19:20DROPS Design answered:
Liebe Frau Studer, die Garnmenge finden Sie immer unter den Kopfzeilen, Größe 92 ist die 1. Größe hier, so brauchen Sie: 250 g DROPS Merino Extra Fine/50 g das Knäuel = 5 Knäuel in Farbe rost + 1 Knäuel in Farbe Natur. Viel Spaß beim stricken!
09.05.2022 - 08:37
![]() Margret Koch wrote:
Margret Koch wrote:
Hallo ! Der Mustersatz für die Kinderjacke Lillesand enthält teilweise Einzelreihen für eine Farbe. Da ich die andere Farbe dann nicht mitführe, müsste ich den Faden abschneiden, um ihn von der anderen Seite weiterstricken zu können. Das würde aber dazu führen, dass viel vernäht werden müsste. Oder gibt es eine andere Lösung, eventuell mit mehreren Knäueln derselben Farbe? Danke für Ihre Antwort, Margret
30.11.2021 - 23:05DROPS Design answered:
Liebe Frau Koch, in solchen Fällen können Sie diese beiden Reihen z.B. auf der gleichen "Seite" stricken, dh: die 3. Reihe ist eine Hinreihe mit zeder, die 4. Reihe sollen Sie mit natur stricken aber da der Faden auf der anderen Seite ist, stricken Sie dann die 4. Reihe wie eine Hinreihe aber dieses Mal mit natur (= 1 Hinreihe mit zeder, 1 Hinreihe mit natur) - und wenn sowas nicht möglich ist, dann können Sie den Faden abschneiden. Noch eine Möglichkeite: mit Steek-Maschen stricken (siehe Video. Viel Spaß beim stricken!
01.12.2021 - 07:32
|
||||||||||
Lillesand#lillesandjacket |
||||||||||
 |
 |
|||||||||
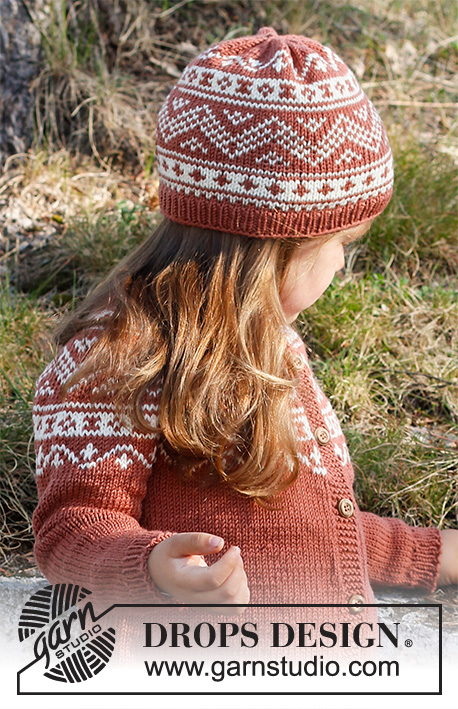
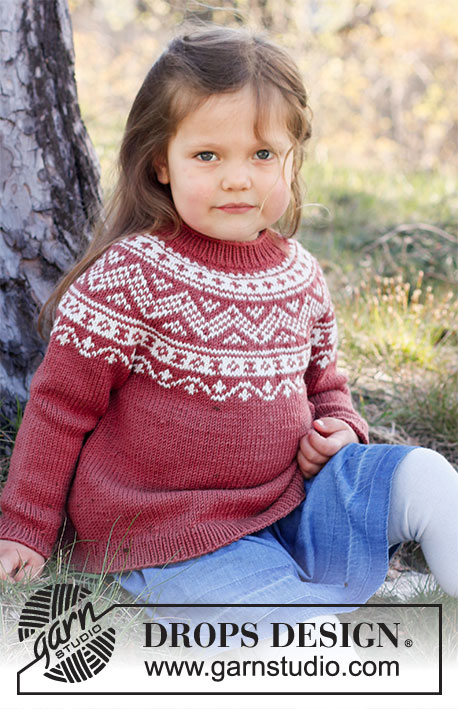
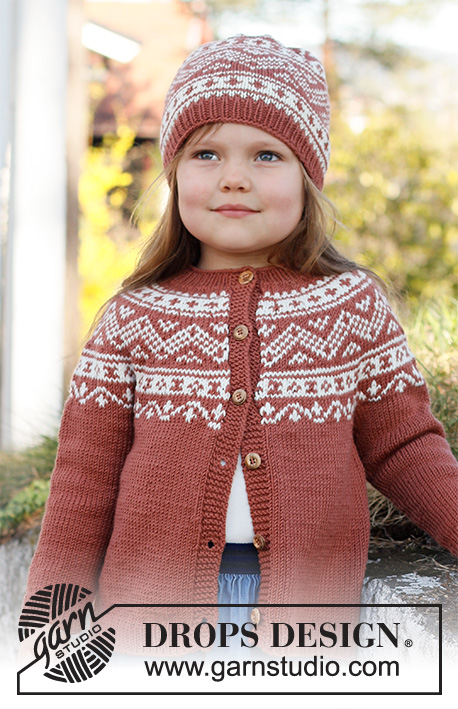
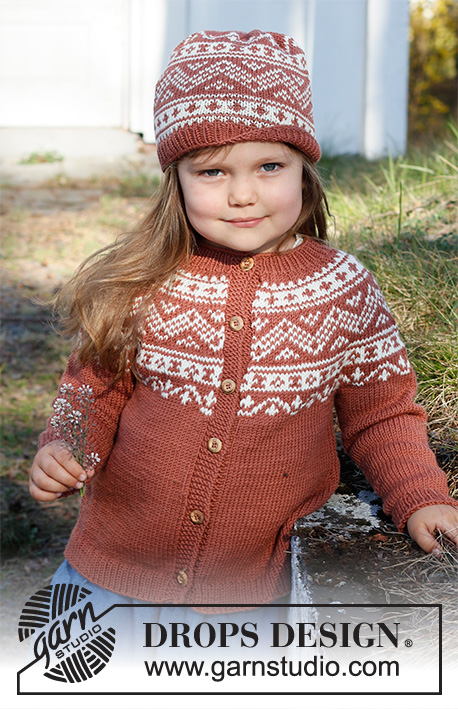
Knitted jacket for children in DROPS Merino Extra Fine. The piece is worked top down, with round yoke and Nordic pattern on the yoke. Sizes 2 – 12 years.
DROPS Children 37-6 |
||||||||||
|
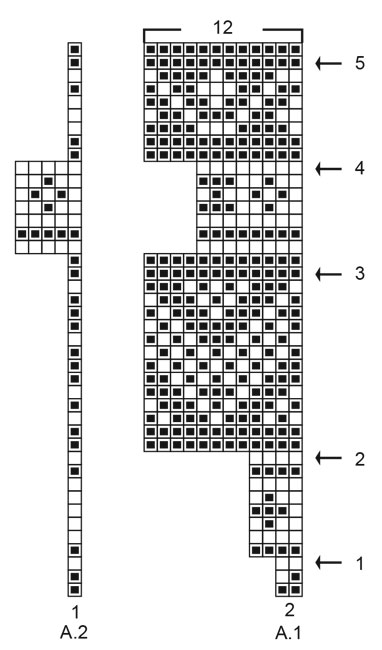
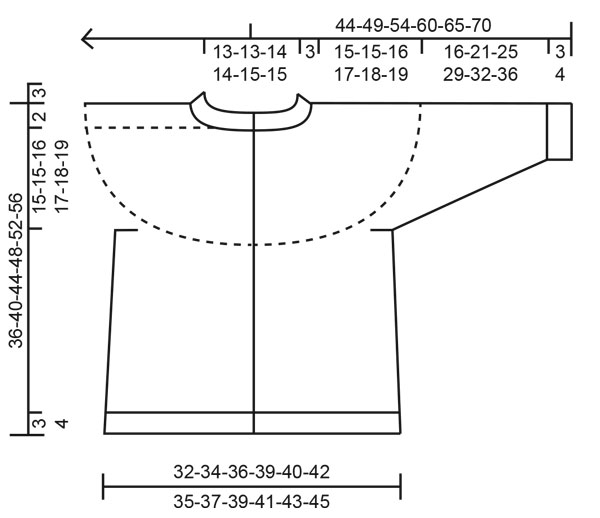
------------------------------------------------------- EXPLANATIONS FOR THE PATTERN: ------------------------------------------------------- PATTERN: See diagrams A.1 and A.2. The whole pattern is worked in stocking stitch. RIDGE/GARTER STITCH (worked back and forth): Knit all rows. 1 ridge in height = Knit 2 rows. INCREASE TIP-1 (evenly spaced): To work out how to increase evenly, count the total number of stitches on the needle (e.g. 83 stitches) minus bands (e.g. 10 stitches) and divide the remaining stitches by the number of increases to be made (e.g. 16) = 4.56. In this example, increase by making 1 yarn over after alternately each 4th and 5th stitch. Do not increase on the bands. On the next row work the yarn overs twisted to avoid holes. INCREASE TIP-2 (for sides of body): All increases are worked from the wrong side! Increase 1 stitch on each side of each marker thread as follows: Work until there are 4 stitches left before the marker thread, make 1 yarn over, purl 8 (marker thread sits in the middle of these 8 stitches), 1 yarn over (= 2 stitches increased at each marker thread; 4 stitches increased on the row). On the next row (right side), knit the yarn overs twisted to avoid holes. Then work the new stitches in stocking stitch. KNITTING TIP: To avoid the garment losing its elasticity when working pattern, it is important that the strands at the back are not tight. Increase a needle size when working pattern if this is a problem. DECREASE TIP (for mid under sleeves): Decrease 1 stitch on each side of the marker thread as follows: Work until there are 3 stitches left before the marker thread, knit 2 together, knit 2, slip 1 stitch as if to knit, knit 1 and pass the slipped stitch over the knitted stitch (= 2 stitches decreased). BUTTONHOLES: When the neck measures 1½ - 2 cm, work 1 buttonhole on the right side of the neck (when the garment is worn). Work from the right side when there are 3 stitches left on the row as follows: Make 1 yarn over, knit 2 together and knit 1. On the next row (wrong side) knit the yarn over to leave a hole. The other 5-5-5-6-6-6 buttonholes are worked with approx. 6-6½-7½-7-7½-8½ cm between each one. CASTING-OFF TIP: To avoid the cast-off edge being tight you can cast off with a larger needle size. If the edge is still tight, make 1 yarn over after approx. each 4th stitch at the same time as casting off and the yarn overs are cast off as normal stitches. ------------------------------------------------------- START THE PIECE HERE: ------------------------------------------------------- JACKET – SHORT OVERVIEW OF THE PIECE: The neck and yoke are worked back and forth with circular needle, from mid front and top down. The band stitches are placed on a thread and the rest of the yoke is continued with 1 edge stitch on each side towards mid front. The yoke is divided for body and sleeves. The body is finished back and forth with circular needle. The sleeves are worked in the round, top down, with double pointed needles. NECK: Cast on 83-85-87-89-91-93 stitches (including 5 band stitches on each side towards mid front) with circular needle size 3 mm and cedar. Purl 1 row (= wrong side). The next row is worked as follows from the right side: Work 5 band stitches in GARTER STITCH – read description above, * knit 1, purl 1 *, work from *-* until there are 6 stitches left on the row, knit 1 and finish with 5 band stitches in garter stitch. Continue this rib for 3 cm – remember the BUTTONHOLE on the right band – read description above. Change to circular needle size 4 mm. Purl 1 row from the wrong side with 5 band stitches in garter stitch on each side and increase 16-16-16-18-18-18 stitches evenly spaced – read INCREASE TIP-1 = 99-101-103-107-109-111 stitches. Now place the outermost 5 stitches on each side on a thread (= bands) and cast on 1 edge stitch on each side on the next 2 rows as follows: Work 5 band stitches in garter stitch, work in stocking stitch until 5 band stitches remain and place them on a thread without working them, cast on 1 edge stitch, turn and work stocking stitch until there are 5 band stitches left on the other side, place these 5 stitches on a thread without working them, cast on 1 edge stitch, turn = 91-93-95-99-101-103 stitches – the bands will be worked later and sewn onto the front pieces inside the 1 edge stitch. Insert 1 marker after the edge stitch at the beginning of the row; the yoke will be measured from this marker! Work the yoke as described below. YOKE: Work 0-0-2-4-6-8 rows of stocking stitch using cedar and with 1 edge stitch in garter stitch on each side towards mid front. Work the edge stitches in the same colour as first/last stitch in the pattern. Read KNITTING TIP and work the next row from the right side as follows: 1 edge stitch in garter stitch, work A.1 until there are 2 stitches left on the row (= 44-45-46-48-49-50 repeats of 2 stitches), work A.2 (so that the pattern begins and ends in the same way on both sides) and finish with 1 edge stitch in garter stitch. Continue this pattern. REMEMBER THE KNITTING TENSION! AT THE SAME TIME, on each row marked with an arrow in A.1, increase stitches evenly spaced as described below – remember INCREASE TIP-1: Arrow-1: Increase 16-18-20-20-22-24 stitches evenly spaced = 107-111-115-119-123-127 stitches (there is now room for 26-27-28-29-30-31 repeats of A.1 with 4 stitches). Arrow-2: Increase 40-36-44-40-48-44 stitches evenly spaced = 147-147-159-159-171-171 stitches (there is now room for 12-12-13-13-14-14 repeats of A.1 with 12 stitches). Arrow-3: Increase 36-44-40-48-44-52 stitches evenly spaced = 183-191-199-207-215-223 stitches (there is now room for 22-23-24-25-26-27 repeats of A.1 with 8 stitches; be aware that A.2 now consists of 5 stitches). Arrow-4: Increase 24-28-32-36-40-44 stitches evenly spaced = 207-219-231-243-255-267 stitches (there is now room for 17-18-19-20-21-22 repeats of A.1 with 12 stitches). Arrow-5: Before this row, leave the stitches on the needle and work the bands. Place the 5 band stitches from the left front piece on needle size 3 mm and work garter stitch back and forth with cedar for approx. 13-13-14-15-15-16 cm – lay the band along the front piece and check the measurement; the band should be stretched a little to match the length (finish after a row from the wrong side). Place the stitches on 1 thread. Work the right band in the same way, but remember to work the buttonholes. Then work the row marked with arrow-5 in A.1 as follows: Work the 5 band stitches from the thread in garter stitch, decrease the 1 edge stitch, knit the next 205-217-229-241-253-265 stitches AT THE SAME TIME as you increase 4-4-4-0-0-0 stitches evenly over these stitches, decrease the 1 edge stitch and work the 5 band stitches in garter stitch = 219-231-243-251-263-275 stitches. If your knitting tension is correct, the piece measures approx. 15-15-16-17-18-19 cm from the marker on the neck. If the piece is shorter than this, continue with stocking stitch and 5 band stitches in garter stitch on each side until you reach the correct length. On the next row, divide the piece for the body and sleeves as follows: Work 35-37-39-41-43-45 stitches as before (= front piece), place the next 44-46-48-48-50-52 stitches on 1 thread for the sleeve, cast on 6-6-6-8-8-8 new stitches on the needle (= in side under sleeve), work 61-65-69-73-77-81 stitches as before (= back piece), place the next 44-46-48-48-50-52 stitches on 1 thread for the sleeve, cast on 6-6-6-8-8-8 new stitches on the needle (= in side under sleeve) and work the remaining 35-37-39-41-43-45 stitches as before (= front piece). Body and sleeves are finished separately. THE PIECE IS NOW MEASURED FROM HERE! BODY: = 143-151-159-171-179-187 stitches. Insert 1 marker thread 38-40-42-45-47-49 stitches in from each side (= 67-71-75-81-85-89 stitches between threads on the back piece). Allow the threads to follow your work onwards; they will be used when increasing in the sides. Work stocking stitch back and forth using cedar and with 5 band stitches in garter stitch on each side. When the piece measures 4-4-5-5-6-6 cm from the division increase 1 stitch on each side of both marker threads – read INCREASE TIP-2 (= 4 stitches increased). Increase like this every 4-5-6-6-7-8 cm a total of 3 times = 155-163-171-183-191-199 stitches. Continue working until the piece measures 16-20-23-25-28-31 cm from the division. There is now approx. 3-3-3-4-4-4 cm left to finished length; you can try the jacket on and work to desired length. Knit 1 row from the right side, where you increase 46-48-50-54-58-60 stitches evenly spaced – remember INCREASE TIP-1 = 201-211-221-237-249-259 stitches. NOTE: The increased stitches prevent the rib being tight. Change to circular needle size 3 mm and work the first row from the wrong side as follows: 5 band stitches in garter stitch, * purl 1, knit 1 *, work from *-* until there are 6 stitches left on the row, purl 1 and finish with 5 band stitches in garter stitch. Continue this rib for 3-3-3-4-4-4 cm. Cast off with garter stitch over garter stitch, knit over knit and purl over purl – read CASTING-OFF TIP! The jacket measures approx. 36-40-44-48-52-56 cm from the shoulder down. SLEEVE: Place the 44-46-48-48-50-52 stitches from the thread on the one side of the piece on double pointed needles size 4 mm and knit up 1 stitch in each of the 6-6-6-8-8-8 stitches cast on under the sleeve = 50-52-54-56-58-60 stitches. Insert a marker thread in the middle of the 6-6-6-8-8-8 stitches under the sleeve. Allow the thread to follow your work onwards; it will be used when decreasing under the sleeve. Starting at the marker thread, work stocking stitch in the round with cedar. When the sleeve measures 3 cm from the division, decrease 2 stitches mid under the sleeve – read DECREASE TIP. Decrease like this every 2-3-3-3½-3½-4 cm a total of 6-6-7-7-8-8 times = 38-40-40-42-42-44 stitches. Continue working until the sleeve measures 16-21-25-29-32-36 cm from the division. There is now approx. 3-3-3-4-4-4 cm left to finished length; you can try the jacket on and work to desired length. Knit 1 round where you increase 6-6-8-8-8-8 stitches evenly spaced = 44-46-48-50-50-52 stitches. Change to double pointed needles size 3 mm and work rib in the round (= knit 1 / purl 1) for 3-3-3-4-4-4 cm. Cast off with knit over knit and purl over purl – remember CASTING-OFF TIP. The sleeve measures approx. 19-24-28-33-36-40 cm from the division. Work the other sleeve in the same way. ASSEMBLY: Sew the bands neatly to each front piece, inside the 1 edge stitch. Sew the buttons onto the left band. |
||||||||||
Diagram explanations |
||||||||||
|
||||||||||
 |
||||||||||
 |
||||||||||
Have you finished this pattern?Tag your pictures with #dropspattern #lillesandjacket or submit them to the #dropsfan gallery. Do you need help with this pattern?You'll find 33 tutorial videos, a Comments/Questions area and more by visiting the pattern on garnstudio.com. © 1982-2026 DROPS Design A/S. We reserve all rights. This document, including all its sub-sections, has copyrights. Read more about what you can do with our patterns at the bottom of each pattern on our site. |
||||||||||


With over 40 years in knitting and crochet design, DROPS Design offers one of the most extensive collections of free patterns on the internet - translated to 17 languages. As of today we count 324 catalogues and 12290 patterns translated into English (UK/cm). 12290
We work hard to bring you the best knitting and crochet have to offer, inspiration and advice as well as great quality yarns at incredible prices! Would you like to use our patterns for other than personal use? You can read what you are allowed to do in the Copyright text at the bottom of all our patterns. Happy crafting!
Post a comment to pattern DROPS Children 37-6
We would love to hear what you have to say about this pattern!
If you want to leave a question, please make sure you select the correct category in the form below, to speed up the answering process. Required fields are marked *.