
Popular categories
Looking for a yarn?


Comments / Questions (45)
![]() Ulrika wrote:
Ulrika wrote:
Hej! När det ska ökas för v-ringningen, börjar den ökningen direkt på varv 6 från det att man påbörjat arbetet, dvs parallellt med ökningarna för raglan? Eller börjar man öka för v-ringningen först när raglanökningarna är klara?
21.01.2024 - 22:36DROPS Design answered:
Hej Ulrika, ja du skal starte udtagningen til V-hals samtidigt som raglanen :)
02.02.2024 - 13:27
![]() Truus wrote:
Truus wrote:
Goedendag Ik brei het patroon met veel plezier. Ik heb wel een vraag over de genoemde lengte. Na het meerderen, de raglan, moet je breien tot (in mijn geval) 29 cm. Daarna meet je het werk vanaf de verdeling en brei je dit stuk tot 22 cm lengte. Daarna 4 cm boordsteek. Als ik dit optel, kom ik op 29+22+4= 55cm uit. Het patroon heeft het echter over 62 cm. Waar komen die 7 cm vandaan? Ik hoor het graag.
26.11.2023 - 23:12DROPS Design answered:
Dag Truus,
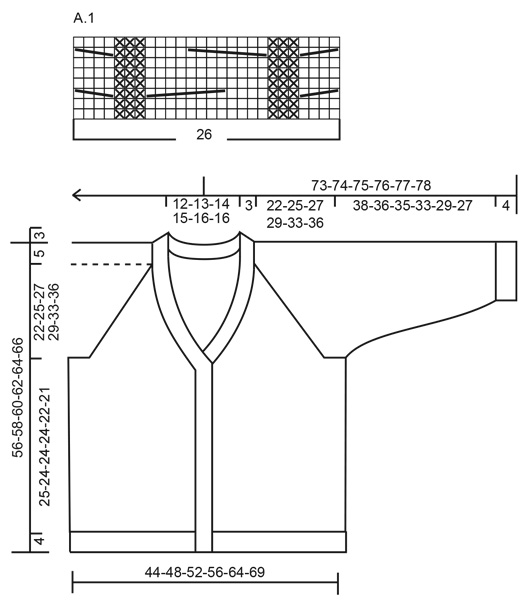
De 29 cm meet je vanaf de hals/raglan, maar als je het werk plat neerlegt heb je ook nog het stukje van de mouw. Zie ook de tekening onderaan.
29.11.2023 - 19:32
![]() Nicole Roux wrote:
Nicole Roux wrote:
Bonjour Est ce que le modèle se tricote avec les 2 fils à la fois? car je n'ai pas compris (Alpaga et Kid Silk ) Puis faire le modèle uniquement Alpaga? Qu'apporte de plus Kid Silk? Merci
20.11.2023 - 11:52DROPS Design answered:
Bonjour Mme Roux, si vous n'utilisez qu'un seul fil Alpaca, la tension ne sera pas juste, il vous faut donc tricoter avec 2 fils du groupe A, soit par exemple 1 fil Alpaca + 1 fil Kid-Silk, ou bien avec 2 fils Alpaca. Bon tricot!
20.11.2023 - 16:21
![]() Annick wrote:
Annick wrote:
Wanted to share the finished product but it does not appear that you accept pictures! Thanks for a fun pattern to knit!
16.10.2023 - 02:17
![]() Melissa wrote:
Melissa wrote:
Hello! I really want to make this cardigan, but I prefer to knit it with a high round neck rather than a V-neck. Do you maybe have an instruction on how to change this?
02.07.2023 - 00:27DROPS Design answered:
Dear Melissa, we unfortunately don't have such instructions, but you might find inspiration from our jackets worked top down with round neck and cables. Happy knitting!
03.07.2023 - 10:25
![]() CYNTHIA NAGLE wrote:
CYNTHIA NAGLE wrote:
I am making the smallest size - however stitch count adds up to 76 not 80 {3+26-18+26+3=76)
22.02.2023 - 21:33DROPS Design answered:
Dear Mrs Nagle, please note that you should insert 1 marker thread in one stitch and not between stitches, so that you should have: 3+1+26+1+18+1+26+1+3= 80 sts. Happy knitting!
23.02.2023 - 13:44
![]() Ute Thumm wrote:
Ute Thumm wrote:
Hallo, ich hab die Wolle nach der Angabe bestellt und bin verwundert, wie dünn diese ist. Wenn ich diese mit Nadel Nr. 5 wie angegeben stricke, wird das ganz dünn und luftig. Das hat im Bild ganz anders ausgesehen. Ist das gewollt oder ist hier was falsch. Danke
05.01.2023 - 10:24DROPS Design answered:
Liebe Frau Thumm, hier wird es 2-Fäding (=mit 1 Faden Alpaca + 1 Faden Kid-Silk) gestrickt, solange daß Ihre Maschenprobe (= 17 Maschen x 22 Reihen glatt rechts = 10 x10 xm) stimmt, dann bekommen Sie die gewünschten Maßen wie im Diagram gezeigt. Viel Spaß beim stricken!
05.01.2023 - 11:17
![]() Carla wrote:
Carla wrote:
Como saber que talla me corresponde
03.10.2022 - 23:25DROPS Design answered:
Hola Carla, bajo el patrón tienes el diagrama de la prenda con las medidas en cm. La medida principal es el contorno del pecho (por ejemplo, para la talla S el contorno del pecho es 44cm x2 = 88 cm, e.t.c.). La medida indicada para el contorno del pecho es el ancho de la prenda para la talla S. Siempre recomendamos, cuando hay que elegir entre dos tallas, elegir la talla más grande.
04.10.2022 - 15:21
![]() Biegitta örmin wrote:
Biegitta örmin wrote:
Stickas mönstret med två trådar dvs kidsilk och merlino
01.05.2021 - 09:53DROPS Design answered:
Hei Biegitta. Oppskriften strikkes med 1 tråd av DROPS Kid-Silk + 1 tråd DROPS Alpaca (ikke merlino). mvh DROPS design
03.05.2021 - 13:52
![]() Sophie wrote:
Sophie wrote:
Bonjour, j'ai beaucoup de difficultés avec le haut en bas. Peut on réaliser ce modèle de manière classique et si oui comment? merci beaucoup
29.03.2021 - 11:59DROPS Design answered:
Bonjour Sophie, fort probablement, vous pouvez ajuster les explications en commençant par la fin. Il sera sans dote plus simple de suivre le modèle tel qu'il est. Cette leçon montre comment tricoter un pull de haut en bas et pourra vous aider à comprendre la technique pour réaliser ce gilet. Bon tricot!
06.04.2021 - 08:52
|
|||||||||||||||||||
Deep Woods#deepwoodscardigan |
|||||||||||||||||||
 |
 |
||||||||||||||||||
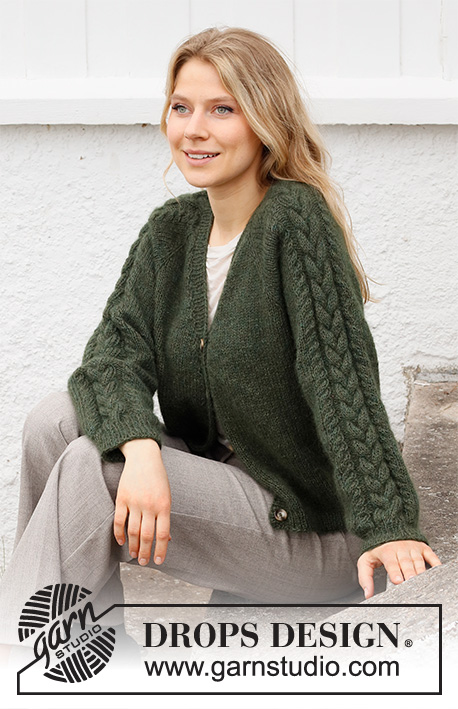
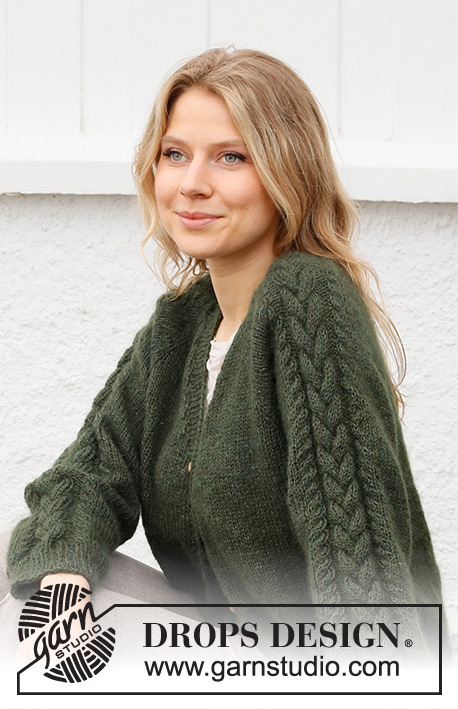
Knitted jacket in DROPS Alpaca and DROPS Kid-Silk. The piece is worked top down with raglan, cable-pattern and V-neck. Sizes S - XXXL.
DROPS 215-6 |
|||||||||||||||||||
|
------------------------------------------------------- EXPLANATIONS FOR THE PATTERN: ------------------------------------------------------- RIDGE/GARTER STITCH (worked back and forth): Knit all rows. 1 ridge in height = Knit 2 rows. PATTERN: See diagram A.1. RAGLAN: Increase 1 stitch on each side of the stitch in stocking stitch (stitch with marker thread) in each transition between body and sleeves (= 8 stitches increased on the row). Increase 1 stitch by making 1 yarn over. On the next row purl the yarn overs twisted to avoid holes. Then work the new stitches in stocking stitch. V-NECK: All increases are worked from the right side! Make 1 yarn over on the inside of the edge stitch on each side. On the next row (wrong side) purl the yarn over twisted to avoid a hole. Then work the new stitch in stocking stitch. 2 stitches increased on each increase-row (1 stitch each side) DECREASE TIP (for sleeves): Decrease 1 stitch on either side of the marker thread as follows: Work until there are 3 stitches left before the marker thread, knit 2 together, knit 2 (marker thread sits between these 2 stitches), slip 1 stitch as if to knit, knit 1 and pass the slipped stitch over the knitted stitch. CASTING-OFF TIP: To avoid the cast-off edge being tight you can cast off with a larger size needle. If the edge is still tight, make 1 yarn over after approx. each 4th stitch at the same time as casting off; the yarn overs are cast off as normal stitches. BUTTONHOLES: Work 5 buttonholes on the right band (when the garment is worn). 1 buttonhole = knit 2 stitches together and make 1 yarn over. On the next row knit the yarn over to leave a hole. The bottom buttonhole is worked approx. 2 cm from the bottom edge and the top buttonhole where the V-neck begins. The other 4 buttonholes are worked evenly between them (with approx. 8 cm between each one). ------------------------------------------------------- START THE PIECE HERE: ------------------------------------------------------- JACKET – SHORT OVERVIEW OF THE PIECE: The yoke is worked back and forth with circular needle from mid front and top down. AT THE SAME TIME increases are made for the V-neck and raglan. The yoke is divided for body and sleeves and the body continued back and forth. The sleeves are worked in the round with short circular needle/double pointed needles, top down. The neck/bands are worked to finish. YOKE: Cast on 80-82-84-86-88-90 stitches (including 1 edge stitch on each side towards mid front) with circular needle size 5 mm and 1 strand Kid-Silk and 1 strand Alpaca (= 2 strands). Purl 1 row from the wrong side. READ THE WHOLE OF THE NEXT SECTION BEFORE CONTINUING: Insert 4 marker threads in the piece as follows (without working the stitches): Count 3 stitches (= front piece), insert 1 marker thread in the next stitch, count 26 stitches (= sleeve), insert 1 marker thread in the next stitch, count 18-20-22-24-26-28 stitches (= back piece), insert 1 marker thread in the next stitch, count 26 stitches (= sleeve), insert 1 marker thread in the next stitch, there are 3 stitches left after the last marker thread (= front piece). Continue with 1 edge stitch in garter stitch and stocking stitch over the stitches on both front pieces, stocking stitch on the back piece and A.1 (= 26 stitches) over each sleeve, AT THE SAME TIME on the first row from the right side increase to RAGLAN in each transition between body and sleeves – read description above. Continue this increase every 2nd row (i.e. each row from the right side) a total of 22-25-27-29-33-36 times on both sides of all 4 marker threads. Continue the increase 2 more times on the front and back pieces (do not increase any more on the sleeves). AT THE SAME TIME on row 6 (i.e. the 3rd row from the right side) increase for the V-NECK on each side towards mid front – read description above, as follows: Increase every 6th row a total of 4-5-6-7-8-9 times and every 4th row a total of 3 times (= a total of 7-8-9-10-11-12 stitches increased on each side towards mid front). REMEMBER THE KNITTING TENSION! After the last increase to raglan, continue working without further increases until the piece measures 22-25-27-29-33-36 cm; the increases for the V-neck should now be finished. There are 278-306-326-346-382-410 stitches on the needle. The next row is worked as follows: Work the first 35-39-42-45-50-54 stitches (= front piece), place the next 70-76-80-84-92-98 stitches on 1 thread for the sleeve and cast on 6-6-6-8-10-12 new stitches on the needle (= in side under the sleeve), work the next 68-76-82-88-98-106 stitches (= back piece), place the next 70-76-80-84-92-98 stitches on 1 thread for the sleeve and cast on 6-6-6-8-10-12 new stitches on the needle (= in side under the sleeve), work the remaining 35-39-42-45-50-54 stitches (= front piece). THE PIECE IS NOW MEASURED FROM HERE! BODY: = 150-166-178-194-218-238 stitches. Continue with stocking stitch and 1 edge stitch in garter stitch on each side. When the piece measures 25-24-24-24-22-21 cm from the division, knit 1 row from the right side where you increase 1 stitch = 151-167-179-195-219-239 stitches. Change to circular needle size 4 mm. The next row is worked as follows from the wrong side: 1 edge stitch in garter stitch, * purl 1, knit 1 *, work from *-* until there are 2 stitches left on the row, purl 1 and finish with 1 edge stitch in garter stitch. Continue this rib for 4 cm. Loosely cast off with knit over knit and purl over purl, read CASTING-OFF TIP. The jacket measures approx. 56-58-60-62-64-66 cm from the shoulder. SLEEVE: Place the 70-76-80-84-92-98 stitches from the thread on the one side of the piece on double pointed needles/short circular needle size 5 mm and knit up 1 stitch in each of the 6-6-6-8-10-12 stitches cast on under the sleeve = 76-82-86-92-102-110 stitches. Insert a marker thread in the middle of the 6-6-6-8-10-12 stitches under the sleeve. Allow the thread to follow your work onwards; it will be used when decreasing under the sleeve. Start at the marker thread and continue with stocking stitch and A.1 in the round. When the piece measures 3 cm from the division, decrease 2 stitches under the sleeve – read DECREASE TIP. Decrease like this every 3½-3-2-1½-1-1 cm a total of 10-11-13-16-19-21 times = 56-60-60-60-64-68 stitches. Continue working until the sleeve measures 38-36-34-33-29-27 cm from the division (or to desired length; shorter measurements in larger sizes due to longer yoke). Work 1 round where you decrease 12 stitches evenly over the stitches in A.1 = 44-48-48-48-52-56 stitches. Change to double pointed needles size 4 mm and work rib (= knit 1, purl 1) for 4 cm. Loosely cast off with knit over knit and purl over purl but to avoid the cast-off edge being tight, use double pointed needles size 5 mm. Work the other sleeve in the same way. BANDS/NECK: Insert 1 marker, middle-back of the neck, to help you knit up half the stitches around the jacket. The bands are knitted up inside the 1 edge stitch on the front pieces and the stitches around the neck are knitted up inside the first row worked. Start from the right side at the bottom of the right front piece – knit up approx. 119-125-131-137-143-149 stitches, up the front piece and halfway around the neck, using circular needle size 4 mm and 1 strand of each quality – leave the marker here. Knit up approx. 120-126-132-138-144-150 stitches around the other half of the neck and down the left front piece; the number of stitches should be divisible by 2 + 1 = approx. 239-251-263-275-287-299 stitches. It is important that the bands are neither too loose or too tight. The next row is worked as follows from the wrong side: 2 stitches in garter stitch, * purl 1, knit 1 *, work from *-* until there are 3 stitches left, purl 1 and finish with 2 stitches in garter stitch. Continue this rib for 1½ cm. Now work the BUTTONHOLES on the right band – read description above. Continue the rib until the bands measure 3 cm. Loosely cast off with knit over knit and purl over purl, remember the CASTING-OFF TIP ASSEMBLY: Sew the buttons onto the left band. |
|||||||||||||||||||
Diagram explanations |
|||||||||||||||||||
|
|||||||||||||||||||
 |
|||||||||||||||||||
Have you finished this pattern?Tag your pictures with #dropspattern #deepwoodscardigan or submit them to the #dropsfan gallery. Do you need help with this pattern?You'll find 30 tutorial videos, a Comments/Questions area and more by visiting the pattern on garnstudio.com. © 1982-2026 DROPS Design A/S. We reserve all rights. This document, including all its sub-sections, has copyrights. Read more about what you can do with our patterns at the bottom of each pattern on our site. |
|||||||||||||||||||


With over 40 years in knitting and crochet design, DROPS Design offers one of the most extensive collections of free patterns on the internet - translated to 17 languages. As of today we count 324 catalogues and 12239 patterns translated into English (UK/cm). 12239
We work hard to bring you the best knitting and crochet have to offer, inspiration and advice as well as great quality yarns at incredible prices! Would you like to use our patterns for other than personal use? You can read what you are allowed to do in the Copyright text at the bottom of all our patterns. Happy crafting!
Post a comment to pattern DROPS 215-6
We would love to hear what you have to say about this pattern!
If you want to leave a question, please make sure you select the correct category in the form below, to speed up the answering process. Required fields are marked *.