
Popular categories
Looking for a yarn?


Comments / Questions (32)
![]() Laplus wrote:
Laplus wrote:
Bonjour, pourquoi vos modèles sont-ils tjrs aussi compliqués à comprendre même pour une tricoteuse avertie? ! C'est décourageant malgré les beaux modèles proposés....je vais tenter à ma mode et si pas j'abandonnerai , le tricot doit resté un plaisir et pas une casse-tête... Dommage Belle journée!
04.06.2022 - 09:22DROPS Design answered:
Bonjour Mme Laplus, les modèles sont écrits par des stylistes scandinaves qui ont probablement une façon différente d'écrire que celle à laquelle vous êtes habituée, mais si vous suivez bien les indications pas à pas, vous y arriverez, et au pire, posez votre question ici ou bien demandez conseil à votre magasin, on vous aidera, même par mail ou téléphone. Bon tricot!
07.06.2022 - 10:37
![]() Freya wrote:
Freya wrote:
Hi! I want to ask about the ribbon tie. Is it right that the ribbon in on the each side of the front piece?
07.04.2022 - 06:37DROPS Design answered:
Hi Freya, Yes, the ribbon tie comes from the sides of the front pieces and around the waist to the front. Happy knitting!
07.04.2022 - 06:55
![]() Anna wrote:
Anna wrote:
"Increase inside 3 edge stitches in garter stitch. Increase 1 stitch by making 1 yarn over. On next row (wrong side) purl yarn over twisted to avoid holes. Then work the increased stitches in stocking stitch." Can you help me explain this part?
06.04.2022 - 13:44DROPS Design answered:
Dear Anna, when working the increases for the armholes, increase at the beginning of the row from RS as follows: work 3 sts in garter stitch, make 1 yarn over / increase at the end of the row from WS as follows: work until 3 sts remain, make 1 yarn over, work 3 sts in garter stitch. On the next row from wrong side, purl the yarn over twisted (the new stitches are worked in stocking stitch, not in garter stitch). Happy knitting!
06.04.2022 - 16:31
![]() Chris wrote:
Chris wrote:
Jeg behøver lidt hjælp med farvevalg, da det er svært at vurdere farverne på skærmen (og jeg har ikke mulighed for at besøge en fysisk butik). Hvilken farve Kid-Silk vil I anbefale til Alpaca - Skovgrøn mix 7815? Og hvilken farve Kid-Silk vil gå godt med Alpaca - Havbrise mix 7323?
06.06.2021 - 10:02DROPS Design answered:
Hei Chris. Fargevalg er ganske personlig og vanskelig å gi en 100% perfekt anbefaling. Ønsker du en mix som gir et lysere resultat eller mørk? Til f.eks DROPS Alpaca skog grønn, passer både DROPS Kid-Silk nordsjø nr. 37, mørkgrønn nr. 19 og for et lysere forslag salvie grønn nr. 34. Til DROPS Alpaca Havbrise, som både har litt grønt og blått i seg, kommer det an på om du ønsker en blåtone eller grønn tone. Sjekk ut da f.eks DROPS Kid-Silk salvie nr. 34, eplegrønn nr. 18, lys jeansblå nr. 08 eller blå tåke nr. 06. mvh DROPS design
07.06.2021 - 10:18
![]() Sandrine GREKOV wrote:
Sandrine GREKOV wrote:
Bonjour, Est-il possible de faire le dos et les devants plus longs que spécifié ? Une fois les dernières diminutions faites, peut-on continuer tout droit ou doit-on faire d'autres diminutions si on veut rallonger le dos et les devants ?
04.04.2021 - 22:50DROPS Design answered:
Bonjour Mme Grekov, fort probablement, vous pouvez même augmenter sur les côtés pour un effet cintré. Inspirez-vous d'un modèle de la longueur souhaitée dans la même tension si besoin. Bon tricot!
06.04.2021 - 14:07
![]() Rachel Burston wrote:
Rachel Burston wrote:
Hi there! I can’t find any information for how many balls of yarns I would need for this. How many balls of the Drops Alpaca and Drops Kid Silk would I need for a size small? Thanks
25.03.2021 - 18:28DROPS Design answered:
Dear Mrs Burston, you will find the total weight of each yarn required for each size under the header; ie in S you will need 200 g DROPS Alpaca/50 g a bal = 4 balls Alpaca + 75 g DROPS Kid-Silk/25 g a ball = 4 balls Kid-Silk. Happy knitting!
26.03.2021 - 07:08
![]() Catherine wrote:
Catherine wrote:
Hi, I just wanted to ask you to clarify the bit where it says, "Slip right shoulder and left shoulder on to same circular needle size 5 mm = 60-62-62-64-66-68 stitches. Begin from right side and work 3 ridges in garter stitch over all stitches." Does this mean the two shoulder back pieces are together because on the pictures it looks like there are apart. Thank you.
19.01.2021 - 22:19DROPS Design answered:
Dear Catherine, you first work 2 cm on each shoulder casting on new stitches for neck at the end of right shoulder, then, after left shoulder has been worked you work from right side: the 22 stitches on left shoulder, the 16 to 24 new stitches cast on at the end of right shoulder for neck ending with the 22 stitches for left shoudler = you should have now 60 to 68 sts on needle. Happy knitting!
20.01.2021 - 07:42
![]() Brianna wrote:
Brianna wrote:
In the right front piece it says "increase 1 stitch in the side for armhole - continue to increase the same way as on back piece" does this mean to increase every 4th row 8 times and then every other row or just every other row?
09.07.2020 - 18:06DROPS Design answered:
Dear Briana, in the 3rd size you will increase for armhole 1 stitch towards armhole (1 st increased on front piece) 8 times in total every 4th row than cast on 3 sts at the end of next row towards armhole. Happy knitting!
10.07.2020 - 07:47
![]() Julia Jonas wrote:
Julia Jonas wrote:
Would you please explain where i do increases for the right front piece ( when garment is worn) it says "When piece measures 4 cm = 1 1/2”, increase for neck line inside A.1 towards mid front - so where are the increases done? Does it mean the increases are just before the lace pattern? I have been increasing after the first 5 stitches (3 garter, 2 stocking st.)
19.03.2020 - 15:29DROPS Design answered:
Dear Mrs Jonas, when piece measures 4 cm you will increase on right front piece 1 stitch before A.1 (as explained under INCREASE-TIP 2, ie work RS row until 17 stitches remain (= A.1) make 1 yarn over and work the 17 sts in A.1 as before. And continue increasing like this, ie always just before A.1. Happy knitting!
19.03.2020 - 15:55
![]() Christina wrote:
Christina wrote:
Jeg har nu strikket bagstykket og skal i gang med højre forstykke. Jeg kan ikke forstå at der står at jeg skal strikke 3 masker retstrik, 2 m glatstrik og så mønster. Skal man ikke se blusen som om man selv har den på og så man kigger ned på den ? Eller er "højre" set fra én der kigger hen på blusen ? Jeg kan slet ikke få det til at give mening. Den rille der er mellem glatstrik og mønster er det retstrik eller er det vrangmasker eller noget ?
03.02.2020 - 21:40DROPS Design answered:
Hej Christina, vi beskriver stykkerne som når man selv har tøjet på :)
11.02.2020 - 10:36
|
|||||||||||||||||||
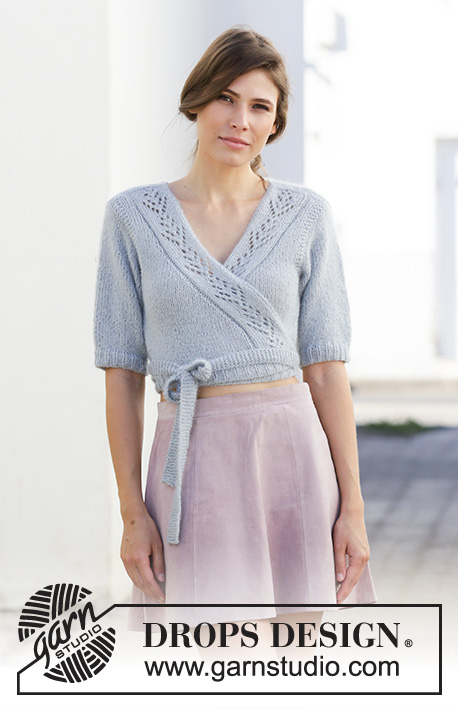
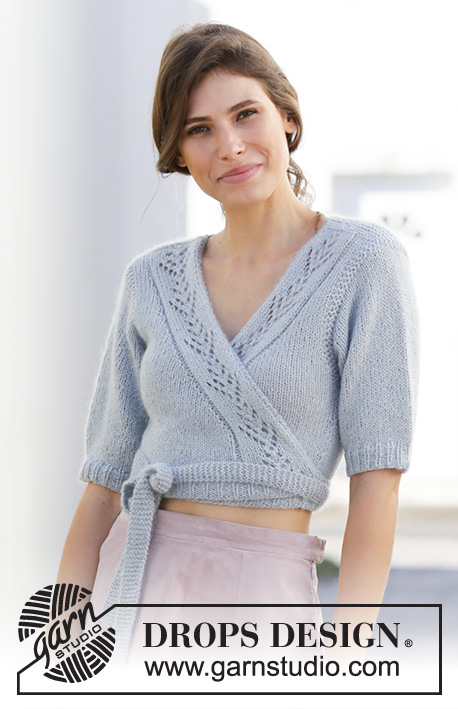
Holiday in Rome#holidayinromewrap |
|||||||||||||||||||
 |
 |
||||||||||||||||||
Knitted wrap-around jacket in DROPS Alpaca and DROPS Kid-Silk. Piece is knitted top down with lace pattern. Size: S - XXXL
DROPS 199-48 |
|||||||||||||||||||
|
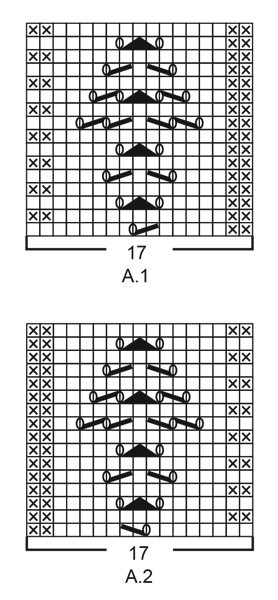
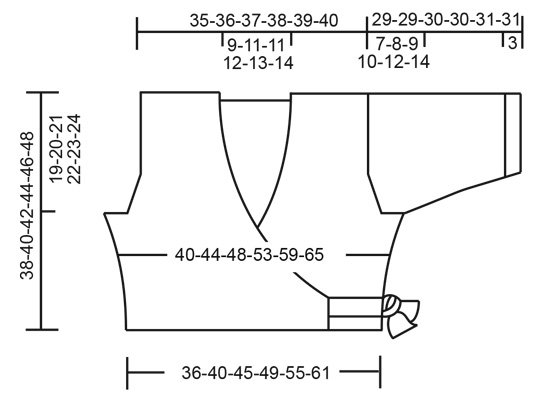
---------------------------------------------------------- EXPLANATION FOR THE PATTERN: ---------------------------------------------------------- GARTER STITCH (back and forth): Knit all rows. 1 ridge vertically = knit 2 rows. PATTERN: See diagrams A.1 and A.2. Diagrams show all rows in pattern seen from the right side. INCREASE TIP-1 (applies to armholes): All increases are done from the right side. Increase inside 3 edge stitches in garter stitch. Increase 1 stitch by making 1 yarn over. On next row (wrong side) purl yarn over twisted to avoid holes. Then work the increased stitches in stocking stitch. INCREASE TIP-2 (applies to neckline at the front): Increase for neck inside 17 stitches in A.1/A.2. Increase 1 stitch by making 1 yarn over. On next row (wrong side) purl yarn over twisted to avoid holes. Then work the increased stitches in stocking stitch. DECREASE TIP-1 (applies to sides of body): All decreases are done from the right side! Decrease inside 1 edge stitch in garter stitch. Decrease as follows after 1 edge stitch in garter stitch: Slip 1 stitch knitwise, knit 1, pass slipped stitch over stitch worked. Decrease as follows before 1 edge stitch in garter stitch: Work until 2 stitches remain before edge stitch, knit 2 together. DECREASE TIP-2 (applies to mid under sleeves): Work until 3 stitches remain before marker thread, knit 2 together, knit 2 stitches (marker thread is between these 2 stitches), slip 1 stitch knitwise, knit 1, pass slipped stitch over stitch worked (= 2 stitches decreased). ---------------------------------------------------------- START THE PIECE HERE: ---------------------------------------------------------- WRAP-AOURND JACKET - SHORT OVERVIEW OF THE PIECE: Front pieces and back piece are worked back and forth on circular needle, top down. Then pick up stitches for ties. Sleeve cap is worked back and forth on circular needle, top down. Then work the rest of sleeve in the round on circular needle/double pointed needles top down. RIGHT SHOULDER BACK (when garment is worn): Cast on 22-22-22-22-22-22 stitches on circular needle size 4 mm with 1 strand Alpaca + 1 strand Kid-Silk (= 2 strands). Work 1 ridge in GARTER STITCH - read explanation above. Switch to circular needle size 5 mm, and continue with garter stitch until piece measures approx. 2 cm, on last row from wrong side cast on 16-18-18-20-22-24 new stitches on needle = 38-40-40-42-44-46 stitches. Put piece aside and work the left shoulder at the back. LEFT SHOULDER BACK (when garment is worn): Cast on 22-22-22-22-22-22 stitches on circular needle size 4 mm with 1 strand Alpaca + 1 strand Kid-Silk (= 2 strands). Work 1 ridge in GARTER STITCH - read explanation above. Switch to circular needle size 5 mm, and continue with garter stitch until piece measures approx. 2 cm, adjust so that last row is worked from wrong side. Now work parts together and work back piece as explained below. BACK PIECE: Slip right shoulder and left shoulder on to same circular needle size 5 mm = 60-62-62-64-66-68 stitches. Begin from right side and work 3 ridges in garter stitch over all stitches. Then work in stocking stitch with 3 edge stitches in garter stitch in each side towards armholes. When piece measures 17-14-8-11-9-7 cm, increase 1 stitch in each side for armholes – read INCREASE TIP-1. Increase like this every 4th-4th-4th-2nd-2nd-2nd row, 2-4-8-11-15-19 times in total in each side. Continue to work until piece measures 19-20-21-22-23-24 cm. Now cast on 3 new stitches for armholes at the end of the next 2 rows = 70-76-84-92-102-112 stitches. Work 4 rows in stocking stitch with 6 stitches in garter stitch in each side. Then work in stocking stitch with 1 edge stitch in garter stitch in each side. When piece measures 4 cm from armhole, decrease 1 stitch in each side - read DECREASE TIP-1 (= 2 stitches decreased). Repeat decrease when piece measures 8 and 12 cm = 64-70-78-86-96-106 stitches. Work until piece measures 16-17-18-19-20-21 cm from armhole, at the same time, on last row from wrong side adjust number of stitches to 64-70-79-85-97-106 stitches (back piece measures now approx. 35-37-39-41-43-45 cm from shoulder). Switch to circular needle size 4 mm and work next row from right side as follows: 1 edge stitch in garter stitch, * purl 2, knit 1 *, repeat from *-* until 3 stitches remain on needle, purl 2 and finish with 1 edge stitch in garter stitch. Continue rib like this for 3 cm. Loosely cast off stitches with knit over knit and purl over purl. Back piece measures approx. 38-40-42-44-46-48 cm from shoulder. RIGHT FRONT PIECE (when garment is worn): Cast on 22-22-22-22-22-22 stitches on circular needle size 4 mm with 1 strand Alpaca + 1 strand Kid-Silk (= 2 strands). Work 1 ridge. Switch to circular needle size 5 mm and work next row from right side as follows: 3 edge stitches in garter stitch towards armhole, 2-2-2-2-2-2 stitches in stocking stitch, A.1 (= 17 stitches). Continue pattern back and forth like this. When piece measures 4 cm, increase for neck line inside A.1 towards mid front - read INCREASE TIP-2. Increase like this every 4th row (i.e. every other row from right side) 8-8-9-11-12-13 times in total and then every other row (i.e. every row from right side) 17-18-17-16-16-16 times in total. At the same time when piece measures 17-14-8-11-9-7 cm, increase 1 stitch in the side for armhole - continue to increase the same way as on back piece. Work until piece measures 19-20-21-22-23-24 cm, and cast on 3 new stitches at the end of next row from wrong side. Continue as before with A.1 towards mid front, increase for neck line and stocking stitch but over the outermost 6 stitches towards the side work 2 ridges (i.e. this is done on the next 4 rows). Then work in stocking stitch with 1 edge stitch in garter stitch towards the side, and A.1 towards mid front (continue increase as before). When piece measures 4 cm from armhole, decrease 1 stitch in the side - read DECREASE TIP-1. Repeat decrease when piece measures 8-8-9-9-10-10 and 12-13-14-15-16-17 cm. After all increases and decreases, there are 49-52-56-60-65-70 stitches on needle. Work until piece measures 16-17-18-19-20-21 cm from armhole and at the same time, on last row from wrong side, adjust number of stitches to 49-52-58-61-64-70 stitches (35-37-39-41-43-45 cm from shoulder). Switch to circular needle size 4 mm and work next row from right side as follows: 1 edge stitch in garter stitch, * knit 1, purl 2 *, repeat from *-* until 3 stitches remain on needle (towards mid front), knit 1 and finish with 2 edge stitches in garter stitch. Continue rib like this for 3 cm - NOTE: Rib should fit nicely over A.1. Loosely cast off stitches with knit over knit and purl over purl. Front piece measures approx. 38-40-42-44-46-48 cm from shoulder. LEFT FRONT PIECE (when garment is worn): Cast on 22-22-22-22-22-22 stitches on circular needle size 4 mm with 1 strand Alpaca + 1 strand Kid-Silk (= 2 strands). Work 1 ridge. Switch to circular needle size 5 mm and work next row from right side as follows: Work A.2 (= 17 stitches), work 2 stitches in stocking stitch and finish with 3 edge stitches in garter stitch towards armhole. Continue pattern back and forth like this. When piece measures 4 cm, increase for neck line inside A.2 towards mid front - read INCREASE TIP-2. Increase like this every 4th row (i.e. every other row from right side) 8-8-9-11-12-13 times in total and then every other row (i.e. every row from right side) 17-18-17-16-16-16 times in total. At the same time when piece measures 17-14-8-11-9-7 cm, increase 1 stitch in the side for armhole - continue to increase the same way as on back piece and right front piece. Work until piece measures 19-20-21-22-23-24 cm, and cast on 3 new stitches at the end of next row from right side. Continue as before with A.2 towards mid front, increase for neck line and stocking stitch but over the outermost 6 stitches towards the side work 2 ridges (i.e. this is done on the next 4 rows). Then work in stocking stitch with 1 edge stitch in garter stitch towards the side, and A.2 towards mid front (continue increase as before). When piece measures 4 cm from armhole, decrease 1 stitch in the side - read DECREASE TIP-1. Repeat decrease when piece measures 8-8-9-9-10-10 and 12-13-14-15-16-17 cm. After all increases and decreases, there are 49-52-56-60-65-70 stitches on needle. Work until piece measures 16-17-18-19-20-21 cm from armhole and at the same time, on last row from wrong side, adjust number of stitches to 49-52-58-61-64-70 stitches (35-37-39-41-43-45 cm from shoulder). Switch to circular needle size 4 mm and work next row from right side as follows: 2 edge stitches in garter stitch towards mid front, * knit 1, purl 2 *, repeat from *-* until 2 stitches remain on needle, knit 1 and finish with 1 edge stitch in garter stitch towards the side. Continue rib like this for 3 cm - NOTE: Rib should fit nicely over A.2. Loosely cast off stitches with knit over knit and purl over purl. Front piece measures approx. 38-40-42-44-46-48 cm from shoulder. SLEEVE: Cast on 22-24-26-28-24-26 stitches on circular needle size 5 mm with 1 strand Alpaca + 1 strand Kid-Silk. Work stocking stitch back and forth to sleeve cap, and cast at the same time on new stitches at the end of every row in each side as follows: Cast on 3 stitches 1 time in each side, 2 stitches 3-3-3-3-4-4 times in each side, 1 stitch 0-1-2-3-3-5 times in each side, 2 stitches 3-3-3-3-4-4 times in each side, and then 3 stitches 1 time in each side = 58-62-66-70-74-80 stitches. Put piece together and continue in the round on double pointed needles/a short circular needle. Insert 1 marker thread where piece is put together = mid under sleeve. Use marker thread later when decreasing mid under sleeve. Work in stocking stitch in the round. When piece measures 4 cm from where it was put together, decrease 2 stitches mid under sleeve - read DECREASE TIP-2. Decrease like this every 4-3-2-1½-1-1 cm 3-4-5-6-7-9 times in total = 52-54-56-58-60-62 stitches. Work until piece measures 19-18-18-17-16-14 cm from where piece was put together. Switch to double pointed needles size 4 mm and work rib in the round (knit 1/purl 2) for 3 cm, at the same time adjust number of stitches to 54-54-57-57-60-63 on first round. Loosely cast off stitches with knit over knit and purl over purl. Sleeve measures approx. 29-29-30-30-31-31 cm from cast-on edge and down. Work another sleeve the same way. ASSEMBLY: Sew shoulder seams inside cast-off edge. Sew side seam inside 1 edge stitch but leave an opening in each side to thread the ties through - place opening just above the rib in each side, and 2½–3 cm up towards armholes. Insert sleeves inside edge in garter stitch along armholes and fasten neatly from right side (the edge should not be loose when sewing: sew in the outermost stitch in garter stitch from right side, so that the edge in garter stitch lies nicely on top of sleeve). TIE RIBBON: Pick up on needle size 4 mm with 1 strand of each quality: Approx. 6-7 stitches along rib edge at the front. Work in garter stitch back and forth until tie measures approx. 75-100 cm, cast off. Knit another tie on the other front piece. |
|||||||||||||||||||
Diagram explanations |
|||||||||||||||||||
|
|||||||||||||||||||
 |
|||||||||||||||||||
 |
|||||||||||||||||||
Have you finished this pattern?Tag your pictures with #dropspattern #holidayinromewrap or submit them to the #dropsfan gallery. Do you need help with this pattern?You'll find 28 tutorial videos, a Comments/Questions area and more by visiting the pattern on garnstudio.com. © 1982-2026 DROPS Design A/S. We reserve all rights. This document, including all its sub-sections, has copyrights. Read more about what you can do with our patterns at the bottom of each pattern on our site. |
|||||||||||||||||||


With over 40 years in knitting and crochet design, DROPS Design offers one of the most extensive collections of free patterns on the internet - translated to 17 languages. As of today we count 324 catalogues and 12290 patterns translated into English (UK/cm). 12290
We work hard to bring you the best knitting and crochet have to offer, inspiration and advice as well as great quality yarns at incredible prices! Would you like to use our patterns for other than personal use? You can read what you are allowed to do in the Copyright text at the bottom of all our patterns. Happy crafting!
Post a comment to pattern DROPS 199-48
We would love to hear what you have to say about this pattern!
If you want to leave a question, please make sure you select the correct category in the form below, to speed up the answering process. Required fields are marked *.