
Popular categories
Looking for a yarn?


Comments / Questions (32)
![]() Mira wrote:
Mira wrote:
I am at the beginning of the project and it already seems too small for the back. I am knitting in size S and normally even an S here on drops design is way too big for me so I changed the yarn and went down 1 size in needles for this project. Is it supposed to seem small and a trust the process project or is it smarter to start all over with a larger size (but even if I go to M its only 2 stitches more so I am quite confused haha). Thank you :)
25.09.2025 - 08:11DROPS Design answered:
Hi Mira, please see the lesson HERE in order to decide what size should be chosen. Happy knitting!
25.09.2025 - 09:38
![]() Kaitlin wrote:
Kaitlin wrote:
Never mind my question, I figured it out.
19.09.2025 - 12:27
![]() Kaitlin wrote:
Kaitlin wrote:
For the sleeve at the very beginning, do I knit one or two rows before adding stitches on each end? Or what is meant by "to the sleeve cap" (tot de mouwkop)? It doesn't make sense to add stitches immediately when starting knitting the cast on stitches (could have cast on those 2x 3 stitches to begin with). Answer in either English or Dutch is fine.
12.09.2025 - 17:52DROPS Design answered:
Hi Kaitlin, after casting on your stitches, knit 1st row and add 3 stitches at the end. Then purl next row and add 3 stitches at the end, etc. Happy knitting!
22.10.2025 - 16:27
![]() Sharryn wrote:
Sharryn wrote:
Hi there If i am right in between sizes, should I go up or down? My chest measurement is 101cm. Thank you 😊
05.08.2025 - 11:28DROPS Design answered:
Dear Sharryn, if you are not sure you should always work the larger size, since those are the final garment measurements. For a 101 cm bust you should work the XL size, with a 106cm bust, since the L size has a bust of 96 cm, which is too narrow for your size. Happy knitting!
05.08.2025 - 11:41
![]() Riviere wrote:
Riviere wrote:
Merci je viens de comprendre. J ai utilisé la laine air et ça donne un résultat très joli !
13.11.2023 - 16:18
![]() Riviere wrote:
Riviere wrote:
Ma question est : doit on relever les 7 mailles des liens dans l emplacement des 3 cm non cousu des côtés soit au dessus des côtes Merci
13.11.2023 - 16:13DROPS Design answered:
Bonjour Mme Riviere, non, cet espace est prévu pour pouvoir y passer les liens, vous relevez les mailles des lien le long du bas des côtes, en bas des devants, autrement dit à droite du devant droit, vu sur l'endroit et à gauche du devant gauche, vu sur l'endroit, cf schéma où ces liens (au moins celui du devant droit) a été dessiné. Bon tricot!
14.11.2023 - 10:08
![]() Riviere wrote:
Riviere wrote:
Bonjour, j en suis aux liens. Dans l assemblage on laisse une ouverture de 3cm au dessus des cotes. Et au liteau des explications des lien, on relève 7 mailles le long des côtes. L espace dans les côtés ne doivent ils pas êtres au niveau des liens ? Merci
13.11.2023 - 13:00DROPS Design answered:
Bonjour Mme Riviere, on relève les mailles des liens le long des rangs des côtes, le long de chacun des devants pour tricoter les liens, et, lors de l'assemblage des côtés, laissez une ouverture d'environ 2,5 à 3 cm pour y passer les liens, vous pouvez attendre d'avoir terminé les liens pour faire les coutures, ce sera plus facile de visualiser où prévoir cette ouverture. Bon tricot!
13.11.2023 - 16:12
![]() Alyssa wrote:
Alyssa wrote:
Is the indicated knitting gauge (of 17 stitches in width and 22 rows vertically) the knitting gauge for the 4 mm or 5 mm needles, as both are used in the pattern? Thank you!
17.09.2023 - 12:37DROPS Design answered:
Dear Alyssa, you use the 5mm for the stocking stitch in the pattern. Since the gauge is worked in stocking stitch then you should use the 5mm needles. Happy knitting!
17.09.2023 - 21:29
![]() Micaela wrote:
Micaela wrote:
Hei, en ymmärrä mitä tämä tarkoittaa: "Samanaikaisesti kun työn pituus on 17-14-8-11-9-7 cm, lisää sivuun kädentietä varten 1 silmukka. Toista kädentien lisäykset kuten takana. " Eli mitä toistetaan ja miten? Missä takana? Kiitos!
18.05.2023 - 13:31DROPS Design answered:
Hei, kädentien lisäykset toistetaan kuten takakappaleessa. Eli lisää kädentien reunaan 1 silmukka ja toista lisäys joka 4.-4.-4.-2.-2.-2. kerros yhteensä 2-4-8-11-15-19 kertaa.
18.05.2023 - 16:21
![]() Kat wrote:
Kat wrote:
Hallo! Ich stricke gerade das Modell und bin ganz begeistert. Auf den Bildern der anderen Strickerinnen hat die Jacke lange Ärmel. Wie geht das? Gibt es vielleicht Tipps dazu/eine Vorlage oder ein anderes Modell, von dem ich die Ärmel übernehmen könnte? Vielen Dank!
12.09.2022 - 11:12DROPS Design answered:
Liebe Kat, Sie können sich von ähnlichn Modellen mit langen Ärmeln und die gleiche Maschenprobe inspirieren. Viel Spaß beim stricken!
12.09.2022 - 12:10
|
|||||||||||||||||||
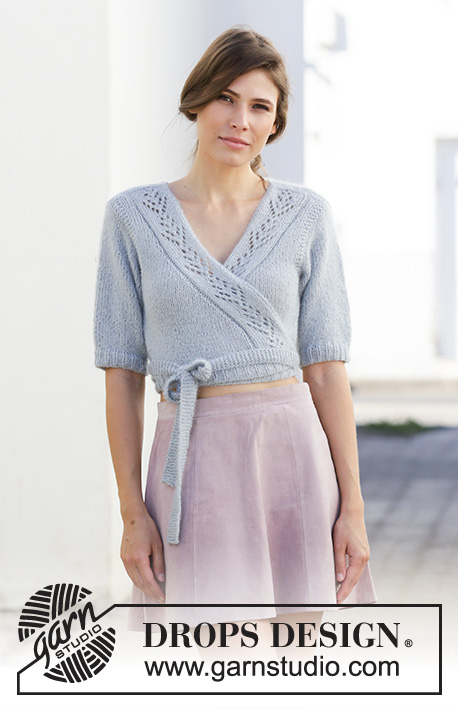
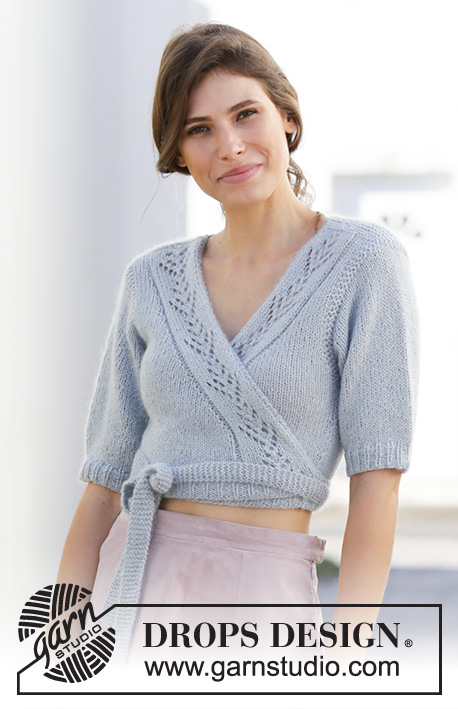
Holiday in Rome#holidayinromewrap |
|||||||||||||||||||
 |
 |
||||||||||||||||||
Knitted wrap-around jacket in DROPS Alpaca and DROPS Kid-Silk. Piece is knitted top down with lace pattern. Size: S - XXXL
DROPS 199-48 |
|||||||||||||||||||
|
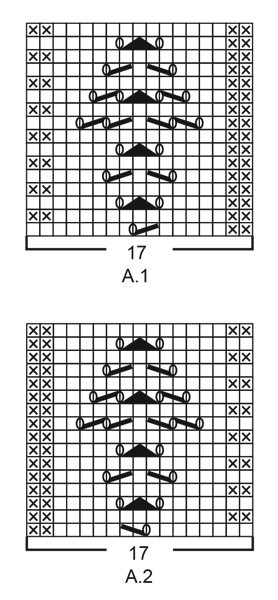
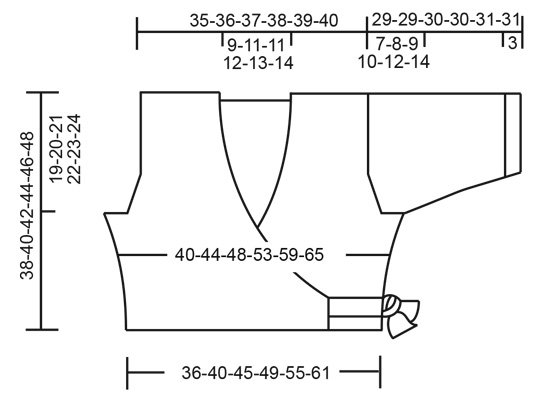
---------------------------------------------------------- EXPLANATION FOR THE PATTERN: ---------------------------------------------------------- GARTER STITCH (back and forth): Knit all rows. 1 ridge vertically = knit 2 rows. PATTERN: See diagrams A.1 and A.2. Diagrams show all rows in pattern seen from the right side. INCREASE TIP-1 (applies to armholes): All increases are done from the right side. Increase inside 3 edge stitches in garter stitch. Increase 1 stitch by making 1 yarn over. On next row (wrong side) purl yarn over twisted to avoid holes. Then work the increased stitches in stocking stitch. INCREASE TIP-2 (applies to neckline at the front): Increase for neck inside 17 stitches in A.1/A.2. Increase 1 stitch by making 1 yarn over. On next row (wrong side) purl yarn over twisted to avoid holes. Then work the increased stitches in stocking stitch. DECREASE TIP-1 (applies to sides of body): All decreases are done from the right side! Decrease inside 1 edge stitch in garter stitch. Decrease as follows after 1 edge stitch in garter stitch: Slip 1 stitch knitwise, knit 1, pass slipped stitch over stitch worked. Decrease as follows before 1 edge stitch in garter stitch: Work until 2 stitches remain before edge stitch, knit 2 together. DECREASE TIP-2 (applies to mid under sleeves): Work until 3 stitches remain before marker thread, knit 2 together, knit 2 stitches (marker thread is between these 2 stitches), slip 1 stitch knitwise, knit 1, pass slipped stitch over stitch worked (= 2 stitches decreased). ---------------------------------------------------------- START THE PIECE HERE: ---------------------------------------------------------- WRAP-AOURND JACKET - SHORT OVERVIEW OF THE PIECE: Front pieces and back piece are worked back and forth on circular needle, top down. Then pick up stitches for ties. Sleeve cap is worked back and forth on circular needle, top down. Then work the rest of sleeve in the round on circular needle/double pointed needles top down. RIGHT SHOULDER BACK (when garment is worn): Cast on 22-22-22-22-22-22 stitches on circular needle size 4 mm with 1 strand Alpaca + 1 strand Kid-Silk (= 2 strands). Work 1 ridge in GARTER STITCH - read explanation above. Switch to circular needle size 5 mm, and continue with garter stitch until piece measures approx. 2 cm, on last row from wrong side cast on 16-18-18-20-22-24 new stitches on needle = 38-40-40-42-44-46 stitches. Put piece aside and work the left shoulder at the back. LEFT SHOULDER BACK (when garment is worn): Cast on 22-22-22-22-22-22 stitches on circular needle size 4 mm with 1 strand Alpaca + 1 strand Kid-Silk (= 2 strands). Work 1 ridge in GARTER STITCH - read explanation above. Switch to circular needle size 5 mm, and continue with garter stitch until piece measures approx. 2 cm, adjust so that last row is worked from wrong side. Now work parts together and work back piece as explained below. BACK PIECE: Slip right shoulder and left shoulder on to same circular needle size 5 mm = 60-62-62-64-66-68 stitches. Begin from right side and work 3 ridges in garter stitch over all stitches. Then work in stocking stitch with 3 edge stitches in garter stitch in each side towards armholes. When piece measures 17-14-8-11-9-7 cm, increase 1 stitch in each side for armholes – read INCREASE TIP-1. Increase like this every 4th-4th-4th-2nd-2nd-2nd row, 2-4-8-11-15-19 times in total in each side. Continue to work until piece measures 19-20-21-22-23-24 cm. Now cast on 3 new stitches for armholes at the end of the next 2 rows = 70-76-84-92-102-112 stitches. Work 4 rows in stocking stitch with 6 stitches in garter stitch in each side. Then work in stocking stitch with 1 edge stitch in garter stitch in each side. When piece measures 4 cm from armhole, decrease 1 stitch in each side - read DECREASE TIP-1 (= 2 stitches decreased). Repeat decrease when piece measures 8 and 12 cm = 64-70-78-86-96-106 stitches. Work until piece measures 16-17-18-19-20-21 cm from armhole, at the same time, on last row from wrong side adjust number of stitches to 64-70-79-85-97-106 stitches (back piece measures now approx. 35-37-39-41-43-45 cm from shoulder). Switch to circular needle size 4 mm and work next row from right side as follows: 1 edge stitch in garter stitch, * purl 2, knit 1 *, repeat from *-* until 3 stitches remain on needle, purl 2 and finish with 1 edge stitch in garter stitch. Continue rib like this for 3 cm. Loosely cast off stitches with knit over knit and purl over purl. Back piece measures approx. 38-40-42-44-46-48 cm from shoulder. RIGHT FRONT PIECE (when garment is worn): Cast on 22-22-22-22-22-22 stitches on circular needle size 4 mm with 1 strand Alpaca + 1 strand Kid-Silk (= 2 strands). Work 1 ridge. Switch to circular needle size 5 mm and work next row from right side as follows: 3 edge stitches in garter stitch towards armhole, 2-2-2-2-2-2 stitches in stocking stitch, A.1 (= 17 stitches). Continue pattern back and forth like this. When piece measures 4 cm, increase for neck line inside A.1 towards mid front - read INCREASE TIP-2. Increase like this every 4th row (i.e. every other row from right side) 8-8-9-11-12-13 times in total and then every other row (i.e. every row from right side) 17-18-17-16-16-16 times in total. At the same time when piece measures 17-14-8-11-9-7 cm, increase 1 stitch in the side for armhole - continue to increase the same way as on back piece. Work until piece measures 19-20-21-22-23-24 cm, and cast on 3 new stitches at the end of next row from wrong side. Continue as before with A.1 towards mid front, increase for neck line and stocking stitch but over the outermost 6 stitches towards the side work 2 ridges (i.e. this is done on the next 4 rows). Then work in stocking stitch with 1 edge stitch in garter stitch towards the side, and A.1 towards mid front (continue increase as before). When piece measures 4 cm from armhole, decrease 1 stitch in the side - read DECREASE TIP-1. Repeat decrease when piece measures 8-8-9-9-10-10 and 12-13-14-15-16-17 cm. After all increases and decreases, there are 49-52-56-60-65-70 stitches on needle. Work until piece measures 16-17-18-19-20-21 cm from armhole and at the same time, on last row from wrong side, adjust number of stitches to 49-52-58-61-64-70 stitches (35-37-39-41-43-45 cm from shoulder). Switch to circular needle size 4 mm and work next row from right side as follows: 1 edge stitch in garter stitch, * knit 1, purl 2 *, repeat from *-* until 3 stitches remain on needle (towards mid front), knit 1 and finish with 2 edge stitches in garter stitch. Continue rib like this for 3 cm - NOTE: Rib should fit nicely over A.1. Loosely cast off stitches with knit over knit and purl over purl. Front piece measures approx. 38-40-42-44-46-48 cm from shoulder. LEFT FRONT PIECE (when garment is worn): Cast on 22-22-22-22-22-22 stitches on circular needle size 4 mm with 1 strand Alpaca + 1 strand Kid-Silk (= 2 strands). Work 1 ridge. Switch to circular needle size 5 mm and work next row from right side as follows: Work A.2 (= 17 stitches), work 2 stitches in stocking stitch and finish with 3 edge stitches in garter stitch towards armhole. Continue pattern back and forth like this. When piece measures 4 cm, increase for neck line inside A.2 towards mid front - read INCREASE TIP-2. Increase like this every 4th row (i.e. every other row from right side) 8-8-9-11-12-13 times in total and then every other row (i.e. every row from right side) 17-18-17-16-16-16 times in total. At the same time when piece measures 17-14-8-11-9-7 cm, increase 1 stitch in the side for armhole - continue to increase the same way as on back piece and right front piece. Work until piece measures 19-20-21-22-23-24 cm, and cast on 3 new stitches at the end of next row from right side. Continue as before with A.2 towards mid front, increase for neck line and stocking stitch but over the outermost 6 stitches towards the side work 2 ridges (i.e. this is done on the next 4 rows). Then work in stocking stitch with 1 edge stitch in garter stitch towards the side, and A.2 towards mid front (continue increase as before). When piece measures 4 cm from armhole, decrease 1 stitch in the side - read DECREASE TIP-1. Repeat decrease when piece measures 8-8-9-9-10-10 and 12-13-14-15-16-17 cm. After all increases and decreases, there are 49-52-56-60-65-70 stitches on needle. Work until piece measures 16-17-18-19-20-21 cm from armhole and at the same time, on last row from wrong side, adjust number of stitches to 49-52-58-61-64-70 stitches (35-37-39-41-43-45 cm from shoulder). Switch to circular needle size 4 mm and work next row from right side as follows: 2 edge stitches in garter stitch towards mid front, * knit 1, purl 2 *, repeat from *-* until 2 stitches remain on needle, knit 1 and finish with 1 edge stitch in garter stitch towards the side. Continue rib like this for 3 cm - NOTE: Rib should fit nicely over A.2. Loosely cast off stitches with knit over knit and purl over purl. Front piece measures approx. 38-40-42-44-46-48 cm from shoulder. SLEEVE: Cast on 22-24-26-28-24-26 stitches on circular needle size 5 mm with 1 strand Alpaca + 1 strand Kid-Silk. Work stocking stitch back and forth to sleeve cap, and cast at the same time on new stitches at the end of every row in each side as follows: Cast on 3 stitches 1 time in each side, 2 stitches 3-3-3-3-4-4 times in each side, 1 stitch 0-1-2-3-3-5 times in each side, 2 stitches 3-3-3-3-4-4 times in each side, and then 3 stitches 1 time in each side = 58-62-66-70-74-80 stitches. Put piece together and continue in the round on double pointed needles/a short circular needle. Insert 1 marker thread where piece is put together = mid under sleeve. Use marker thread later when decreasing mid under sleeve. Work in stocking stitch in the round. When piece measures 4 cm from where it was put together, decrease 2 stitches mid under sleeve - read DECREASE TIP-2. Decrease like this every 4-3-2-1½-1-1 cm 3-4-5-6-7-9 times in total = 52-54-56-58-60-62 stitches. Work until piece measures 19-18-18-17-16-14 cm from where piece was put together. Switch to double pointed needles size 4 mm and work rib in the round (knit 1/purl 2) for 3 cm, at the same time adjust number of stitches to 54-54-57-57-60-63 on first round. Loosely cast off stitches with knit over knit and purl over purl. Sleeve measures approx. 29-29-30-30-31-31 cm from cast-on edge and down. Work another sleeve the same way. ASSEMBLY: Sew shoulder seams inside cast-off edge. Sew side seam inside 1 edge stitch but leave an opening in each side to thread the ties through - place opening just above the rib in each side, and 2½–3 cm up towards armholes. Insert sleeves inside edge in garter stitch along armholes and fasten neatly from right side (the edge should not be loose when sewing: sew in the outermost stitch in garter stitch from right side, so that the edge in garter stitch lies nicely on top of sleeve). TIE RIBBON: Pick up on needle size 4 mm with 1 strand of each quality: Approx. 6-7 stitches along rib edge at the front. Work in garter stitch back and forth until tie measures approx. 75-100 cm, cast off. Knit another tie on the other front piece. |
|||||||||||||||||||
Diagram explanations |
|||||||||||||||||||
|
|||||||||||||||||||
 |
|||||||||||||||||||
 |
|||||||||||||||||||
Have you finished this pattern?Tag your pictures with #dropspattern #holidayinromewrap or submit them to the #dropsfan gallery. Do you need help with this pattern?You'll find 28 tutorial videos, a Comments/Questions area and more by visiting the pattern on garnstudio.com. © 1982-2026 DROPS Design A/S. We reserve all rights. This document, including all its sub-sections, has copyrights. Read more about what you can do with our patterns at the bottom of each pattern on our site. |
|||||||||||||||||||


With over 40 years in knitting and crochet design, DROPS Design offers one of the most extensive collections of free patterns on the internet - translated to 17 languages. As of today we count 324 catalogues and 12290 patterns translated into English (UK/cm). 12290
We work hard to bring you the best knitting and crochet have to offer, inspiration and advice as well as great quality yarns at incredible prices! Would you like to use our patterns for other than personal use? You can read what you are allowed to do in the Copyright text at the bottom of all our patterns. Happy crafting!
Post a comment to pattern DROPS 199-48
We would love to hear what you have to say about this pattern!
If you want to leave a question, please make sure you select the correct category in the form below, to speed up the answering process. Required fields are marked *.