
Popular categories
Looking for a yarn?


Comments / Questions (19)
![]() LeFoe wrote:
LeFoe wrote:
Guten Tag! Am Ende des Rumpfteils steht für Größe „es ergibt sich eine Gesamtlänge von 52cm“. Kann das sein, dass das ein Fehler ist? Nach meiner Rechnung sind es 45cm und erst 52cm, wenn die Halsblende hinzugefügt wurde am Ende der Arbeit. Mit freundlichen Grüßen, Leonie Förster
05.10.2025 - 11:19DROPS Design answered:
Hi LeFoe, when you lay the jamper flat, its length (without neck edge) should be 52 cm, you have to measure from the highest point on the shoulder closest to the neckline, and straight down to the bottom of the garment. See the schematic drawing, the neck edge is laying flat on the shoulder, so it does not lengthen the jumper total length. Happy knitting!
15.11.2025 - 19:27
![]() Dörthe wrote:
Dörthe wrote:
Hallo, kann es sein, dass sich im Teil „Streifen Ärmel“ ein Fehler eingeschlichen hat? Ich soll in der 3. Größe 11 cm in hellrosa stricken und inklusive der 2 cm aus der Passe sollen das dann 10 cm sein. Bei mir sind das 13 cm, oder denke ich falsch? Viele Grüße Dörthe
17.09.2025 - 13:15DROPS Design answered:
Liebe Dörthe, danke für den Hinweis, Sie haben Recht und der Fehler wird nun behoben! Entschuldigen Sie die späte Rückmeldung. Viel Spaß beim Stricken!
23.10.2025 - 20:16
![]() Gunilla wrote:
Gunilla wrote:
Hej! Hur stickar man omslaget vridet avigt, så att det inte blir hål?
21.02.2025 - 10:53DROPS Design answered:
Hej Gunilla. I denna video ser du hur du stickar en vriden avig maska. Mvh DROPS Design
21.02.2025 - 11:27
![]() Deb Hobson wrote:
Deb Hobson wrote:
How many grammes/balls would be needed to knit the cardigan in one shade for the smallest size please? I'm assuming it's fewer than all the colours added together 😊
07.06.2023 - 20:18DROPS Design answered:
Dear Mrs Hobson, we unfortunately have no experience with this jumper worked with a single colour as it was worked with stripes, and we don't have the piece anymore. You can add all colours together, you might require somewhat less - your DROPS store will be able to help you - even per mail or telephone. Thanks for your comprehension. Happy knitting!
08.06.2023 - 09:23
![]() Victoria wrote:
Victoria wrote:
When starting the rib at the lower part of the body the pattern says to 'knit one for from the wrong side while increasing 2 stitches'. This leaves a ridge of stitches on the right side before going into the ribbed section, which looks strange. Should it be a purl row on the row of increases? Many thanks
05.06.2023 - 14:16DROPS Design answered:
Dear Victoria, correct, this row should be purled from the wrong side, pattern has been fixed, thanks for your feedback. Happy knitting!
05.06.2023 - 17:32
![]() Vickyf wrote:
Vickyf wrote:
I'm doing this lovely cardigan in size medium but my tension is very different to the suggested 16 stitches and 20 rows. I've got 16 stitches and 26 rows. Will the yoke shaping work as mine only measure 16 cms after finishing the increases (rather than 20mins). Thanks
20.05.2023 - 23:27DROPS Design answered:
Dear Vicky, since your tension is higher in amount of rows, that means that you work too many rows in 10 cm. You need to reach the necessary length of the yoke (20 cm), so you may need to spread out your increases, so as to reach the necessary number of stitches by the time the piece measures 20cm. For example, instead of increasing every other row, increase every other row at the beginning and then, after having worked 2/3 of the increases, start increasing every 4th row instead. Happy knitting!
21.05.2023 - 18:52
![]() Ana Cecilia Ramirez wrote:
Ana Cecilia Ramirez wrote:
Når man strikker opp maskene til Venstre stolpe begynner man ned til halsen eller halsen til nede? Takk for hjelpen
11.06.2022 - 19:51DROPS Design answered:
Hei Ana Cecilia. Du skal strikke opp masker fra retten og da blir det fra halsen og ned. mvh DROPS Design
13.06.2022 - 10:07
![]() Ana Cecilia Ramirez wrote:
Ana Cecilia Ramirez wrote:
Hvilken end skal man begynne å strikke opp maskene til Venstre stolpen? Fra halsen eller fra neden.?
11.06.2022 - 19:36
![]() Erin wrote:
Erin wrote:
Est-il possible de rajouter un léger décolleté ? Si oui, comment ?
19.02.2021 - 18:36DROPS Design answered:
Bonjour Erin, tout à fait, vous pouvez par exemple tricoter une réhausse pour que l'encolure dos soit plus haute que celle du devant - pour ceci, vous pouvez vous inspirer d'un modèle de même tension qui en propose une. Bon tricot!
22.02.2021 - 07:27
![]() Anne wrote:
Anne wrote:
To get the 10 1/4 inch length before I separate the sleeves and body, I will have more stitches. What should I do to match the pattern count? Also, when I separate the sleeves and body I do it on a wrong side row? Do the yarn overs just slide onto the stitch holder too? How do I knit them in the round? 😊
12.09.2020 - 19:46DROPS Design answered:
Dear Anne, check your tension, you should have 20 rows = 4" - if you have less rows, yoke will be too long, you can compensate by working less rows between the increase rows for raglan. The dividing row is worked from WS, if you still have some yarn overs on the needle, just count them as stitches when counting/dividing pieces. This lesson shows how to work a jumper top down and could help you with this jacket. Happy knitting!
14.09.2020 - 08:44
|
|
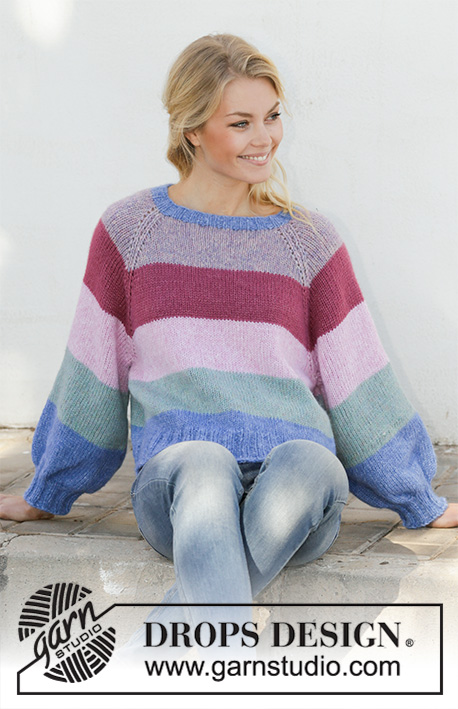
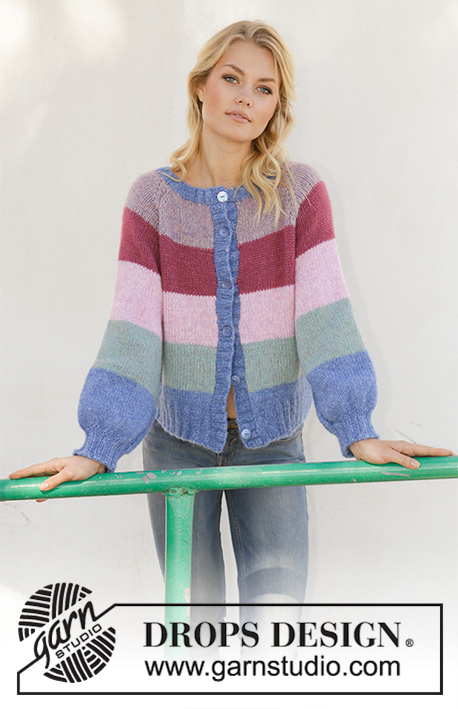
Sweet Country Sunrise Jacket#sweetcountrysunrisejacket |
|
 |
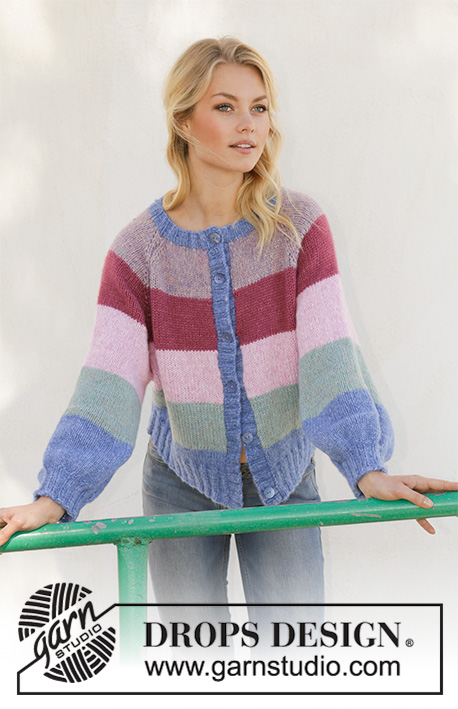 |
Knitted jacket with stripes, balloon sleeves and raglan. Piece is worked in DROPS Air, top down. Size: S - XXXL
DROPS 202-21 |
|
|
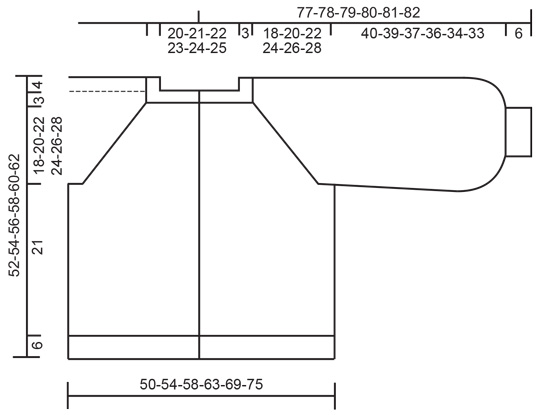
---------------------------------------------------------- EXPLANATION FOR THE PATTERN: ---------------------------------------------------------- GARTER STITCH (back and forth): K all rows. 1 ridge vertically = knit 2 rows. STRIPES YOKE: Work stripes in stocking stitch, top down as follows: 9-9-10-10-11-11 cm with colour 15, purple haze, 9-9-10-10-11-11 cm with colour 14, heather, 0-2-2-4-4-6 cm with colour 08, light pink. STRIPES BODY: Work stripes in stocking stitch, top down as follows: 9-7-8-6-7-5 cm with colour 08, light pink (i.e. the stripe in light pink is 9-9-10-10-11-11 cm in total including rounds from yoke), 9-9-10-10-11-11 cm with colour 27, sea green, 9-11-9-11-9-11 cm (or until finished measurements) with colour 16, blue. STRIPES SLEEVE: Work stripes in the round in stocking stitch, top down as follows: 13-11-11-9-9-8 cm with colour 08, light pink (i.e. the stripe in light pink is 13-13-13-13-13-14 cm in total including rounds from yoke), 13-13-13-13-13-14 cm with colour 27, sea green, 20-21-19-20-18-17 cm (or until finished measurements) with colour 16, blue. RAGLAN: All increases are done from the right side. Increase for raglan on each side of the 4 markers in every transition between sleeves and body as follows: Work until 1 stitch remains before marker, make 1 yarn over, knit 2 (marker is between these 2 stitches), make 1 yarn over (= 1 stitch increased on each side of marker and 8 stitches increased in total on row.) On next row (wrong side) purl yarn overs twisted to avoid holes. Then work the new stitches in stocking stitch. INCREASE TIP (applies to mid under sleeves): Work until 2 stitches remain before marker thread, make 1 yarn over, knit 4 (marker thread is in the middle of these 4 stitches), make 1 yarn over = 2 stitches increased. On next round knit yarn overs twisted to avoid holes. Then work the new stitches in stocking stitch. DECREASE TIP (evenly): To calculate how to decrease evenly, use the total number of stitches on row (e.g. 112 stitches), minus edge stitches (2 stitches) and divide the remaining stitches by number of decreases to be done (e.g. 26) = 4.2. In this example decrease by working approx. every 3rd and 4th stitch together. KNITTING TIP (applies to sleeve length): Length on sleeves can be adjusted as explained in pattern but note that the sleeve length should be a bit longer than usual to make the sleeve baggy at the bottom. ---------------------------------------------------------- START THE PIECE HERE: ---------------------------------------------------------- JACKET - SHORT OVERVIEW OF THE PIECE: Work yoke back and forth on circular needle from mid front, work top down. Now divide yoke for body and sleeves. Work body back and forth from mid front, top down. Work sleeves in the round on double pointed needles/short circular needle, top down. Work bands along mid front and finish with a neck edge. Work entire garment in stocking stitch with stripes and edges in rib. YOKE: Read all of the following section on yoke before working! Cast on 102-106-114-114-118-126 stitches (including 1 edge stitch in each side towards mid front) on circular needle size 5.5 mm with purple haze. Purl 1 row (= wrong side). Insert 4 marker in piece as follows (without working the stitches): Count 20-21-22-22-23-25 stitches (= front piece), insert 1 marker before next stitch, count 12-12-14-14-14-14 stitches (= sleeve), insert 1 marker before next stitch, count 38-40-42-42-44-48 stitches (= back piece), insert 1 marker before next stitch, count 12-12-14-14-14-14 stitches (= sleeve), insert 1 marker before next stitch. There are 20-21-22-22-23-25 stitches after last marker on front piece. Work STRIPES YOKE with 1 edge stitch in GARTER STITCH in each side towards mid front - read explanation above. REMEMBER THE KNITTING TENSION! AT THE SAME TIME on first row from right side increase for RAGLAN – see explanation above. Increase for raglan like this on every other row (i.e. every row from right side) 18-20-21-24-26-28 times in total = 246-266-282-306-326-350 stitches. After last increase piece measures approx. 18-20-22-24-26-28 cm from neck edge mid front. If the garment is shorter than this, continue until correct measurements. Work next row as follows from wrong side: Work 38-41-43-47-51-56 stitches as before (= front piece), slip the next 48-52-56-60-62-64 stitches on 1 stitch holder for sleeve, cast on 6-6-8-8-10-10 new stitches on row (= in the side under sleeve), work 74-80-84-92-100-110 stitches as before (= back piece), slip the next 48-52-56-60-62-64 stitches on 1 stitch holder for sleeve, cast on 6-6-8-8-10-10 new stitches on row (= in the side under sleeve) and work the 38-41-43-47-51-56 stitches as before (= front piece). Finish body and sleeves separately. NOW MEASURE THE PIECE FROM HERE! BODY: = 162-174-186-202-222-242 stitches. Work STRIPES BODY - read explanation above, with 1 edge stitch in garter stitch in each side towards mid front. When piece measures 21 cm from division in all sizes, purl 1 row from wrong side while increasing 2 stitches evenly in all sizes = 164-176-188-204-224-244 stitches. Switch to circular needle size 4.5 mm. Work next row as follows from right side: 1 edge stitch in garter stitch, * knit 2, purl 2 *, repeat from *-* until 3 stitches remain on needle, knit 2 and finish with 1 edge stitch in garter stitch. Continue rib like this for 6 cm. Loosely cast off stitches with knit over knit and purl over purl. To avoid a tight cast-off edge cast off with circular needle size 5.5 mm (this applies to all cast-off edge on this garment). Jacket measures approx. 52-54-56-58-60-62 cm from shoulder and down. SLEEVE: Slip the 48-52-56-60-62-64 stitches from stitch holder in one side of piece double pointed needles/a short circular needle size 5.5 mm and pick in addition up 1 stitch in each of the 6-6-8-8-10-10 new stitches cast on under sleeve = 54-58-64-68-72-74 stitches. Insert 1 marker thread at beginning of round (= mid under sleeve). Use marker thread later when increasing under sleeve. Work STRIPES SLEEVE - see explanation above. AT THE SAME TIME when piece measures 4 cm from division in all sizes, increase 2 stitches mid under sleeve - READ INCREASE TIP. Increase like this every 3½-3½-3½-3-3-3 cm 9-9-8-8-8-8 times in total = 72-76-80-84-88-90 stitches. Continue to work until sleeve measures approx. 39-38-36-35-33-32 cm from division (approx. 7 cm remain until finished measurements - read KNITTING TIP). NOTE: Shorter measurements in the larger sizes because of wider neck and longer yoke. Knit 1 round while decreasing 0-4-0-4-0-2 stitches evenly = 72-72-80-80-88-88 stitches. On next round knit all stitches together 2 by 2 = 36-36-40-40-44-44 stitches. Switch to double pointed needles size 4.5 mm. Work rib in the round = knit 2/purl 2 for 6 cm. Loosely cast off stitches with knit over knit and purl over purl. Sleeve measures approx. 46-45-43-42-40-39 cm from division. Work the other sleeve the same way. LEFT BAND: Pick up from right side inside 1 edge stitch in garter stitch, approx. 85 to 109 stitches along left front piece on circular needle size 4.5 mm with blue (number of stitches should be divisible by 4 + 1). Work first row as follows from wrong side: 2 edge stitches in garter stitch, * purl 2, knit 2 *, repeat from *-* until 3 stitches remain on needle, purl 2 and finish with 1 edge stitch in garter stitch. Continue rib like this for 2½-3 cm. Loosely cast off stitches with knit over knit and purl over purl. RIGHT BAND: Pick up from right side inside 1 edge stitch in garter stitch, approx. 85 to 109 stitches along right front piece on circular needle size 4.5 mm with blue (number of stitches should be divisible by 4 + 1). Work first row as follows from wrong side: 1 edge stitch in garter stitch, * purl 2, knit 2 *, repeat from *-* until 4 stitches remain on needle, purl 2 and finish with 2 edge stitches in garter stitch. Continue rib like this but after approx. 1-1½ cm decrease evenly for 5-5-5-6-6-6 buttonholes. Bottom buttonhole should be approx. 2-3 cm from bottom edge, and top buttonhole approx. 5-6 cm from neck edge. 1 buttonhole = work 2 stitches together and make 1 yarn over - Note: Decreasing in the purl sections will look more pretty (from right side). Continue rib until it measure the same as left band. Loosely cast off stitches with knit over knit and purl over purl. NECK EDGE: Pick up from right side approx. 112-116-124-124-128-136 stitches along the entire neck on circular needle size 4.5 mm with blue. Purl 1 row from wrong side while decreasing evenly to 86-90-94-98-102-106 stitches – read DECREASE TIP! Work next row as follows from right side: 2 edge stitches in garter stitch, * knit 2, purl 2 *, repeat from *-* until 4 stitches remain on needle, knit 2 and finish with 2 edge stitches in garter stitch. Continue rib like this but after approx. 1-1½ cm cast off for 1 buttonhole over the other holes on right band. Continue until neck edge measures approx. 3 cm, cast off with knit over knit and purl over purl. ASSEMBLY: Sew the buttons on to the left band. |
|
 |
|
Have you finished this pattern?Tag your pictures with #dropspattern #sweetcountrysunrisejacket or submit them to the #dropsfan gallery. Do you need help with this pattern?You'll find 29 tutorial videos, a Comments/Questions area and more by visiting the pattern on garnstudio.com. © 1982-2026 DROPS Design A/S. We reserve all rights. This document, including all its sub-sections, has copyrights. Read more about what you can do with our patterns at the bottom of each pattern on our site. |
|


With over 40 years in knitting and crochet design, DROPS Design offers one of the most extensive collections of free patterns on the internet - translated to 17 languages. As of today we count 324 catalogues and 12290 patterns translated into English (UK/cm). 12290
We work hard to bring you the best knitting and crochet have to offer, inspiration and advice as well as great quality yarns at incredible prices! Would you like to use our patterns for other than personal use? You can read what you are allowed to do in the Copyright text at the bottom of all our patterns. Happy crafting!
Post a comment to pattern DROPS 202-21
We would love to hear what you have to say about this pattern!
If you want to leave a question, please make sure you select the correct category in the form below, to speed up the answering process. Required fields are marked *.