
Popular categories
Looking for a yarn?


Comments / Questions (129)
![]() Nadine wrote:
Nadine wrote:
Hallo. Die Markierung des Rumpfteils betreffend. Kommt die Markierung quasi nach 3 von den 6 neu angeschlagenen Maschen? Danke
06.04.2021 - 14:00DROPS Design answered:
Liebe Nadine, die Markierung an beiden Seiten sind genau in der Mitte von den 6 neu angeschlagenen Maschen zugenommen. Viel Spaß beim stricken!
06.04.2021 - 15:07
![]() Nadine wrote:
Nadine wrote:
Hallo. Das Muster A1 und A2 beginnt das mit einer Hin oder Rückreihe? Danke.
02.04.2021 - 08:31DROPS Design answered:
Liebe Nadine, die Muster beginnen beide mit einer Hin-Reihe. Gutes Gelingen!
04.04.2021 - 23:42
![]() Annick Poncelet wrote:
Annick Poncelet wrote:
Joli modèle intemporel
01.04.2021 - 13:16
![]() Nadine wrote:
Nadine wrote:
Hallo. Wie stricke ich die 5 Blendemaschen? Kraus rechts?
24.03.2021 - 11:42DROPS Design answered:
Liebe Nadine, ja genau, die 5 Blendemaschen beidseitig werden krausrechts gestrickt. Viel Spaß beim stricken!
24.03.2021 - 12:51
![]() Nola wrote:
Nola wrote:
Please could i knit this on 2 needles and not on a round needle. Thanks
07.03.2021 - 11:28DROPS Design answered:
Dear Nola, round yoked sweaters, are much easier to knit on circulars, than on straight needles. Not entirely impossible, a cardigan is somewhat easier to do on straights than circulars, but it involves uncomfortably many stitces on a short(er) needle, sewing up the sleeves, and other modifications. These styles are really designed for circular needles. Sorry. Do not forget, yoou can always ask for help, either in person, or over the phone, in the store, you bought your DROPS yarn from. Happy knitting!
08.03.2021 - 03:29
![]() Elizabeth wrote:
Elizabeth wrote:
Hej! Jag älskar mönster Agnes (Modell sk-001-bn). Går det att göra mönster en storlek större då vuxen model av liknande mönster är för stor? Alltså den största storlek är för 11/12 år, så den skulle passa typ 12/13. Tack på förhand! Mvh Elizabeth
15.02.2021 - 20:17DROPS Design answered:
Hej, der er 5 cm forskel i bredden på de to størrelser. Det er svært at lave mønsteret om i og med du behøver det rigtige antal masker for at få diagrammerne til at gå op hele vejen rundt. Så du er nok nødt til at vælge en af dem :)
19.02.2021 - 14:26
![]() Kerstin wrote:
Kerstin wrote:
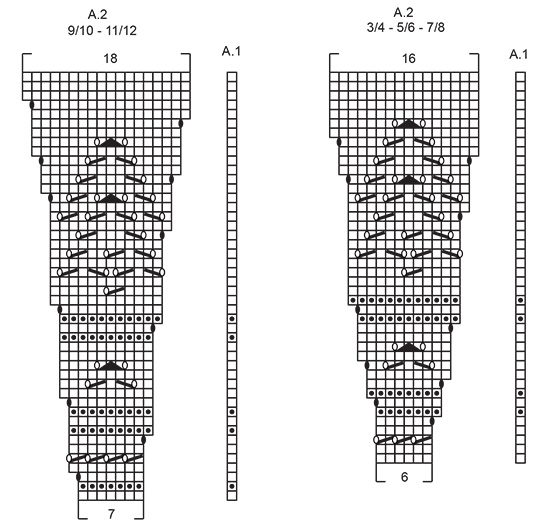
Hallo, Wie komme ich beim Strickmuster Agnes auf 235 Maschen, wenn Diagramm A1 und A2 fertig gestrickt sind? Wo nehme ich Maschen zu? Liebe Grüße
14.02.2021 - 16:14DROPS Design answered:
Liebe Kerstin, die Zunahmen sind in A.2 gezeichnet (siehe 5. Symbol). Diagramme stricken Sie bei der 1. Reihe so: 5 Blenden-Maschen, A.1 (= 1 Masche), 14 x A.2 (=14x6= 84Maschen), 5 Blenden-Maschen (= 95 M) - wenn A.1/A.2 fertig sind, dann haben Sie 16 M in jedem A.2: 5 Blenden-Maschen, A.1 (= 1 Masche), 14 x A.2 (= 14x16=224 Maschen), 5 Blenden-Maschen = 235 Maschen. Viel Spaß beim stricken!
15.02.2021 - 09:06
![]() Valentina wrote:
Valentina wrote:
Ahhh that makes sense. Thank you so much! I got confused because the piece is knitted from top to bottom, so I though it would be the same with the diagram. Thanks again!
08.01.2021 - 10:13
![]() Valentina wrote:
Valentina wrote:
Hello! I'm doing size 5/6 and have just tried the 6th row of the diagram, where there are still 16 stitches. With 84 total stitches for the 16-stitch diagram (leaving aside 10 for the bands and 1 for A1), I end up with 4 stitches left (as expected, considering that 16x5=80). I don't know what to do with those 4? Do I just restart A2 and pick up from stitch 12 in the next row? Thank you!
07.01.2021 - 23:03DROPS Design answered:
Dear Valentina, diagrams should be read from the bottom up, ie you start A.2 with 6 sts and work like this: 5 front band sts in garter st, A.1 (= 1 st), repeat 14 times the 6 sts in A.2 over the next 84 sts, and finish with 5 front band st in garter st = 5+1+84+5= 95 sts. You will increase on 4th row in diagram with a yarn over, there will be 7 sts in each diagram. Continue like this, reading diagram from the right towards the left from RS and from the left towards the right from WS. Read more about diagrams here. Happy knitting!
08.01.2021 - 07:46
![]() Ann wrote:
Ann wrote:
Nu har jag läst alla kommentarer och förstår att mönstret är väldigt otydligt. Snälla ändra i mönstret så att man förstår att A1 bara ska vara först på varvet. (Om jag har fattat rätt)När jag läser mönstret kan jag inte förstå något annat än att A1 alltid följs av A2. Har lagt ner mycket jobb, så synd!
11.12.2020 - 09:41
|
||||||||||||||||||||||
Agnes#agnescardigan |
||||||||||||||||||||||
 |
 |
|||||||||||||||||||||
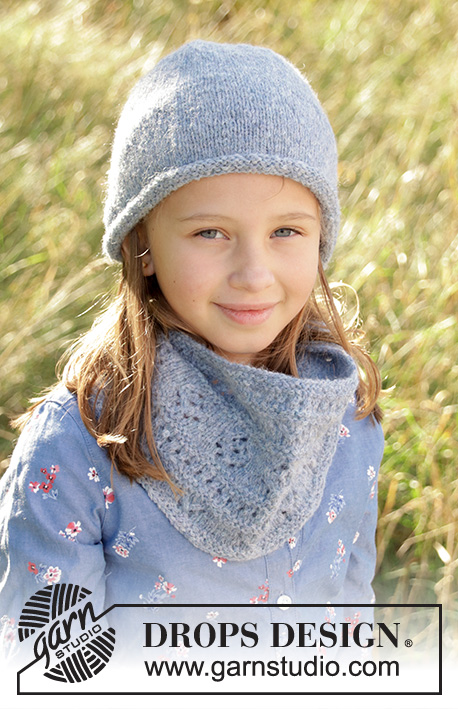
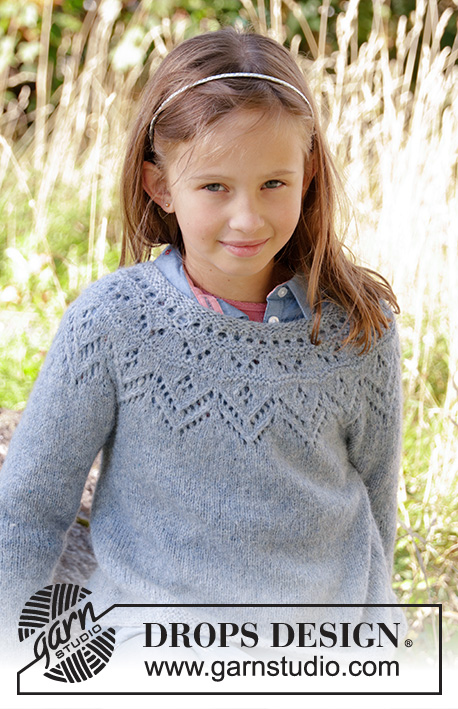
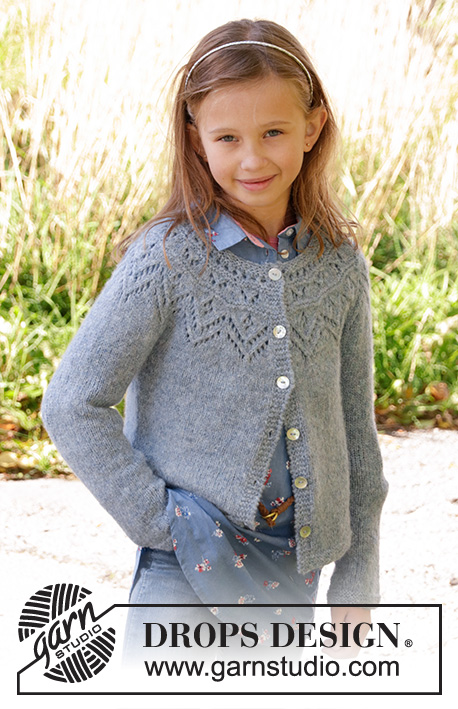
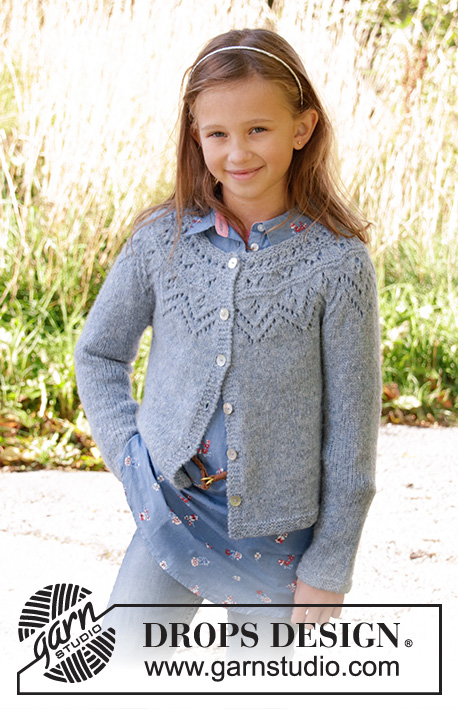
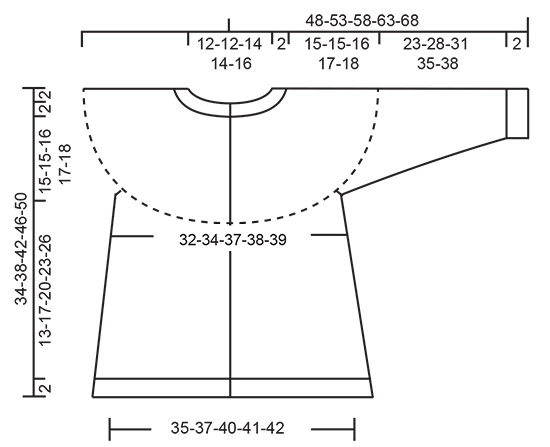
Knitted jacket for children in DROPS Sky. The piece is worked top down with round yoke, lace pattern, stocking stitch and garter stitch. Sizes 3-12 years.
DROPS Children 34-9 |
||||||||||||||||||||||
|
------------------------------------------------------- EXPLANATIONS FOR THE PATTERN: ------------------------------------------------------- RIDGE/GARTER STITCH (worked back and forth): 1 ridge = Knit 2 rows. RIDGE/GARTER STITCH (worked in the round): 1 ridge = 2 rounds. Knit 1 round and purl 1 round PATTERN: See diagrams A.1 and A.2. Choose diagram for your size. The diagrams show all the rows in the pattern seen from the right side. INCREASE TIP-1 (evenly spaced): To work out how to increase evenly, count the total number of stitches on the needle (e.g. 72 stitches) and divide by the number of increases to be made (e.g. 17) = 4.2. In this example, increase by making 1 yarn over after approx. each 4th stitch. On the next row work the yarn overs twisted to avoid holes. INCREASE TIP-2 (for sides of body): Work until there is 1 stitch left before the marker thread, 1 yarn over, knit 2 (the marker thread sits between these 2 stitches), 1 yarn over = 2 stitches increased. On the next row work the yarn overs twisted to avoid holes. Then work the new stitches in stocking stitch. DECREASE TIP (for sleeves): Decrease 1 stitch on each side of the marker thread as follows: Work until there are 3 stitches left before the marker thread, knit 2 together, knit 2 (the marker thread sits between these 2 stitches), slip 1 stitch as if to knit, knit 1 and pass the slipped stitch over the knitted stitch = 2 stitches decreased. BUTTONHOLE: Work the buttonholes on right band (when the garment is worn). 1 buttonhole = start from the wrong side and knit together the 2nd and 3rd stitch from the edge, make 1 yarn over. On the next row knit the yarn over to leave a hole. The first buttonhole is worked after approx. 1 cm from the neck edge, then the next 5-5-5-6-6 buttonholes every 5-6-6-6-7 cm. ------------------------------------------------------- START THE PIECE HERE: ------------------------------------------------------- JACKET - SHORT OVERVIEW OF THE PIECE: The piece is worked back and forth with circular needle, top down. It is divided for body and sleeves. The body is continued back and forth with circular needle. The sleeves are worked in the round with double pointed needles/short circular needle. YOKE: Cast on 72-76-80-86-92 stitches with circular needle size 4 mm and Sky. Work 2 RIDGES – see description above – remember BUTTONHOLES on right band – see description above. Knit 1 row where you increase 17-19-21-23-24 stitches evenly on row - READ INCREASE TIP-1! = 89-95-101-109-116 stitches on needle. Knit 1 row from the wrong side. Insert a marker thread on this round and measure from here. Work according to diagrams A.1 and A.2 as follows from the right side: Work 5 band stitches in GARTER STITCH, work A.1 over 1 stitch, A.2 a total of 13-14-15-14-15 times on the row and then 5 band stitches in garter stitch. REMEMBER THE KNITTING TENSION! When diagrams A.1 and A.2 have been completed in height there are 219-235-251-263-281 stitches on the row. On the next row from the right side adjust stitch count to 219-235-253-261-283 stitches. Continue working stocking stitch until the piece measures 15-15-16-17-18 cm from marker thread. The next row from the right side is worked as follows: Work 5 band stitches in garter stitch, 30-32-35-36-37 stitches in stocking stitch (= front piece), place the next 44-48-51-53-62 stitches on a thread (= sleeve), cast on 6 new stitches under the sleeve, work 61-65-71-73-75 stitches in stocking stitch (= back piece), place the next 44-48-51-53-62 stitches on a new thread (= sleeve), cast on 6 new stitches, work 30-32-35-36-37 stitches (= front piece) and 5 band stitches in garter stitch. BODY: There are 143-151-163-167-171 stitches on the needle. THE PIECE IS NOW MEASURED FROM HERE! Insert 1 marker thread in the middle of the 6 new stitches which were cast on in each side. Work stocking stitch back and forth with 5 band stitches in garter stitch on each side. When the piece measures 3 cm increase 1 stitch on each side of each marker (= 4 stitches increased) READ INCREASE TIP-2! Repeat this increase every 3-4½-5½-6½-7½ cm a total of 3 times = 155-163-175-179-183 stitches on needle. Continue working until the piece measures approx. 15-17-20-23-26 cm (or to desired length, there is approx. 2 cm until finished measurements). Work garter stitch for 2 cm. Loosely cast off with knit. Cut and fasten the thread. SLEEVE: Place the stitches from the one thread on short circular needle/double pointed needles size 4 mm (= 44-48-51-53-62 stitches) and knit up 1 new stitch in each of the 6 new stitches on the body (= 50-54-57-59-68 stitches). Insert 1 marker thread in the middle of these 6 stitches. Work stocking stitch in the round until the sleeve measures 3 cm. Now decrease 1 stitch on each side of the marker thread - READ DECREASE TIP. Continue with stocking stitch and repeat the decrease every 4-4-4-4-3½ cm until you have decreased a total of 5-6-7-8-10 times = 40-42-43-43-48 stitches on needle. Work stocking stitch until the sleeve measures 23-28-31-35-38 cm. Work garter stitch for 2 cm. Cast off with knit. Cut and fasten the strand. Work the other sleeve in the same way. ASSEMBLY: Sew buttons onto left band. |
||||||||||||||||||||||
Diagram explanations |
||||||||||||||||||||||
|
||||||||||||||||||||||
 |
||||||||||||||||||||||
 |
||||||||||||||||||||||
Have you finished this pattern?Tag your pictures with #dropspattern #agnescardigan or submit them to the #dropsfan gallery. Do you need help with this pattern?You'll find 28 tutorial videos, a Comments/Questions area and more by visiting the pattern on garnstudio.com. © 1982-2026 DROPS Design A/S. We reserve all rights. This document, including all its sub-sections, has copyrights. Read more about what you can do with our patterns at the bottom of each pattern on our site. |
||||||||||||||||||||||


With over 40 years in knitting and crochet design, DROPS Design offers one of the most extensive collections of free patterns on the internet - translated to 17 languages. As of today we count 324 catalogues and 12290 patterns translated into English (UK/cm). 12290
We work hard to bring you the best knitting and crochet have to offer, inspiration and advice as well as great quality yarns at incredible prices! Would you like to use our patterns for other than personal use? You can read what you are allowed to do in the Copyright text at the bottom of all our patterns. Happy crafting!
Post a comment to pattern DROPS Children 34-9
We would love to hear what you have to say about this pattern!
If you want to leave a question, please make sure you select the correct category in the form below, to speed up the answering process. Required fields are marked *.