
Popular categories
Looking for a yarn?


Comments / Questions (45)
![]() Delphine wrote:
Delphine wrote:
Bonjour, Très joli pull que je souhaiterai réaliser, peux ton réaliser cet ouvrage avec des aiguilles fixes ? Merci
22.02.2019 - 16:03DROPS Design answered:
Bonjour Delphine, seul le col de ce modèle se tricote en rond, le devant, le dos et les manches se tricotent en allers et retours sur aiguille circulaire pour avoir suffisamment de place pour toutes les mailles, vous pouvez donc utiliser des aiguilles droites, veillez juste à bien conserver la bonne tension car vos mailles seront plus serrées. Vous trouverez ici quelques informations complémentaires sur les aiguilles circulaires.. Bon tricot!
22.02.2019 - 16:40
![]() Eva wrote:
Eva wrote:
Susanne! A1 finns under ritningens ärm, det är bara 2maskor och 4 varv.
27.01.2019 - 15:51
![]() Susanne Nordstrand wrote:
Susanne Nordstrand wrote:
Hej. Hittade denna fantastiskt fina och lite ovanliga tröja. Men letar förjäves efter diagram A1. Är det jag som är korkad, eller är det så att det fallit bort ur mönstret ??? Ser fram emot ett snabbt svar, och ev en bilaga i ett mail om diagram A1 fattas.?! Vill gärna sticka denna tröja. Mvh Susanne.
24.01.2019 - 00:16DROPS Design answered:
Hej Susanne, A.1 hittar du till höger om måttskissen längst ner på sidan. Lycka till :)
24.01.2019 - 14:23
![]() Susanne Nordstrand wrote:
Susanne Nordstrand wrote:
Hej. Hittade denna fantastiskt fina och lite ovanliga tröja. Men letar förjäves efter diagram A1. Är det jag som är korkad, eller är det så att det fallit bort ur mönstret ??? Ser fram emot ett snabbt svar, och ev en bilaga i ett mail om diagram A1 fattas.?! Vill gärna sticka denna tröja. Mvh Susanne.
24.01.2019 - 00:14DROPS Design answered:
Hei Susanne. A.1 ligger helt nederst, ved siden av målskissen. Det er et lite diagram på kun 2 masker og 4 pinner. God fornøyelse
11.02.2019 - 08:53
![]() Rosa wrote:
Rosa wrote:
Kan er geen filmpje gemaakt worden van de steek en de meerderingen en minderingen?
08.01.2019 - 17:11DROPS Design answered:
Dag Rosa,
Je verzoek zal ik doorsturen naar de designafdeling.
11.01.2019 - 11:50
![]() Ingrid De Heij wrote:
Ingrid De Heij wrote:
Er staat dat je een rondbreinaald nodig hebt, maar daar brei je toch steeds aan dezelfde kant? Er wordt volgens het patroon heen en weer gebreid. En het voorpand en achterpand brei je apart. Kunt u mij uitleggen hoe dat zit?
04.01.2019 - 19:07DROPS Design answered:
Dag Ingrid,
Je kan deze trui inderdaad ook gewoon helemaal met rechte naalden breien.
05.01.2019 - 12:57
![]() Mankau wrote:
Mankau wrote:
Ich trage Größe 42 laut Skizze müsste ich Größe S stricken. Das kann nicht richtig sein.
22.12.2018 - 11:32DROPS Design answered:
Liebe Frau Mankau, messen Sie einen ähnlichen Pullover, die Sie haben und gerne tragen. Vergleichen Sie die verschiedenen Massen mit den in der Maßskizze um die passende Größe zu finden. Hier lesen Sie mehr über Grössen. Viel Spaß beim stricken!
02.01.2019 - 08:40
![]() Monika wrote:
Monika wrote:
Die Größenangaben können nicht stimmen. Ich trage Größe 42 und müsste demnach S stricken
22.12.2018 - 11:29
![]() Lia wrote:
Lia wrote:
Kunt u me svp helpen met de minderingen bij het figuurtje van het zwarte driehoekje met het lijntje omlaag. Kom er niet uit
29.10.2018 - 16:52DROPS Design answered:
Dag Lia,
Eerst haal je de omslag en de rechte steek recht of (dus op de rechter naald zetten zonder te breien) Dan brei je 1 averecht, 1 omslag en 1 recht. Deze laatste 3 (averecht, omslag en recht) zet je terug om de linker naald om ze vervolgens recht samen te breien. Dan haal je de omslag en de rechter steek over de zojuist samengebreide steken
01.01.2019 - 21:01
![]() Marja wrote:
Marja wrote:
Het is eindelijk gelukt met het patroon Bij Stella had je2 video's staan toen had ik het door hoe het moest De video's die bij het patroon staan daar had ik niks aan
27.09.2018 - 08:45
|
|||||||||||||||||||
Autumn Blush#autumnblushsweater |
|||||||||||||||||||
|
|
|||||||||||||||||||
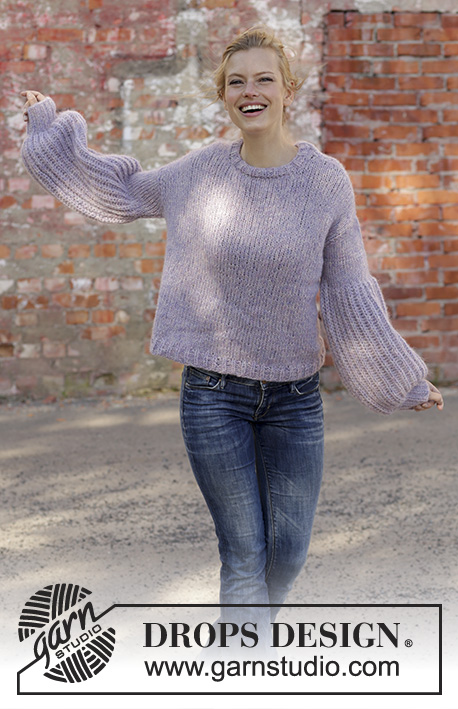
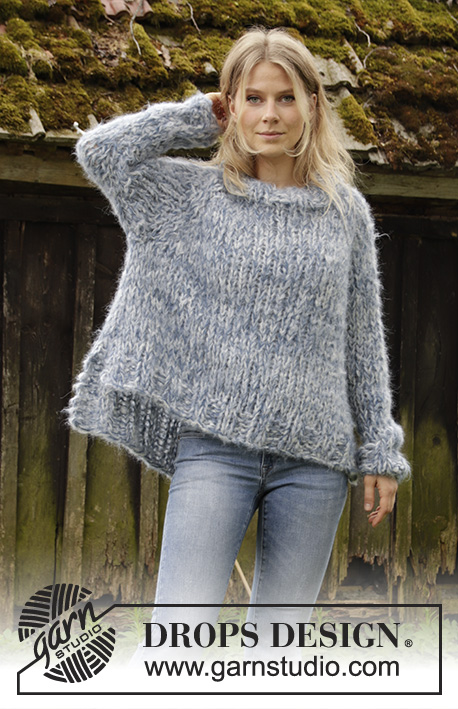
Knitted jumper with false English rib and displacements in DROPS Snow. Size: S - XXXL
DROPS 194-22 |
|||||||||||||||||||
|
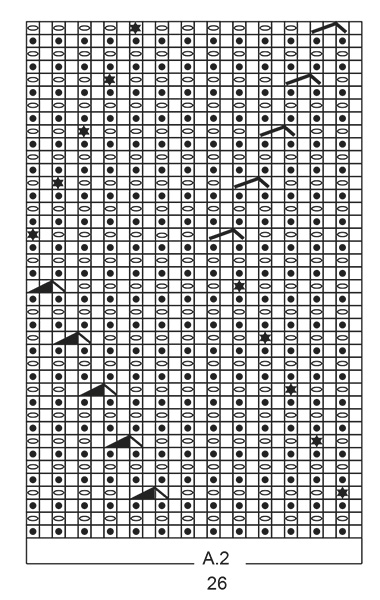
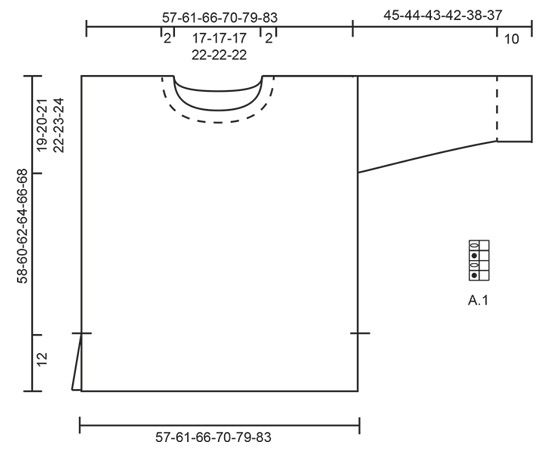
EXPLANATION FOR THE PATTERN: ---------------------------------------------------------- GARTER STITCH (back and forth): 1 ridge = knit 2 rows. PATTERN: See diagrams A.1 and A.2. Diagrams show all rows in pattern seen from the right side. INCREASE TIP: All increases are done from the right side. Work 1 edge stitch in garter stitch, knit 1, 1 yarn over (= 1 stitch increased), knit until 2 stitches remain, 1 yarn over (= 1 stitch increased), knit 1 and finish with 1 edge stitch in garter stitch (= 2 stitches increased in total). Knit yarn overs twisted on next row to avoid holes. ---------------------------------------------------------- START THE PIECE HERE: ---------------------------------------------------------- JUMPER - SHORT OVERVIEW OF THE PIECE: Worked back and forth. Finish front and back piece separately. Work sleeves back and forth on needle. FRONT PIECE: Cast on 78-84-90-96-108-114 stitches (including 1 edge stitch in each side) on circular needle size 9 mm with Snow. Work first row as follows from right side: Work 1 edge stitch in GARTER STITCH – read explanation above, * knit 1, purl 2 together *, work from *-* until 2 stitches remain, finish with knit 1 and 1 edge stitch in garter stitch = 53-57-61-65-73-77 stitches. Then work as follows from wrong side (read diagrams from left towards right): Work 1 edge stitch in garter stitch, A.1 (= 2 stitches) over the next 12-14-16-18-22-24 stitches, A.2 (= 26 stitches), A.1 over the next 13-15-17-19-23-25 stitches and finish with 1 edge stitch in garter stitch. I.e. pattern begins and ends with 1 knit stitch in false English rib inside 1 edge stitch in garter stitch in each side of piece, seen from right side. Continue pattern like this. REMEMBER THE KNITTING TENSION! When piece measures 48-50-50-52-52-54 cm (approx. 10-10-12-12-14-14 cm remain), work A.1 over all stitches (i.e. pattern continues straight up without displacements). On next row from right side cast off the middle 11-11-11-15-15-15 stitches for neck with knit over knit and purl over purl (1 yarn over and 1 knit stitch = 1 stitch) = 21-23-25-25-29-31 stitches on each shoulder. Stitch closest to the neck on each shoulder should now be a purl stitch from right side. Now finish each shoulder separately. RIGHT SHOULDER: On next row from the neck (= right side) work as follows: Work 1 stitch in garter stitch, slip yarn over and 1 stitch off the needle as if to knit together, purl 1, pass yarn over and stitch over stitch worked (= 1 stitch decreased), work the rest of row as before. Decrease like this on every row from right side 4 times in total = 17-19-21-21-25-27 stitches. Work until piece measures 58-60-62-64-66-68 cm in total. On next row from right side cast off. Knit together yarn overs and knit stitches while casting off and purl the purl stitches while casting off. LEFT SHOULDER: Work as right shoulder by decrease for neck at the end of every row from right side as follows: Work as before until 3 stitches remain (yarn over is not counted as stitch), knit purl stitch, yarn over and knit stitch together (= 1 stitch decreased) and finish with 1 stitch in garter stitch. BACK PIECE: Cast on 78-84-90-96-108-114 stitches (including 1 edge stitch in each side) on circular needle size 9 mm with Snow. Work first row as follows from right side: Work 1 edge stitch in garter stitch, * knit 1, purl 2 together *, work from *-* until 2 stitches remain, finish with knit 1 and 1 edge stitch in garter stitch = 53-57-61-65-73-77 stitches. Then work as follows from wrong side (read diagram from left towards right): Work 1 edge stitch in garter stitch, A.1 until 1 stitch remains and finish with 1 edge stitch in garter stitch. I.e. pattern begins and ends with 1 knit stitch in false English rib inside 1 edge stitch in garter stitch in each side of piece, seen from right side. Continue pattern like this. When piece measures 54-56-58-60-62-64 cm (approx. 4 cm remain), cast off the middle 19-19-19-23-23-23 stitches for neck with knit over knit and purl over purl (1 yarn over and 1 knit stitch = 1 stitch) = 17-19-21-21-25-27 stitches on each shoulder. Stitch closest to the neck on each shoulder should now be a purl stitch from right side. Now finish each shoulder separately. RIGHT SHOULDER: Work pattern as before 1 stitch in garter stitch closest to the neck until piece measures 58-60-62-64-66-68 cm in total. Cast off on next row from right side. Knit together yarn overs and knit stitches while casting off and purl the purl stitches while casting off. LEFT SHOULDER: Work as right shoulder. SLEEVE: Cast on 35-35-38-38-41-41 stitches on circular needle size 9 mm with Snow. Work first row as follows from right side: Work 1 edge stitch in garter stitch, * knit 1, purl 2 together *, work from *-* until 1 stitch remains, finish 1 edge stitch in garter stitch = 24-24-26-26-28-28 stitches. Then work as follows from wrong side (read diagram from left towards right): Work 1 edge stitch in garter stitch, A.1 until 1 stitch remains and finish with 1 edge stitch in garter stitch. Continue like this until piece measures 10 cm, adjust to finish with last row from right side. Now work piece in stocking stitch with 1 edge stitch in garter stitch in each side of piece. When piece measures 12 cm, increase 1 stitch inside 1 edge stitch and 1 stitch in each side of piece - read INCREASE TIP! Increase like this every 4-3½-3½-3-2½-2 cm 8-9-9-10-10-11 times in total = 40-42-44-46-48-50 stitches. Cast off when piece measures 45-44-43-42-38-37 cm. Knit another sleeve the same way. ASSEMBLY: Sew the shoulder seams. Sew in sleeves (= approx. 19-20-21-22-23-24 cm down from shoulder seams) and sew sleeve seams and side seams inside 1 edge stitch until approx. 12 cm remain (= vent). NECK EDGE: Pick up approx. 44 to 56 stitches along neck edge (make sure to avoid a tight edge, pick up more stitches if needed), adjust so that number of stitches is divisible by 2. Work rib (= knit 1/purl 1). Work 2 rounds in total, then cast off with knit over knit and purl over purl. |
|||||||||||||||||||
Diagram explanations |
|||||||||||||||||||
|
|||||||||||||||||||
 |
|||||||||||||||||||
 |
|||||||||||||||||||
Have you finished this pattern?Tag your pictures with #dropspattern #autumnblushsweater or submit them to the #dropsfan gallery. Do you need help with this pattern?You'll find 25 tutorial videos, a Comments/Questions area and more by visiting the pattern on garnstudio.com. © 1982-2026 DROPS Design A/S. We reserve all rights. This document, including all its sub-sections, has copyrights. Read more about what you can do with our patterns at the bottom of each pattern on our site. |
|||||||||||||||||||


With over 40 years in knitting and crochet design, DROPS Design offers one of the most extensive collections of free patterns on the internet - translated to 17 languages. As of today we count 324 catalogues and 12290 patterns translated into English (UK/cm). 12290
We work hard to bring you the best knitting and crochet have to offer, inspiration and advice as well as great quality yarns at incredible prices! Would you like to use our patterns for other than personal use? You can read what you are allowed to do in the Copyright text at the bottom of all our patterns. Happy crafting!
Post a comment to pattern DROPS 194-22
We would love to hear what you have to say about this pattern!
If you want to leave a question, please make sure you select the correct category in the form below, to speed up the answering process. Required fields are marked *.