
Popular categories
Looking for a yarn?


Comments / Questions (65)
![]() Yvonne wrote:
Yvonne wrote:
Ik zou dit model graag in drops 9 breien maar dat is met naald 3. Is het mogelijk en hoe maak ik mijn berekening? Ik heb normaal een maat M bij jullie modellen. Kan ik BV' nu de hoeveelheid Katoen en het patroon van maat L of XL volgen?
09.05.2018 - 13:03DROPS Design answered:
Dag Yvonne, Om het om te rekenen kun je als volgt te werk gaan: maak een proeflapje met je eigen garen en naalden en bereken dan hoeveel je op zou moeten zetten op basis de stekenverhouding in het patroon en het aantal op te zetten steken volgens het patroon in jouw maat. Daarna kun je kijken of dit overeenkomt met een andere maat en of je dus die maat kunt volgen.
10.05.2018 - 10:48
![]() Carmen Ilies wrote:
Carmen Ilies wrote:
Hej,jag förstår inte i diagram 3 i mitten ska man minska 2 mask? jag jorde det och då stämmer inre i andra rad mask nummer. en annan fråga:jag har stickat storlek M men när jag tog av för ärmar då ser inte att modellen fortsätter som det var fortfarande stickad med A1 och A2 som jag ser på bild här hos er. tack på förhand för hjälpen. madrid drops 188-19
08.05.2018 - 05:46DROPS Design answered:
Hej, i diagram A.3 ökas det lika många maskor (med omslag) som det minskas på varvet, maskantalet ska hela tiden vara detsamma. När man satt ärmarnas maskor på en tråd ska det fortsättas med A.3 över maskorna i sidan.
17.05.2018 - 17:04
![]() Lotte wrote:
Lotte wrote:
Jeg ser kun diagram A4 nederst på siden under A1 og A2 Kan stadig ikke finde A3??
07.05.2018 - 20:45DROPS Design answered:
Hej Lotte, A.3 ligger mellem A.1-A.2 og A.4 altså lige ovenfor A.4....
09.05.2018 - 13:40Lotte wrote:
Hej Hvor finder jeg A3 (diagram)? Mvh Lotte
04.05.2018 - 20:37DROPS Design answered:
Hei Lotte. A.3 ligger rett under A.1 og A.2 nederst på siden. God fornøyelse
07.05.2018 - 13:33
![]() Pierrette Quilliet wrote:
Pierrette Quilliet wrote:
J'ai commence ce modele mais j'ai un petit souci , j'ai monte 115 mailles puis augmenter de 7 m a la fin du premier rang de l'empiecement je me retrouve avec 15mailles au lieu de 10 mailles comme indiqué sur les explicatons , c'est normal ? j'ai recommence plusieurs fois toujours le meme probleme. je vous remercie d'avance,
16.04.2018 - 12:03DROPS Design answered:
Bonjour Mme Quilliet, tricotez les 122 m ainsi: 10 mailles endroit (= demi-dos), 1 jeté, A.1 (= 20 mailles), 1 jeté, 1 maille endroit (= manche), 1 jeté, A.2 (= 20 mailles), 1 jeté, 20 mailles endroit (= devant), 1 jeté, A.1, 1 jeté, 1 maille endroit (= manche), 1 jeté, A.2, 1 jeté, 10 mailles endroit (= demi-dos). = (10 + 1) + 20 + (1 + 1 + 1) + 20 +( 1 + 20 + 1) + 20 +( 1+ 1 + 1) + 20 +( 1 + 10) = 130 m (soit 122 m + 8 jetés). Bon tricot!
16.04.2018 - 13:39
![]() Elena wrote:
Elena wrote:
Buongiorno, grazie per la risposta, comunque sono riuscita a risolvere. Non dovevo guardare la sequenza dei rovesci sul modello, ma seguire riga per riga, in questo modo il disegno viene corretto, mentre io insistevo a far combaciare i rovesci del lavoro con quelli del diagramma. Ho quasi finito il corpo del maglione ed è venuto veramente bellissimo!
31.03.2018 - 15:26
![]() Elena wrote:
Elena wrote:
Buonasera, sì è vero il numero delle maglie non cambia, ma se seguo il disegno dei punti a rovescio, che formano una \"scala\", le maglie centrali che mi ritrovo sul secondo ferro di A3 sono 8 e non 10.
29.03.2018 - 23:09DROPS Design answered:
Buonasera Elena, i gettati in nero servono a creare la parte esterna della V rovesciata: il numero delle maglie del motivo rimane lo stesso. E' sicura di lavorare il gettato che precede il rovescio nella maniera corretta? Abbiamo provato a lavorare il motivo e non ci sono problemi nel conto delle maglie. Se vuole, può mandare una mail a italian@garnstudio.com con una foto del suo lavoro. Buon lavoro!
30.03.2018 - 22:14
![]() Elena Crema wrote:
Elena Crema wrote:
Buongiorno, problema con A3 : lavorando il primo ferro dello schema, con le due diminuzioni centrali, mi rimangono solo 8 maglie centrali. Anche calcolando i gettati, lavorati sul ferro successivo a diritto ritorno, il lavoro non combacia con il disegno, perché i punti a rovescio del secondo ferro non seguono lo schema. Potete chiarire questo passaggio? Sono ormai due giorni che provo e riprovo a lavorare questi due ferri, ma il disegno non c'è verso che combaci con il diagramma. Grazie.
29.03.2018 - 14:09DROPS Design answered:
Buongiorno Elena. Al primo ferro, nella parte centrale, si inizia con 12 maglie e con le due diminuzioni si arriva a 10 maglie; al ferro due le maglie della parte centrale sono 10. In ogni ripetizione, vengono diminuite 4 maglie e aumentate 4 maglie. Il numero di maglie in ogni ripetizione non cambia. Buon lavoro!
29.03.2018 - 17:12
![]() Julia wrote:
Julia wrote:
Ich bin noch bei der Passe. Meine Frage ist, an welcher Stelle in der Anleitung ich die ganzen Umschläge einberechne. Die Maschenanzahl vermehrt sich, weshalb ich ja zwischen den Mustern nicht stur die Anzahl stricken kann, die unter "Passe" im Text steht. Wird die eine Masche Ärmel immer breiter?
20.03.2018 - 17:50DROPS Design answered:
Liebe Julia, es wird in jede 2. Runde 8 Umschläge für die Raglanzunahmen (wie erklärte bei der 1. Zunahme): 1 am Anfang und 1 am Ende jedes Teil, Rücken- bzw Vorderteil und Ärmel. Die neuen Maschen werden dann glatt gestrickt und somit vergrössert sich die Maschenanzahl in jedem Teil. Viel Spaß beim stricken!
21.03.2018 - 08:57
![]() Vers wrote:
Vers wrote:
Oh Danke das hab ich überlesen
16.03.2018 - 18:48
|
||||||||||||||||||||||||||||
Madrid#madridsweater |
||||||||||||||||||||||||||||
 |
 |
|||||||||||||||||||||||||||
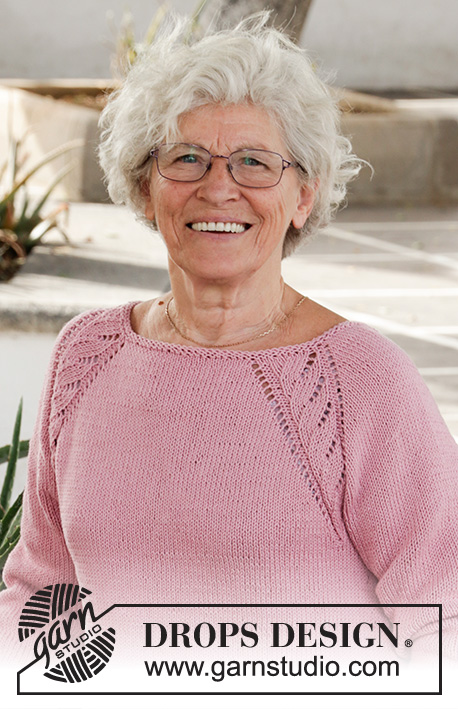
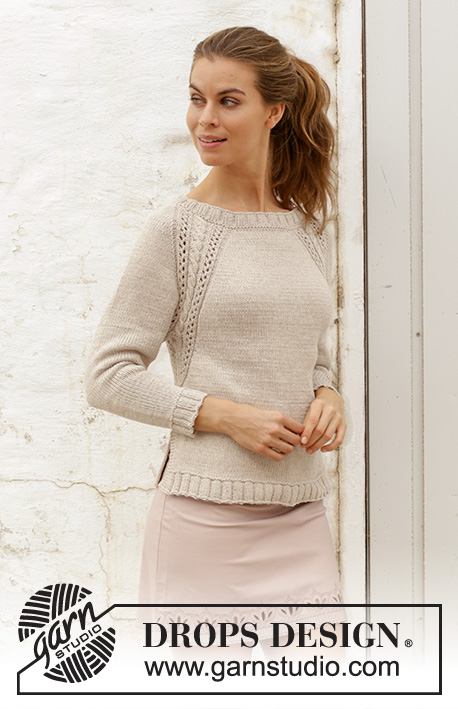
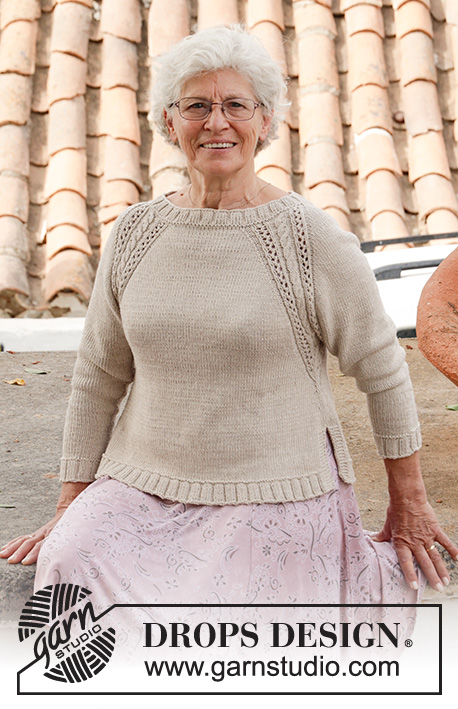
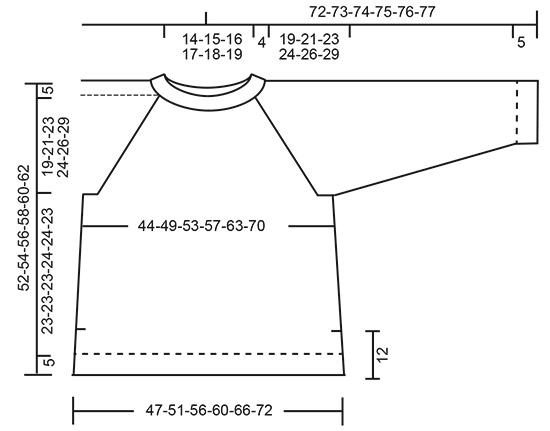
Knitted jumper with raglan, cables, lace pattern and split in sides, worked top down. Sizes S - XXXL. The piece is worked in DROPS Cotton Light.
DROPS 188-19 |
||||||||||||||||||||||||||||
|
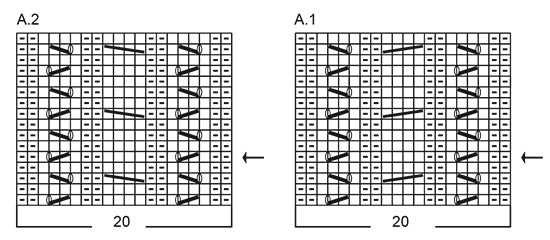
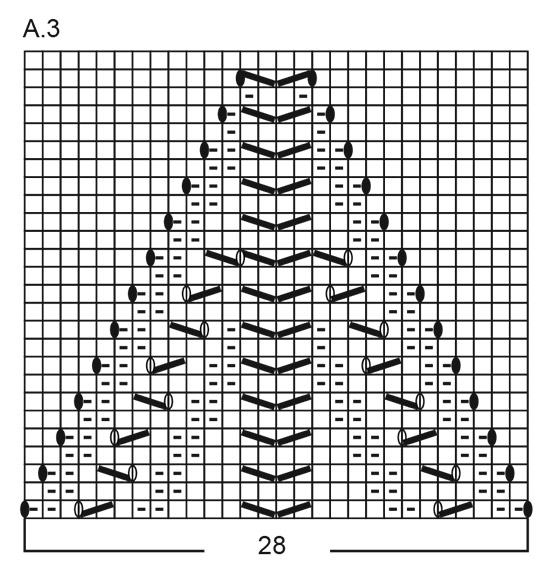
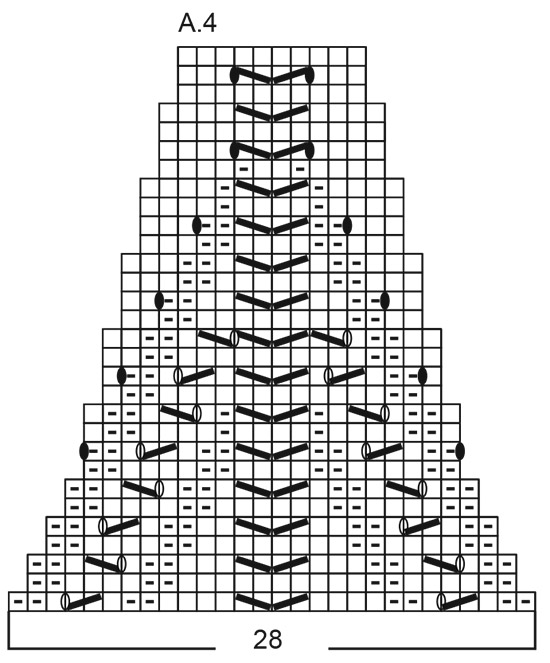
INFORMATION FOR THE PATTERN: RIDGE/GARTER STITCH (worked in the round): 1 ridge = 2 rounds. Knit 1 round and purl 1 round. RIDGE/GARTER STITCH (worked back and forth): 1 ridge = Knit 2 rows. PATTERN: See diagrams A.1 to A.4. The diagrams show all the rows in the pattern seen from the right side. RAGLAN: Increase 1 stitch on each side of each repeat of A.1/A.2 (= 8 stitches increased on the round). Increase 1 stitch by making 1 yarn over. On the next round knit the yarn overs twisted to avoid holes. INCREASE TIP-1 (evenly spaced): To work out how to increase evenly, count the total number of stitches on the needle (e.g. 110 stitches), and divide by the number of increases to be made (e.g. 4) = 27.5. In this example, increase alternately after every 27th and 28th stitch. Increase with a yarn over after the stitch and work the yarn over twisted on the next row to avoid a hole. INCREASE TIP-2 (for sides): All increases are made from the right side! Work until there are 2 stitches left before the marker thread, 1 yarn over, knit 4 (the marker sits in the middle of these 4 stitches), 1 yarn over. On the next round knit the yarn overs twisted to avoid holes. DECREASE TIP (for sleeves): Decrease 1 stitch on each side of the marker thread as follows: Work until there are 2 stitches left before the marker thread, knit 2 stitches together, (marker thread sits here), slip 1 stitch as if to knit, knit 1, pass the slipped stitch over. ---------------------------------------------------------- JUMPER: The piece is worked in the round with circular needle, top down as far as the split at the bottom of the body. Then the front and back pieces are finished separately back and forth. The sleeves are worked in the round with double pointed needles/ short circular needle. NECK: Cast on 110-115-120-125-135-145 stitches with circular needle size 3.5 mm and Cotton Light. Knit 1 round. Then work rib (knit 3 / purl 2) for 4 cm. Work 1 RIDGE – see description above, where on the first round you increase 4-7-10-9-11-17 stitches evenly – read INCREASE TIP-1 (evenly spaced) = 114-122-130-134-146-162 stitches. YOKE: Change to circular needle size 4 mm. Insert a marker here. THE PIECE IS NOW MEASURED FROM HERE! Work pattern as follows: Knit 8-10-12-13-16-20 stitches (= half back piece), make 1 yarn over, A.1 (= 20 stitches), 1 yarn over, knit 1 (= sleeve), 1 yarn over, A.2 (= 20 stitches), 1 yarn over, knit 16-20-24-26-32-40 stitches (= front piece), 1 yarn over, A.1, 1 yarn over, knit 1 (= sleeve), 1 yarn over, A.2, 1 yarn over, knit 8-10-12-13-16-20 stitches (= half back piece). The first increase to RAGLAN – see description above, is now finished. Continue the pattern like this and increase every 2nd round a total of 24-27-30-33-36-39 times = 306-338-370-398-434-474 stitches. REMEMBER THE KNITTING TENSION. When all the increases to raglan are finished, the piece measures 17-19-21-24-26-28 cm. Continue pattern without increasing until the piece measures 19-21-23-24-26-29 cm. The next round is worked as follows: Knit 32-37-42-46-52-59 stitches, work the next 6 stitches in pattern as before, purl 2, knit 2 (= half back piece), place the next 69-75-81-87-93-99 stitches on a thread (= sleeve), cast on 8 new stitches on the needle (= side under sleeve), knit 2, purl 2, work the next 6 stitches in pattern as before, knit 64-74-84-92-104-118 stitches, work the next 6 stitches in pattern as before, purl 2, knit 2 (= front piece), place the next 69-75-81-87-93-99 stitches on a thread (= sleeve), cast on 8 new stitches on the needle (= side under sleeve), knit 2, purl 2, work the next 6 stitches in pattern as before, knit 32-37-42-46-52-59 stitches (= half back piece). THE PIECE IS NOW MEASURED FROM HERE! BODY: = 184-204-224-240-264-292 stitches. Insert 1 marker thread in each side, in the middle of the new stitches cast on. Continue in the round with knit and A.3 (= 28 stitches) over the 8 new stitches cast on under the sleeves + 10 stitches on each side of these (i.e. 14 stitches on each side of the marker thread in each side). When A.3 has been completed in height, the piece measures 9 cm. Continue in the round with knit and on the next round increase 1 stitch on each side of the marker thread in each side – read INCREASE TIP-2 (for sides)! Increase like this every 3 cm a total of 3 times = 196-216-236-252-276-304 stitches. Continue with knit until the piece measures 16-16-16-17-17-16 cm. Now divide the piece into front and back pieces, which are finished separately back and forth. Place the one set of 98-108-118-126-138-152 stitches between the marker threads on a thread for the front piece and work the back piece as follows: BACK PIECE: = 98-108-118-126-138-152 stitches. Work stocking stitch with 5 stitches garter stitch in each side. When the piece measures 23-23-23-24-24-23 cm increase 30-30-30-37-40-41 stitches evenly on row (but not over the stitches in garter stitch) = 128-138-148-163-178-193 stitches. Change to circular needle size 3.5 mm. Work 1 ridge. Work rib from the right side as follows: 5 stitches in garter stitch, (knit 3 / purl2) until there are 8 stitches left on the row, knit 3, 5 stitches in garter stitch. Continue like this until the rib measures 5 cm. Cast off with knit over knit and purl over purl. To avoid the cast-off edge being tight you can make a yarn over after approx. every 5th stitch. The yarn over is cast off as a normal stitch. The piece measures a total of 52-54-56-58-60-62 cm from the shoulder down. FRONT PIECE: = 98-108-118-126-138-152 stitches. Place the other set of stitches back on circular needle size 4 mm and work in the same way as for the back piece. SLEEVE: Place the 69-75-81-87-93-99 stitches from the thread on the one side of the piece onto double pointed needles/short circular needle size 4 mm and, in addition, knit up 1 new stitch in each of the 8 stitches cast on under the sleeve = 77-83-89-95-101-107 stitches. Insert a marker thread in the middle of the new stitches (= 4 new stitches on each side of the marker thread). Work A.4 (= 28 stitches) mid under the sleeve so that there are 14 stitches of A.4 on each side of the marker thread mid under sleeve. The remaining stitches on the round are worked knitted. When the whole of A.4 has been worked in height you have decreased 18 stitches = 59-65-71-77-83-89 stitches. Continue to decrease 2 stitches under the sleeve – read DECREASE TIP! Decrease like this every 10th-7th-6th-5th-4th-3rd round a total of 7-9-11-13-15-17 times = 45-47-49-51-53-55 stitches. Continue with knit until the sleeve measures 37-35-34-33-32-29 cm. Now increase 5-8-6-9-7-10 stitches evenly on round = 50-55-55-60-60-65 stitches. Change to double pointed needles size 3.5 mm. Work 1 ridge. Then work rib (knit 3 / purl 2) until the sleeve measures 42-40-39-38-37-34 cm from the division. Cast off with knit over knit and purl over purl. To avoid the cast-off edge being tight you can make a yarn over after approx. every 5th stitch. The yarn over is cast off as a normal stitch. Work the other sleeve in the same way. |
||||||||||||||||||||||||||||
Diagram explanations |
||||||||||||||||||||||||||||
|
||||||||||||||||||||||||||||
 |
||||||||||||||||||||||||||||
 |
||||||||||||||||||||||||||||
 |
||||||||||||||||||||||||||||
 |
||||||||||||||||||||||||||||
Have you finished this pattern?Tag your pictures with #dropspattern #madridsweater or submit them to the #dropsfan gallery. Do you need help with this pattern?You'll find 32 tutorial videos, a Comments/Questions area and more by visiting the pattern on garnstudio.com. © 1982-2026 DROPS Design A/S. We reserve all rights. This document, including all its sub-sections, has copyrights. Read more about what you can do with our patterns at the bottom of each pattern on our site. |
||||||||||||||||||||||||||||


With over 40 years in knitting and crochet design, DROPS Design offers one of the most extensive collections of free patterns on the internet - translated to 17 languages. As of today we count 324 catalogues and 12245 patterns translated into English (UK/cm). 12245
We work hard to bring you the best knitting and crochet have to offer, inspiration and advice as well as great quality yarns at incredible prices! Would you like to use our patterns for other than personal use? You can read what you are allowed to do in the Copyright text at the bottom of all our patterns. Happy crafting!
Post a comment to pattern DROPS 188-19
We would love to hear what you have to say about this pattern!
If you want to leave a question, please make sure you select the correct category in the form below, to speed up the answering process. Required fields are marked *.