
Popular categories
Looking for a yarn?


Comments / Questions (15)
![]() Sylvie Bérard wrote:
Sylvie Bérard wrote:
J' ai presque terminé le dos et on écrit dans le patron: `` Tricoter jusqu'à ce que l'ouvrage mesure 31-34-37-41-45-49 cm, tricoter 2 côtes au POINT MOUSSE sur toutes les mailles et rabattre.`` Je voudrais savoir si ça veut dire qu' on tricote au point mousse toutes les mailles ainsi que les mailles centrales
26.04.2025 - 22:39DROPS Design answered:
Bonjour Mme Bérard, lorsque vous avez mis les mailles de l'encolure devant en attente, vous tricotez chaque épaule séparément; à 31-49 cm vous tricotez 2 côtes mousse sur toutes les mailles de l'épaule (pas les mailles centrales) et vous rabattez ces mailles; puis vous tricotez les mailles de la 2ème épaule. Vous relèverez plus tard les mailles autour de l'encolure pour tricoter le col. Bon tricot!
28.04.2025 - 08:15
![]() Gonda De Brakeleer wrote:
Gonda De Brakeleer wrote:
Ik ben de hoofdband en de halswarmer aan het breien. Ik brei patroon A1 maar naald 1tot 10 = de goede kant. Moet ik dan telkens een naald averechts breien na elke goede kant?
19.02.2025 - 20:16
![]() Louise wrote:
Louise wrote:
Can I use straight needles and knit back and forth rather than with knitting in the round with this pattern?
10.09.2024 - 00:03DROPS Design answered:
Sure Louise, this lesson will help you to adjust the pattern to work back and forth instead of in the round. Happy knitting!
10.09.2024 - 09:12
![]() Corinne wrote:
Corinne wrote:
Bonjour Je possède 4 pelotes baby alpaga Silk et 4 pelotes kid Silk qui doivent se tricoter ensembles On me les a donnée mais je ne sais pas quelle grosseur d’aiguille je dois utiliser et quel modèle je pourrai réaliser avec cette laine J’aimerai réaliser un pull en 6/7 ans Merci pour votre aide
01.07.2023 - 21:35DROPS Design answered:
Bonjour Corinne, vous n'auriez pas assez pour ce modèle avec 4 pelotes Baby Alpaca Silk en taille 5/6 ans (il vous en faudrait 6 (soit 270 g), cf convertisseur). Vous pouvez consulter les modèles tricotés en fil du groupe A (comme Baby Alpaca Silk ou Kid-Silk) ou les tricoter ensemble sur la base d'un échantillon de 16 mailles (voir ici - cette leçon vous aidera à calculer si vous aurez suffisamment de laine. Bon tricot!
03.07.2023 - 10:18
![]() Guyot Pascale wrote:
Guyot Pascale wrote:
Un mot pour vous remercier de vos beaux modèles. Je viens de réaliser celui ci en coloris 16 pour ma petite fille. Une réussite. Je commence le modèle 34-10 en sky. Je suis fan de vos laines et de vos modèles. Hâte d en découvrir de nouveau. Merci
29.01.2021 - 14:35
![]() Gjertrud Witzøe wrote:
Gjertrud Witzøe wrote:
Strikket denne modellen , enkel og grei oppskrift .. Ble veldig fornøyd . Takk for at dere deler gratis oppskrifte :)
27.04.2020 - 23:31
![]() Laila Larsen wrote:
Laila Larsen wrote:
Hej Jeg er i tvivl om vrangmaskerne som man laver på 1. pind før, efter og imellem diagrammet skal fortsætte hele vejen op?
04.03.2020 - 15:40DROPS Design answered:
Hei Laila. Ja, vrangmaksene skal strikkes hele veien. Om du ser på bildet, ser du at det er vrangmasker før, etter og imellom flettene. God Fornøyelse!
09.03.2020 - 08:09
![]() Carlota wrote:
Carlota wrote:
Bonjour, j’ai tricoté en circulaire jusqu’aux emmanchures et je ne parviens pas à tricoter le motif du devant avec les aiguilles droites. Faut-il commencer par un rang endroit/envers ? (Je commence avec un rang endroit - première ligne du diagramme en lisant du bas vers le haut et de la droite vers la gauche, rang suivant de la gauche vers la droite). Peut-on continuer en circulaire en tricotant les manches en même temps comme les pulls tricotés en bottom up ? Merci
25.10.2019 - 12:06DROPS Design answered:
Bonjour Carlotta, si vous avez rabattu les mailles au dernier tour sur un rang ajouré des diagrammes, votre premier rang sur le dos/le devant sera un rang sur l'envers, si vous avez rabattu les mailles au dernier tour sur un tour sans jour/diminution, le 1er rang du dos/devant sera alors un rang sur l'endroit. Lisez ensuite les diagrammes de gauche à droite sur l'endroit et de droite à gauche sur l'envers. Bon tricot!
25.10.2019 - 13:59
![]() Jane Moore wrote:
Jane Moore wrote:
Looking for free knitted baby dress patterns
21.08.2019 - 18:11DROPS Design answered:
Dear Mrs Moore, please find our knitted baby dresses patterns here. Happy knitting!
22.08.2019 - 09:51
![]() Sigrid wrote:
Sigrid wrote:
Wie sind die Diagramme beim Rumpfstricken zu verstehen, daja nur die rechte Seite rundgegestrickt wird? müssen die Rückreihen in rechten oder linken Maschen gestrickt werden?
11.01.2019 - 14:31DROPS Design answered:
Liebe Sigrid, die Diagramme zeigen alle Reihen, beginnen Sie die Diagramme an der unteren Ecke an der rechten Seite und lesen Sie sie rechts nach links bei jeder Runde. Wenn Sie dann hin un zurück stricken werden die Rückreihen links nach rechts gelesen. Viel Spaß beim stricken!
11.01.2019 - 15:09
|
||||||||||||||||
Julie#juliesweater |
||||||||||||||||
|
|
||||||||||||||||
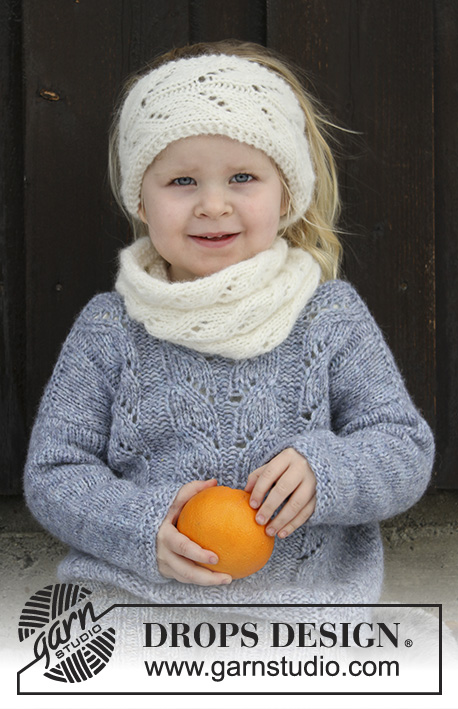
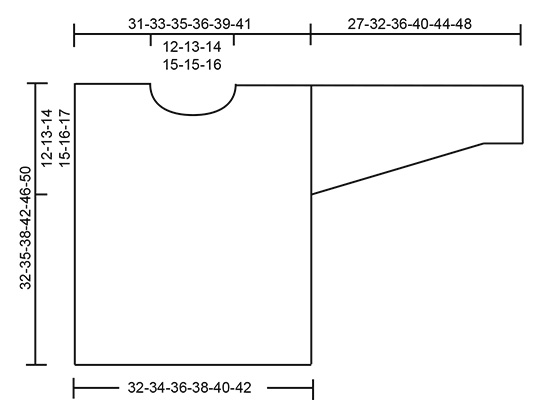
Knitted jumper with lace pattern for kids. Size 2 - 12 years Piece is knitted in DROPS Air.
DROPS Children 30-10 |
||||||||||||||||
|
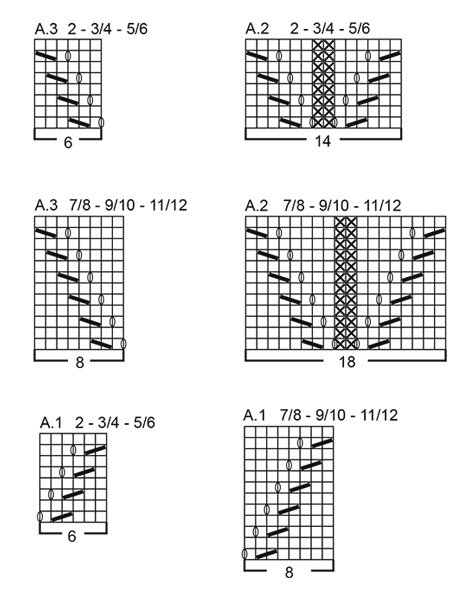
INFORMATION FOR PATTERN: GARTER STITCH (back and forth): 1 ridge = knit 2 rows. GARTER STITCH (worked in the round): 1 ridge = 2 rounds. Knit 1 round and purl 1 round. PATTERN: See diagrams A.1 to A.3. Diagrams show all rows in pattern seen from the right side. Choose diagram for your size. INCREASE TIP (applies to mid under sleeve): Begin 1 stitch before marker thread, make 1 yarn over, knit 2 (marker thread is in the middle of these 2 stitches), make 1 yarn over (= 2 stitches increased). On next round knit yarn overs twisted to avoid holes. ---------------------------------------------------------- JUMPER: Body is worked in the round on circular needle up to armholes. Then work front and back piece back and forth on circular needle separately. Work sleeves in the round on double pointed needles/a short circular needle. BODY: Cast on 104-108-116-120-128-136 stitches on circular needle size 5.5 mm with Air. Work 2 ridges in GARTER STITCH - see explanation above. Insert 1 marker thread at beginning of round and 1 marker thread after 52-54-58-60-64-68 stitches (= the sides). Knit 1 round. Work next round as follows: 7-8-10-7-9-11 stitches in stocking stitch, purl 2, A.1 (= 6-6-6-8-8-8 stitches), purl 4, A.2 (= 14-14-14-18-18-18 stitches), purl 4, A.3 (= 6-6-6-8-8-8 stitches), purl 2, knit the rest of round. Continue the pattern like this and move the markers upwards when working. REMEMBER THE KNITTING TENSION! When piece measures 20-22-24-27-30-33 cm, cast off 2 stitches in each side for armholes (cast off 1 stitch on each side of both marker treads). Finish front and back piece separately. BACK PIECE: = 50-52-56-58-62-66 stitches. Continue in stocking stitch. Work back and forth until piece measures 30-33-36-40-44-48 cm. Now cast off the middle 16-18-20-22-22-24 stitches for neck and finish each shoulder separately. Continue in stocking stitch and cast off 1 stitch on next row from the neck = 16-16-17-17-19-20 stitches remain on shoulder. Work until piece measures 31-34-37-41-45-49 cm, work 2 ridges in GARTER STITCH over all stitches, then cast off. Piece measures approx. 32-35-38-42-46-50 cm from shoulder and down. Work the other shoulder the same way. FRONT PIECE: = 50-52-56-58-62-66 stitches. Continue pattern as before. Work back and forth until piece measures 28-31-33-37-40-44 cm. Now slip the middle 10-12-14-16-16-18 stitches on 1 stitch holder for neck and finish each shoulder separately. Continue pattern as before and cast off for neck at the beginning of every row from neck as follows: 2 stitches 1 time and 1 stitch 2 times = 16-16-17-17-19-20 stitches remain for shoulder. Work until piece measures 31-34-37-41-45-49 cm, work 2 ridges in GARTER STITCH over all stitches, then cast off. Piece measures approx. 32-35-38-42-46-50 cm from shoulder and down. Work the other shoulder the same way. SLEEVE: Cast on 28-28-30-30-32-32 stitches on double pointed needles size 5.5 mm with Air. Work 3 ridges in GARTER STITCH in the round - see explanation above. Insert 1 marker thread at beginning of round = mid under sleeve. Work in stocking stitch in the round. When piece measures 6 cm, increase 2 stitches mid under sleeve - read INCREASE TIP. Increase like this every 4-4-4-4-4-4 cm 5-7-7-9-10-11 times in total = 38-42-44-48-52-54 stitches. When piece measures 27-32-36-40-44-48 cm, cast off all stitches. Work another sleeve the same way. ASSEMBLY: Sew shoulder seams inside cast-off edge. Sew in sleeves. NECK EDGE: Pick up from right side approx. 58 to 68 stitches around the neck (including stitches on stitch holder at the front) on a short circular needle size 5.5 mm. Work 3 ridges in the round. Cast off by knitting. |
||||||||||||||||
Diagram explanations |
||||||||||||||||
|
||||||||||||||||
 |
||||||||||||||||
 |
||||||||||||||||
Have you finished this pattern?Tag your pictures with #dropspattern #juliesweater or submit them to the #dropsfan gallery. Do you need help with this pattern?You'll find 33 tutorial videos, a Comments/Questions area and more by visiting the pattern on garnstudio.com. © 1982-2026 DROPS Design A/S. We reserve all rights. This document, including all its sub-sections, has copyrights. Read more about what you can do with our patterns at the bottom of each pattern on our site. |
||||||||||||||||


With over 40 years in knitting and crochet design, DROPS Design offers one of the most extensive collections of free patterns on the internet - translated to 17 languages. As of today we count 324 catalogues and 12290 patterns translated into English (UK/cm). 12290
We work hard to bring you the best knitting and crochet have to offer, inspiration and advice as well as great quality yarns at incredible prices! Would you like to use our patterns for other than personal use? You can read what you are allowed to do in the Copyright text at the bottom of all our patterns. Happy crafting!
Post a comment to pattern DROPS Children 30-10
We would love to hear what you have to say about this pattern!
If you want to leave a question, please make sure you select the correct category in the form below, to speed up the answering process. Required fields are marked *.