
Popular categories
Looking for a yarn?


Comments / Questions (83)
![]() Helle Reinhold wrote:
Helle Reinhold wrote:
Skal A2tilA6 gentages indtil der er 339 masker på pinden el hvordan skal det forstås ??
03.02.2022 - 15:27DROPS Design answered:
Hej Helle, ja det stemmer, du gentager A.x som er de sidste 4 pinde i A.2 til A.6. God fornøjelse!
04.02.2022 - 14:20
![]() Suzanne Bois wrote:
Suzanne Bois wrote:
Bonjour, vous dites que dans le patron no, la.035 les rangs 11et 17 sont faux dans A7 A8 A9 A10 A11 A12. comment je puisse trouver les modifications apportées
27.11.2021 - 03:55DROPS Design answered:
Bonjour Mme Bois, si vous avez imprimé les diagrammes après la date de la correction, alors les diagrammes en ligne sont justes, en revanche, si vous aviez déjà imprimé tout, il peut être sage de les imprimer à nouveau. Bon tricot!
29.11.2021 - 07:36
![]() Eva-Britt wrote:
Eva-Britt wrote:
Jag ser naturligtvis i diagrammet var A.x ska stickas men hur ska detta stickas. Är det slätstickning, eller mönsterstickning och i så fall vilket mönster
17.09.2021 - 10:48DROPS Design answered:
Hej Eva-Britt. Du upprepar ökningarna enligt A.x (som det visas i diagrammet) så att mönstret fortsätter. Det ökas växelvis 4 och 8 maskor på varje varv från rätsidan (dvs 12 ökade maskor för varje upprepning av A.x på höjden), de ökade maskorna stickas i slätstickning på varje sida av A.3. Mvh DROPS Design
22.09.2021 - 09:15
![]() Eva-Britt wrote:
Eva-Britt wrote:
Just A.x. Jag hittar inte var det beskrivs hur A.x stickas
16.09.2021 - 13:32DROPS Design answered:
Hej Eva-Britt. A.x är de 4 sista varven i diagram A.2, A.3, A.4, A.5 och A.6. Mvh DROPS Design
17.09.2021 - 09:34
![]() Eva-Britt wrote:
Eva-Britt wrote:
Vilken sorts maskor ska jag sticka?
16.09.2021 - 12:09DROPS Design answered:
Hej Eva-Britt. Det stickas från mitten av kanten uppe på sjalen med slätstickning och hålvarv, och det avslutas längst ner med en bård av hålmönster i rätstickning. Det står förklarat i beskrivningen och i diagram-förklaringen hur du ska sticka. Är det någon särskild del du är osäker på? Mvh DROPS Design
16.09.2021 - 13:28
![]() Eva-Britt wrote:
Eva-Britt wrote:
Vad menas med A.x.
15.09.2021 - 17:04DROPS Design answered:
Hej Eva-Britt. A.x är en del av diagrammen (det är markerat vid sidan av respektive diagram). Mvh DROPS Design
16.09.2021 - 09:15
![]() Ann-Louise Abdellah wrote:
Ann-Louise Abdellah wrote:
Hej! Eftersom Lace har utgått tänkte jag byta till Alpacka. Är det något speciellt jag bör tänka på? MVH Ann-Louise Abdellah
01.03.2021 - 16:41DROPS Design answered:
Hei Ann-Louise. DROPS Alpaca er tykkere enn DROPS Lace, men du vil få et deilig og mykt sjal, bare husk garnmengden og strikkefastheten. mvh DROPS design
03.03.2021 - 13:38
![]() Paco wrote:
Paco wrote:
Désolée, ma dernière question concerne le modèle lacey laurels. et pas Wings of love.
15.02.2021 - 07:55
![]() PAco wrote:
PAco wrote:
BOnjour, je ne comprends pas, vous dites qu'une fois terminé A2 à A6, on a 51 Mailles, mais j'en compte personnellement sur le dernier rang selon le diagramme : 10 à la fin de A2, 9 à la fin de A3 deux fois, 7 à la fin de A4, 7 à la fin de A5 et10 à la fin de A6 = 10+ 9 +9 +7 +7 +10 soit 52 mailles en tout. Pouvez vous m'aider? Merci
13.02.2021 - 12:59DROPS Design answered:
Bonjour Mme Paco, désolée pour le retard de la réponse, votre question a été transmise à nos stylistes pour vérification. Merci d'avance pour votre patience.
20.05.2021 - 09:06
![]() Patricia wrote:
Patricia wrote:
Merci pour votre rapidité. Thanks for your speed
15.12.2020 - 17:45
|
||||||||||||||||||||||||||||||||||||||||
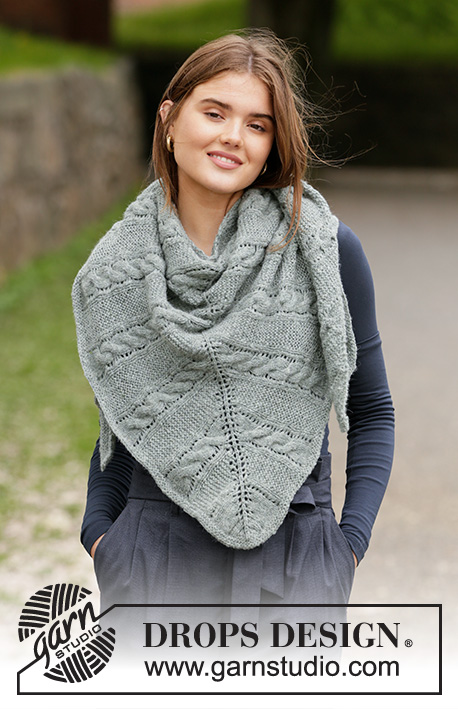
Wings of Love#wingsofloveshawl |
||||||||||||||||||||||||||||||||||||||||
 |
 |
|||||||||||||||||||||||||||||||||||||||
Knitted shawl with lace pattern in stocking stitch and garter stitch. The piece is worked in DROPS Lace.
DROPS 181-4 |
||||||||||||||||||||||||||||||||||||||||
|
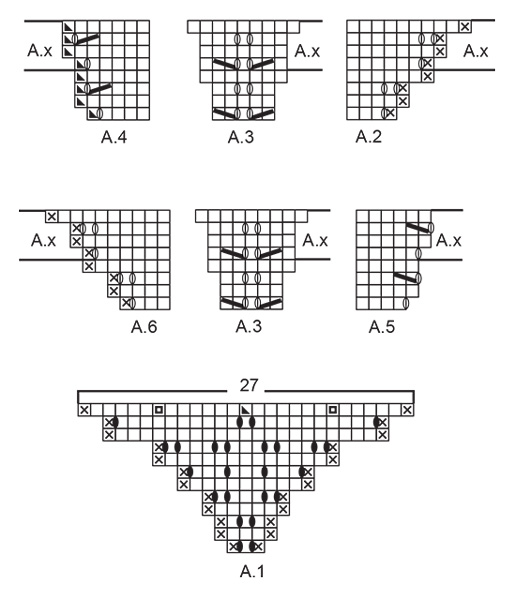
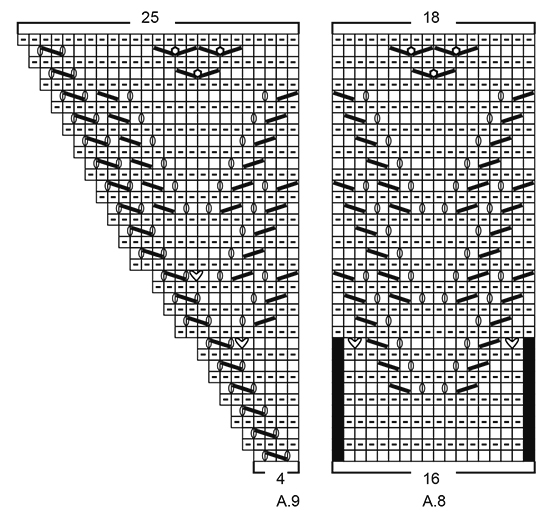
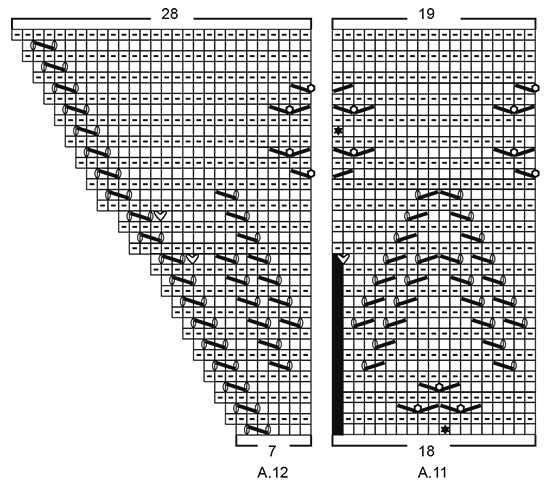
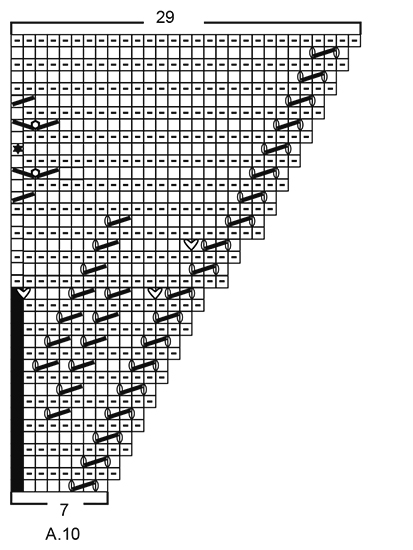
INFORMATION FOR THE PATTERN: RIDGE/GARTER STITCH (worked back and forth): 1 ridge = Knit 2 rows. PATTERN: See diagrams A.1 to A.12. The diagram shows all the rows in the pattern seen from the right side. Row 1 = right side. SHAPING: If you are using another yarn from yarn group A, you do not need to stretch the shawl to the right measurements, but dampen it and carefully lay it flat in the right shape. Allow it to dry. Repeat the process every time the shawl is washed. CASTING OFF TIP: To avoid the cast-off edge being tight, you can cast off with a needle a ½ size larger. ---------------------------------------------------------- SHAWL: The piece is worked back and forth with circular needle, top down. Work from the middle of the top edge with stocking stitch and lace pattern and finish at the bottom with a border of lace pattern and garter stitch. Cast on 3 stitches with circular needle size 3 mm and Lace - read KNITTING TENSION above. Work according to diagram A.1 (= 3 stitches) - read PATTERN above. On the last row, insert 3 markers as shown in the diagram. When the whole of diagram A.1 has been completed in height, there are 27 stitches on the needle. WORK ACCORDING TO DIAGRAMS A.2 TO A.6 AS FOLLOWS FROM THE RIGHT SIDE: Work A.2 (= 4 stitches), A.3 (= 5 stitches – the first marker sits in the middle of A.3), A.4 (= 5 stitches – the second marker sits in the last stitch of A.4), A.5 (= 4 stitches), A.3 (= 5 stitches – the third marker sits in the middle of A.3) and A.6 (= 4 stitches). When the whole of diagrams A.2 to A.6 have been completed in height, there are 51 stitches on the needle. Repeat the increases as shown in A.x onwards – increase alternately 4 and 8 stitches on each row from the right side (i.e. 12 increased stitches for every repeat of A.x in height), the increased stitches are worked in stocking stitch on each side of A.3. Repeat as shown in A.x 24 times in total in height = 339 stitches on the needle. The piece measures approx. 36 cm. On the next row from the right side, work and increase 4 stitches as shown on the first row of A.x = 343 stitches. Purl 1 row from the wrong side (the edge stitch in each side is worked in GARTER STITCH – see description above, throughout the whole piece). Knit 1 row from the right side and increase 1 stitch inside the edge stitch in garter stitch in each side and increase 1 stitch only by the mid-stitch (= 3 stitches increased) = 346 stitches on the needle and purl 1 row from the wrong side. You do not need the 3 markers from here. WORK ACCORDING TO DIAGRAMS A.7 TO A.9 AS FOLLOWS FROM THE RIGHT SIDE: Work 1 edge stitch in garter stitch, A.7 over 4 stitches, repeat A.8 until there are 5 stitches left on the needle (= 21 repeats of 16 stitches), A.9 over 4 stitches and 1 edge stitch in garter stitch. NOTE! On the 11th row in the diagram, increase 2 stitches in each repeat of A.7, A.8 and A.9. On the 17th row increase 2 stitches in each of A.7 and A.9. When the whole of diagrams A.7 to A.9 have been completed in height, there are 430 stitches on the needle. WORK ACCORDING TO DIAGRAMS A.10 TO A.12 AS FOLLOWS FROM THE RIGHT SIDE: Work 1 edge stitch in garter stitch, A.10 over 7 stitches, repeat A.11 until there are 8 stitches left on the needle (= 23 repeats of 18 stitches), A.12 over 7 stitches and 1 edge stitch in garter stitch. NOTE! On the 17th row in the diagram increase 3 stitches in A.10, 1 stitch in A.11 and 2 stitches in A.12. On the 21st row increase 2 stitches in A.10 and in A.12. When the whole of diagrams A.10 to A.12 have been completed in height, there are 496 stitches on the needle – loosely cast off on the last row from the wrong side - read CASTING OFF TIP above. STRETCHING: Lay the shawl in lukewarm water until it is thoroughly wet. Carefully press the water out of the shawl – it must not be twisted, then roll the shawl in a towel and press again to remove more water – the shawl will now just be damp. If you are using another yarn from yarn group A - read SHAPING above. Lay the shawl on a floor rug or mattress – pull it carefully into shape and use pins to fasten it in place. Allow the shawl to dry. Repeat the process every time the shawl is washed. |
||||||||||||||||||||||||||||||||||||||||
Diagram explanations |
||||||||||||||||||||||||||||||||||||||||
|
||||||||||||||||||||||||||||||||||||||||
 |
||||||||||||||||||||||||||||||||||||||||
 |
||||||||||||||||||||||||||||||||||||||||
 |
||||||||||||||||||||||||||||||||||||||||
 |
||||||||||||||||||||||||||||||||||||||||
 |
||||||||||||||||||||||||||||||||||||||||
Have you finished this pattern?Tag your pictures with #dropspattern #wingsofloveshawl or submit them to the #dropsfan gallery. Do you need help with this pattern?You'll find 23 tutorial videos, a Comments/Questions area and more by visiting the pattern on garnstudio.com. © 1982-2026 DROPS Design A/S. We reserve all rights. This document, including all its sub-sections, has copyrights. Read more about what you can do with our patterns at the bottom of each pattern on our site. |
||||||||||||||||||||||||||||||||||||||||


With over 40 years in knitting and crochet design, DROPS Design offers one of the most extensive collections of free patterns on the internet - translated to 17 languages. As of today we count 324 catalogues and 12290 patterns translated into English (UK/cm). 12290
We work hard to bring you the best knitting and crochet have to offer, inspiration and advice as well as great quality yarns at incredible prices! Would you like to use our patterns for other than personal use? You can read what you are allowed to do in the Copyright text at the bottom of all our patterns. Happy crafting!
Post a comment to pattern DROPS 181-4
We would love to hear what you have to say about this pattern!
If you want to leave a question, please make sure you select the correct category in the form below, to speed up the answering process. Required fields are marked *.