
Popular categories
Looking for a yarn?


Comments / Questions (11)
![]() Betty Van Kruining wrote:
Betty Van Kruining wrote:
Het vest krult om aan de onderkant. Hoe kan ik dit oplossen?
13.11.2017 - 21:57DROPS Design answered:
Hoi Betty, Zelf los ik dit altijd op door de onderkant heel voorzichtig op te persen met het strijkijzer. Leg het werk op de strijkplank, leg daaroverheen en natte theedoek en ga er heel voorzichtig overheen met het strijkijzer. Je moet beslist niet te hard drukken of te lang strijken. Op deze manier blijft het omkrullen weg.
15.11.2017 - 10:25
|
|||||||||||||||||||||||||
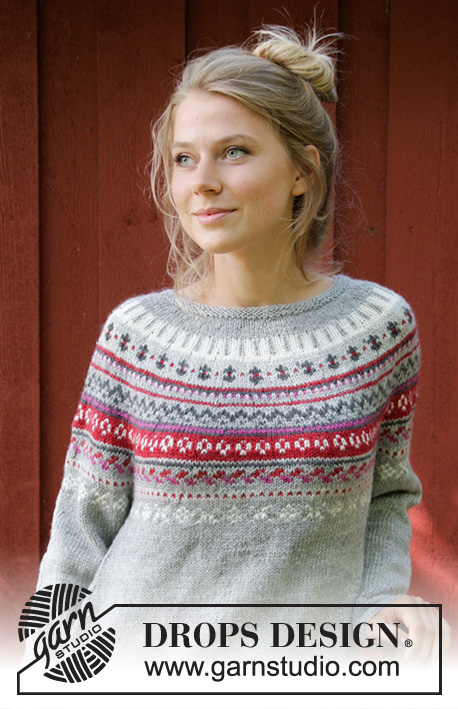
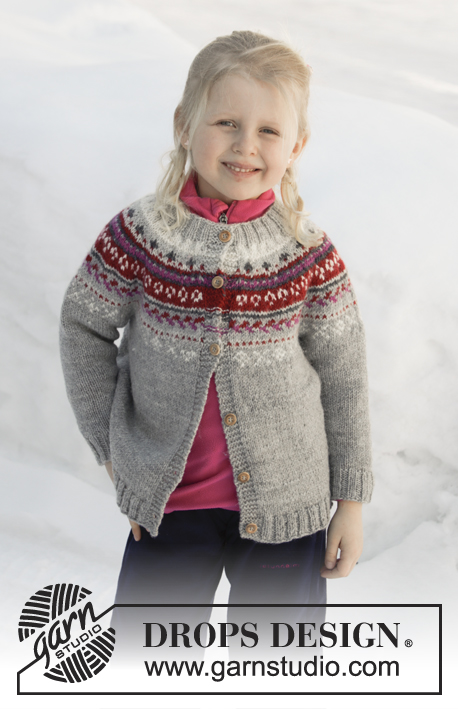
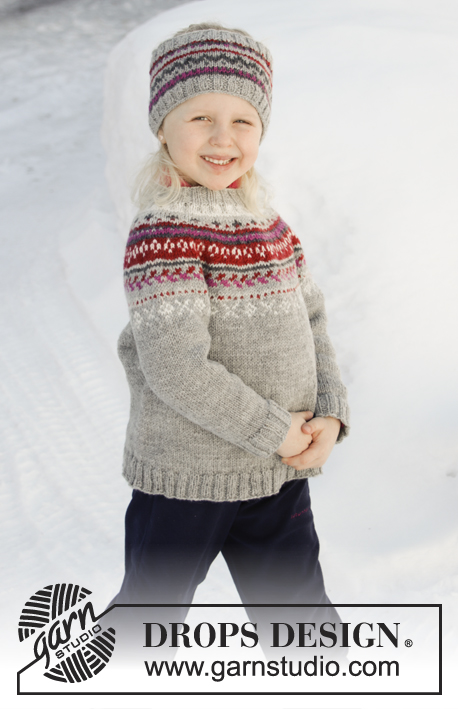
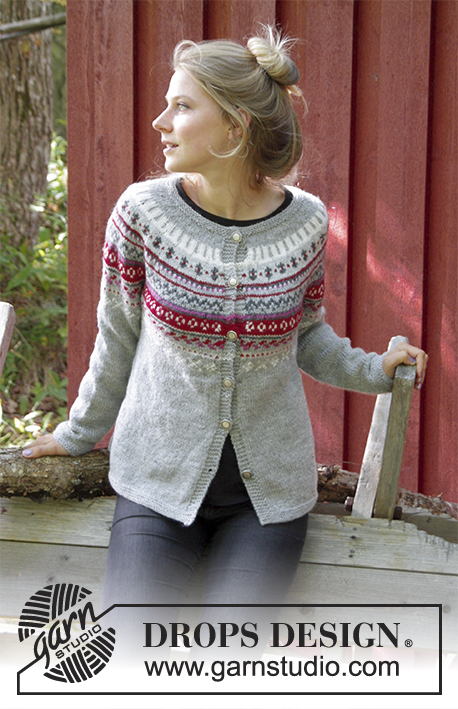
Winter Berries Jacket#winterberriesjacket |
|||||||||||||||||||||||||
 |
 |
||||||||||||||||||||||||
Knitted jacket with round yoke, multi-coloured Norwegian pattern and A-shape, worked top down. Sizes S - XXXL. The piece is worked in DROPS Karisma.
DROPS 181-15 |
|||||||||||||||||||||||||
|
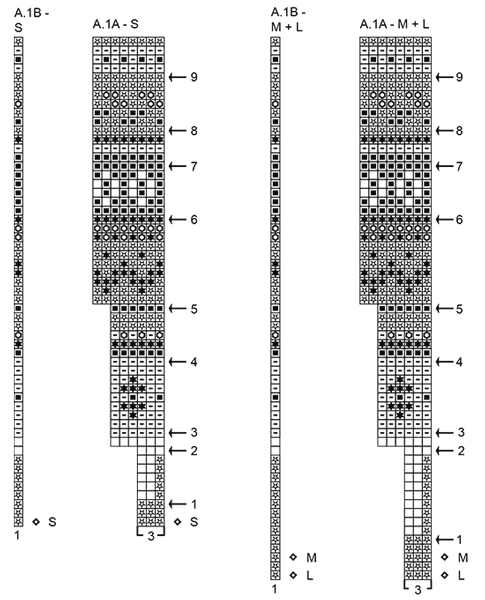
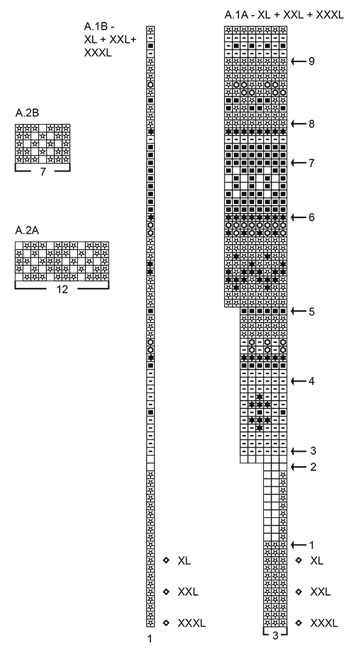
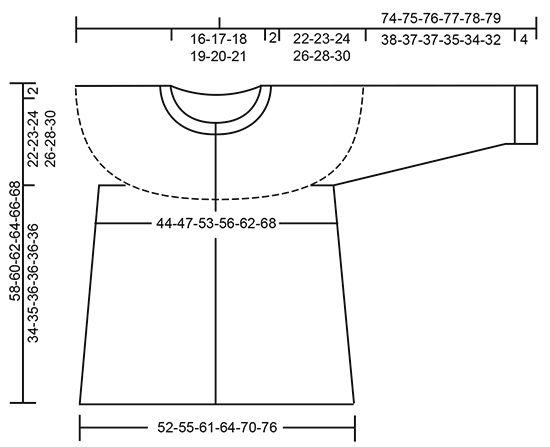
INFORMATION FOR THE PATTERN: RIDGE/GARTER STITCH (worked back and forth): 1 ridge = Knit 2 rows. RIDGE/GARTER STITCH (worked in the round): 1 ridge = 2 rounds. Knit 1 round and purl 1 round. ELEVATION: Insert 1 marker mid back. Start from the right side with light grey and knit until you have worked 11-12-13-14-15-16 stitches past the marker, turn, tighten the strand and purl 22-24-26-28-30-32 stitches. Turn, tighten the strand and knit 33-36-39-42-45-48 stitches, turn, tighten the strand and purl 44-48-52-56-60-64 stitches. Turn, tighten the strand and knit 55-60-65-70-75-80 stitches. Turn, tighten the strand and purl to end of the row (knit the band). INCREASE TIP-1: To work out how to increase evenly, count the total number of stitches on the needle (e.g. 100 stitches), minus the bands (e.g. 10 stitches) and divide by the number of increases to be made (e.g. 19) = 4.7. In this example, increase after alternately the 4th and 5th stitch by making 1 yarn over, on the next row work the yarn overs twisted to prevent holes. Do not increase over the bands. KNITTING TIP-1 (for the bands): On the rows where you have either stripes or pattern border, work the colour in the stripe or the background colour in pattern over the 5 band stitches in each side as well. KNITTING TIP-2 (for the multi-coloured pattern): To prevent the knitting tension becoming tighter when working pattern, it is important that the strands do not tighten at the back of the piece. You can increase a needle size when working pattern if this is a problem. PATTERN: See diagrams A.1 and A.2. Choose diagram for your size. The whole pattern is worked in stocking stitch. INCREASE TIP-2 (for the sides in the body): All increases are worked from the right side! Start 2 stitches before the marker thread, make 1 yarn over, knit 4 stitches (the marker thread sits in the middle of these 4 stitches), make 1 yarn over (= 2 stitches increased). On the next row (wrong side) purl the yarn overs twisted to prevent holes. DECREASE TIP (for mid under sleeve): Start 3 stitches before the marker thread, knit 2 together, knit 2 (the marker thread sits in the middle of these 2 stitches), slip 1 stitch as if to knit, knit 1, pass the slipped stitch over the knitted stitch (= 2 stitches decreased). BUTTONHOLE: Decrease for buttonhole on right band (when the garment is worn). In other words, work from the right side until there are 3 stitches left on the needle, make 1 yarn over, knit 2 together and finish with knit 1. On the next row, knit the yarn over so that there is a hole. The first buttonhole is worked on the first row from the right side after the garter stitch edge in the neck, then work the 5-5-5-6-6-6 next buttonholes with approx. 9-9-9-8-8-8 cm between each. ---------------------------------------------------------- JACKET: The piece is worked back and forth with circular needle from mid front and top down. The sleeves are worked in the round with short circular needle top down, change to double pointed needles when necessary. NECKLINE: Cast on 100-104-108-112-116-120 stitches (including 5 band stitches in each side towards mid front) with circular needle size 3.5 mm and light grey. Work 3 RIDGES – see description above. Knit 1 row from the right side where you increase 19-21-23-31-33-35 stitches evenly on row – read INCREASE TIP-1 and work BUTTONHOLE at the end of this row – see description above = 119-125-131-143-149-155 stitches on the needle. Continue by working yoke as described below. YOKE: Read KNITTING TIP-1 and 2! Change to circular needle size 4.5 mm and purl 1 row from the wrong side with 5 knitted stitches in each side for bands. For a better fit, you can now work an ELEVATION in the back of the neck – see description above. When the elevation has been completed, work the next row as follows from the right side: 5 band stitches in garter stitch, work A.1A until there are 6 stitches left on the needle (= 36-38-40-44-46-48 repeats of 3 stitches), work A.1B (= 1 stitch) and finish with 5 band stitches in garter stitch. Continue the pattern in this way and at the same time increase on each row marked with an arrow in A.1A as described below – read INCREASE TIP-1 (you always increase on a row from the right side) and REMEMBER THE KNITTING TENSION! On the row with arrow-1 increase 30-30-36-42-42-42 stitches evenly on row = 149-155-167-185-191-197 stitches. On the row with arrow-2 increase 24-27-30-33-36-36 stitches evenly on row = 173-182-197-218-227-233 stitches. On the row with arrow -3 increase 24-27-30-33-36-36 stitches evenly on row = 197-209-227-251-263-269 stitches. On the row with arrow -4 increase 20-26-28-28-30-36 stitches evenly on row = 217-235-255-279-293-305 stitches. On the row with arrow -5 increase 18-24-28-28-30-34 stitches evenly on row = 235-259-283-307-323-339 stitches. On the row with arrow -6 increase 16-16-16-16-16-24 stitches evenly on row = 251-275-299-323-339-363 stitches. On the row with arrow -7 increase 8-12-12-12-16-16 stitches evenly on row = 259-287-311-335-355-379 stitches. On the row with arrow -8 increase 8-12-12-12-16-16 stitches evenly on row = 267-299-323-347-371-395 stitches. On the row with arrow -9 increase 6-10-14-14-14-10 stitches evenly on row = 273-309-337-361-385-405 stitches. After the final increase, the piece measures approx 23-25-26-28-30-32 cm from the cast-on edge measured mid front. When A.1 has been worked 1 time vertically, work the next row as follows from the wrong side with light grey: 5 band stitches in garter stitch, purl 40-43-48-51-57-61 stitches (= front piece), place the next 52-64-68-74-74-76 stitches on 1 thread for sleeve, cast on 8-8-10-10-10-14 new stitches on the needle (= in the side under the sleeve), purl the next 79-85-95-101-113-121 stitches (= back piece), place the next 52-64-68-74-74-76 stitches on 1 thread for sleeve, cast on 8-8-10-10-10-14 new stitches on the needle (= in the side under the sleeve), purl 40-43-48-51-57-61 stitches and finish with 5 band stitches in garter stitch (= front piece). Body and sleeves are now finished separately. THE PIECE IS NOW MEASURED FROM HERE! BODY: = 185-197-221-233-257-281 stitches. Insert 1 marker thread, 49-52-58-61-67-73 stitches in from each side = 87-93-105-111-123-135 stitches between the marker threads on the back piece. The first row is worked as follows from the right side: 5 band stitches in garter stitch, work A.2A until there are 12 stitches left on the needle (= 14-15-17-18-20-22 repeats of 12 stitches), work A.2B (= 7 stitches) and finish with 5 band stitches in garter stitch. Continue the pattern in this way. When A.2 has been completed, work stocking stitch with light grey with 5 band stitches in garter stitch in each side. When the piece measures 4 cm from the separation, increase 2 stitches in each side – read INCREASE TIP-2 (= 4 stitches increased). Increase in this way every 4 cm a total of 8 times in each side = 217-229-253-265-289-313 stitches. Continue working until the piece measures 32-33-34-34-34-34 cm from the separation. Change to circular needle size 4 mm and work 4 ridges back and forth over all stitches. Cast off with knit from the right side, but to avoid the cast-off edge being tight, cast off with circular needle size 4.5 mm. The jacket measures approx. 58-60-62-64-66-68 cm from the shoulder down. SLEEVE: Place the 52-64-68-74-74-76 stitches from the thread on the one side of the piece on short circular needle size 4.5 mm and, in addition, knit up 1 stitch in each of the 8-8-10-10-10-14 stitches which were cast on under the sleeve, with light grey = 60-72-78-84-84-90 stitches on the needle. Insert 1 marker thread in the middle of the 8-8-10-10-10-14 stitches under the sleeve. Start the round here and knit 1 round. Then work A.2A in the round (= 5-6-6½-7-7-7½ repeats of 12 stitches). When A.2A has been completed, work stocking stitch with light grey. AT THE SAME TIME on the first round after A.2A decrease 2 stitches mid under the sleeve – read DECREASE TIP. Decrease in this way a total of 9-14-16-18-18-20 times; in S: Every 11th round, in M: Alternately every 6th and 7th round, in L: Alternately every 5th and 6th round, in XL and XXL: Alternately every 4th and 5th round and in XXXL: Alternately every 3rd and 4th round = 42-44-46-48-48-50 stitches. Continue working until the piece measures 38-37-37-35-34-32 cm from the separation. Change to double pointed needles size 3.5 mm and continue with GARTER STITCH in the round – see description above, for 4 cm. Cast off with knit, but to avoid the cast-off edge being tight, cast off with double pointed needles size 4.5 mm. The sleeve measures approx. 42-41-41-39-38-36 cm from the separation. Work the other sleeve in the same way. ASSEMBLY: Sew the buttons onto the left band. |
|||||||||||||||||||||||||
Diagram explanations |
|||||||||||||||||||||||||
|
|||||||||||||||||||||||||
 |
|||||||||||||||||||||||||
 |
|||||||||||||||||||||||||
 |
|||||||||||||||||||||||||
Have you finished this pattern?Tag your pictures with #dropspattern #winterberriesjacket or submit them to the #dropsfan gallery. Do you need help with this pattern?You'll find 31 tutorial videos, a Comments/Questions area and more by visiting the pattern on garnstudio.com. © 1982-2026 DROPS Design A/S. We reserve all rights. This document, including all its sub-sections, has copyrights. Read more about what you can do with our patterns at the bottom of each pattern on our site. |
|||||||||||||||||||||||||


With over 40 years in knitting and crochet design, DROPS Design offers one of the most extensive collections of free patterns on the internet - translated to 17 languages. As of today we count 324 catalogues and 12290 patterns translated into English (UK/cm). 12290
We work hard to bring you the best knitting and crochet have to offer, inspiration and advice as well as great quality yarns at incredible prices! Would you like to use our patterns for other than personal use? You can read what you are allowed to do in the Copyright text at the bottom of all our patterns. Happy crafting!
Post a comment to pattern DROPS 181-15
We would love to hear what you have to say about this pattern!
If you want to leave a question, please make sure you select the correct category in the form below, to speed up the answering process. Required fields are marked *.