
Popular categories
Looking for a yarn?


Comments / Questions (32)
![]() Jardé wrote:
Jardé wrote:
Bonjour, Je reprends mon ouvrage délaissé et je voudrais juste avoir la confirmation que la fin de la partie empiècement (juste avant la rehausse) se termine bien par 2 mailles envers ? Et qu’après ces deux mailles il faut couper le fil . Merci beaucoup de votre réponse.
14.11.2025 - 01:04DROPS Design answered:
Bonjour Mme Jardé, le tour va effectivement bien se terminer par les 2 mailles envers de A.3. Bon tricot!
14.11.2025 - 08:44
![]() Jardé wrote:
Jardé wrote:
Bonjour, Juste avant de couper le fil pour réaliser la rehausse doit- on terminer par une maille envers du diagramme ou par une maille de transition à savoir une maille endroit ? Après cela je coupe le fil pour réaliser la rehausse et je voudrais savoir si les mailles de transition faisaient partie du dos ou des manches ?
02.03.2024 - 18:16DROPS Design answered:
Bonjour Mme Jardé, avant de tricoter la rehausse, tricotez le dernier tour exactement comme avant, en le commençant et en le terminant au même endroit que les tours précédents, coupez le fil. Les rangs raccourcis doivent commencer au milieu du dos, mettez un marqueur si besoin pour mieux repérer le milieu du dos (pour que le ,nombre de mailles tricoté de chaque côté soit symétrique) et tricotez en jersey, avec les torsades comme avant en suivant bien le nombre de mailles pour votre taille. Bon tricot!
04.03.2024 - 08:26
![]() Agnieszka wrote:
Agnieszka wrote:
Cześć, przerobiłam tył i przód i mam koniec nitki na początku podkroju pachy. Jak teraz dodać rękawy, które też mam już zrobione, skoro na wzorze jest napisane, żeby zacząć okrążenie za 5 pierwszymi oczkami i 51 oczek? Czy nie powinnam się cofnąć z oczkami o 5 idodac rękawy tak, jakjestna filmiku? Czy jak mam zrobione podkroje na rękawach, to mam dokończyć okrążenie aby nitka była na początku podkroju? Z góry dziękuję za pomoc, Pozdrawiam
07.10.2023 - 13:22DROPS Design answered:
Witaj Agnieszko, ja bym to zrobiła jak jest na filmie TUTAJ. Później przerabiając karczek zaczniesz okrążenie za 5-4-3-3-4-5 pierwszymi oczkami tyłu jak w opisie. Pozdrawiamy!
09.10.2023 - 08:57
![]() Jardé wrote:
Jardé wrote:
Bonjour, Concernant la réhausse j'imagine qu'on tricote les mailles comme elles se présentent ? A savoir que sur les rangs retour donc côté envers on tricote les mailles se présentant à l'envers à l'envers et celles se présentant à l'endroit à l'endroit ? Merci beaucoup d'avance.
22.03.2023 - 22:21DROPS Design answered:
Bonjour Mme Jardé, effectivement, lorsque l'on tricote les rangs envers de la réhausse, tricotez les mailles des diagrammes comme elles se présentent (pour conserver le motif, vu sur l'endroit) et les autres mailles à l'envers (jersey envers, sur l'envers). Bon tricot!
23.03.2023 - 09:58
![]() Jardé wrote:
Jardé wrote:
Bonjour, je suis arrivée au niveau de la rehausse et je suis coincée. Première question : le dos est il bien le premier côté du tour que l'on tricote ? ( ce n'est pas spécifié dans les instructions ) Deuxième question : j'ai bien 23 mailles pour le devant et le dos et il faut commencer le tour après les 11 premières mailles. ... Mais 23 est un nombre impair. On place le marqueur dans la 12 ème maille ? Merci infiniment de votre aide.
06.03.2023 - 03:33DROPS Design answered:
Bonjour Mme Jardé, vous commencez bien par le dos lorsque vous tricotez l'empiècement; comptez les 11 premières mailles après la maille du milieu dos (elle sera tricotée au premier rang sur l'envers: 36 m sur l'endroit puis 73 m sur l'envers, soit 36 m de chaque côté de cette maille du nombre 'impair'). Bon tricot!
06.03.2023 - 10:42
![]() Jardé wrote:
Jardé wrote:
Bonjour, au niveau du raglan il faut diminuer 6 fois tous les 4 tours puis 8 fois tous les 2 tours. Cela fait-il bien 40 tours au total ? Merci beaucoup par avance.
18.02.2023 - 01:11DROPS Design answered:
Bonjour Mme Jardé, tout à fait. Bon tricot!
20.02.2023 - 09:08
![]() Dea wrote:
Dea wrote:
Un'altra cosa, sempre per l'alzata, quando dice " inserire un segnapunti nella maglia successiva sul ferro (centro dietro) e lavorare 36 (taglia più piccola) maglie dopo il segnapunti...intende che quella col segno non viene conteggiata?
28.08.2021 - 14:26DROPS Design answered:
Buonasera Dea, si intende dopo il segnapunti. Buon lavoro!
29.08.2021 - 22:42
![]() Dea wrote:
Dea wrote:
Buongiorno, dove inizia il giro dopo che uno ha fatto l'alzata? Nella spiegazione dice nello stesso punto di prima , quindi 16 maglie verso destra rispetto al segnapunti sul dietro, in sostanza invece che all'inizio del dietro , si parte in mezzo al diagramma della treccia?
28.08.2021 - 14:22DROPS Design answered:
Buonasera Dea, dopo l'alzata il giro inizia all'altezza del segnapunti al centro dietro. Buon lavoro!
29.08.2021 - 22:42
![]() Rosanne wrote:
Rosanne wrote:
Of moet de laatste zin van de instructie voor de Verhoging misschien zijn: “ De naald begint nu op dezelfde plaats als hiervoor, dus 16 steken richting de rechterkant VANAF (in plaats van OP) de markeerdraad midden achter.”? Dan beginnen de 33 steken net in de kabel rechts achter en lopen precies over het middenachtergedeelte. Klopt dit?
09.02.2020 - 17:08DROPS Design answered:
Dag Rosanne,
De naald moet je inderdaad beginnen bij waar je was voordat je begon met de verhoging, dus het zou inderdaad zo kunnen zijn dat de minderingen over het voor- en achterpand gemaakt moeten worden.
10.02.2020 - 23:37
![]() Rosanne wrote:
Rosanne wrote:
Dank! Nog een laatste vraag: van waar gerekend begint men met de 33 volgende steken. M.a.w. Waar moeten de 16 steken 2 aan 2 recht samen geplaatst worden? Zijn deze 16 steken midden boven de mouwen of midden voor en midden achter? Heel hartelijk dank voor uw hulp.
09.02.2020 - 16:54DROPS Design answered:
Dag Rosanne,
Het was even puzzelen, maar ik denk dat het de bedoeling is dat je eerst 23 steken breit (in plaats van 33) en dan de volgende 16 steken 2 aan 2 samen breit, deze 16 steken zijn de 12 steken van de raglan, 2 steken van de mouw en nog 12 steken van de raglan. Dit herhaal je vervolgens nog een keer. Dus niet 2 aan 2 samenbreien op de voor- en achterpanden, maar over de raglan- en mouwsteken. Er zit dus denk ik een foutje in het patroon en ik zal dit even doorgeven aan design ter controle
10.02.2020 - 23:31
|
||||||||||||||||
Solfest#solfestsweater |
||||||||||||||||
 |
 |
|||||||||||||||
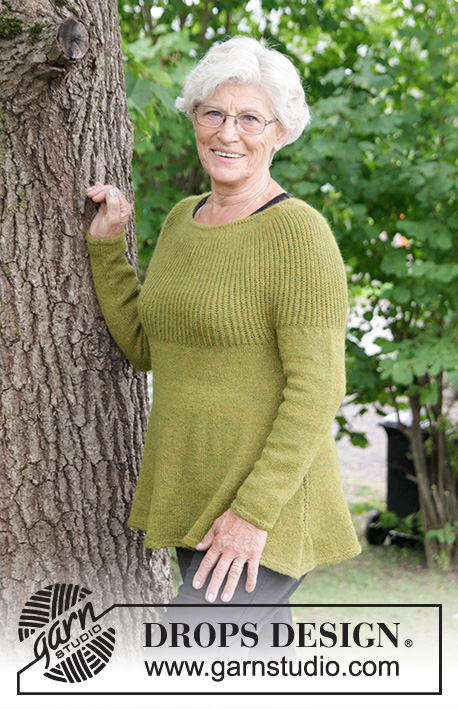
Knitted jumper with cables and raglan. Sizes S - XXXL. The piece is worked in DROPS Nepal.
DROPS 180-16 |
||||||||||||||||
|
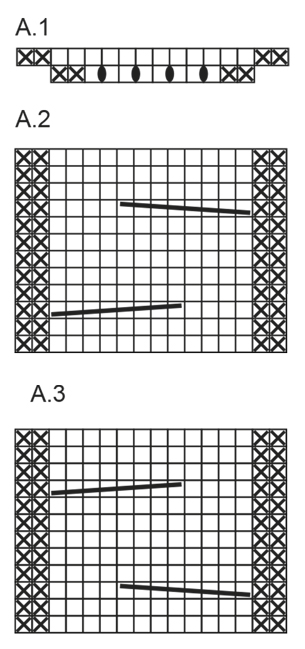
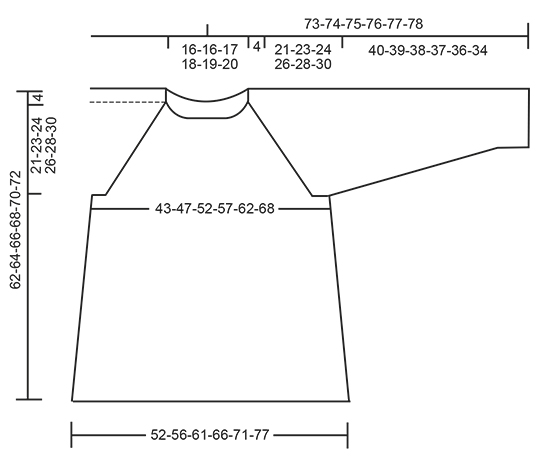
INFORMATION FOR THE PATTERN: RIDGE/GARTER STITCH (worked in the round): 1 ridge = 2 rounds. Knit 1 round and purl 1 round. DECREASE TIP (for body): Decrease as follows by both marker threads: Work until there are 3 stitches left before the marker thread: Knit 2 together, knit 2 (the marker thread sits in the middle of these stitches), slip 1 stitch as if to knit, knit 1, pass the slipped stitch over the knitted stitch. INCREASE TIP (for sleeves): Increase as follows mid under the sleeve – start 1 stitch before the marker thread: Make 1 yarn over, knit 2 stitches (the marker thread sits in the middle of these 2 stitches), make 1 yarn over (= 2 stitches increased). On the next round, knit the yarn overs twisted to prevent holes. RAGLAN: Decrease 2 stitches in each transition between body and sleeves. Start 2 stitches before A.2/A.3, knit 2 together, work A.2/A.3, slip 1 stitch as if to knit, knit 1, pass the slipped stitch over the knitted stitch. ELEVATION (for back of neck): Cut the strand. Continue working as follows – starting after 11-13-16-18-19-20 stitches on the back piece (= mid back): Work stocking stitch, A.2 and A.3 as before. Insert 1 marker in the next stitch on the row (= mid back). Start from the right side and work 36-37-39-41-43-45 stitches past the marker, turn, tighten the strand and work 73-75-79-83-87-91 stitches. Turn, tighten the strand and work 67-69-73-77-81-85 stitches, turn, tighten the strand and work 61-63-67-71-75-79 stitches. Turn, tighten the strand and work to mid back. Cut the strand. The round now starts at the same place as before, i.e. 16-17-19-21-23-25 stitches towards the right (seen from the right side) at the marker mid back. PATTERN: See diagrams A.1 to A.3. ---------------------------------------------------------- JUMPER: The piece is worked bottom up. The body is worked in the round with circular needle and the sleeves are worked in the round with double pointed needles before they are worked together and you work the yoke in the round with circular needle. BODY: Cast on 166-178-194-210-226-246 stitches with circular needle size 4.5 mm and Nepal. Work 3 RIDGES – see description above. Change to circular needle size 5.5 mm and work stocking stitch. Insert 1 marker thread at the beginning of the round and 1 marker thread after 83-89-97-105-113-123 stitches (the marker threads mark the sides of the garment). REMEMBER THE KNITTING TENSION! When the piece measures 11 cm decrease 1 stitch on each side of each marker thread (= 4 stitches decreased) – read DECREASE TIP. Decrease in this way every 4 cm a total of 7 times = 138-150-166-182-198-218 stitches. When the piece measures 37-37-38-38-38-38 cm cast off 4-4-5-5-6-7 stitches on each side of each marker thread (= 8-8-10-10-12-14 stitches in each side) = 61-67-73-81-87-95 stitches on the front/back piece. Lay the piece to one side and work the sleeves. SLEEVES: The piece is worked in the round with double pointed needles. Cast on 44-44-48-48-52-52 stitches with double pointed needles size 4.5 mm and Nepal. Knit 1 round, then work rib (= knit 2/ purl 2). When the piece measures 6 cm change to double pointed needles size 5.5 mm. Knit 1 round and decrease 8-8-8-6-8-8 stitches evenly on round = 36-36-40-42-44-44 stitches. Work stocking stitch. Insert 1 marker thread at the beginning of the round (= mid under the sleeve). When the piece measures 8 cm increase 1 stitch on each side of the marker thread – read INCREASE TIP. Increase in this way every 4-3-2½-2-2-1½ cm a total of 8-11-12-13-13-15 times = 52-58-64-68-70-74 stitches. When the piece measures 40-39-38-37-36-34 cm (shorter measurements in larger sizes because of longer yoke) cast off the middle 8-8-10-10-12-14 stitches under the sleeve (= 4-4-5-5-6-7 stitches on each side of the marker thread) = 44-50-54-58-58-60 stitches. Lay the piece to one side and work 1 more sleeve. YOKE: Place the sleeves on the same circular needle size 5.5 mm as the body where you have cast off stitches for the armholes = 210-234-254-278-290-310 stitches. Continue working as follows – start the round after 5-4-3-3-4-5 stitches on the back piece: Work * 51-59-67-75-79-85 stitches stocking stitch, A.1 (= 12 stitches), 30-34-36-40-42-46 stitches stocking stitch, A.1 over the next 12 stitches *, work from *-* a total of 2 times. When A.1 has been completed in height 1 time, there are 226-250-270-294-306-326 stitches on the needle. Now continue working as follows: Work * 51-59-67-75-79-85 stitches stocking stitch, A.2 (= 16 stitches), 30-34-36-40-42-46 stitches stocking stitch, A.3 (= 16 stitches) *, work from *-* a total of 2 times. Continue with pattern and decrease to RAGLAN – see description above. Decrease every 4th round 6-6-6-6-7-7 times, then every 2nd round 8-10-11-13-13-15 times (= a total of 14-16-17-19-20-22 times). After all the decreases, there are 114-122-134-142-146-150 stitches on the round. For a better fit, you can now work an ELEVATION in the back of the neck – see description above. On the next round, decrease 4 stitches over each of A.2 and A.3 = 98-106-118-126-130-134 stitches. The next round is worked as follows: Work * 33-35-39-43-47-51 stitches stocking stitch and decrease 3-4-7-9-10-11 stitches evenly on round, knit the next 16-18-20-20-18-16 stitches together 2 and 2, *, work from *-* a total of 2 times = 76-80-84-88-92-96 stitches. Purl 1 round. The yoke measures approx. 21-23-24-26-28-30 cm. NECK: Knit 1 round and increase 8 stitches evenly on round = 84-88-92-96-100-104 stitches. Change to short circular needle size 4.5 mm. Work rib (= knit 2 / purl 2) for 4 cm, then cast off with knit over knit and purl over purl. |
||||||||||||||||
Diagram explanations |
||||||||||||||||
|
||||||||||||||||
 |
||||||||||||||||
 |
||||||||||||||||
 |
||||||||||||||||
Have you finished this pattern?Tag your pictures with #dropspattern #solfestsweater or submit them to the #dropsfan gallery. Do you need help with this pattern?You'll find 32 tutorial videos, a Comments/Questions area and more by visiting the pattern on garnstudio.com. © 1982-2026 DROPS Design A/S. We reserve all rights. This document, including all its sub-sections, has copyrights. Read more about what you can do with our patterns at the bottom of each pattern on our site. |
||||||||||||||||


With over 40 years in knitting and crochet design, DROPS Design offers one of the most extensive collections of free patterns on the internet - translated to 17 languages. As of today we count 324 catalogues and 12291 patterns translated into English (UK/cm). 12291
We work hard to bring you the best knitting and crochet have to offer, inspiration and advice as well as great quality yarns at incredible prices! Would you like to use our patterns for other than personal use? You can read what you are allowed to do in the Copyright text at the bottom of all our patterns. Happy crafting!
Post a comment to pattern DROPS 180-16
We would love to hear what you have to say about this pattern!
If you want to leave a question, please make sure you select the correct category in the form below, to speed up the answering process. Required fields are marked *.