
Popular categories
Looking for a yarn?


Comments / Questions (73)
![]() Martine Demey wrote:
Martine Demey wrote:
Kan dit doop jurkje ook gebreid worden met gewone breinaalden
13.09.2024 - 15:41DROPS Design answered:
Dag Martine,
Nee, dat is niet zo geschikt omdat het patroon van het rokgedeelte helemaal in de rondte loopt. Dat gaat niet passen op gewone breinaalden.
18.09.2024 - 16:44
![]() Marja wrote:
Marja wrote:
Hei. Kiitos paljon nopeasta vastauksesta.
30.05.2024 - 14:11
![]() Marja wrote:
Marja wrote:
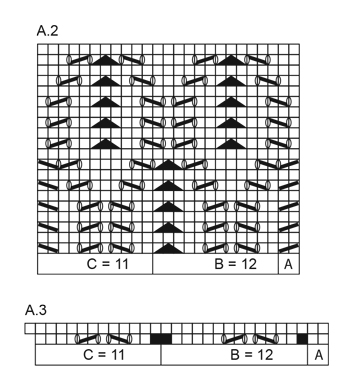
Vielä lisäys, koko ajan siis reunasilmukat aina oikeaa. Oikealla krs:lla aina ensimmäisen aina oikean silmukan jälkeen 2 silmukkaa A2A? Tämä ei voi täsmätä, koska A2A kavennettujen silmukoiden tilalle ei tehdä lisäyksiä. A2B osiossa lisätään aina sama määrä kuin kavennetaan, siinä silmukkamäärät täsmäävät. A2C kuviossa taas lisätään enemmän kuin kavennetaan. En ymmärrä. Apua!
29.05.2024 - 19:20DROPS Design answered:
Hei, kun neulot mallineuletta piirrosten A.2A-A.2C mukaisesti, kerroksella lisätään ja kavennetaan yhtä monta silmukkaa (8 silmukkaa). Eli piirroksen A.2A kavennettu silmukka lisätään työhön piirroksessa A.2C. Jatka siis neulomista piirrosten mukaan, niin kuviosta tulee oikeanlainen.
30.05.2024 - 13:08
![]() Marja wrote:
Marja wrote:
Hei. Teen myssyä, pienin koko. En ymmärrä kuviota. Teen molempiin reunoihin aina 1 s aina oikein. Oikean puolen krs:lla 2 s oikein yhteen (=A2A), 12 s A2B x4, 11s A2C, ja 1s ainaoikein. Nurja krs nurjaa paitsi reunasilmukat. Seuraavalla oikealla krs:lla on A2A:ssa vain 1 s. Mitä teen väärin?
29.05.2024 - 18:54
![]() Wanda Wendling wrote:
Wanda Wendling wrote:
When I am working A2 I always end up with 12 stitches in the C section not 11. When I count the number of stitches it always works out to 12. Can you help me understand how you are staying there are 11 stitches in A2C? Even when I count the boxes in the pattern it comes to 12 stitches and not 11. Is there a video for how to work A2?
04.05.2024 - 22:09DROPS Design answered:
Dear Wendy, all the relevant videos for this pattern can be found if you click on the "Videos" sign, just below the title line. As for your question, please look at the diagrams (A.2A, A.B and AC) as a whole (and that is why we prefer to use diagrams insted of written out instructions), and you will see that at the end of the last repeat of A.2B there is a decrease, that has its "couple" increase in A.2C, and since there you decrease a stitch, you should only have 11 stitches remaining for A.2C part. I hope this helps. Happy Crafting!
05.05.2024 - 15:17
![]() Doris wrote:
Doris wrote:
Hallo Drops Team, wieso zieht sich das Muster bei mir so zusammen? Kann es daran liegen weil ich es in der Nadelstärke Nr. 4 gestrickt habe anstatt 4,5 ? Als Wolle habe ich Original Drops Cotton Merino verwendet. Mit freundlichen Grüßen
18.04.2024 - 17:59DROPS Design answered:
Liebe Doris, stimmt Ihre Maschenprobe immer noch auch beim Stricken? dh beim Lochmuster sollen Sie immer 21 Maschen.x 30 Reihen haben; stimmt es so? Bei den Diagrammen A.2 , A.4, A.6, A.9 und A.10 sollen Sie immer die gleiche Maschenanzahl haben. Viel Spaß beim Stricken!
19.04.2024 - 08:07
![]() Doris wrote:
Doris wrote:
Hallo Drops Team, beim Muster A2 muss ich doch A 2 M rechts zusammen stricken. Dann hab ich doch in der 3 Reihe (Musterreihe) 1 M zu wenig. Habe dann nur 13 M anstatt 14. Hab ich da ein Denkfehler? Mit freundlichen Grüßen Doris
07.04.2024 - 18:19DROPS Design answered:
Liebe Doris, beachten Sie, daß Sie immer genauso viele Umschläge wie Sie Maschen abgenommen haben - beachten Sie auch, daß Sie immer die richtigen Maschenanzahl für jedes Diagram haben, dh: 2 M in A, 12 M in B und 11 M in C. Viel Spaß beim Stricken!
08.04.2024 - 08:29
![]() Katie Douce wrote:
Katie Douce wrote:
Merci beaucoup pour votre aide, je vais étudier la leçon. je voulais savoir quel numéro d'aiguille je peux prendre pour faire la robe. Merci .
12.03.2024 - 18:49DROPS Design answered:
Bonjour Katie Douce, pour la robe, nous avons 2 échantillons, un pour les aiguilles 4 et un pour les aiguilles 4,5 - cf en-tête sous les fournitures. Pensez, si besoin, à bien adapter la taille des aiguilles pour bien avoir le bon échantillon. Bon tricot!
13.03.2024 - 07:48
![]() Katie Douce wrote:
Katie Douce wrote:
Bonjour, je souhaiterais faire cette jolie robe de baptême, je voudrais savoir si il est possible de remplacer les aiguilles circulaires par des aiguilles a pointes. Merci beaucoup
06.03.2024 - 18:03DROPS Design answered:
Bonjour Katie Douce, l'empiècement se tricote en allers et retours, vous pourrez donc le faire sur aiguilles droites, pour le bas de la robe, vous devrez adapter les explications, le point fantaisie, etc., cette leçon vous donnera quelques infos. Bon tricot!
07.03.2024 - 08:01
![]() Joan Kann wrote:
Joan Kann wrote:
Hejsa efter at have pillet op 3 gange så kører mønsteret - fandt ud af det Hilsen Joan Kann
12.02.2024 - 21:32
|
|||||||||||||||||||||||||
My Fairy#myfairychristeninggown |
|||||||||||||||||||||||||
 |
 |
||||||||||||||||||||||||
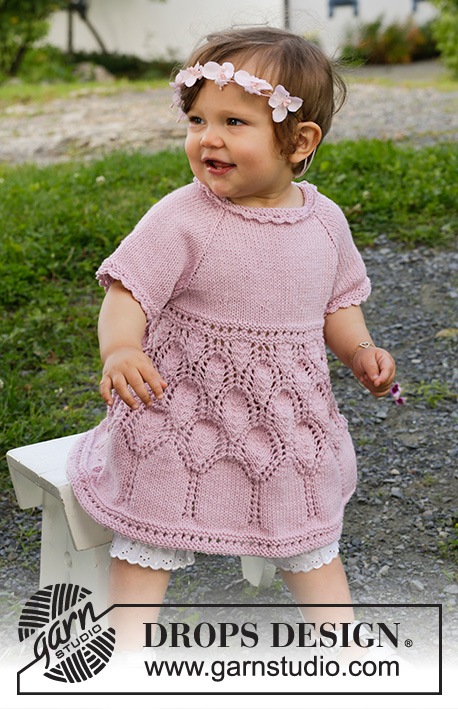
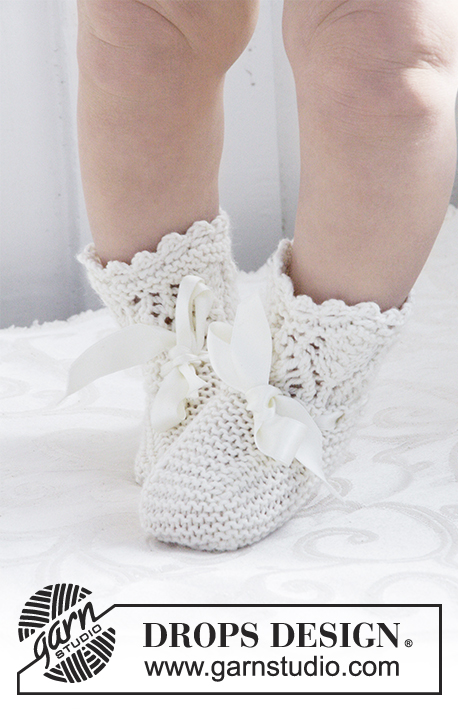
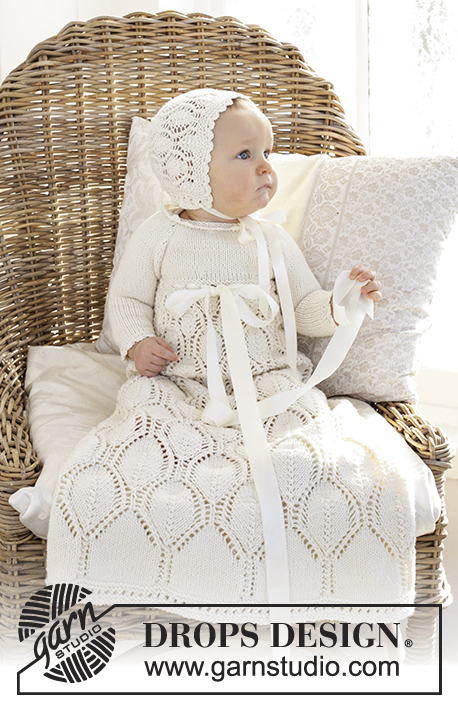
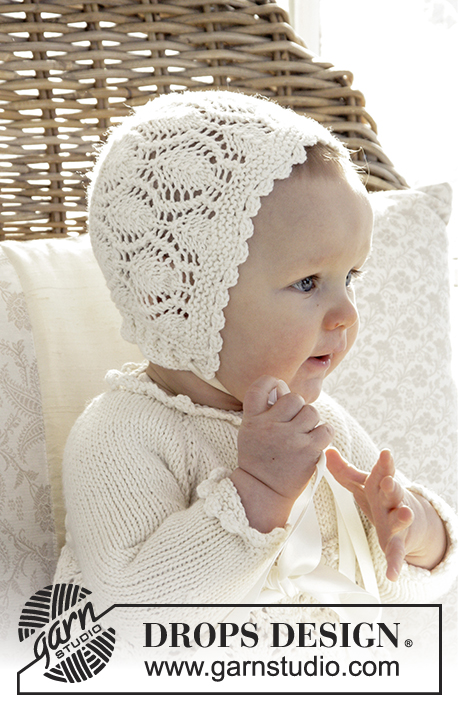
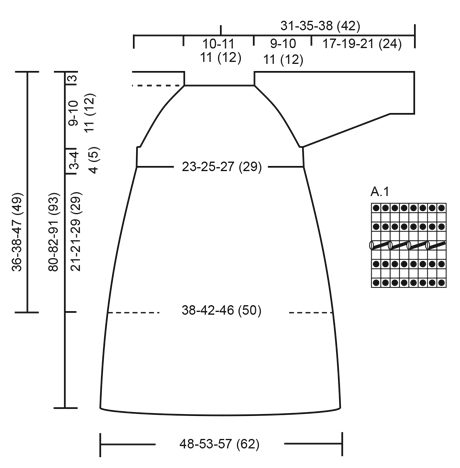
This set is made up of: Dress for Christening or special occasions worked top down with raglan and lace pattern in DROPS Cotton Merino. Knitted hat with lace pattern in DROPS Cotton Merino. Baby sizes 0 - 2 years.
DROPS Baby 29-1 |
|||||||||||||||||||||||||
|
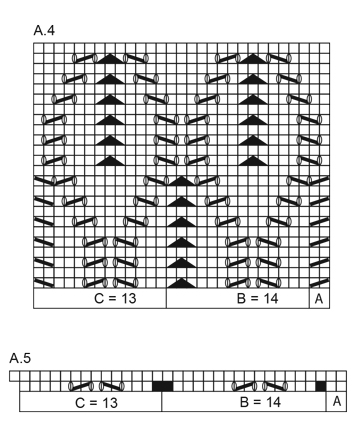
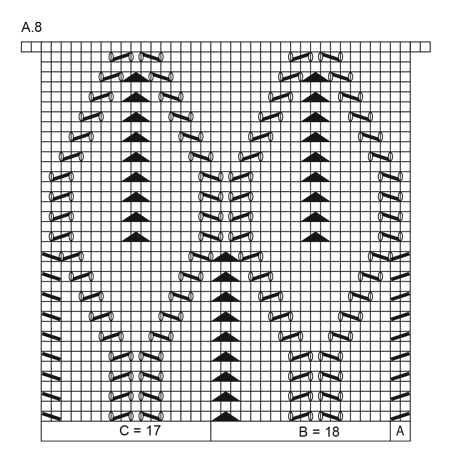
DRESS: RIDGE/GARTER STITCH (worked back and forth): 1 ridge = knit 2 rows. RIDGE/GARTER STITCH (worked in the round): 1 ridge = 2 rounds. Knit 1 round and purl 1 round. PATTERN: See diagrams A.1 to A.10. The diagrams show all the rows in the pattern from the right side. INCREASE TIP: To work out how to increase evenly along the row, count the total number of stitches on the needle (e.g. 96 stitches) and divide by the number of increases to be made (e.g. 25) = 3.84. In other words, in this example you increase after approx. every 4 stitches. Increase by making 1 yarn over. On the next round knit the yarn overs twisted to prevent holes. DECREASE TIP (for mid under sleeve): Decrease on each side of the marker thread mid under the sleeve as follows: Start 3 stitches before the marker thread, knit 2 together, knit 2 (the marker thread sits in the middle of these 2 stitches), slip 1 stitch as if to knit, knit 1, pass the slipped stitch over the knitted stitch (= 2 stitches decreased). RAGLAN: Increase to raglan on each side of the stitch with the marker thread. Increase as follows: Start just before the stitch with the marker thread, make 1 yarn over, knit 1 (= stitch with marker thread), 1 yarn over (= 2 stitches increased). On the next round, purl the yarn overs twisted to prevent holes. BUTTONHOLES: Decrease for the buttonholes on the right band at the back (when the garment is worn). 1 buttonhole = knit the second and third stitch from the edge together and make 1 yarn over. On the next row, knit the yarn overs so that there are holes. Decrease for the buttonholes when the piece measures: SIZE 0/6 MONTHS: 2, 5 and 8 cm. SIZE 6/12 MONTHS: 2, 5 and 8 cm. SIZE 12/18 MONTHS: 2, 6 and 10 cm. SIZE 2 YEARS: 2, 6 and 10 cm. ---------------------------------------------------------- DRESS: The piece is worked top down. It is worked back and forth from mid back until the band at the back is finished, then the piece is worked in the round to desired length (normal dress length or long dress) – see description in the text. YOKE: Cast on 50-54-54 (58) stitches with circular needle size 3 mm and Cotton Merino. Work 2 RIDGES – see description above. Knit 1 row from the right side where you increase 21 stitches evenly along the row (increase after approx. every 2nd stitch and do not increase over the outermost 3 stitches in each side) = 71-75-75 (79) stitches on the needle. Now insert 4 marker threads in the piece as follows (start mid back – NOTE: Do NOT work the stitches whilst inserting the marker threads): Skip the first 10-11-11 (12) stitches (= right back piece when the garment is worn), insert 1 marker thread in the next stitch, skip the next 12 stitches (= sleeve), insert 1 marker thread in the next stitch, skip the next 20-22-22 (24) stitches (= front piece), insert 1 marker thread in the next stitch, skip the next 12 stitches (= sleeve) and insert the last marker thread in the next stitch (there are now 13-14-14 (15) stitches on the row after the last marker thread (= left back piece). READ THE WHOLE OF THE NEXT SECTION BEFORE CONTINUING! Change to circular needle size 4 mm and work stocking stitch back and forth from mid back, but the 3 outermost stitches in each side are worked in garter stitch (= bands). REMEMBER THE KNITTING TENSION and remember BUTTONHOLE on the right band – see description above. AT THE SAME TIME on the first row from the right side, increase to RAGLAN on each side of the 4 marker threads – see description above (= 8 stitches increased). Increase in this way every 2nd row (i.e. every row from the right side) a total of 11-13-15 (16) times = 159-179-195 (207) stitches. After the final increase to raglan work the next row from the wrong side as follows: Work 25-28-30 (32) stitches as before (= left back piece), place the next 34-38-42 (44) stitches on 1 thread (= sleeve), cast on 6-6-8 (8) new stitches on the needle (= under the sleeve), work the next 44-50-54 (58) stitches as before (= front piece), place the next 34-38-42 (44) stitches on 1 thread (= sleeve), cast on 6-6-8 (8) new stitches on the needle (= under the sleeve) and work the remaining 22-25-27 (29) stitches as before (= right back piece). The yoke is now finished and the body and sleeves are worked separately. BODY: Insert 1 marker in the piece – THE PIECE IS NOW MEASURED FROM HERE! Start mid back, lay the 3 band stitches on the left back piece under the 3 band stitches on the right back piece (so that the band with the buttonholes is on top). Work in the round and knit 1 round over all stitches and AT THE SAME TIME knit the stitches from the two bands together 2 and 2 = 100-112-124 (132) stitches on the needle. Continue working stocking stitch in the round for 1-2-2 (3) cm – decrease AT THE SAME TIME 4-8-12 (12) stitches evenly along the first round = 96-104-112 (120) stitches. Change to circular needle size 3 mm and work pattern according to diagram A.1. When A.1 has been completed, change to circular needle size 4.5 mm. Knit 1 round where you increase 25-29-33 (37) stitches evenly – READ INCREASE TIP = 121-133-145 (157) stitches. Continue to work pattern in the round as follows: A.2A (= 2 stitches), A.2B (= 12 stitches) a total of 9-10-11 (12) times and A.2C (= 11 stitches). Continue the pattern in this way, but follow the description onwards for the desired length (dress of normal length or long dress). DRESS OF NORMAL LENGTH: When A.2 has been completed 1 time in height in all sizes, continue with pattern in the same way, but now work A.3 instead of A.2. When A.3 has been completed 1 time in height you have increased 2 stitches in each repeat of the lace pattern = 141-155-169 (183) stitches on the needle. Continue working pattern as before, but now work A.4 instead of A.3. When A.4 has been worked 1-1-2 (2) times in height (or to desired length) work A.5 instead of A.4. After A.5 there are 161-177-193 (209) stitches on the needle. Now work pattern according to diagram A.9 in the same way for approx. 5 cm, i.e. work A.9A (= 2 sts), A.9B (= 16 stitches) a total of 9-10-11 (12) times and A.9C (= 15 stitches). Work 4 rounds stocking stitch. Change to circular needle size 4 mm and work A.1 in the round over all the stitches before LOOSELY casting off (NOTE: On round 5 in A.1 knit the last stitch of the round). The dress measures approx. 36-38-47 (49) cm from the shoulder down. LONG DRESS: When A.2 has been completed 1 time in height in all sizes, continue with pattern in the same way, but now work A.3 instead of A.2. When A.3 has been completed 1 time in height you have increased 2 stitches in each repeat of the lace pattern = 141-155-169 (183) stitches. Continue working pattern as before, but now work A.4 instead of A.3. When A.4 has been worked 2-2-3 (3) times in height, work pattern in the same way, but now with A.5 instead of A.4. When A.5 has been completed 1 time in height you have increased 2 stitches in each repeat of the lace pattern = 161-177-193 (209) stitches. Continue working pattern as before, but with A.6 instead of A.5. When A.6 has been completed 2 times in height in all sizes (or to desired length), work A.7 instead of A.6. When A.7 has been completed 1 time in height you have increased 2 stitches in each repeat of the lace pattern = 181-199-217 (235) stitches. Work 1 repeat of A.8 in height. After A.8 there are 201-221-241 (261) stitches on the needle. Now work pattern according to diagram A.10 in the same way for approx. 5 cm, i.e. work A.10A (= 2 stitches), A.10B (= 20 stitches) a total of 9-10-11 (12) times and A.10C (= 19 stitches). Work 4 rounds stocking stitch. Change to circular needle size 4 mm and work A.1 in the round over all stitches before LOOSELY casting off (NOTE: On round 5 in A.1 knit the last stitch on the round). The dress measures approx. 80-82-91 (93) cm from the shoulder down. BOTH DRESSES: SLEEVE: Place the stitches from the thread on one side of the piece on double pointed needles size 4 mm. Knit 1 round and knit up in addition 1 stitch in each of the 6-6-8 (8) new stitches mid under the sleeve = 40-44-50 (52) stitches. Insert 1 marker thread in the middle of the new stitches (= the round begins mid under the sleeve) – THE PIECE IS NOW MEASURED FROM HERE! Work stocking stitch in the round. When the piece measures 2 cm in all sizes decrease 2 stitches mid under the sleeve – READ DECREASE TIP. Decrease in this way every 3-2½-2 (2) cm a total of 4-6-8 (8) times = 32-32-34 (36) stitches. Continue working until the sleeve measures 16-18-20 (23) cm. Change to double pointed needles size 3 mm and work 2 RIDGES – see description above, before loosely casting off with knit. Work the other sleeve in the same way. PICOT EDGE: Work a picot edge at the bottom of both sleeves with crochet hook size 3 mm as follows: 1 double crochet in the first stitch, * 3 chain stitches, 1 treble crochet in the first chain stitch worked, skip 2 stitches on the sleeve, 1 double crochet in the next stitch *, repeat from *-*, but finish the round with 1 slip stitch in the double crochet at the beginning of the round (instead of 1 double crochet in the next stitch). Work the same picot edge along the neckline in the transition between the garter stitch edge and the stocking stitch section on the yoke – NOTE: The edge is worked top down. ASSEMBLY: Fasten 3 buttons on the left band at the back. Thread the silk ribbon up and down through the row of holes on the yoke (start and finish mid front) and tie a bow mid front. ---------------------------------------------------------- HAT: RIDGE/GARTER STITCH (worked back and forth): 1 ridge = knit 2 rows. PATTERN: See diagrams A.1 and A.2. The diagrams show all the rows in the pattern from the right side. DECREASE TIP (for mid piece on the back of the hat): Decrease inside the outermost stitch in garter stitch in each side. All decreases are done from the right side! Decrease as follows after the first stitch in garter stitch: Slip 1 stitch as if to knit, knit 1, pass the slipped stitch over the knitted stitch. Decrease as follows before the last stitch in garter stitch: Start 2 stitches before the last stitch in garter stitch and knit 2 together. ---------------------------------------------------------- HAT: The piece is worked back and forth on circular needle. Cast on 70-78-82 (90) stitches (including 1 edge stitch in each side) with circular needle size 3 mm and Cotton Merino. Work 2 RIDGES – see description above. Knit 1 row from the right side where you decrease 7-3-7 (3) stitches evenly along the row = 63-75-75 (87) stitches. Knit 1 row from the wrong side. The next row is worked as follows from the right side: 1 edge stitch in garter stitch, A.2A (= 2 stitches), A.2B (= 12 stitches) a total of 4-5-5 (6) times, A.2C (= 11 stitches) and 1 edge stitch in garter stitch. Continue the pattern in this way. REMEMBER THE KNITTING TENSION! When the piece measures 12-13-14 (15) cm work 1 ridge over all stitches. Cut the strand. Now place the outermost 23-28-28 (33) stitches in each side on separate threads or extra needle = 17-19-19 (21) stitches left on the row (= mid piece at the back of the hat). Work garter stitch back and forth over the mid piece AT THE SAME TIME as the last stitch on each row (both from the right and wrong side) is knitted together with the first stitch on the thread/extra needle. Continue in this way. AT THE SAME TIME when the mid piece measures 4 cm in all sizes, decrease 1 stitch in each side of the mid piece – READ DECREASE TIP! Repeat the decrease when the piece measures 8-8-9 (9) cm = 13-15-15 (17) stitches left on the mid piece. Continue working until all the stitches from the threads/extra needle in each side have been worked together with the mid piece, then cast off the 13-15-15 (17) stitches on the mid piece. ASSEMBLY: Knit up from the right side approx. 66-72-76 (82) stitches along the bottom edge of the hat with circular needle size 3 mm and work pattern according to diagram A.1 with 1 edge stitch in garter stitch in each side (first row = from the wrong side). When A.1 has been completed, cast off in knit from the right side. PICOT EDGE: Work a picot edge at the front of the hat. Start from the right side at the bottom in the corner and work with hook size 3 mm as follows: 1 double crochet in the first stitch, * 3 chain stitches, 1 treble crochet in the first chain stitch worked, skip 2 stitches on the hat, 1 double crochet in the next stitch *, repeat from *-* along the whole of the front edge of the hat. Cut and fasten the strand. Thread the silk ribbon up and down through the row of holes at the bottom of the hat. |
|||||||||||||||||||||||||
Diagram explanations |
|||||||||||||||||||||||||
|
|||||||||||||||||||||||||
 |
|||||||||||||||||||||||||
 |
|||||||||||||||||||||||||
 |
|||||||||||||||||||||||||
 |
|||||||||||||||||||||||||
 |
|||||||||||||||||||||||||
Have you finished this pattern?Tag your pictures with #dropspattern #myfairychristeninggown or submit them to the #dropsfan gallery. Do you need help with this pattern?You'll find 35 tutorial videos, a Comments/Questions area and more by visiting the pattern on garnstudio.com. © 1982-2026 DROPS Design A/S. We reserve all rights. This document, including all its sub-sections, has copyrights. Read more about what you can do with our patterns at the bottom of each pattern on our site. |
|||||||||||||||||||||||||


With over 40 years in knitting and crochet design, DROPS Design offers one of the most extensive collections of free patterns on the internet - translated to 17 languages. As of today we count 324 catalogues and 12290 patterns translated into English (UK/cm). 12290
We work hard to bring you the best knitting and crochet have to offer, inspiration and advice as well as great quality yarns at incredible prices! Would you like to use our patterns for other than personal use? You can read what you are allowed to do in the Copyright text at the bottom of all our patterns. Happy crafting!
Post a comment to pattern DROPS Baby 29-1
We would love to hear what you have to say about this pattern!
If you want to leave a question, please make sure you select the correct category in the form below, to speed up the answering process. Required fields are marked *.