
Popular categories
Looking for a yarn?


Comments / Questions (25)
![]() Lisbeth Teien wrote:
Lisbeth Teien wrote:
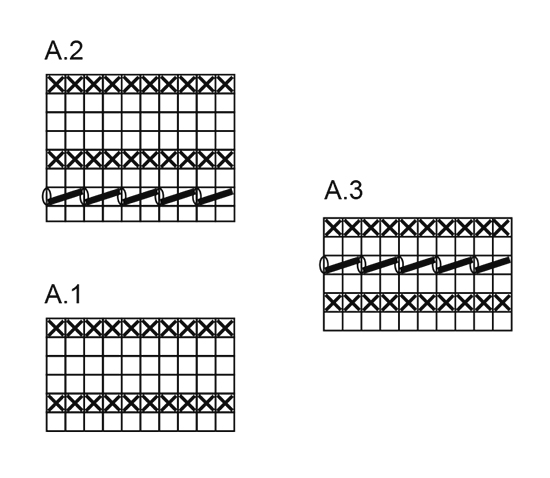
Ser at det er mønsterrapporte betegnet A1; A2 og A3, men jeg finner ikke at det er referert til A3 noe sted, hvor kommer det inn?
21.03.2021 - 17:51DROPS Design answered:
Hei Lisbeth, A.3 er strikket på slutten av bolen, før du feller av. God fornøyelse!
22.03.2021 - 11:43
![]() Lydia Lapidus Radlow wrote:
Lydia Lapidus Radlow wrote:
Hei, det virker rart at man skal legge opp nye masker under armen etter at man har strikket før og bakstykket sammen på forrige omgang.. er det riktig at det skal gjøres slikt eller skal man legge opp de nye maskene i det en samler før- og bakstykket under armen? Det er bare en omgang som blir trangere under armen før en øker... det har jeg aldri sett før. Kan du forklare?
16.06.2020 - 23:48DROPS Design answered:
Hei Lydia Etter alle raglan økningene skal du ha 272-304-328-360-384-408 masker på pinnen = Bærestykket. På neste omgang skal det i denne oppskriften strikkes halve bakstykke, så 1. arm (disse erm maskene settes på en tråd). Så strikkes forstykket, deretter 2. arm (disse erm maskene settes også på en tråd), så strikkes de siste maskene (= halve bakstykke). Når du skal strikke ermene, strikkes det opp i de nye maskene, slik unngår du å måtte sy «hullet» mellom bolen og ermene. God Fornøyelse!
22.06.2020 - 09:45
![]() Falou wrote:
Falou wrote:
Bonjour J’aimerais savoir combien de pelotes de laines faudrait-il pour une taille XL et s’il y a des frais de livraison s’il vous plaît. Merci. Cordialement
24.03.2020 - 17:09DROPS Design answered:
Bonjour Falou, il vous faut 500 g DROPS Muskat, soit 10 pelotes - cf en-tête. Contactez votre magasin DROPS pour connaître les frais de port. Bon tricot!
24.03.2020 - 17:59
![]() Renate wrote:
Renate wrote:
Es wird zwischen "Raglanzunahmen" und "Zunahmetipp" unterschieden. Muss ich für die Passe nur die Raglanzunahmen berücksichtigen, d.h. jeweils vor und nach dem Markierungsfaden die Umschläge als Löcher arbeiten? Oder muss ich im Ärmelteil den Zunahmetipp anwenden und nur für Vorder- und Rückenteil jeweils die Raglanzunahmen umsetzen? Oder ist der Zunahmetipp zusätzlich zu den Raglanzunahmen anzuwenden? Oder ausschließlich für den Rumpfteil anzuwenden? Danke für Eure Hilfe!
29.01.2020 - 18:00DROPS Design answered:
Liebe Renate, alle Raglanzunahmen stricken Sie wie unter RAGLANZUNAHMEN beschrieben ist ; ZUNAHMETIPP beschreibt wie man die Zunahmen am Rumpfteil (nach der Verteilung) arbeitet. Viel Spaß beim stricken!
30.01.2020 - 09:05
![]() Selam Belay wrote:
Selam Belay wrote:
Hi Is there increase on the mid back? I don't understand the first marker after 19st? Thanks!
01.05.2019 - 23:00DROPS Design answered:
Hi Selam, The 4 markers are positioned in each transition between sleeve and body, both front and back. The increases to raglan are either side of each of these markers as described in the pattern - so no increase mid back. I hope this helps and happy knitting!
02.05.2019 - 07:52
![]() Gunn Berg wrote:
Gunn Berg wrote:
Når jeg legger opp 84 masker på rundpinne, blir det en utrolig trang hals. Slik ser det ikke ut på oppskriften. Hvordan får jeg den løse halsen med så få masker?
04.04.2018 - 16:28DROPS Design answered:
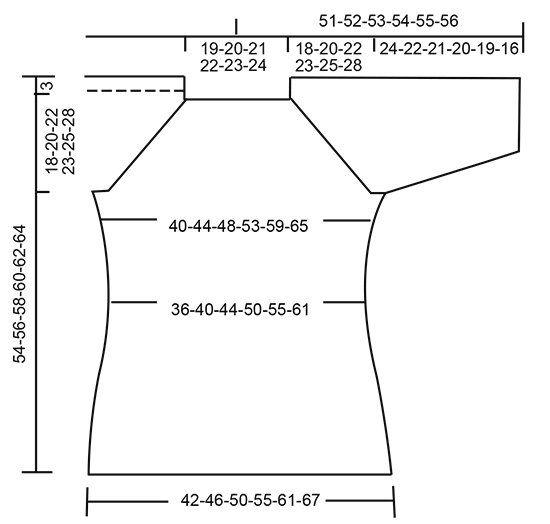
Hei Gunn. Om du ser på målskissen nederst i oppskriften ser du at halsåpningen er 20 cm (= ca 40 cm runt i str M). Dette stemmer overens med den den angitte strikkefastheten. Om du vil ha halsåpnigen litt videre kan du legge opp litt løsere, gå opp en halv pinnestørrelse eller evt velge å følge en større størrelse, du må prøve deg frem å se hva du syntes passer. God fornøyelse
18.04.2018 - 08:07
![]() Patoudefrance wrote:
Patoudefrance wrote:
Bonjour, je souhaite réalisé le modele r-706 raglan sur aiguille circulaire mais avec les manches d'une couleur et le corps d'une autre. Le jacquart serai une solution mais je ne souhaite pas voir l es fils derrière. Si j'utilise 4 pelotes en même temps, le ne peux plus tricoter en rond. Y a t il une solution qui m'échappe? Pas de magasin de laine dans mon secteur, je me sens vraiment seule ! Merci de votre aide.
26.01.2018 - 10:46DROPS Design answered:
Bonjour Patoudefrance, vous trouverez ici quelques informations qui devraient pouvoir vous aider. N'oubliez pas que vous pouvez contacter votre magasin DROPS même par mail, téléphone ou via les réseaux sociaux. Bon tricot!
26.01.2018 - 13:26
![]() Grete wrote:
Grete wrote:
Jeg lurer på hvordan det skal økes på fram-og bakstykket? Hvor mange masker skal økes på hver 2.omgang? Hvor skal det økes?
25.06.2017 - 23:36DROPS Design answered:
Hei Grete. I begynnelsen av oppskriften er det forklart hvordan det skal økes til raglan, under MØNSTER og over FELLETIPS. Under BÆRESTYKKE står det hvordan det skal økes til forstykket/bakstykket og på ermene(det økes forskjellig på forstykket/bakstykket og på ermene slik).God Fornøyelse!
26.06.2017 - 14:02
![]() Malin Hallgren wrote:
Malin Hallgren wrote:
Hej! Det står inte i mönstret hur många maskor som ska ökas på fram/bakstycket eller var på varvet. En mycket rörig och knapphändig beskrivning! Hur sker ökningarna?
07.05.2017 - 16:51DROPS Design answered:
Hej! Ökningarna görs på varje sida om markören i varje sida och det ökas totalt 6 gånger i varje sida så här: ÖKNINGSTIPS: Sticka till det är 1 maska kvar före markören. Gör 1 omslag, sticka 2 rätmaskor (markören sitter mellan dessa 2 maskor) och gör 1 omslag. På nästa varv stickas omslagen vridet räta så att det inte blir hål (de ökade maskorna stickas i slätstickning).
08.05.2017 - 14:14
![]() Magotte wrote:
Magotte wrote:
Bonjour, les diagrammes A1 et A2 ne sont ils pas inversés dans leur numéro? Merci de votre réponse
17.04.2017 - 08:30DROPS Design answered:
Bonjour Margotte, on tricote 1 x A.1 (sans jours) en hauteur sur les manches, puis on continue en répétant A.2 en hauteur (avec des jours). Bon tricot!
18.04.2017 - 11:08
|
|||||||||||||
Petronella#petronellasweater |
|||||||||||||
|
|
|||||||||||||
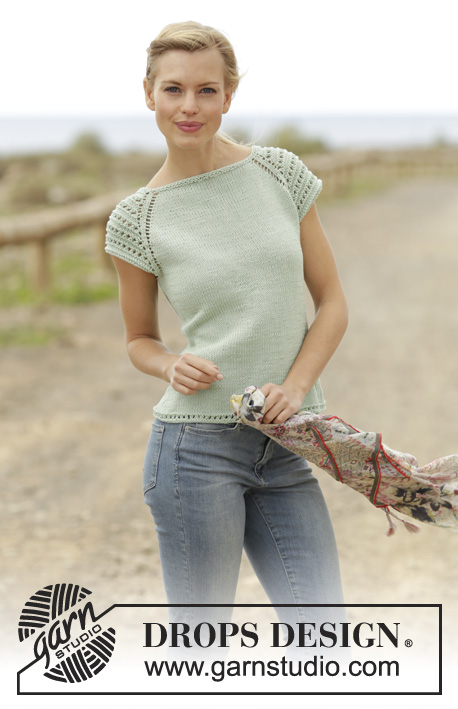
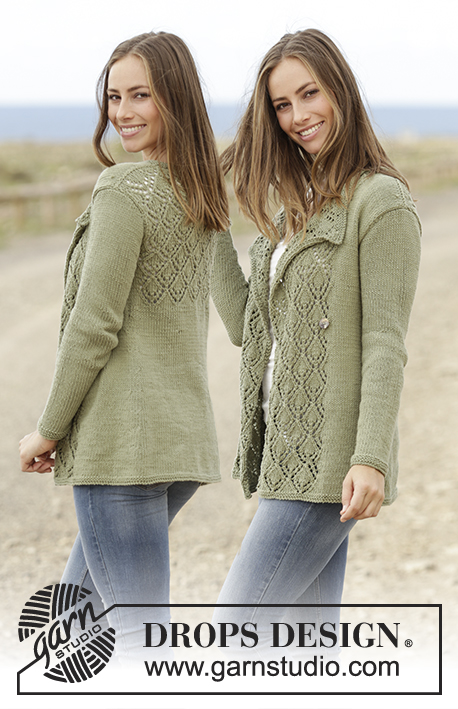
Knitted jumper with raglan and lace pattern, worked top down with 3/4-length sleeves in DROPS Muskat. Sizes S - XXXL.
DROPS 175-31 |
|||||||||||||
|
RIDGE/GARTER STITCH (worked in the round): 1 ridge = 2 rounds. Knit 1 round and purl 1 round. PATTERN: See diagrams A.1, A.2 and A.3. The diagrams show all the rows in the pattern from the right side. RAGLAN: Increase every 2nd round as follows: Increase as follows before the marker thread: Start 1 stitch before the marker thread: Make 1 yarn over, knit 1, marker thread. Increase as follows, after the marker thread: Marker thread, knit 1, make 1 yarn over. On the next round work the yarn overs knit, there will be holes. Increase every 4th round as follows: Increase as follows before the marker thread: ROUND 1: Start 1 stitch before the marker thread: Make 1 yarn over, knit 1, marker thread. ROUND 2: Yarn overs worked knit, there will be holes. ROUND 3: Start 3 stitches before the marker thread: Knit 2 together, make 1 yarn over, knit 1, marker thread. No increase in stitches, but the row of holes is continued as before. ROUND 4: Yarn overs worked knit, there will be holes. Increase as follows, after the marker thread: ROUND 1: Marker thread, knit 1, make 1 yarn over. ROUND 2: The yarn overs are worked knit, there will be holes. ROUND 3: Marker thread, knit 1, make 1 yarn over, slip 1 stitch as if to knit, knit 1, pass the slipped stitch over the knitted stitch. No increase in stitches, but the row of holes continues as before. ROUND 4: The yarn overs are worked knit, there will be holes. DECREASE TIP: Start 3 stitches before the marker thread: Knit 2 together, knit 2 (the marker thread sits between these 2 stitches), slip 1 stitch as if to knit, knit 1, pass the slipped stitch over the knitted stitch = 2 stitches decreased. INCREASE TIP: Work until there is 1 stitch left before the marker thread. Make 1 yarn over, knit 2 (the marker thread sits between these 2 stitches) and make 1 yarn over. On the next round work the yarn overs twisted knit to prevent holes (the increased stitches are worked in stocking stitch). --------------------------------------------------------- JUMPER: The piece is worked in the round on circular needle from mid back, top down. YOKE: Cast on 80-84-88-92-96-100 stitches with circular needle size 4 mm and Muskat. Work 2 RIDGES – see description above, on the last round of the ridges increase 20 stitches evenly along the round = 100-104-108-112-116-120 stitches. Insert 4 marker threads in the piece as follows: first marker thread after 19-20-21-22-23-24 stitches (= half the back piece), second marker thread after 12 new stitches (= sleeve), third marker thread after 38-40-42-44-46-48 new stitches (= front piece), fourth marker thread after 12 new stitches (= sleeve), there are 19-20-21-22-23-24 stitches left on the needle after the last marker thread (= half the back piece). Begin with increase to raglan as described above, work stocking stitch across the stitches on the back piece and front piece and A.1 across the sleeve stitches. The increases are different for the front piece/back piece and the sleeves as follows: FRONT PIECE/BACK PIECE: Increase every 2nd round 12-15-17-25-30-35 times, then every 4th round 7-7-7-4-3-2 times. SLEEVES: Increase every 2nd round 22-27-31-33-32-31 times, then every 4th round 2-1-0-0-2-4 times. When A.1 has been completed 1 time in height, repeat A.2 in height. The increased stitches on the sleeves are worked in to A.2 as you go. REMEMBER THE KNITTING TENSION! After all the increase to raglan, there are 272-304-328-360-384-408 stitches on the needle. The next round is worked as follows: Work 38-42-45-51-56-61 stitches (= half the back piece), work the next 60-68-74-78-80-82 stitches and place these stitches on a thread (=sleeve), work the next 76-84-90-102-112-122 stitches (= front piece), work the next 60-68-74-78-80-82 stitches and place these stitches on a thread (= sleeve), work the last 38-42-45-51-56-61 stitches (= half the back piece). BODY: Continue working as follows: work half of the back piece, cast on 8-8-10-10-12-14 new stitches, work the front piece, cast on 8-8-10-10-12-14 new stitches, work half of the back piece. There are now 168-184-200-224-248-272 stitches on the body. Insert a marker thread in each side, in the middle of the new stitches which were cast on. THE PIECE IS NOW MEASURED FROM HERE. Continue with stocking stitch across all the stitches. When the piece measures 4 cm decrease 1 stitch on each side of the marker threads (= 4 stitches decreased), decrease every 3 cm in total 4 times – READ DECREASE TIP = 152-168-184-208-232-256 stitches. When the piece measures 19-19-19-18-18-19 cm increase 1 stitch on each side of the marker threads (= 4 stitches increased), increase every 2 cm in total 6 times – READ INCREASE TIP = 176-192-208-232-256-280 stitches. When the piece measures 32-32-32-33-33-32 cm work A.3 across all stitches. Then cast off with knit, the piece measures approx. 54-56-58-60-62-64 cm from the shoulder. SLEEVE: The sleeve is worked on a short circular needle/double pointed needles. Place the stitches for the sleeve back on a short circular needle size 4 mm, knit up 1 stitch in each of the 8-8-10-10-12-14 stitches under the sleeve = 68-76-84-88-92-96 stitches. Insert 1 marker thread mid under sleeve. THE PIECE IS NOW MEASURED FROM HERE! Continue with A.2 across all stitches. When the piece measures 4-4-4-4-4-2 cm decrease 1 stitch on each side of the marker thread. Decrease every 2½-1½-1-1-1-1 cm in total 8-10-12-12-12-12 times = 52-56-60-64-68-72 stitches. When the piece measures 24-22-21-20-19-16 cm work 2 ridges across all the stitches, then cast off with knit. Work the other sleeve the same way. |
|||||||||||||
Diagram explanations |
|||||||||||||
|
|||||||||||||
 |
|||||||||||||
 |
|||||||||||||
Have you finished this pattern?Tag your pictures with #dropspattern #petronellasweater or submit them to the #dropsfan gallery. Do you need help with this pattern?You'll find 25 tutorial videos, a Comments/Questions area and more by visiting the pattern on garnstudio.com. © 1982-2026 DROPS Design A/S. We reserve all rights. This document, including all its sub-sections, has copyrights. Read more about what you can do with our patterns at the bottom of each pattern on our site. |
|||||||||||||


With over 40 years in knitting and crochet design, DROPS Design offers one of the most extensive collections of free patterns on the internet - translated to 17 languages. As of today we count 324 catalogues and 12290 patterns translated into English (UK/cm). 12290
We work hard to bring you the best knitting and crochet have to offer, inspiration and advice as well as great quality yarns at incredible prices! Would you like to use our patterns for other than personal use? You can read what you are allowed to do in the Copyright text at the bottom of all our patterns. Happy crafting!
Post a comment to pattern DROPS 175-31
We would love to hear what you have to say about this pattern!
If you want to leave a question, please make sure you select the correct category in the form below, to speed up the answering process. Required fields are marked *.