
Popular categories
Looking for a yarn?


Comments / Questions (45)
![]() Helena wrote:
Helena wrote:
Hej, jag har hittat ett garn som är 100g och 200 m med virknål 5. Kan jag använda det? Måste jag göra en större storlek eller ska jag räkna om på annat sätt?
10.03.2020 - 14:12DROPS Design answered:
Hej Helena, din tröja vill bli tyngre. Viktigt att du håller virkfastheten som står i mönstret för att få rätt mått. Gör gärne ett litet prov så du ser hur det ser ut med 12 st x 7 varv på 10x10 cm. Lycka till
10.03.2020 - 14:56
![]() Peggie wrote:
Peggie wrote:
Ik snap de eerste 8 markers niet zo, want als ik van het begin de een kantop 10 en na 2 en na 10 en na 2 doe en ik doe dat ook de andere kant op. Heb je aan de achterkant je21 steken ( want het begin van je toer was de achterkant) en dus niet aan de voorkant. Wat snap ik hier niet? Dank je wel voor antwoord
09.04.2019 - 17:07DROPS Design answered:
Dag Peggie,
Als je vanaf het begin van de toer naar beide kanten toe markeerders plaatst dan heb je zowel aan de voor- als achterkant 20 steken tussen de markeerders. Het voor in achterpand is het zelfde wat dat betreft.
Na het plaatsten van de markeerdraden meerder je steken, waardoor je op het voor en achterpand aan beide kanten 21 steken hebt vanaf het midden voor/achter.
09.04.2019 - 20:48
![]() Savanna wrote:
Savanna wrote:
Hello, I am confused on this part: "Then inc alternately on right and left side of every marker." So does that mean on Row 1 of inc, I increase on the Right side of the markers, then Row 2 of inc, I increase on the left side of markers and alternate like this. Or do I alternate each marker: Marker 1: Right side, Marker 2: Left side... continue with this pattern. Thank you.
14.01.2019 - 05:25DROPS Design answered:
Dear Savanna, this video is showing how to incrase alternately on right and left side of markers. Happy crocheting!
14.01.2019 - 12:52
![]() Dorota wrote:
Dorota wrote:
Witam. Zrobiłam 10 pierwszych okrążeń i teraz jak rozumiem mam wykonać 6 dodatkowych okrążeń a w tym w trzech mam dodać po 8 słupów. Ale to w sumie daje o 8 słupków za malo. Jak to zrobić żeby otrzymać 173 słupki a nie 165?
12.01.2019 - 11:29DROPS Design answered:
Witaj Doroto! W rozmiarze M w 1-szym okr. masz 61 oś. W 2-gim okr. dodajesz 8 sł = 69 sł, w 3-cim dodajesz 8 sł = 77 sł. A następnie będziesz dodawać jeszcze 9 razy po 8 o. (72 o.) w każdym okrążeniu i 3 razy po 8 o. co 2 okrążenia (24 o.). 77+72+24= 173. Powodzenia!
14.02.2019 - 08:10Marisa Serra wrote:
Sorry for coming back on this but I cannot figure it out. I’ve never crocheted a top-down sweater before and these instructions are not clear to me. I’ve understood that there are 12 rows in the yoke. Round 2 = 64 dc. And we’re supposed to reach 160dc by the end of row 12. How am I to increase by 96 stitches over 10 rows?? The math doesn’t add up. Thank you for your help.
04.12.2018 - 15:23DROPS Design answered:
Dear Mrs Serra, you start with 64 dc and increase 8 sts on each of the next 10 rounds = 80 sts increased + 64 dc = 144 dc. Then you will increase 8 sts every other round a total of 2 times (= 4 rounds x 8 sts inc) = 8 sts x 2 times = 16 sts inc + 144 sts = 160 sts. Yoke should now measure approx. 20 cm. Happy crocheting!
04.12.2018 - 15:44Marisa wrote:
Hello, For size small, could you please clarify this sentence: Repeat inc every round 9 more times, and every other round 2times = 160 dc. What does "every other round" mean? How do I evenly increase from round 3? i.e get from 72 dc to 160 dc? Thank you very much in advance
03.12.2018 - 22:21DROPS Design answered:
Dear Marisa, you will increase at each marker (= 1st increase at the right of the markers = before each marker - 2nd increase at the left of the markers = after each marker = 8 stitches increased on each increase round) first every round a total of 10 times (work 10 rounds inc alternately before and after each marker) then increase a total of 2 times every other round (= work 1 round without dec, 1 round with dec, repeat these 2 rounds a total of 2 times). Happy crocheting!
04.12.2018 - 07:41
![]() Coldwind wrote:
Coldwind wrote:
Superschöner Pullover. Grösse S fällt sehr klein aus, passt meiner 10jährigen wie angegossen. Habe das muster an den ärmeln wiederholt.
29.08.2018 - 20:28Mary Manoly wrote:
Need chart to how to place the markers shal i place them right and left from starting points? Thank you
26.09.2017 - 09:50DROPS Design answered:
Dear Mary, yes you will insert them from beg of round on the right and on the left, so that you will have a total of 8 markers and 20-21-22-23-26-30 tr (UK-En)/dc (US-En) between markers on front piece. Happy crocheting!
26.09.2017 - 13:14
![]() Knaxgurke wrote:
Knaxgurke wrote:
Danke, die letzte Erklärung war dann doch noch hilfreich. Wenn Sie eigentlich 10 Rd mit je 8 Zunahmen statt 10 Zunahmen pro Rd meinen ist die Formulierung in der Anleitung nach deutscher Grammatik und Syntax aber leider einfach falsch & unnötig irreführend. Dort steht "Zunahmen IN JEDER Rd nach dem 1. Mal noch weitere 9 Mal wiederholen" = 9 Wiederholungen pro Runde. Nicht 9 Wiederholungen der (Zunahme-)Runde oder R3+4 x Mal wiederholen, was anscheinend eigentlich gemeint ist.
25.09.2017 - 14:39
![]() Knaxgurke wrote:
Knaxgurke wrote:
(Meinen Sie vielleicht eigentlich 10 Runden mit je 8 Zunahmen statt 10 Zunahmen pro Runde?) Was meinen Sie mit "in jeder 2. Rd 2 x arb"? Zwei Mal WAS arbeiten? Bitte schreiben Sie doch einfach Runde für Runde auf, was zu tun ist. R3: 8x Zunahme je rechts der Markierer (72M) R4: 8x Zunahme je links der Markierer (80M) R5: ? R6: ? ...
25.09.2017 - 12:53DROPS Design answered:
Ja genau, 8 Zunahmen in jeder der nächsten 10 Runde, dann in jeder 2. Runde = (Eine Runde ohne Zunahme, Eine Runde mit Zunahme), von (bis) insgesamt 2 x wiederholen. Runde 1: 64+8 rechts aller Markierung = 72 M, Rd2: 72+8 M links aller Markierung = 80 M, usw bis Runde 10: 144 M; dann, nächste Runde: keine Zunahme, Rd 12: 144 + 8 = 152 M. Rd 13: keine Zunahme. Rd 14: 152+8= 160 M. Viel Spaß beim stricken!
25.09.2017 - 13:27
|
||||||||||||||||||||||||||||
Lakeside#lakesidesweater |
||||||||||||||||||||||||||||
|
|
||||||||||||||||||||||||||||
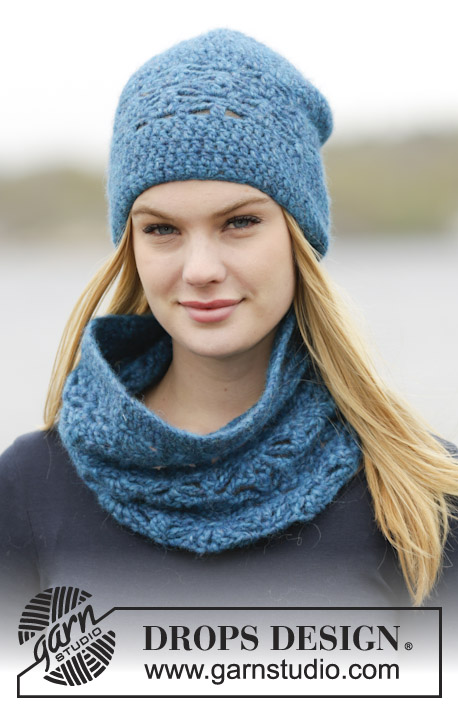
Crochet DROPS jumper with trebles, lace pattern and round yoke, worked top down in ”Air”.
DROPS 164-31 |
||||||||||||||||||||||||||||
|
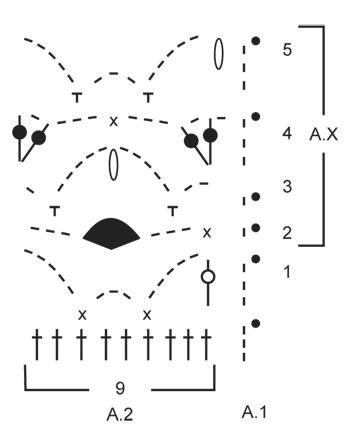
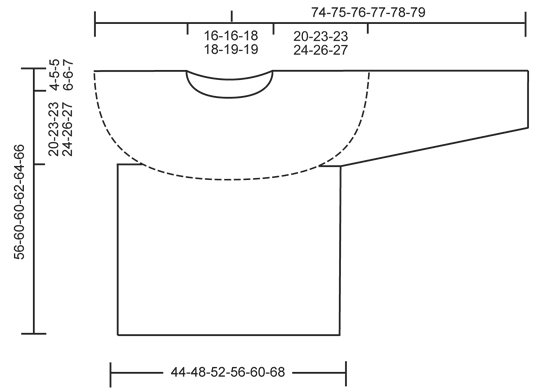
CROCHET INFO: Replace first dc at beg of every dc round with 1 ch. Finish every round with 1 sl st in ch from beg of round. Replace first tr at beg of every tr round with 3 ch. Finish round with 1 sl st in 3rd ch at beg of round. PATTERN: See diagrams A.1 and A.2. CROCHET 2 TR TOG (in tr): Work 1 tr in next tr but wait with last pull through, work 1 tr more in same tr, but on last pull through, pull through all sts on hook. CROCHET 2 TR TOG (around ch): Work 1 tr around the middle ch in tr-group but wait with last pull through, work 1 tr more around same ch, but on last pull through, pull through all sts on hook. TR-GROUP: Work a tr-group around ch-space as follows: Work * 1 tr, 1 ch *, repeat from *-* 2 more times around same ch-space, 1 tr around same ch-space. INCREASE TIP: Inc 1 tr by working 2 tr in 1 dc/tr. DECREASE TIP: Dec 1 tr at beg and end of round as follows: Work 1 tr (= 3 ch), * work 1 tr but wait with last pull through (= 2 sts on hook), then work next tr but on last pull through, pull yarn through all sts on hook *, repeat from *-* when 3 tr remain on round = 1 st dec on each side of marker. ---------------------------------------------------------- JUMPER: The piece is worked top down. Worked in the round, round beg mid back. YOKE: Work 66-69-75-82-84-90 loose ch on hook size 6 mm with Air and form a ring with 1 sl st. Work first round as follows: ROUND 1: Work 1 ch - READ CROCHET INFO, work 1 dc in each of the first 1-4-2-1-3-1 ch, * skip 1 ch, work 1 dc in each of the next 7 ch *, repeat from *-* 7-7-8-9-9-10 more times = 58-61-66-72-74-79 dc. ROUND 2: Work 1 tr in every dc while AT THE SAME TIME inc 6-8-8-9-12-23 tr evenly - READ INCREASE TIP = 64-69-74-81-86-102 tr. Now insert 8 markers in the piece for raglan inc without working sts. Insert 4 marker in each side from beg of round so that it is reversed from mid front: Insert a marker after 10-10-10-11-12-15 tr, insert next marker after 2 tr, then insert next marker after 8-10-12-14-14-17 tr, and finish with last marker after 2 tr. There are now 20-21-22-23-26-30 tr between the 2 middle markers towards front piece on jumper. Now continue with 1 tr in every tr, AT THE SAME TIME inc 1 tr on right side of each of the 8 markers. Then inc alternately on right and left side of every marker. Repeat inc every round 9-9-11-12-13-16 more times, and every other round 2-3-2-2-2-0 times = 160-173-186-201-214-238 tr on round. Piece measures approx. 20-23-23-24-26-27 cm. REMEMBER THE CROCHET TENSION! On next round work as follows: Work 21-23-25-28-30-34 tr (= half back piece), 8 ch (under sleeve), skip 38-40-42-45-47-50 tr from previous row (= sleeve), 42-47-52-55-60-70 tr (= front piece), 8 ch (under sleeve), skip 38-40-42-45-47-50 tr from previous row (= sleeve) and 21-23-25-27-30-34 tr (= half back piece). Insert a marker, now measure piece from here! BODY: There are now 100-109-118-127-136-154 sts for body. NOW MEASURE THE PIECE FROM HERE. Work 1 round with 1 tr in every tr/ch. Then work PATTERN - see explanation above, as follows: NOTE: Work from 1st round in A.1-A.2. ROUND 1: Work 3 ch (= A.1) - remember crochet info. Then work A.2 as follows: * Work 2 TR TOG (in tr) - see explanation above, 5 ch, skip 2 tr, 1 dc in next tr, 3 ch, skip 2 tr, 1 dc in next tr, 5 ch, skip 2 tr *, repeat from *-* 10-11-12-13-14-16 more times. Finish with 1 sl st in 3rd ch on round (= A.1). ROUND 2: Work 1 ch, * work 1 dc in the 2 tr worked tog, 3 ch, skip 1 ch-space, work 1 TR-GROUP - see explanation above, around next ch-space, 3 ch, skip 1 ch-space *, repeat from *-* 10-11-12-13-14-16 more times. Finish with 1 sl st in 1st ch on round. ROUND 3: Work 1 ch, * 2 ch, 1 dc around next ch-space, 5 ch, work 2 TR TOG (around ch-space) - see explanation above, 5 ch, 1 dc around next ch after tr-group, 1 ch *, repeat from *-* 10-11-12-13-14-16 more times. Finish with 1 sl st in 1st ch on round. ROUND 4: Work 3 ch, work (1 ch, 1 tr, 1 ch, 1 tr) around first ch-space, 3 ch, skip 1 ch-space, 1 dc in the 2 tr worked tog, 3 ch, skip 1 ch-space, * (1 tr, 1 ch, 1 tr, 1 ch, 1 tr, 1 ch, 1 tr) around next ch-space, 3 ch, skip 1 ch-space, 1 dc in the 2 tr worked tog, 3 ch, skip 1 ch-space *, repeat from *-* 9-10-11-12-13-15 more times, (1 tr, 1 ch, 1 tr) around last ch-space. Finish with 1 sl st in 3rd ch on round. ROUND 5: Work 3 ch, * work 2 TR TOG (around ch), 5 ch, work 1 dc around ch-space after tr-group, 3 ch, 1 dc around next ch-space, 5 ch *, repeat from *-* 10-11-12-13-14-16 more times. Finish with 1 sl st in 3rd ch on round. Continue like this and repeat A.X (= 2nd-5th round) until piece measures approx. 32 cm in all sizes - adjust to finish after 2nd or 4th round in A.1-A.2. Piece measures 56-60-60-62-64-66 cm in total. SLEEVE: Sleeve is worked in the round, top down. NOW MEASURE THE PIECE FROM HERE. Insert a marker in the middle of the 8 ch worked under sleeve. Let marker follow in piece until finished measurements. Fasten yarn with 1 sl st in the 5th ch of the 8 ch worked in armhole on body. Work 3 ch (= 1 tr) continue with 1 tr in each of the next 3 ch, 1 tr in each of the tr for sleeve and then 1 tr in the remaining 4 ch under sleeve = 46-48-50-53-55-58 tr - remember CROCHET INFO! Continue with 1 tr in every tr AT THE SAME TIME when piece measures approx. 4 cm beg dec - READ DECREASE TIP. Repeat dec every 3rd-2nd-2nd-2nd-2nd-1st round 8-9-10-10-11-12 more times = 28-28-28-31-31-32 tr remain. When sleeve measures 46-44-44-43-42-40 cm, sleeve is finished. Work the other sleeve the same way. ---------------------------------------------------------- Hat and neck warmer: See DROPS 164-32 or "Related patterns" in pattern on website. ---------------------------------------------------------- |
||||||||||||||||||||||||||||
Diagram explanations |
||||||||||||||||||||||||||||
|
||||||||||||||||||||||||||||
 |
||||||||||||||||||||||||||||
 |
||||||||||||||||||||||||||||
Have you finished this pattern?Tag your pictures with #dropspattern #lakesidesweater or submit them to the #dropsfan gallery. Do you need help with this pattern?You'll find 14 tutorial videos, a Comments/Questions area and more by visiting the pattern on garnstudio.com. © 1982-2026 DROPS Design A/S. We reserve all rights. This document, including all its sub-sections, has copyrights. Read more about what you can do with our patterns at the bottom of each pattern on our site. |
||||||||||||||||||||||||||||


With over 40 years in knitting and crochet design, DROPS Design offers one of the most extensive collections of free patterns on the internet - translated to 17 languages. As of today we count 324 catalogues and 12290 patterns translated into English (UK/cm). 12290
We work hard to bring you the best knitting and crochet have to offer, inspiration and advice as well as great quality yarns at incredible prices! Would you like to use our patterns for other than personal use? You can read what you are allowed to do in the Copyright text at the bottom of all our patterns. Happy crafting!
Post a comment to pattern DROPS 164-31
We would love to hear what you have to say about this pattern!
If you want to leave a question, please make sure you select the correct category in the form below, to speed up the answering process. Required fields are marked *.