
Popular categories
Looking for a yarn?


Comments / Questions (15)
![]() Joyce O’Brien wrote:
Joyce O’Brien wrote:
Bonjour, je ne voudrais pas défaire mon tricot alors je fais encore appel à vous pour être certaine de bien comprendre les instructions. Je suis rendue à 184 mailles. Je dois maintenant tricoter en jersey 18 cm. Ma question: est-ce que le rang endroit sur endroit où je dois augmenter de 36 mailles est le premier rang des 18 cm ou il est à faire après ces 18 cm? Merci de votre bonne collaboration.
11.05.2026 - 22:59DROPS Design answered:
Bonjour Mme O'Brien, vous tricotez d'abord 18 cm sur ces 184 mailles puis, au rang suivant sur l'endroit vous augmentez 36 m à intervalles réguliers et vous tricotez maintenant en côtes; les augmentations sont ainsi faites juste avant les côtes pour éviter qu'elles ne resserrent le bas du gilet. Bon tricot!
12.05.2026 - 08:20
![]() Joyce wrote:
Joyce wrote:
Bonjour, j’ai terminé des augmentations et j’ai bien 256 mailles. Je passe donc à l ‘étape suivante pour la Taille S qui m’amènera à 264 mailles en augmentant uniquement pour le dos et les devants donc 4 augmentations par rang endroit de travail. On écrit d’augmenter ainsi: 2-1-4 fois au total tous les 2 rangs C’est ce que je ne comprends pas. Encore une fois merci de votre attention.
08.05.2026 - 22:03DROPS Design answered:
Bonjour Joyce, vous avez auparavant augmenté 1 m pour chaque devant et 1 pour chaque manche et pour le dos, soit 8 m par rang; vous allez augmenter maintenant seulement sur les devants et le dos (plus pour les manches), soit 4 m seulement: augmentez avant le 1er marqueur (devant gauche), après le 2ème et avant le 3ème marqueur (dos) et après le 4ème marqueur (devant droit); tricotez ces augmentations ainsi 2 fois au total tous les rangs sur l'endroit: vous aurez ainsi 256+(2x4)=264 mailles. Bon tricot!
11.05.2026 - 07:32
![]() Joyce O’Brien wrote:
Joyce O’Brien wrote:
Canada français Bonjour, c’est un beau projet! Mais j’ai encore besoin de votre aide. J’ai terminé l’étape où nous avons 148 mailles au total. Pour l’étape suivante lorsqu’on augmente uniquement pour les devants/dos, si je comprends bien il faut faire un jeté de chaque côté des 2 marqueurs du milieu donc un jeté se trouve ainsi du côté de la manche. Est-ce bien ça?
11.04.2026 - 23:20DROPS Design answered:
Bonjour Mme O'Brien, quand on doit augmenter 4 mailles seulement par rang sur l'endroit, on ne va augmenter que pour les devants et le dos, autrement dit avant le 1er marqueur à la fin du devant gauche, après le 2ème marqueur au début du dos + avant le 3ème marqueur à la fin du dos et après le 4ème marqueur, au début du devant droit. Bon tricot!
13.04.2026 - 09:37
![]() Joyce O’Brien wrote:
Joyce O’Brien wrote:
Bonjour, j’ai fait le premier rang endroit de l’empiècement en finissant tel qu’indiqué pour faire la première boutonnière. Sur le deuxième rang (envers) est-ce que je dois monter une maille pour remplacer les 2 mailles endroits tricotées ensemble. Et je suppose que je dois tricoter le jeté de façon torse. Merci de votre attention, P.S.: Pour les marqueurs, j’ai utilisé ceux que j’avais.
29.03.2026 - 21:33DROPS Design answered:
Bonjour Mme O'Brien, pour ouvrir les boutonnières, on tricote (2 m ens à l'end, 1 jeté), au rang suivant, on tricote le jeté à l'endroit pour qu'il forme un trou pour le bouton. Les jetés des augmentations du raglan se tricotent dans le brin arrière pour éviter des trous. Bon tricot!
07.04.2026 - 13:43
![]() Joyce O’Brien wrote:
Joyce O’Brien wrote:
Le fil marqueur peut être remplacé par les marqueurs de rang vendus dans les boutiques de laines?
28.03.2026 - 18:04DROPS Design answered:
Bonjour Mme O'Brien, tout à fait, vous pouvez choisir au choix des fils marqueurs comme dans les explications ou bien des marqueurs. Bon tricot!
07.04.2026 - 09:56
![]() Joyce O’Brien wrote:
Joyce O’Brien wrote:
Mon échantillon pour tricoter le cardigan Strawberry Haze fait 9 cm x 9cm avec aiguilles de 4,5 et je ne voudrais pas prendre des aiguilles plus petites. Le modèle demande des aiguilles de 5mm pour 10 cm. Pensez-vous que cela fera une grosse différence au final. Si oui, alors je prendrai des aiguilles 4mm. Je tricote pour la Taille S. Je vous remercie de votre attention.
27.03.2026 - 02:52DROPS Design answered:
Bonjour Mme O'Brien, si vous n'avez que 9x9 cm pour 17 m et 22 rangs, vous devez essayer avec des aiguilles plus grosse pour agrandir vos mailles et ainsi optimiser vos chances d'avoir le bon nombre de mailles et de rangs. Retrouvez ici plus d'infos sur l'échantillon. Bon tricot!
27.03.2026 - 07:56
![]() Karin wrote:
Karin wrote:
Hej! Jag kommer att få d sista knapphålet på resåren .. Fast jag mätte till 9 cm mellan knapphålen..menmen😅 Vad är d bästa att göra? Sticka fram o bakstycke längre innan resåren..eller göra resåren kortare..för på bilden ser d ut som sista knappen är precis innan resåren Hoppas förstår mitt surriga inlägg😅
12.06.2025 - 11:32DROPS Design answered:
Hei Karin. Det gjør ikke noe at siste knappehull kommer litt på resåren. Men om du ikke ønsker det, kan du strikke fram o bakstycke längre og resåren kortere, men da vil ikke resåren ha samme lengde som ermene. Anbefaler deg å gjøre det du syns blir penest. Jakken du ser på bildet er i str. S eller M og har 5 knapper, strikker du en av de 3 største str. skal det være 6 knapper og da vil siste knapp være litt på resåren. mvh DROPS Design
16.06.2025 - 08:25
![]() Nancy wrote:
Nancy wrote:
Hi, can I block this cardigan? If I can do you have any videos to show how to do this? Thanks, Nancy
06.01.2025 - 17:01DROPS Design answered:
Dear Nancy,yYou don't have to block the waistcoat, but if you want to, you can dampen it slightly and leave it to dry flat - remember to always follow the care instructions. Enjoy.
07.01.2025 - 09:24
![]() Nancy wrote:
Nancy wrote:
Hi, just following up on my previous question, how do I know around which markers do I increase for front piece and back piece? Is it the markers that are labelled front and back in the pattern as I did this on the lemon glaze jumper and it made it wonky.
30.12.2024 - 16:48DROPS Design answered:
Dear Nancy, marker 1 is between the front piece and the sleeve, marker 2 is between the sleeve and the back piece, marker 3 between the back piece and the sleeve and marker 4 between the sleeve and the front piece. To increase only for the front piece/back piece, you need to increase before markers 1 and 3 and after markers 2 and 4, which are the sides of the markers that correspond to the front pieces and the back piece. So you don't increase on the side of the markers where the sleeve stitches are located. Happy knitting!
31.12.2024 - 01:06
![]() Nancy wrote:
Nancy wrote:
Hi, on the part of this pattern where you increase for the yoke it says to “on every other increase, only increase on front pieces/ back pieces.” Does this mean that you can either increase on the front or the back and if so which would you recommend doing or does this mean to increase on the front piece and back piece as referred to when placing the stitch markers for the yoke (front piece, sleeve, back piece, sleeve) and increasing around the front piece and back piece. Thanks, Nancy.
29.12.2024 - 23:30DROPS Design answered:
Hi Nancy, This means that you increase on both the front and back pieces (but not on the sleeves) every second increase. Happy New Year!
30.12.2024 - 12:27
|
|
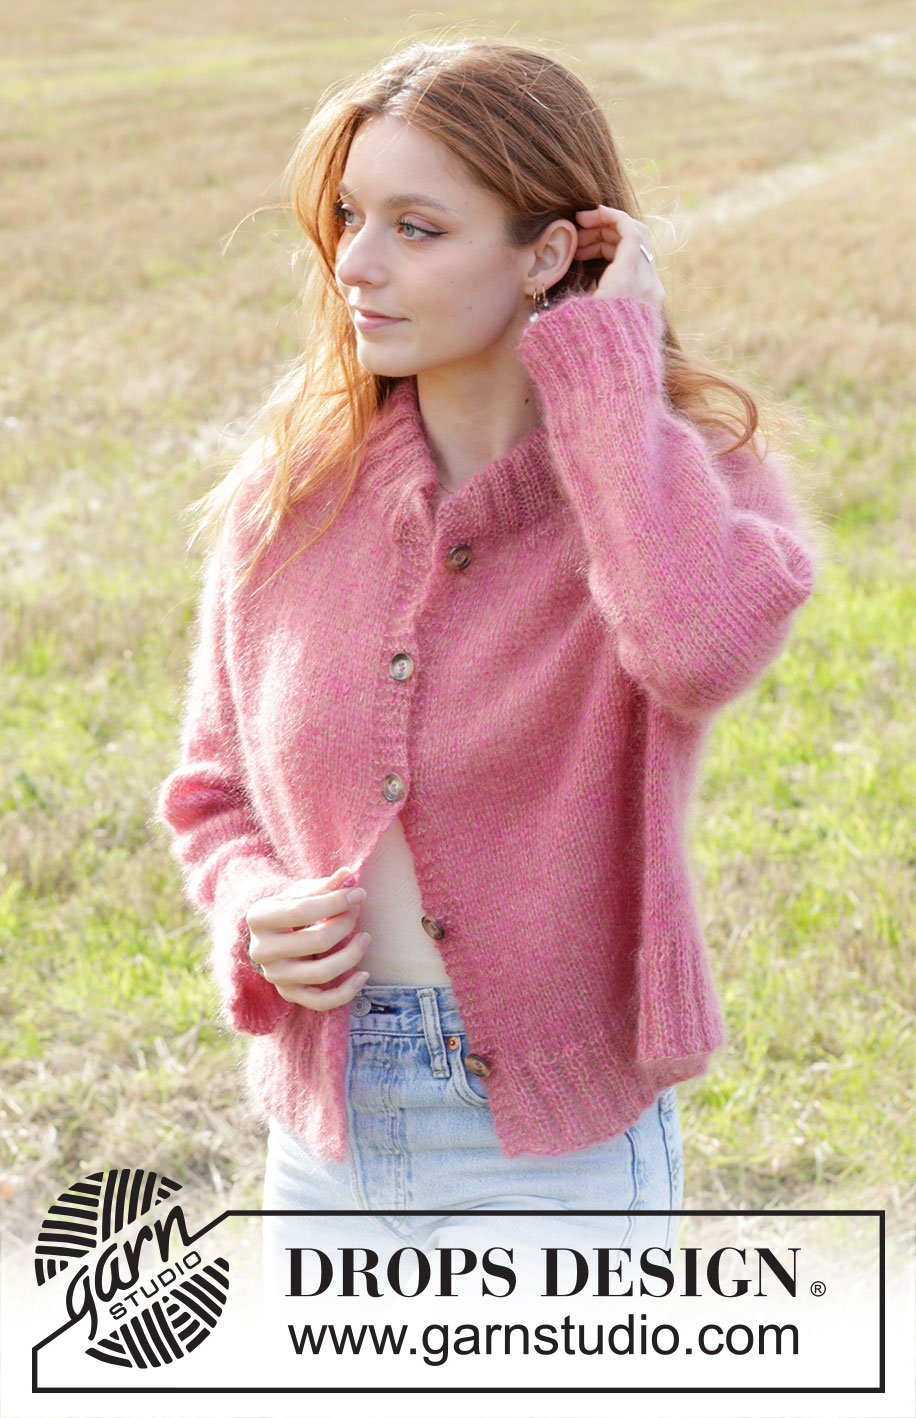
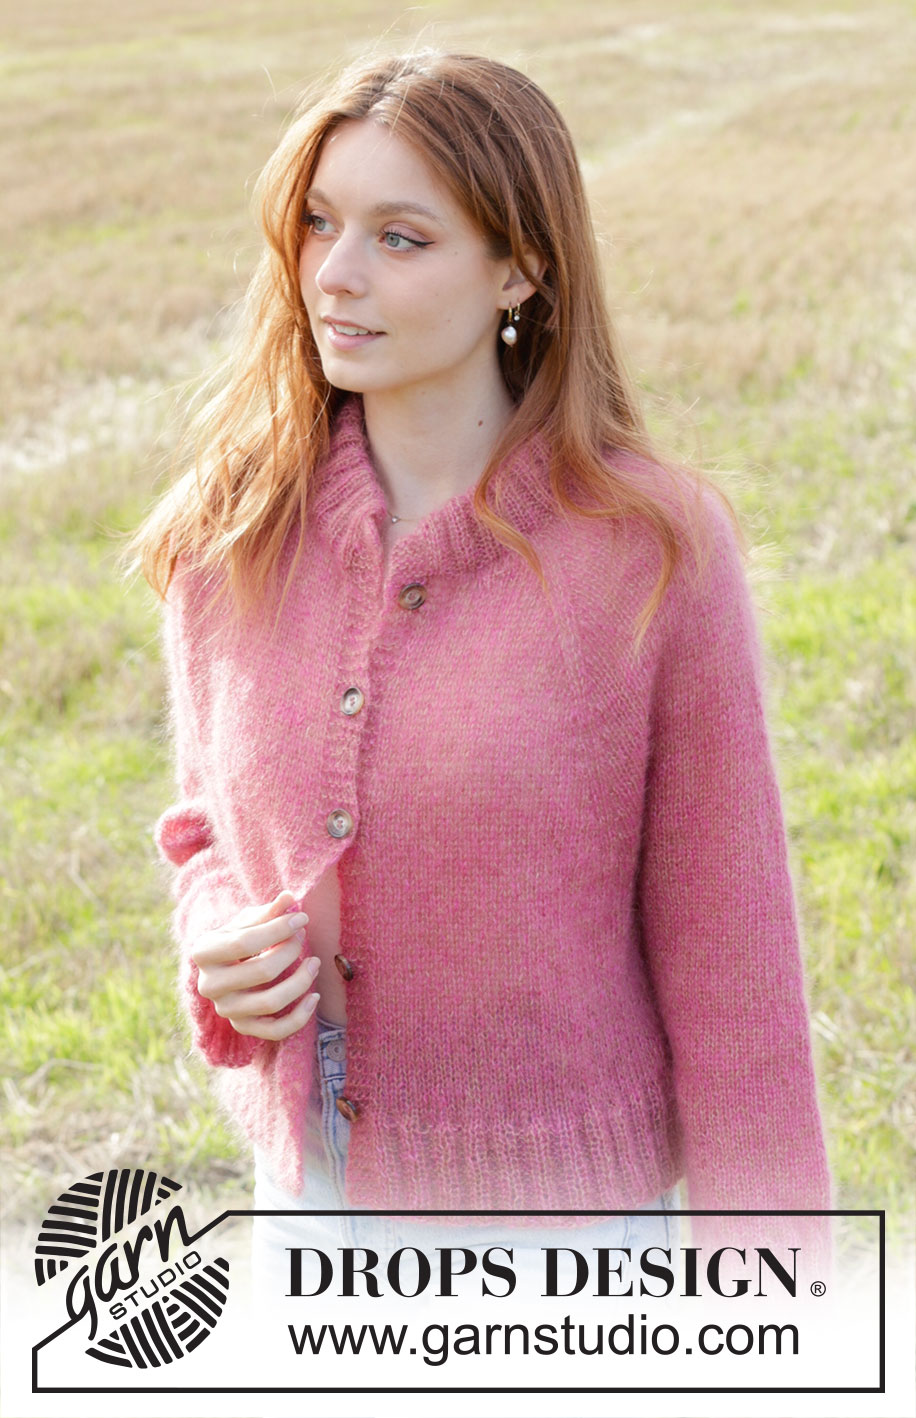
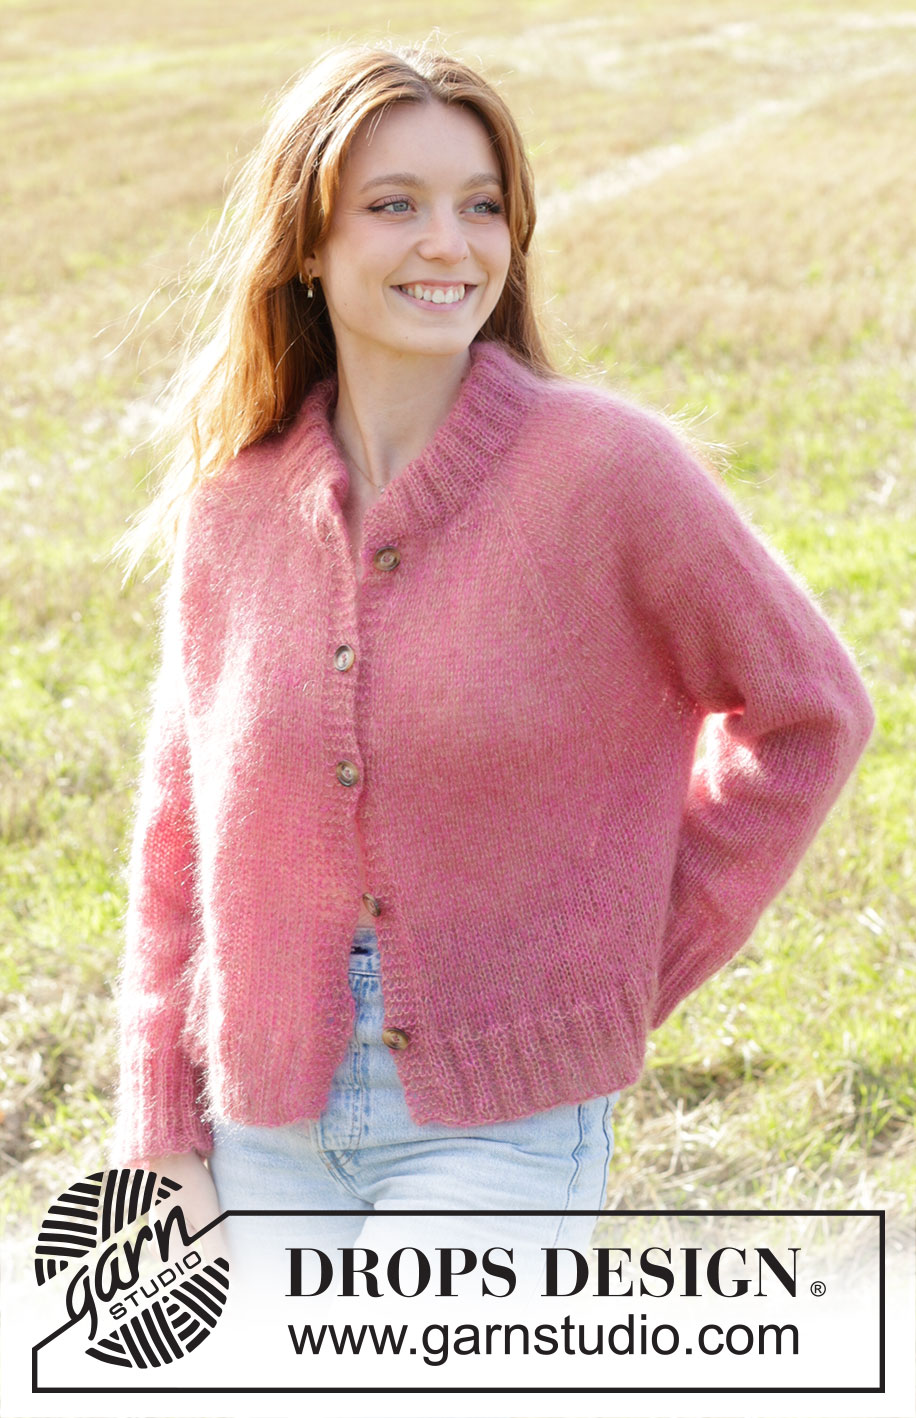
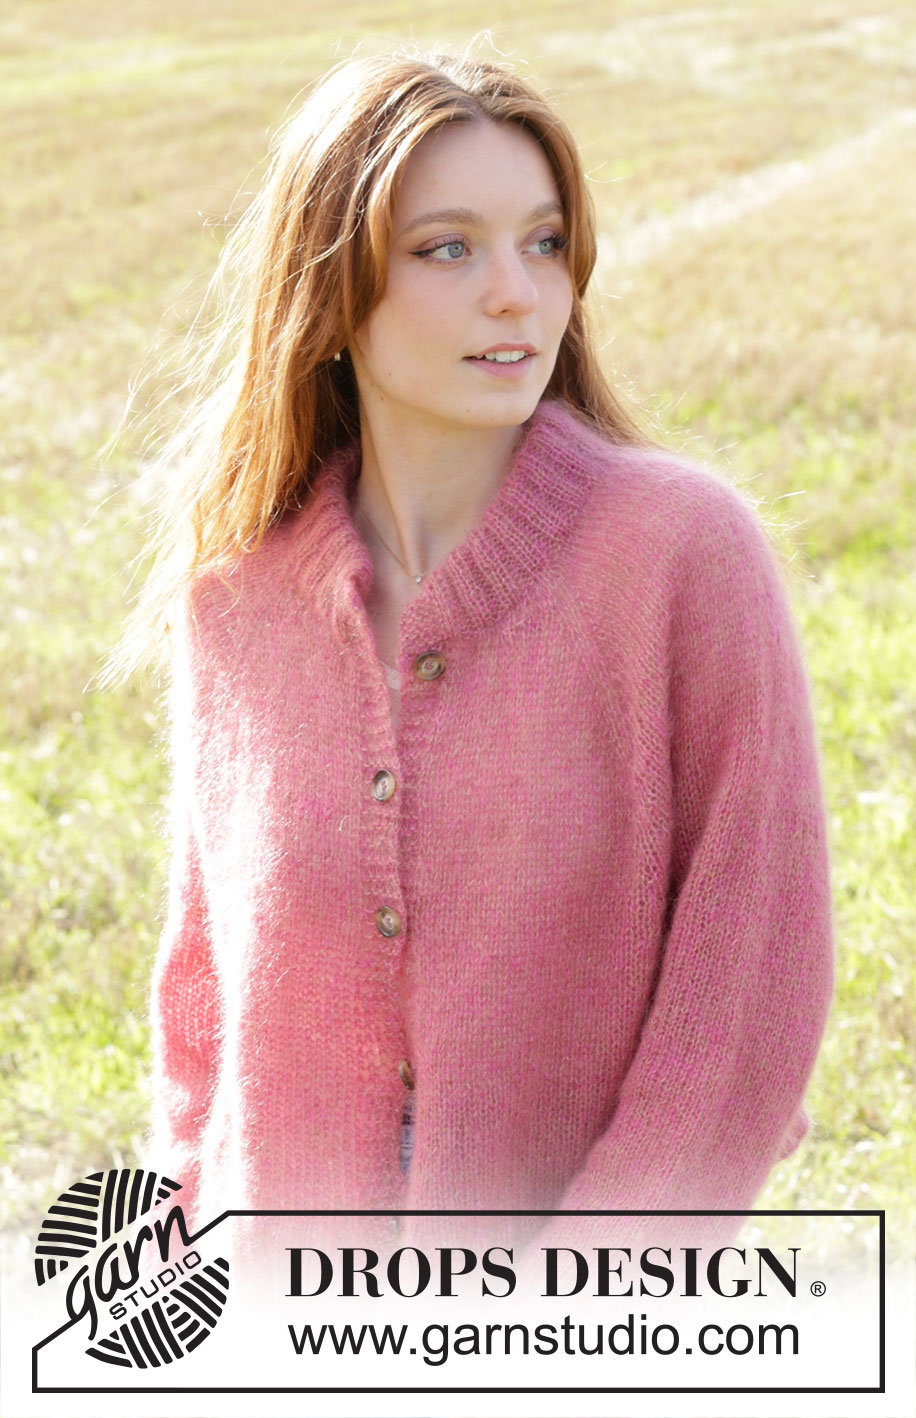
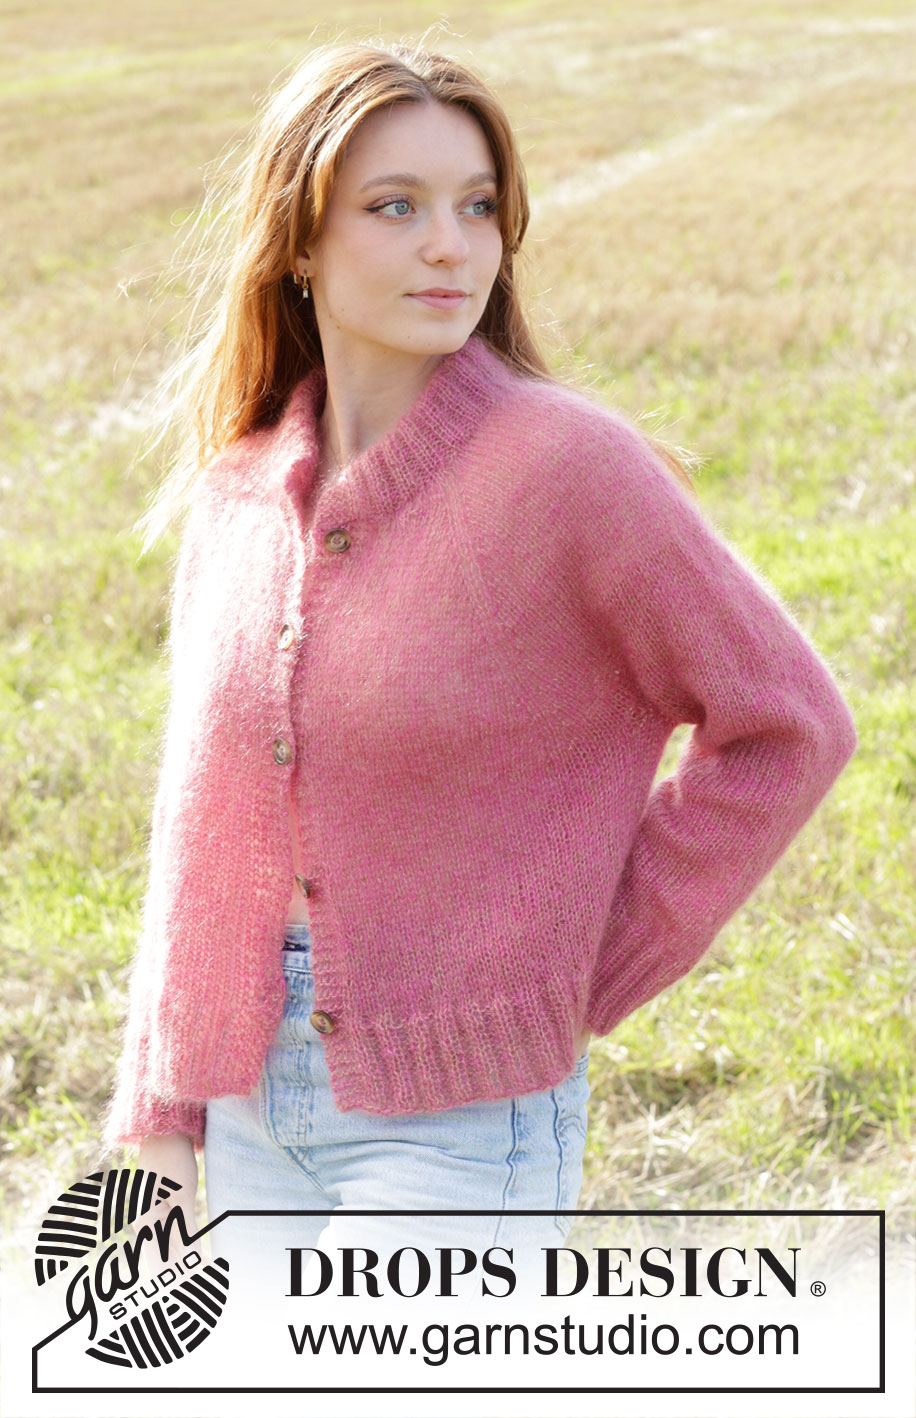
Strawberry Haze Cardigan#strawberryhazecardigan |
|
 |
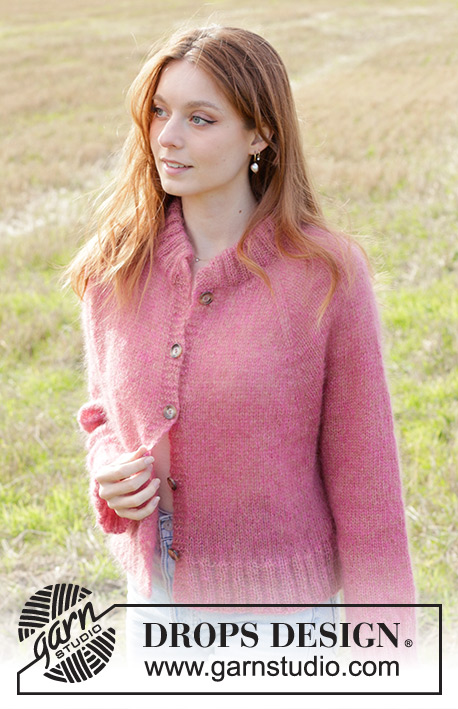 |
Knitted jacket in 2 strands DROPS Kid-Silk. Piece is knitted top down with raglan and double neck edge. Size: S - XXXL
DROPS 250-34 |
|
|
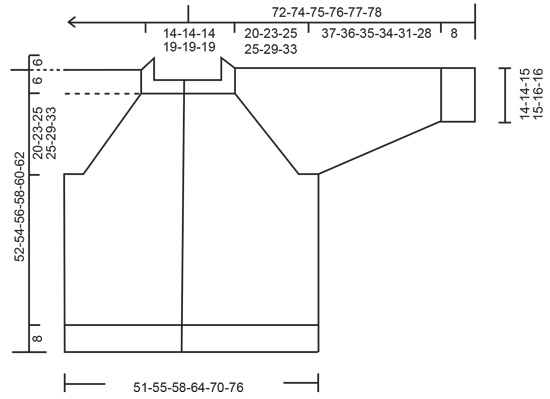
---------------------------------------------------------- EXPLANATION FOR THE PATTERN: ---------------------------------------------------------- GARTER STITCH (back and forth): Knit all rows. 1 ridge vertically = knit 2 rows. RAGLAN: Increase 1 stitch before/after 2 stitches in stocking stitch in every transition between front piece/back piece and sleeve, marker threads are between these 2 stitches. Increase 1 stitch by making 1 yarn over, on next row work yarn over twisted to avoid holes. Then work the new stitches in stocking stitch. DECREASE TIP (applies to mid under sleeves): Decrease 1 stitch on each side of marker thread as follows: Work until 3 stitches remain before marker thread, knit 2 together, knit 2 (marker thread is between these 2 stitches), slip 1 stitch knitwise, knit 1, pass slipped stitch over stitch worked. BUTTONHOLES: Decrease for buttonholes on right band (when garment is worn): Work from right side until 4 stitches remain at the end of row, make 1 yarn over, knit 2 together, knit the next 2 stitches. Decrease for first buttonhole on first row from right side after neckline is done. Then decrease the next 4-4-4-5-5-5 buttonholes as explained above, approx. 9-9-9½-8½-9-9 cm apart. ---------------------------------------------------------- START THE PIECE HERE: ---------------------------------------------------------- JACKET - SHORT OVERVIEW OF THE PIECE: In this pattern long and short needles have been used, begin with fitting length and switch as needed. Cast on stitches for neck and work back and forth on row - at the same time increase in each side of row until correct number of stitches and the neck is done. Then work yoke back and forth on circular needle, top down. When yoke is done, divide stitches for body and sleeves. Finish body downwards on circular needle while putting the sleeves aside. Then work sleeves downwards in the round on needle. Pick up stitches along the neckline and work a neck edge which is folded double towards the wrong side and fastened. NECKLINE: Cast on 70-70-70-78-78-78 stitches on circular needle size 5 mm with 1 strand of each colour (2 strands). Now insert 4 marker threads in piece as explained below (without working the stitches). Use marker threads when increasing for raglan, and insert every marker thread between 2 stitches as follows: Count 3 stitches (front piece), insert 1 marker thread, count 20 stitches (sleeve), insert 1 marker thread, count 24-24-24-32-32-32 stitches (back piece), insert 1 marker thread, count 20 stitches (sleeve), insert 1 marker thread, count 3 stitches (front piece). Worked back and forth as follows: ROW 1 (= wrong side): Purl, then cast on 2 new stitches at the end of row = 72-72-72-80-80-80 stitches. ROW 2 (= right side): Knit, increase for RAGLAN on each side of the 4 marker threads - read explanation above (8 stitches increased), then cast on 2 new stitches at the end of row = 82-82-82-90-90-90 stitches. ROW 3 (= wrong side): Purl, then cast on 2 new stitches at the end of row 84-84-84-92-92-92 stitches. ROW 4 (= right side): Knit, increase for raglan on each side of the 4 marker threads (8 stitches increased), then cast on 2 new stitches at the end of row = 94-94-94-102-102-102 stitches. ROW 5 (= wrong side): Purl, then cast on 3 new stitches at the end of row = 97-97-97-105-105-105 stitches. ROW 6 (= right side): Knit, increase for raglan on each side of the 4 marker threads (8 stitches increased), then cast on 3 new stitches at the end of row = 108-108-108-116-116-116 stitches. ROW 7 (= wrong side): Purl, then cast on 8-8-8-12-12-12 new stitches at the end of row = 116-116-116-128-128-128 stitches. ROW 8 (= right side): Knit, increase for raglan on each side of the 4 marker threads (8 stitches increased), then cast on 8-8-8-12-12-12 new stitches at the end of row = 132-132-132-148-148-148 stitches. ROW 9 (= wrong side): Purl but work the outermost 5 stitches in each side in GARTER STITCH – read explanation above. Neckline is now done, and 4 increases for raglan have been done on each side of the 4 marker threads. Then work yoke as explained below. The decrease for BUTTONHOLES - read explanation above, starts now. YOKE: Work in stocking stitch and garter stitch over band stitches, and continue increases for raglan on every other row 2 more times (6 increases in total have been done for raglan) = 148-148-148-164-164-164 stitches. The continue increases for raglan on every other row (every row from right side) but on every other increase, only increase on front pieces/back piece. I.e. increase on front pieces/back piece on every other row and on sleeves every 4th row, increase alternately 4 and 8 stitches. Increase like this 18-22-26-26-30-30 times on body (9-11-13-13-15-15 times on sleeves) = 256-280-304-320-344-344 stitches. SIZE S, M and XXXL: Continue in stocking stitch and increases for raglan but now only increase on body, increases for sleeves are done. Increase every other row 2-1-4 times in total. ALL SIZES: Increase has been done 26-29-32-32-36-40 times in total on body and 15-17-19-19-21-21 times on sleeves (including increases on the short rows in the neck). After last increase there are 264-284-304-320-344-360 stitches on needle. Work in stocking stitch and garter stitch on band until piece measures 20-23-25-25-29-33 cm from cast-on edge mid front. DIVIDING FOR BODY AND SLEEVES: Work the first 44-47-50-54-58-62 stitches (front piece), slip the next 50-54-58-58-62-62 stitches on a thread for sleeve, cast on 10-10-10-12-14-16 new stitches on needle (in the side under sleeve), work the next 76-82-88-96-104-112 stitches (back piece), slip the next 50-54-58-58-62-62 stitches on a thread for sleeve, cast on 10-10-10-12-14-16 new stitches on needle (in the side under sleeve), work the remaining 44-47-50-54-58-62 stitches (front piece). BODY: = 184-196-208-228-248-268 stitches. Work stocking stitch with garter stitch on bands until piece measures 18-17-17-19-17-15 cm from division. Knit 1 row from right side while increasing 36-40-44- 48-52-56 stitches evenly( do not increase over bands) 220-236-252-276-300-324 stitches. Switch to circular needle size 3.5 mm, work next row as follows – from wrong side: 5 band stitches in garter stitch, * purl 2, knit 2 *, repeat from *-* until 7 stitches remain, purl 2 and 5 band stitches in garter stitch. Continue rib like this for 8 cm. Cast off. Jacket measures approx. 52-54-56-58-60-62 cm from shoulder. SLEEVES: Slip the 50-54-58-58-62-62 stitches from the thread in one side of piece on a short circular needle or double pointed needles size 5 mm and pick in addition up 1 stitch in each of the 10-10-10-12-14-16 stitches cast on under sleeve = 60-64-68-70-76-78 stitches. Insert a marker thread in the middle of the new stitches. Work in stocking stitch in the round. When piece measures 4 cm, decrease 2 stitches under sleeve - read DECREASE TIP. Decrease like this approx. every 5-3½-2½-2½-2-1½ cm 6-8-9-10-11-11 times in total = 48-48-50-50-54-56 stitches. Continue until piece measures 37-36-35-34-31-28 cm. Knit 1 round while increasing 8-8-10-10-10-12 stitches evenly = 56-56-60-60-64-68 stitches. Switch to double pointed needles size 3.5 mm. Work rib (knit 2/purl 2) for 8 cm. Cast off. Sleeve measures approx. 45-44-43-42-39-36 cm from division. DOUBLE NECK EDGE: Pick up from right side approx. 100 to 116 stitches along the neck on circular needle size 3.5 mm with 1 strand of each colour (2 strands) - number of stitches must be divisible 4 - adjust so that rib fits nicely with raglan stitches continuing as knit stitches (seen from right side) in the neck edge. Work first row as follows from wrong side: 5 band stitches in garter stitch, * knit 2, purl 2 *, repeat from *-* until 7 stitches remain, purl 2 and 5 band stitches in garter stitch. Continue rib back and forth like this for 5 cm. At the beginning of the next 2 rows cast off 4 stitches. Continue rib as before with 1 stitch in garter stitch in each side until neck edge measures 10 cm. Loosely cast off. Fold the rib down on the inside of garment and fasten. Sew opening towards mid front together on bands with neat little stitches. ASSEMBLY: Sew the buttons on to left band. |
|
 |
|
Have you finished this pattern?Tag your pictures with #dropspattern #strawberryhazecardigan or submit them to the #dropsfan gallery. Do you need help with this pattern?You'll find 31 tutorial videos, a Comments/Questions area and more by visiting the pattern on garnstudio.com. © 1982-2026 DROPS Design A/S. We reserve all rights. This document, including all its sub-sections, has copyrights. Read more about what you can do with our patterns at the bottom of each pattern on our site. |
|


With over 40 years in knitting and crochet design, DROPS Design offers one of the most extensive collections of free patterns on the internet - translated to 17 languages. As of today we count 325 catalogues and 12298 patterns translated into English (UK/cm). 12298
We work hard to bring you the best knitting and crochet have to offer, inspiration and advice as well as great quality yarns at incredible prices! Would you like to use our patterns for other than personal use? You can read what you are allowed to do in the Copyright text at the bottom of all our patterns. Happy crafting!
Post a comment to pattern DROPS 250-34
We would love to hear what you have to say about this pattern!
If you want to leave a question, please make sure you select the correct category in the form below, to speed up the answering process. Required fields are marked *.