
Popular categories
Looking for a yarn?


Comments / Questions (88)
![]() Eileen wrote:
Eileen wrote:
Do you count the beginning of round marker in the increase number 1 or the next marker as number 1 as this is making things turn out wrong
27.01.2026 - 12:14DROPS Design answered:
Dear Eileen, when increasing for saddle shoulders, you will increase for the end of the back piece at the end of the round, ie start working 1 stitch after marker -1 and increase for the back piece at the end of the round after marker-4 and before marker -1. Happy knitting!
27.02.2026 - 16:02
![]() Inge wrote:
Inge wrote:
Kan ik de hals ook direct na het breien ervan dubbelvouwen, samen breien en verder gaan met de trui?
21.12.2025 - 22:08DROPS Design answered:
Dag Inge,
Jazeker, dat kan ook. Het maakt niet of je het direct doet of op het einde.
22.12.2025 - 20:16
![]() AliceMD wrote:
AliceMD wrote:
Bonjour, J’en suis à la division de l’ouvrage pour le dos/le devant. Je ne comprends pas comment monter 8 mailles après avoir mis les premières mailles en attente. Merci de votre aide. Et bonne journée
20.11.2025 - 11:39DROPS Design answered:
Bonjour AliceMD, retrouvez comment monter ces mailles dans cette vidéo / cette leçon - c'est l'étape 11 de cette leçon. Bon tricot!
20.11.2025 - 16:37
![]() Laure Jansen wrote:
Laure Jansen wrote:
Hej! Det känns som det är fel på mönstret på halsringen fram. Det måste finnas en fördjupning eller som tidigare skrivit en förhöjning bak. Jag har löst det genom att sticka fram och tillbaka vid halsen och vid varje varv tagit några stickor från framkante på halsen. Det är verkligen synd (ser bild tre av inskickade bilder) om någon har lagt ner jättemycket jobb och sedan blir det fel..
03.08.2025 - 09:08
![]() Corradini Nicoletta wrote:
Corradini Nicoletta wrote:
Buona sera sto esegundo il modello Drop design Diamont Fire non riesco a capire dove metto i segna puntiper gli aumenti della manica: spostare ogni segnapunti in modo che sia tra tre maglie indicate dalle frecce in A1 grazie , integrazione alla precedente saluti
28.02.2025 - 18:57DROPS Design answered:
Buongiorno Nicoletta, abbiamo modificato la spiegazione: deve inserire i 2 segnapunti tra le 2 maglie indicate dalle frecce in A.1. Buon lavoro!
08.03.2025 - 11:27
![]() Corradini Nicoletta wrote:
Corradini Nicoletta wrote:
Buona sera sto esegundo il modello Drop design Diamont Fire non riesco a capire dove metto i segna puntiper gli aumenti della manica: spostare ogni segnapunti in modo che sia tra tre maglie
28.02.2025 - 18:55DROPS Design answered:
Buongiorno Nicoletta, abbiamo modificato la spiegazione: deve inserire i 2 segnapunti tra le 2 maglie indicate dalle frecce in A.1. Buon lavoro!
08.03.2025 - 11:27
![]() Marie-Christine BARBE-LEZE wrote:
Marie-Christine BARBE-LEZE wrote:
Bonjour, pour le modèle diamond fire, j'en suis aux augmentations empiècement. vous dites de décaler les marqueurs au milieu de A 2 et A 3, estce que je continue le motif et est ce que les marqueurs ne gênent pas pour effectuer le motif. Merci d'avance Marie-christine Barbe
18.02.2025 - 10:15DROPS Design answered:
Bonjour Mme Barbe-Leze, tout à fait, vous continuez les torsades A.2 et A.3 comme avant, mais maintenant vous augmentez de chaque côté de chaque A.2/A.3 ainsi: tricotez jusqu'à ce qu'il reste 4 mailles avant le marqueur, augmentez 1 maille, tricotez A.2/A.3 (le marqueur est au milieu de ces 8 mailles) et augmentez 1 maille. Bon tricot!
18.02.2025 - 17:10
![]() Snjezana wrote:
Snjezana wrote:
Hej! Jag undrar om ni har bra tips eller video om hur man stickar kantmaskor på framstycke och bakstycke efter fördelning så att det blir fint? Tack på förhand.
09.02.2025 - 22:27DROPS Design answered:
Hej, vi strikker kantmaskerne i retstrik (ret både fra retsiden og fra vrangen) :)
12.02.2025 - 14:52
![]() Deni wrote:
Deni wrote:
Hi,I'm knitting size L and stopped at increasing to yoke.I've moved markers as said but don't understand this section"increase 1 stitch when 4 stitches remain before each marker and increase 1 stitch 4 stitches after each marker". Thank you.
16.12.2024 - 09:08DROPS Design answered:
Hi Deni, This means you work until there are 4 stitches left before the marker, increase 1 stitch according to Increase tip-2 in explanations, then work to 4 stitches after the marker and again increase 1 stitch according to Increase tip-2. Repeat this process at all 4 markers. Hope this helps and Happy Christmas!
19.12.2024 - 07:12
![]() Deni wrote:
Deni wrote:
Hi,can you explain the part in sleeves increase where it says(A4B) place 2 sts on cable needle,knit one,knit the left stitch on the cable needle(the stitch needs to be worked at the back of the piece).how do I do that?
09.12.2024 - 10:18DROPS Design answered:
Dear Deni, you can see how to work this symbol, to cross the cables, in the following video: https://www.garnstudio.com/video.php?id=1741&lang=en. Happy knitting!
15.12.2024 - 13:53
|
|||||||||||||||||||||||||||||||
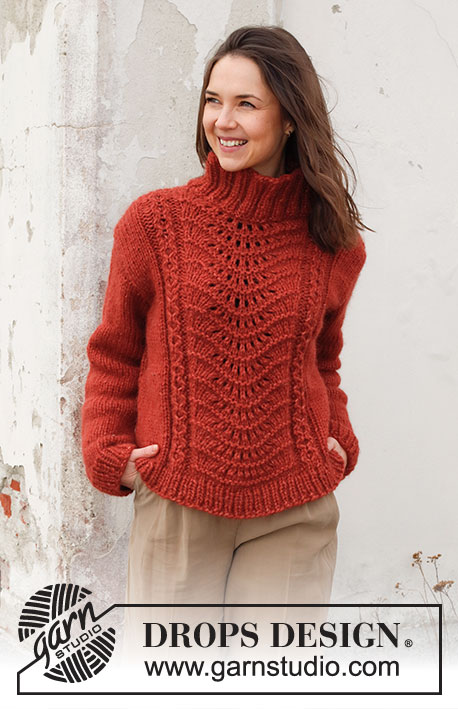
Diamond Fire#diamondfiresweater |
|||||||||||||||||||||||||||||||
 |
 |
||||||||||||||||||||||||||||||
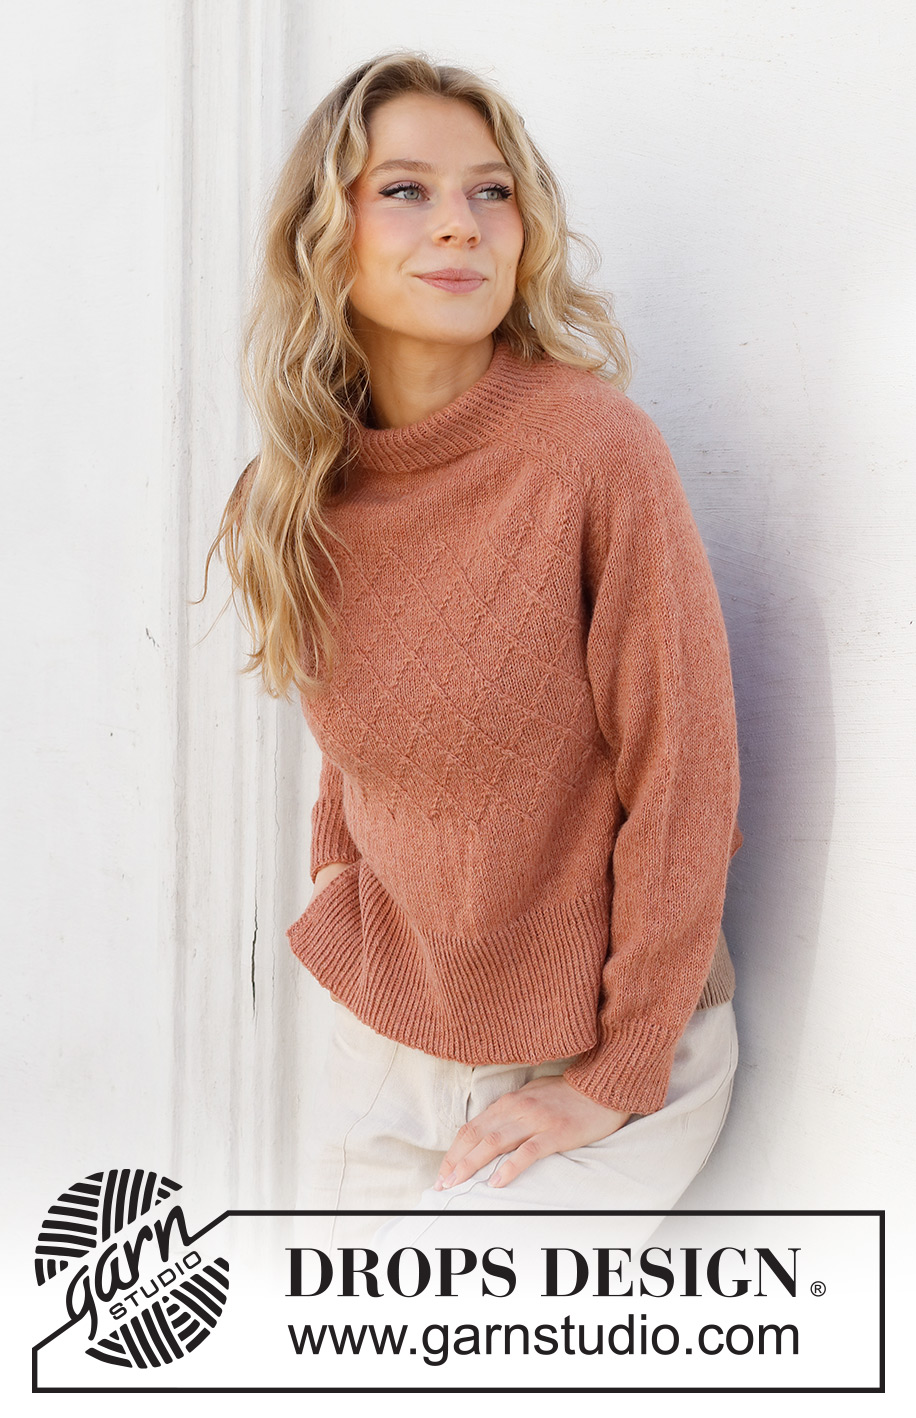
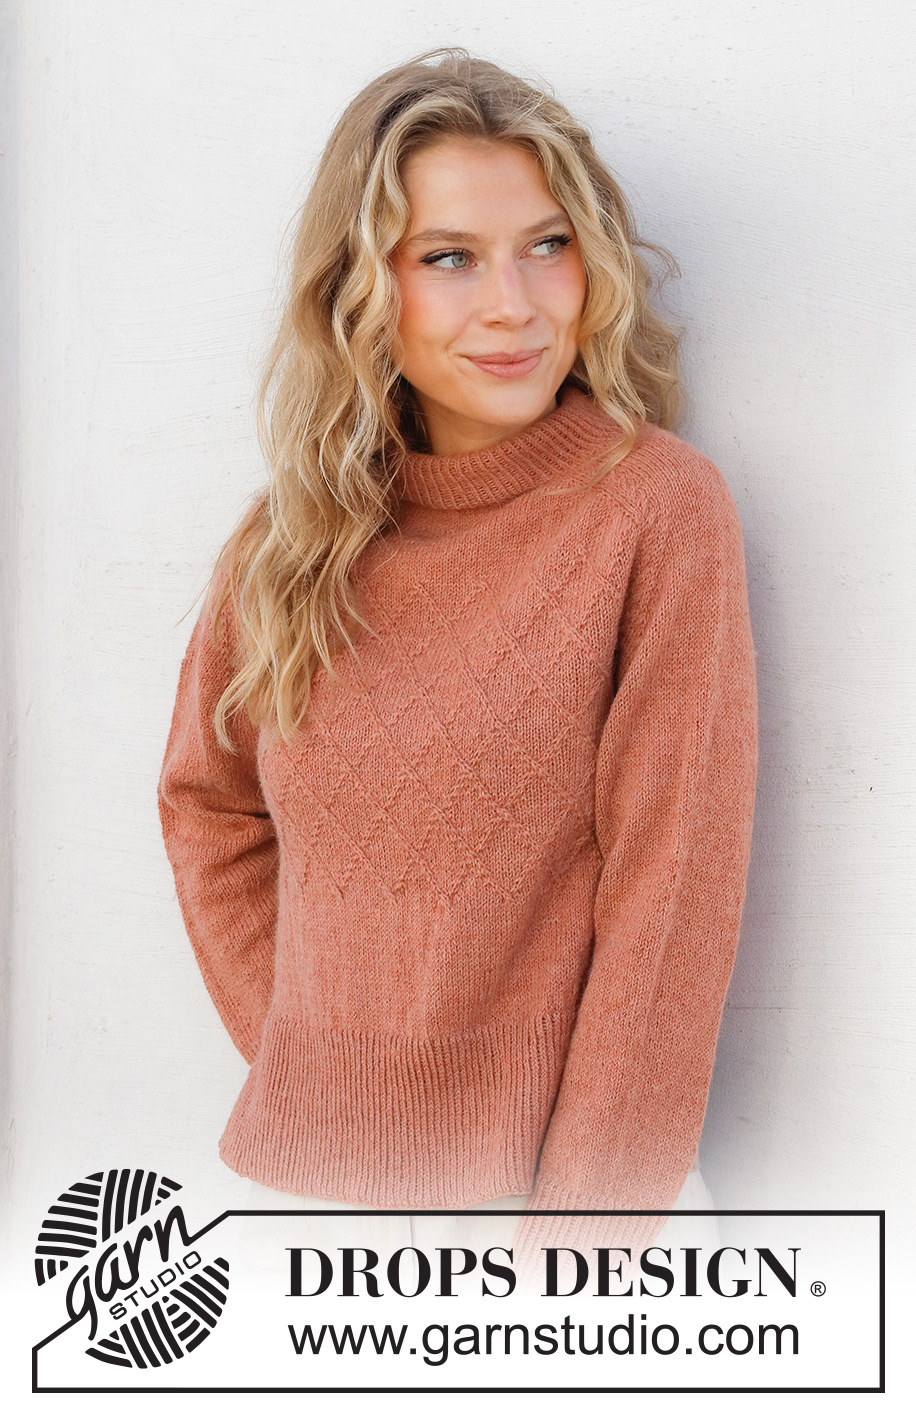
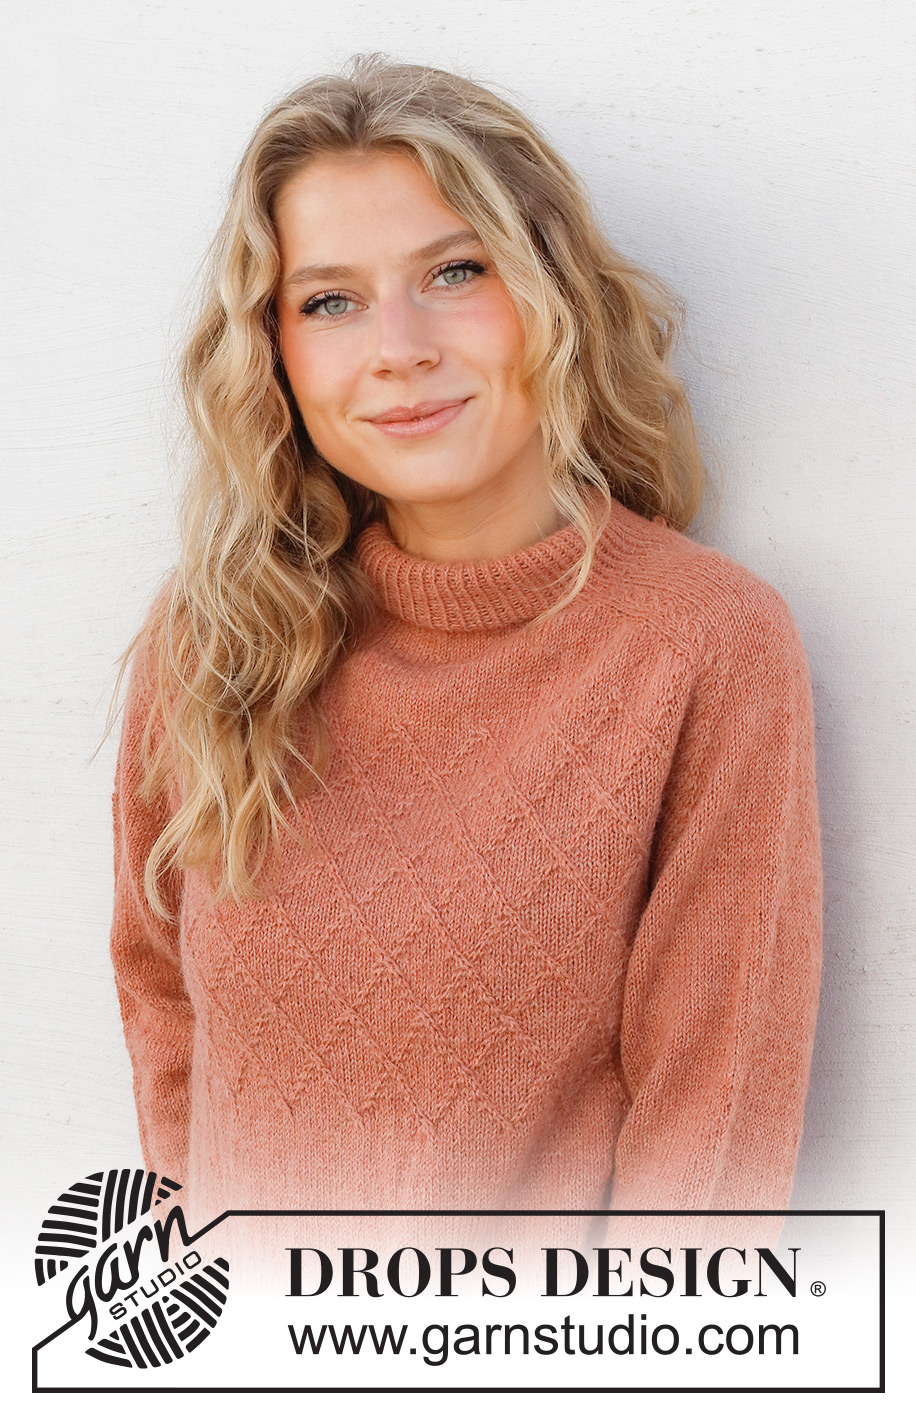
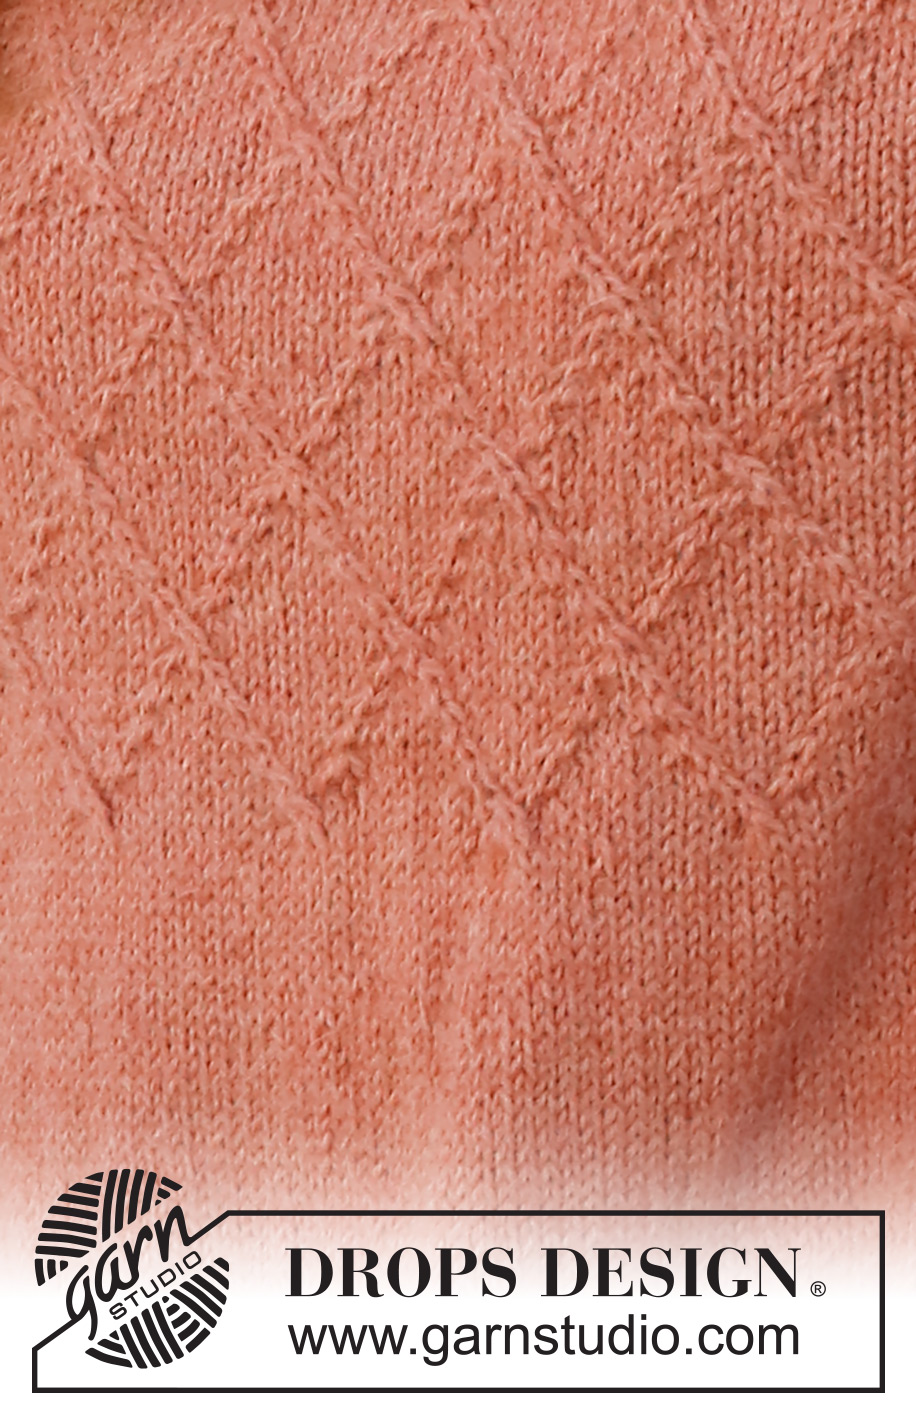
Knitted jumper in DROPS Alpaca or DROPS BabyMerino. The piece is worked top down with double neck, saddle shoulders, split in the sides and cables. Sizes S - XXXL.
DROPS 228-6 |
|||||||||||||||||||||||||||||||
|
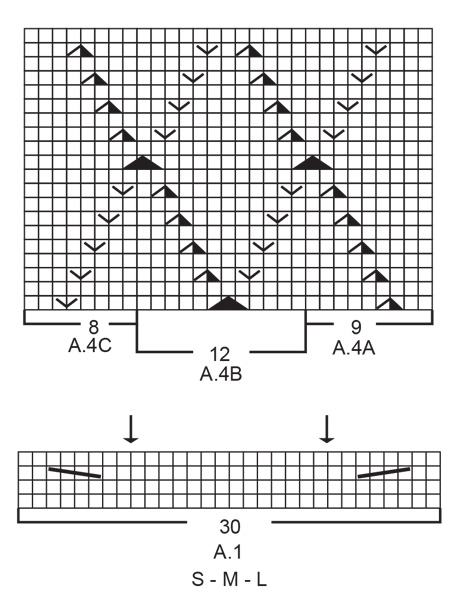
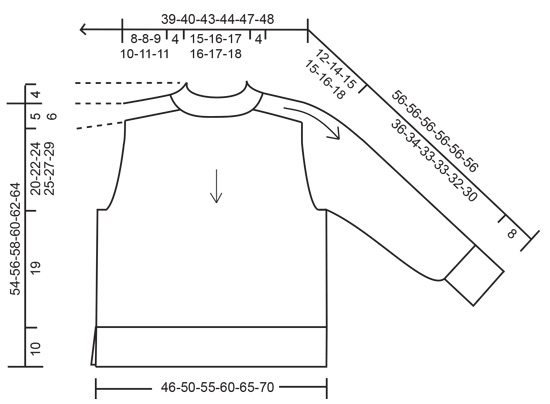
------------------------------------------------------- EXPLANATIONS FOR THE PATTERN: ------------------------------------------------------- RIDGE/GARTER STITCH (worked back and forth): Knit all rows. 1 ridge = knit 2 rows. PATTERN: See diagrams A.1 to A.4. Choose diagram for your size (applies to A.1). INCREASE TIP-1 (evenly spaced): To work out how to increase evenly, count the total number of stitches on the needle (e.g. 120 stitches) and divide by the number of increases to be made (e.g. 26) = 4.6. In this example, increase by making 1 yarn over after alternately each 4th and 5th stitch. On the next round/row work the yarn overs twisted to avoid holes. INCREASE TIP-2: AFTER MARKER: The new stitch twists to the left. Use the left needle to pick up the strand between 2 stitches from the previous round, pick up the front strand and knit in the back loop. BEFORE MARKER: The new stitch twists to the right. Use the left needle to pick up the strand between 2 stitches from the previous round, pick up the back strand and knit in the front loop. DECREASE TIP (for sleeves): Decrease 1 stitch on either side of the marker thread as follows: Work until there are 3 stitches left before the marker thread, knit 2 together, knit 2 (marker thread sits between these 2 stitches), slip 1 stitch as if to knit, knit 1 and pass the slipped stitch over the knitted stitch (2 stitches decreased). CASTING-OFF TIP: To avoid the cast-off edge being tight you can cast off with a larger size needle. If the edge is still tight, make 1 yarn over after approx. each 6th stitch at the same time as casting off; the yarn overs are cast off as normal stitches. ------------------------------------------------------- START THE PIECE HERE: ------------------------------------------------------- JUMPER – SHORT OVERVIEW OF THE PIECE: The neck and yoke are worked in the round with circular needle, from the right shoulder and top down. The yoke is divided for body and sleeves and the body is continued in the round with circular needle as far as the split, then the front and back pieces are finished separately, back and forth. The sleeves are worked with double pointed needles/short circular needle, top down. DOUBLE NECK: Loosely cast on 120-124-130-134-138-146 stitches with short circular needle size 3 mm and DROPS Alpaca or DROPS Baby Merino. Knit 1 round. Change to short circular needle size 2.5 mm and work rib in the round (knit 1 twisted, purl 1) for 9 cm. When the rib is finished, knit 1 round where you increase 26-26-24-24-24-20 stitches evenly spaced – read INCREASE TIP-1 = 146-150-154-158-162-166 stitches. YOKE: Change to circular needle size 3 mm. Insert 4 markers as follows, without working the stitches and inserted between 2 stitches. These markers are used when increasing for the shoulders. Marker 1: Insert the marker in the beginning of the round, before the first stitch (= transition between back piece and right sleeve). All following rounds start by this marker. Marker 2: Count 30-30-30-34-34-34 stitches from marker 1 (= shoulder), insert the marker before the next stitch. Marker 3: Count 43-45-47-45-47-49 stitches from marker 2 (= front piece), insert the marker before the next stitch. Marker 4: Count 30-30-30-34-34-34 stitches from marker 3 (= shoulder), insert the marker before the next stitch. There are 43-45-47-45-47-49 stitches left on the back piece after marker 4. Allow these markers to follow your work onwards; they are used when increasing for the shoulders. INCREASES TO SADDLE SHOULDERS: You will now work pattern at the same time as increasing for the saddle shoulders. Read the whole section before continuing! REMEMBER THE KNITTING TENSION! FIRST ROUND: Work A.1 as far as marker 2 (= 30-30-30-34-34-34 stitches), increase AFTER marker 2– read INCREASE TIP-2, work stocking stitch as far as marker 3, increase BEFORE marker 3, work A.1 as far as marker 4 (= 30-30-30-34-34-34 stitches), increase AFTER marker 4, work stocking stitch as far as marker 1, increase BEFORE marker 1. 4 stitches have been increased for the shoulders – the increases are on the front and back pieces; the number of shoulder stitches remains the same. The increased stitches are worked in stocking stitch. Continue the pattern and increase like this every round a total of 24-26-28-32-34-36 times = 242-254-266-286-298-310 stitches. There are 91-97-103-109-115-121 stitches on the front and back pieces and 30-30-30-34-34-34 stitches on each shoulder. The piece measures approx. 8-8-9-10-11-11 cm from the marker on the neck. INCREASES TO SLEEVES: Move each marker so they sit between 2 stitches shown by the arrows in A.1 (= 2 markers on each shoulder). In addition, insert a marker thread at the beginning of the round; marks the beginning of the round since marker 1 has been moved. FIRST ROUND: Work A.2 (= 8 stitches – A.2 continues over the cable in A.1), increase AFTER marker 1, work stocking stitch as far as marker 2, increase BEFORE marker 2, work A.3 (= 8 stitches – A.3 continues over the cable in A.1), work 1-4-1-4-1-4 stitches in stocking stitch, A.4A (= 9 stitches), work A.4B over the next 72-72-84-84-96-96 stitches (= 6-6-7-7-8-8 repeats of 12 stitches), work A.4C (= 8 stitches), work 1-4-1-4-1-4 stitches in stocking stitch, work A.2 (= 8 stitches – A.2 continues over the cable in A.1), increase AFTER marker 3, work stocking stitch as far as marker 4, increase BEFORE marker 4, work A.3 (= 8 stitches – A.3 continues over the cable in A.1), work 1-4-1-4-1-4 stitches in stocking stitch, A.4A (= 9 stitches), A.4B over the next 72-72-84-84-96-96 stitches (= 6-6-7-7-8-8 repeats of 12 stitches), A.4C (= 8 stitches) and work 1-4-1-4-1-4 stitches in stocking stitch. You have increased 4 stitches for the sleeves; the number of stitches on the front and back pieces remains the same. The increased stitches are worked in stocking stitch. Continue the pattern and increase like this every round a total of 9-8-9-6-11-6 times = 278-286-302-310-342-334 stitches. The piece measures approx 10-11-12-12-14-13 cm from the marker on the neck. INCREASES TO YOKE: Move the 4 markers so they sit in the middle of each A.2 and A.3. On the next round increase 8 stitches as before, but just before and just after each A.2 and A.3 (increase 1 stitch when 4 stitches remain before each marker and increase 1 stitch 4 stitches after each marker). You are now increasing on the front and back pieces as well as the sleeves; the increased stitches are worked in stocking stitch. Increase like this every 2nd round a total of 9-12-14-18-18-23 times = 350-382-414-454-486-518 stitches. When all the increases are finished, the piece measures approx. 16-18-20-23-25-28 cm from the neck. Continue working without further increases until the piece measures 20-22-24-25-27-29 cm for the neck – AT THE SAME TIME, on the last round decrease 8 stitches on the round by decreasing 2 stitches in each A.2/A.3 (knit together the 4 stitches in the cable 2 and 2) = 342-374-406-446-478-510 stitches. Divide for the body and sleeves on the next round as follows: Start 3-4-5-6-3-5 stitches before A.2 at the beginning of the round, place the next 68-74-82-90-94-98 stitches on a thread for the sleeve, cast on 8-8-10-10-12-12 stitches (= in side under sleeve), work as before over the next 103-113-121-133-145-157 stitches (= front piece), place the next 68-74-82-90-94-98 stitches on a thread for the sleeve, cast on 8-8-10-10-12-12 stitches (= in side under sleeve) and work the last 103-113-121-133-145-157 stitches as before (= back piece). The body and sleeves are finished separately. THE PIECE IS NOW MEASURED FROM HERE! BODY: = 222-242-262-286-314-338 stitches. Insert 1 marker thread in the middle of the 8-8-10-10-12-12 new stitches cast on under each sleeve = 111-121-131-143-157-169 stitches between the threads. Allow the marker threads to follow your work onwards – they will later mark the split in each side. Work the first round as follows: 11-16-15-21-22-28 stitches in stocking stitch, continue A.4 over the next 89-89-101-101-113-113 stitches, 22-32-30-42-44-56 stitches in stocking stitch (marker thread sits in the middle of these stitches), continue A.4 over the next 89-89-101-101-113-113 stitches, 11-16-15-21-22-28 stitches in stocking stitch. Continue this pattern in the round until A.4 has been worked 4-4-4-4-4-5 times in height, then work the first round in A.4. The piece measures approx. 33-33-34-35-36-42 cm from after the neck. Continue with stocking stitch over all stitches until the piece measures 19 cm from the division. There is 10 cm left to finished length; try the jumper on and work to desired length. Now divide the piece for the split in each side. Keep the first 111-121-131-143-157-169 stitches on the needle (= front piece). Place the other stitches on a thread or extra needle. FRONT PIECE: = 111-121-131-143-157-169 stitches. To avoid the following rib being tight, knit 1 row from the right side where you increase 34-36-40-42-48-50 stitches evenly spaced – remember INCREASE TIP-1 = 145-157-171-185-205-219 stitches. Change to circular needle size 2.5 mm and work rib as follows: ROW 1 (wrong side): 3 edge stitches in GARTER STITCH – read description above, * purl 1 twisted, knit 1 *, work from *-* until there are 4 stitches left, purl 1 twisted and 3 edge stitches in garter stitch. ROW 2 (right side): 3 edge stitches in garter stitch, * knit 1 twisted, purl 1 *, work from *-* until there are 4 stitches left, knit 1 twisted and 3 edge stitches in garter stitch. Repeat rows 1 and 2 until the rib measures 10 cm. Cast off from the right side with garter stitch over garter stitch, knit over knit and purl over purl – read CASTING-OFF TIP! The jumper measures approx. 54-56-58-60-62-64 cm from the shoulder down. BACK PIECE: Place the 111-121-131-143-157-169 stitches from the thread/extra needle back on circular needle size 3 mm. Knit 1 row from the right side where you increase 34-36-40-42-48-50 stitches evenly spaced - remember INCREASE TIP-1 = 145-157-171-185-205-219 stitches. Change to circular needle size 2.5 mm and work rib as follows: ROW 1 (wrong side): 3 edge stitches in garter stitch, * purl 1 twisted, knit 1 *, work from *-* until there are 4 stitches left, purl 1 twisted and 3 edge stitches in garter stitch. ROW 2 (right side): 3 edge stitches in garter stitch, * knit 1 twisted, purl 1 *, work from *-* until there are 4 stitches left, knit 1 twisted and 3 edge stitches in garter stitch. Repeat rows 1 and 2 until the rib measures 10 cm. Cast off from the right side with garter stitch over garter stitch, knit over knit and purl over purl – remember CASTING-OFF TIP! SLEEVES: Place the 68-74-82-90-94-98 stitches from the thread on the one side of the piece on double pointed needles/short circular needle size 3 mm and knit up 1 stitch in each of the 8-8-10-10-12-12 stitches cast on under the sleeve = 76-82-92-100-106-110 stitches. Insert a marker thread in the middle of the new stitches under the sleeve. Allow the thread to follow your work onwards; it will be used when decreasing under the sleeve. Start at the marker thread and work stocking stitch in the round. When the piece measures 2 cm from the division, decrease 2 stitches under the sleeve – read DECREASE TIP. Decrease like this every 1½ cm a total of 3-5-8-12-15-18 times, then every 4th round 4-4-4-3-2-0 times = 62-64-68-70-72-74 stitches. Continue working until the sleeve measures 36-34-33-33-32-30 cm from the division. There is 8 cm left to finished length; try the jumper on and work to desired length. Change to double pointed needles size 2.5 mm and work rib (knit 1 twisted, purl 1) for 8 cm. Cast off with knit over knit and purl over purl – remember CASTING-OFF TIP! The sleeve measures approx. 44-42-41-41-40-38 cm from the division. Work the other sleeve in the same way. ASSEMBLY: Fold the neck double to the inside and sew down. To avoid the neck being tight and rolling outwards, it is important that the seam is elastic. |
|||||||||||||||||||||||||||||||
Diagram explanations |
|||||||||||||||||||||||||||||||
|
|||||||||||||||||||||||||||||||
 |
|||||||||||||||||||||||||||||||
 |
|||||||||||||||||||||||||||||||
 |
|||||||||||||||||||||||||||||||
 |
|||||||||||||||||||||||||||||||
Have you finished this pattern?Tag your pictures with #dropspattern #diamondfiresweater or submit them to the #dropsfan gallery. Do you need help with this pattern?You'll find 36 tutorial videos, a Comments/Questions area and more by visiting the pattern on garnstudio.com. © 1982-2026 DROPS Design A/S. We reserve all rights. This document, including all its sub-sections, has copyrights. Read more about what you can do with our patterns at the bottom of each pattern on our site. |
|||||||||||||||||||||||||||||||


With over 40 years in knitting and crochet design, DROPS Design offers one of the most extensive collections of free patterns on the internet - translated to 17 languages. As of today we count 324 catalogues and 12290 patterns translated into English (UK/cm). 12290
We work hard to bring you the best knitting and crochet have to offer, inspiration and advice as well as great quality yarns at incredible prices! Would you like to use our patterns for other than personal use? You can read what you are allowed to do in the Copyright text at the bottom of all our patterns. Happy crafting!
Post a comment to pattern DROPS 228-6
We would love to hear what you have to say about this pattern!
If you want to leave a question, please make sure you select the correct category in the form below, to speed up the answering process. Required fields are marked *.