
Popular categories
Looking for a yarn?


Comments / Questions (44)
![]() Catherine Pasutto wrote:
Catherine Pasutto wrote:
Merci beaucoup, en fait je n'avais pas compris ce qu'était un jeté torse, maintenant que je les fais les trous sont nettement plus petits, c'est un joli modèle !
17.03.2022 - 18:35
![]() Catherine Pasutto wrote:
Catherine Pasutto wrote:
Bonjour, je n'arrive pas à faire les emmanchures raglan sans qu'il y ait des trous, pouvez vous me dire comment faire ? Merci beaucoup
13.03.2022 - 08:35DROPS Design answered:
Bonjour Mme Pasutto, il peut rester quelques petits trous quand on augmente avec des jetés, même en les tricotant torse. Pour qu'ils ne soient pas trop grands, essayez de ne pas faire des jetés trop lâches, et si vous ne voulez vraiment pas de trous, utilisez une autre technique, cf par exemple cette vidéo. Bon tricot!
14.03.2022 - 11:02
![]() Martha Laila Gjøvik wrote:
Martha Laila Gjøvik wrote:
Er det ikke beregnet at genseren skal bli lavere i halsen foran. Bildet av modellen viser at den er lavere foran eller i nakken. Lengden på genseren er også lengre på bildet eller det oppskriften viser.Er det feil, modell på bildet i forhold til oppskriften,?
03.03.2022 - 10:24DROPS Design answered:
Hei Martha. Denne genseren har ingen beskrivelse på forhøyning bak og kan ikke se at bildet viser det, men modellen sitter litt foroverlendt (kanskje det du reagerer på?) I oppskriften står det at i f.eks str. S at lengden på genseren er ca 52 cm, det samme målet som står i oppskriften. Så ingen feil bilde til oppskriften. mvh DROPS Design
07.03.2022 - 14:02
![]() Tina62 wrote:
Tina62 wrote:
Wie bekomme ich ein ebenmäßiges Strickbild hin, muss der Pulli vielleicht erst gewaschen werden und die Maschen sehen dann nach dem ziehen alle gleich aus oder hat jemand eine Idee?
01.02.2022 - 06:25DROPS Design answered:
Liebe Tina62, also ja stimmt, nach dem Waschen werden die Maschen mehr regelmäßig aussehen. Bitte beachten, die Hinweise auf der Banderolle richtig folgen - hier lesen Sie noch mehr. Viel Spaß beim stricken!
01.02.2022 - 09:07
![]() Marte wrote:
Marte wrote:
Takk for svar! Ser i etterkant målene, men på bildet av damen i oppskriften synes jeg det er litt misvisende, da den ser ganske lang ut på henne...
27.01.2022 - 16:50
![]() Marte wrote:
Marte wrote:
Hei, jeg er ferdig med bolen, og har felt av, men den er utrolig kort! Bare litt under navlen... Har strikket 22cm fra under arma og 4cm vrangbodd... Ble så skuffet når jeg prøvde den på... Har bestilt garn på nett, og er nå veldig usikker på om jeg har nok garn til å strikke den i ønsket lengde, og i såfall er det ikke sikkert jeg får samme innfargingsnummer! Jeg har også lik strikkefasthet som i oppskrifta.
26.01.2022 - 22:59DROPS Design answered:
Hej Marte, Nej hvor trist! Denne model er ikke så lang... du finde målene i måleskitsen nederst i opskriften.
27.01.2022 - 15:54
![]() Liv wrote:
Liv wrote:
Ich stricke diesen Pulli das erste Mal mit Baby Alpaka Silk. Obwohl ich es mit verschiedenen Nadeln (Alu bis Holz) und Stärken versuche habe ist das Maschenbild unregelmäßig. Ich habe den Pulli einmal mit Baby Merino gestrickt mit gutem Maschenbild. Es ist mir auch bei anderen Modellen mit Baby Alpaka Silk passiert.Woran liegt das und wie kann ich ein glattes Maschenbild erhalten?
21.01.2022 - 13:50DROPS Design answered:
Liebe Liv, oft kann Spannen helfen, regelmäßige Maschenbild zu bekommen, spannen Sie Ihre Maschenprobe (so können Sie auch sehen, ob Maschenprobe stimmt). Viel Spaß beim stricken!
21.01.2022 - 16:04
![]() Gisela Bongart wrote:
Gisela Bongart wrote:
Und ich habe noch eine Frage bezüglich der Aufteilung von Rumpfteil und Ärmel (ich stricke zum 1. Mal einen RVO): "die nächsten 70 Maschen für den Ärmel stilllegen (ohne die Maschen vorher zu stricken), 7 neue Maschen anschlagen (= an der Seite unter dem Arm)" : Müssen die 7 neu angeschlagenen Maschen mit auf den Stilllegungsfaden für die Ärmel? Oder gehören sie zum Rumpfteil?
28.12.2021 - 17:24DROPS Design answered:
Liebe Frau Bongart, diese 7 neu angeschlagenen Maschen gehören zum Rumpfteil - siehe diese Lektion ab Bild 11. Viel Spaß beim stricken!
03.01.2022 - 09:26
![]() Gisela Bongart wrote:
Gisela Bongart wrote:
"Nun wird die Arbeit für das Rumpfteil und die Ärmel aufgeteilt, dafür an der hinteren Mitte beginnen und 2 Maschen nach dem 1. Markierungsfaden stricken (= halbes Rückenteil)" - Ich verstehe das mit den 2 Maschen nicht. Warum nicht ALLE Maschen ab 1. Markierungsfaden für den Ärmel nehmen? Außerdem ist doch NACH dem 1. Markierer das halbe Rückenteil schon vorbei und man ist beim Ärmel, oder?
28.12.2021 - 15:41DROPS Design answered:
Liebe Frau Bongart, je nach der Größen wird die Verteilung unterschiedlich sein, in die 1. Größe z.B. gehören die 2 Maschen nach der 1. Markierung zum Rückenteil und nicht zu den 1. Ärmel - sonnst würden die Ärmel zu breit. Viel Spaß beim stricken!
03.01.2022 - 09:23
![]() Barbara wrote:
Barbara wrote:
Wenn ich den Umfang weiter stricke wo nehme ich ab unter den Armen zu ? An den Seiten oder insgesamt? Danke Euch!!!
17.12.2021 - 13:53DROPS Design answered:
Liebe Barbara, meinen Sie bei den Ärmeln? Denn nehmen Sie beidseiting von den 2 Mittleren der 7 neuen Maschen unter der Ärmel - siehe ABNAHMETIPP (gilt für die untere Ärmelmitte): - oder auch diese Lektion ab Bild 19. Viel Spaß beim stricken!
17.12.2021 - 16:08
|
|
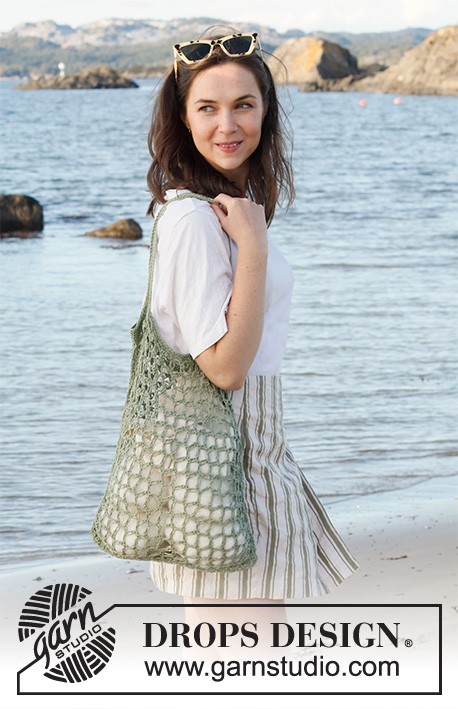
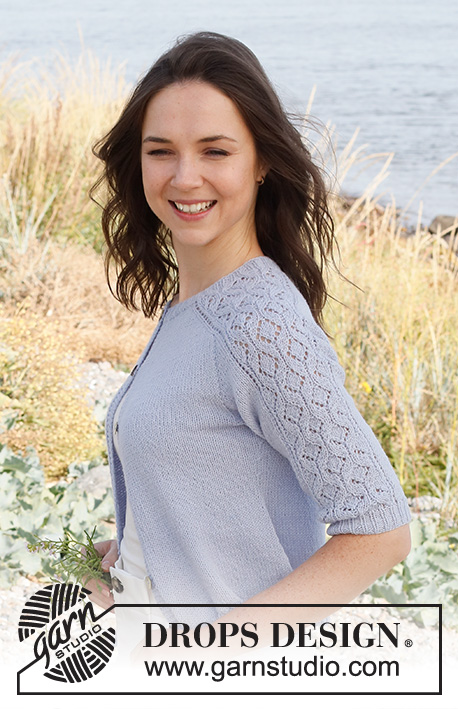
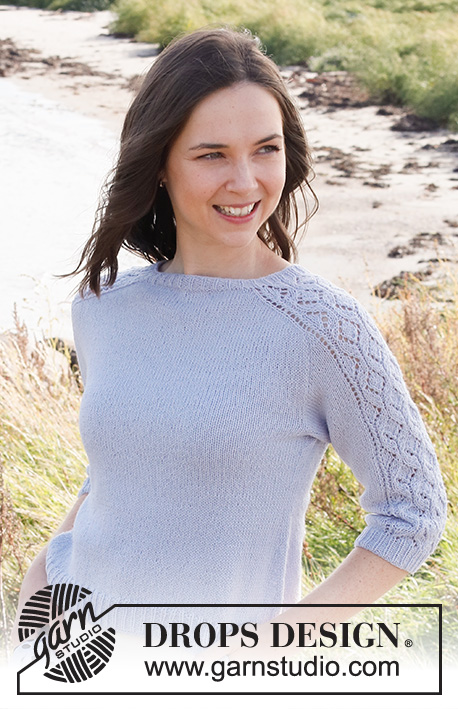
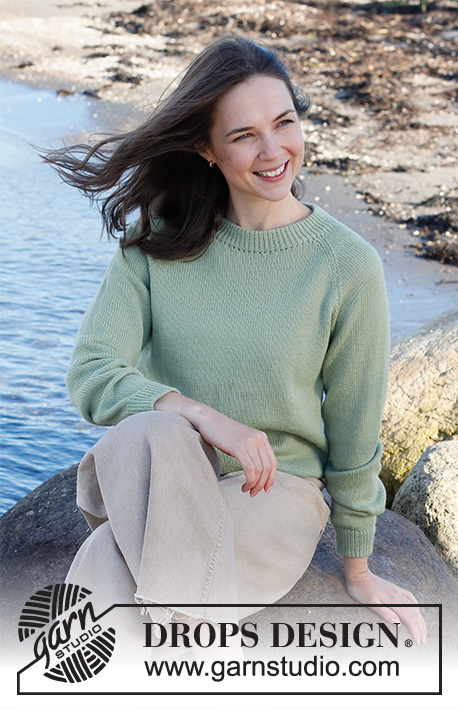
Sweet Sea#sweetseasweater |
|
 |
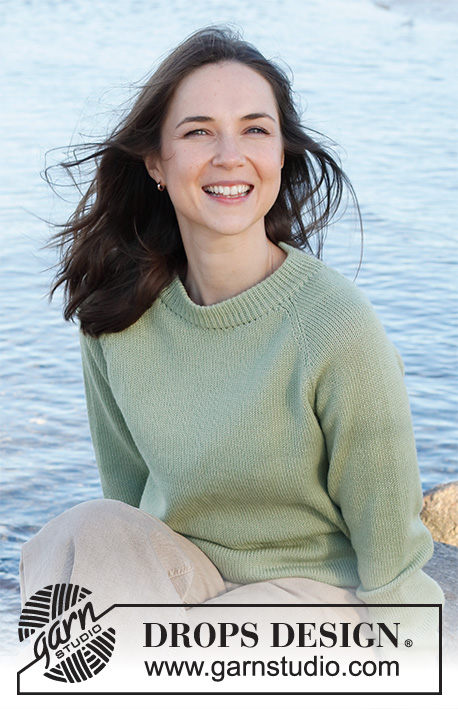 |
Knitted jumper in DROPS BabyAlpaca Silk. Piece is knitted top down with raglan. Size: S - XXXL
DROPS 221-25 |
|
|
------------------------------------------------------- EXPLANATION FOR THE PATTERN: ------------------------------------------------------- INCREASE TIP (evenly): To calculate how to increase/decrease evenly, use the total number of stitches on row (e.g. 96 stitches) , and divide stitches by number of increases/decreases to be done (e.g. 24) = 4. In this example increase by making 1 yarn over after every 4th stitch. On next row work yarn overs twisted to avoid holes. RAGLAN: Increase 1 stitch on each side of marker thread in every transition between sleeves and body as follows: Work until 1 stitch remains before marker thread, make 1 yarn over, knit 2 (marker thread is between these stitches), make 1 yarn over. Repeat at the remaining marker threads (= 8 stitches increased on round). On next round knit yarn overs twisted to avoid holes. Then work the new stitches in stocking stitch. DECREASE TIP (applies to mid under sleeves): Decrease 1 stitch on each side of stitch with marker as follows: Work until 2 stitches remain before stitch with marker, knit 2 together, knit 1 (marker is in this stitch), slip 1 stitch knitwise, knit 1, pass slipped stitch over stitch worked. CAST-OFF TIP: To avoid a tight cast-off edge you may use a larger needle size. If this also is too tight, work a 1 yarn over after approx. every 4th stitch while casting off (cast off yarn overs as regular stitches). ------------------------------------------------------- START THE PIECE HERE: ------------------------------------------------------- JUMPER - SHORT OVERVIEW OF THE PIECE: Neck edge and yoke are worked in the round on circular needle, top down. Increase for raglan. Now divide yoke for body and sleeves. Body is worked in the round on circular needle, top down. Work sleeves in the round on double pointed needles/short circular needle, top down. DOUBLE NECK EDGE: Cast on 120-136-140-152-164-168 stitches on circular needle size 3 mm with Baby Alpaca Silk. Switch to circular needle size 2.5 mm and work rib in the round = knit 1 twisted/purl 1. Continue like this until rib measures approx. 8-9 cm. Switch to circular needle size 3 mm. Insert 1 marker at the beginning of round, measure yoke from this marker! YOKE: Now insert 4 marker threads in the piece without working as follows: Beginning of round = mid back. Count 19-23-23-26-28-29 stitches (= half back piece), and insert 1st marker thread here (= between back piece and sleeve). Count 22-22-24-24-25-25 stitches and insert 2nd marker thread here (= sleeve). Count 38-46-46-52-57-59 stitches (= front piece), and insert 3rd marker thread here. Count 22-22-24-24-25-25 stitches (= sleeve) and insert 4th marker thread here. 19-23-23-26-29-30 stitches (= half back piece) remain until beginning of round. REMEMBER THE KNITTING TENSION! Work in stocking stitch in the round, AT THE SAME TIME on first round begin increase for RAGLAN – read explanation above. Increase like this every other round 26-28-32-36-40-44 times in total = 328-360-396-440-484-520 stitches on row. Work in stocking stitch until piece measures 21-23-25-26-28-30 cm from marker at the neck. Now divide the piece for body and sleeves, begin mid back and work until 2-1-1-1-3-5 stitches past 1st marker thread (= half back piece), and slip the next 70-76-86-94-99-103 stitches on a stitch holder without working them, cast on 7 new stitches in the side under sleeve. Work the next 94-104-112-126-143-157 stitches (= front piece), slip the next 70-76-86-94-99-103 stitches on a stitch holder for sleeve without working them, cast on 7 new stitches in the side under sleeve and work until beginning of round. Then finish body and sleeves separately. Remove the marker threads in piece. NOW MEASURE PIECE FROM HERE! BODY: = 202-222-238-266-300-328 stitches. Continue in the round in stocking stitch until piece measures 22-22-22-23-23-23 cm from division. Switch to circular needle size 2.5 mm. Knit 1 round while AT THE SAME TIME increasing 26-26-26-30-30-32 stitches evenly on round = 228-248-264-296-330-360 stitches. Work rib (= knit 1 twisted/purl 1) until rib measures 4 cm in all sizes. Cast off with knit over knit and purl over purl - read CAST-OFF TIP. Jumper measures approx. 52-54-56-58-60-62 cm from shoulder and down. SLEEVE: Slip the 70-76-86-94-99-103 stitches from stitch holder in one side of piece on a short circular needle or double pointed needles size 3 mm, pick in addition up 1 stitch in each of the 7 stitches cast on under sleeve = 77-83-93-101-106-110 stitches stitch. Insert 1 marker in the middle of the 7 stitches that were cast on under sleeve. Work in stocking stitch in the round. When sleeve measures 2-2-3-3-3-3 cm from division in all sizes, decrease 1 stitch on each side of stitch with marker - read DECREASE TIP. Decrease like this approx. every 2½-2-1½-1-1-1 cm 12-13-16-20-21-23 times in total = 53-57-61-61-64-64 stitches. Work until piece measures 37-34-33-31-29-28 cm from division – or desired length, approx. 4 cm remain until finished measurements. Switch to double pointed needles size 2.5 mm. Knit 1 round and decrease 1-1-1-1-0-0 stitches evenly = 52-56-60-60-64-64 stitches. Work rib (= knit 1 twisted/purl 1) until rib measures 4 cm in all sizes. Cast off with knit over knit and purl over purl - remember CAST-OFF TIP! Work the other sleeve the same way. ASSEMBLY: Fold rib at the top of neck down on the inside of garment. Fasten rib, it is important that the seam is elastic and not to sew stitch by stitch - sew with long and loose stitches. |
|
 |
|
Have you finished this pattern?Tag your pictures with #dropspattern #sweetseasweater or submit them to the #dropsfan gallery. Do you need help with this pattern?You'll find 28 tutorial videos, a Comments/Questions area and more by visiting the pattern on garnstudio.com. © 1982-2026 DROPS Design A/S. We reserve all rights. This document, including all its sub-sections, has copyrights. Read more about what you can do with our patterns at the bottom of each pattern on our site. |
|


With over 40 years in knitting and crochet design, DROPS Design offers one of the most extensive collections of free patterns on the internet - translated to 17 languages. As of today we count 324 catalogues and 12290 patterns translated into English (UK/cm). 12290
We work hard to bring you the best knitting and crochet have to offer, inspiration and advice as well as great quality yarns at incredible prices! Would you like to use our patterns for other than personal use? You can read what you are allowed to do in the Copyright text at the bottom of all our patterns. Happy crafting!
Post a comment to pattern DROPS 221-25
We would love to hear what you have to say about this pattern!
If you want to leave a question, please make sure you select the correct category in the form below, to speed up the answering process. Required fields are marked *.