
Popular categories
Looking for a yarn?


Comments / Questions (116)
![]() Kara wrote:
Kara wrote:
I am somehow not seeing the yardage of material needed for this project (Audrey vest). Also wondering if printing the pattern is possible. Thanks for any help.
05.04.2026 - 21:22DROPS Design answered:
Hi kara, Each ball of Drops Sky has approx. 208 yards of yarn and each ball weighs 50 g (1.8 oz.). You print the pattern by clicking on the printer icon to the right of the "Audrey Vest" title-line. Regards, Drops Team.
06.04.2026 - 15:28
![]() CLAUDINE wrote:
CLAUDINE wrote:
Bonjour, Je souhaiterai tricoter ce modèle que je trouve très joli. Pouvez-vous me dire combien il faut acheter de pelotes ? Merci pour votre réponse, cordialement
11.03.2026 - 17:57DROPS Design answered:
Bonjour Claudine, vous trouverez la quantité nécessaire pour chaque sous l'onglet "Explications" en haut de page, par ex en taille S, il vous faudra 150 g DROPS Sky/50 g la pelote = 3 pelotes Sky en S. Bon tricot!
12.03.2026 - 09:35
![]() Grace wrote:
Grace wrote:
Hello, In the back part of the vest, the pattern says to "Decrease INSIDE." I do not understand what "decreases INSIDE" means. (Then decrease inside 2 stitches, decreasing 1 stitch on each side 8-11-14-16-21-27 times – read DECREASE TIP-2 = 64-66-68-70-72-74 stitches. Best, Grace
17.02.2026 - 05:56DROPS Design answered:
Hi Grace, This means that you decrease after the first 2 stitches at the beginning of the row and before the last 2 stitches at the end of the row. Regards, Drops Team.
17.02.2026 - 06:31
![]() Claudette wrote:
Claudette wrote:
Bonjour. Pourriez-vous me dire pourquoi doit-on diminuer des mailles après avoir fait les côtes? Merci
10.02.2026 - 18:54DROPS Design answered:
Bonjour Claudette, il faut plus de mailles pour les côtes avec les aiguilles 3,5 que pour le jersey avec les aiguilles 4,5, ainsi on va diminuer pour conserver la bonne largeur (les côtes ne doivent pas resserrer le bas du pull). Bon tricot!
11.02.2026 - 17:10
![]() Josephine Austin wrote:
Josephine Austin wrote:
Hello, in your decrease tips for armholes it states that ‘all decreases are worked from the RS’, Laurie asked on the 19.03.22 if the decease on the armhole were worked only on the right side and the answer was given ‘ on both RS and WS. Makes no sense to me! Which is it? The pattern is correct or the person answering comments? Very frustrating!
29.01.2026 - 17:23DROPS Design answered:
Hi Josephine, the correct answer is that the decreases for the armholes are worked from the right side, please see DECREASE TIP-2. The previous answer was corrected. Happy knitting!
29.01.2026 - 20:22
![]() Barbara wrote:
Barbara wrote:
I want to use this pattern to do an all over fairisle design that I will create. Can you give the charted pattern in squares that I could use to create fairisle design
09.01.2026 - 22:09DROPS Design answered:
Dear Barbara, we don't make custom patterns. You can look at our selection of fair isle patterns to check the usual colourwork charts and apply it to this pattern. Remember that you will need to recalculate the pattern, since there may be variations in the knitting gauge. Happy knitting!
11.01.2026 - 23:00
![]() HLop wrote:
HLop wrote:
Bonjour, Est-il possible d'avoir les explications avec les aiguilles non circulaires ? Merci pour votre réponse.
06.12.2025 - 23:14DROPS Design answered:
Bonjour Mme Hlop, dans ce modèle, on tricote en allers et retours sur aiguille circulaire pour avoir suffisamment de place pour y loger toutes les mailles, vous pourrez donc le tricoter en allers et retours sur aiguilles droites. Seul le col sera tricoté sur aiguille circulaire car on relève les mailles tout autour de l'encolure pour le tricoter, même en allers et retours, mais une circulaire sera plus pratique à utiliser, à moins de tricoter le col en différentes parties. Retrouvez quelques astuces ici. Bon tricot!
08.12.2025 - 09:22
![]() Kim wrote:
Kim wrote:
I want to knit this in an oversized fit and like the way it’s laying on the model. What size is she wearing for reference?
20.11.2025 - 10:16DROPS Design answered:
Dear Kim, our models are used to wear either a size S or a M; read more on how to find your size here. Happy knitting!
20.11.2025 - 16:35
![]() Laurence wrote:
Laurence wrote:
Que signifie comme avant ? Merci
31.10.2025 - 09:43
![]() Laurence wrote:
Laurence wrote:
Que signifie comme avant ?
31.10.2025 - 09:24DROPS Design answered:
Bonjour Laurence, lorsque vous devez tricoter les mailles comme avant, vous devez simplement les tricoter comme vous l'avez fait dès le début, soit en jersey (= à l'endroit sur l'endroit et à l'envers sur l'envers), avec 1 m lis au point mousse côté emmanchure (partie Encolure V par ex.). Bon tricot!
03.11.2025 - 07:20
|
|
Audrey Vest#audreyvest |
|
 |
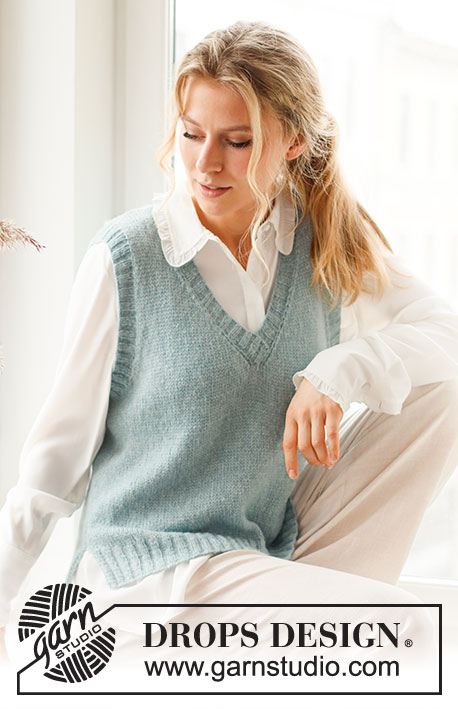 |
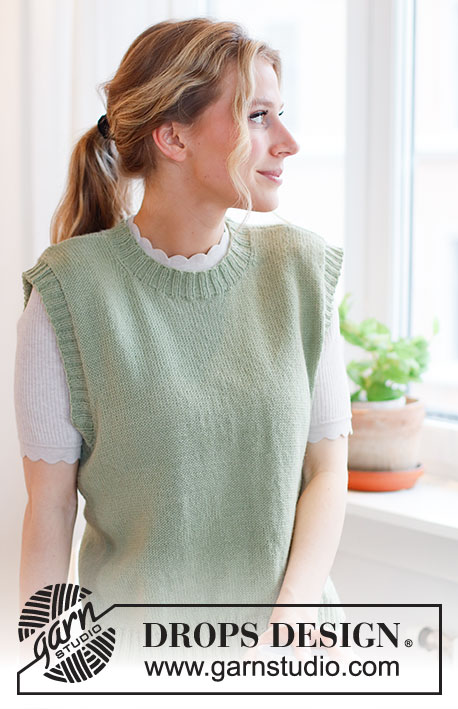
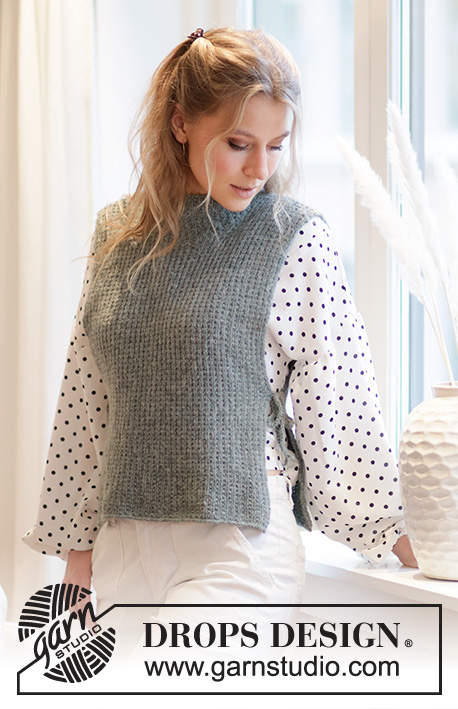
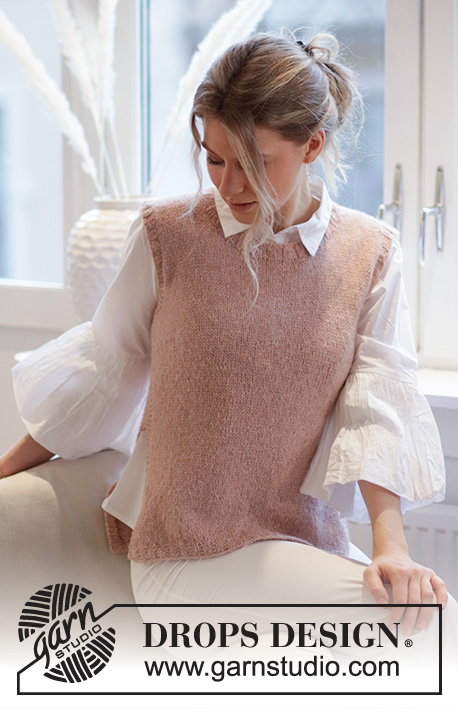
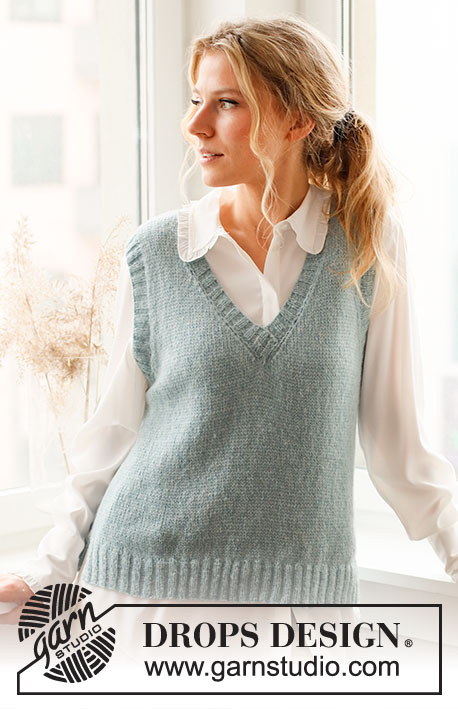
Knitted vest / slipover in DROPS Sky. The piece is worked in stocking stitch with ribbed edges, V-neck and split in the sides. Sizes S - XXXL.
DROPS 220-43 |
|
|
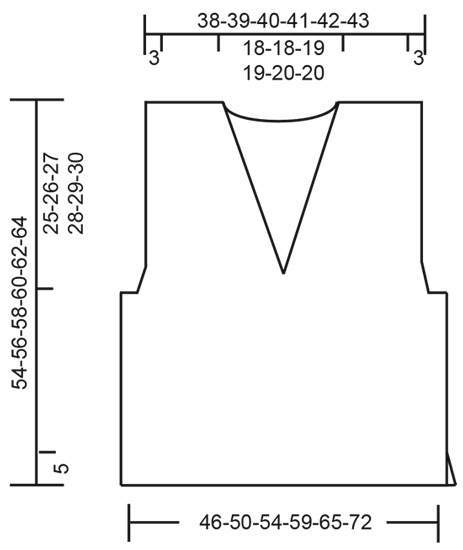
------------------------------------------------------- EXPLANATIONS FOR THE PATTERN: ------------------------------------------------------- RIDGE/GARTER STITCH (worked back and forth): Knit all rows. 1 ridge in height = Knit 2 rows. DECREASE TIP (evenly spaced): To work out how to decrease evenly, count the total number of stitches on the needle (e.g. 118 stitches) and divide by the number of decreases to be made (e.g. 24) = 4.9. In this example, decrease by knitting together approx. each 4th and 5th stitch. DECREASE TIP-2 (for armholes): Decrease on the inside of 2 stitches. All decreases are worked from the right side. Decrease as follows at the beginning of the row: Knit 2, slip 1 stitch as if to knit, knit 1 and pass the slipped stitch over the knitted stitch. Decrease as follows at the end of the row: Work until there are 4 stitches left, knit 2 together and knit the last 2 stitches. ------------------------------------------------------- START THE PIECE HERE: ------------------------------------------------------- VEST – SHORT OVERVIEW OF THE PIECE: The piece is worked back and forth, in sections and sewn together to finish. The V-neck and armhole edges are worked in the round to finish. BACK PIECE: Cast on 118-130-138-150-166-182 stitches with circular needle size 3.5 mm and Sky. Purl 1 row (= wrong side). Then work the next row from the right side as follows: 2 edge stitches in GARTER STITCH – read description above, * knit 2, purl 2 *, work from *-* until there are 4 stitches left, knit 2 and finish with 2 edge stitches in garter stitch. Continue this rib for 6 cm. Knit 1 row from the wrong side then knit 1 row from the right side where you decrease 24-28-28-30-34-36 stitches evenly spaced – read DECREASE TIP = 94-102-110-120-132-146 stitches. Change to circular needle size 4.5 mm. Work stocking stitch back and forth, with 1 edge stitch in garter stitch on each side. REMEMBER THE KNITTING TENSION! When the piece measures 29-30-31-32-33-34 cm, cast off for the armholes at the beginning of each row as follows: Cast off 3 stitches 1 time, then 2 stitches 2-2-2-3-3-3 times on each side. Then decrease inside 2 stitches, decreasing 1 stitch on each side 8-11-14-16-21-27 times – read DECREASE TIP-2 = 64-66-68-70-72-74 stitches. Continue with stocking stitch. When the piece measures 52-54-56-58-60-62 cm, cast off the middle 34-34-36-36-38-38 stitches for the neck and each shoulder is finished separately. Cast off 1 stitch on the next row from the neck = 14-15-15-16-16-17 stitches on the shoulder. Continue working stocking stitch until the piece measures 54-56-58-60-62-64 cm (25-26-27-28-29-30 cm from the bottom of the armhole). Cast off with knit from the right side (making sure the cast-off edge is not tight). Work the other shoulder in the same way. FRONT PIECE: Cast on 118-130-138-150-166-182 stitches with circular needle size 3.5 mm and Sky. Purl 1 row (= wrong side). Then work the next row from the right side as follows: 2 edge stitches in garter stitch, * knit 2, purl 2 *, work from *-* until there are 4 stitches left, knit 2 and finish with 2 edge stitches in garter stitch. Continue this rib for 6 cm. Knit 1 row from the wrong side then knit 1 row from the right side where you decrease 24-28-28-30-34-36 stitches evenly spaced = 94-102-110-120-132-146 stitches. Change to circular needle size 4.5 mm. Work stocking stitch back and forth with 1 edge stitch in garter stitch on each side until the piece measures 29-30-31-32-33-34 cm. Insert 1 marker in the middle of the row, with 47-51-55-60-66-73 stitches on each side (this marker is used when working the V-neck). READ THE WHOLE OF THE NEXT SECTION BEFORE CONTINUING! Continue with stocking stitch and cast off for the armholes at the beginning of each row as follows: 3 stitches 1 time, then 2 stitches 2-2-2-3-3-3 times on each side. Then decrease inside 2 stitches, decreasing 1 stitch on each side 8-11-14-16-21-27 times = 64-66-68-70-72-74 stitches. V-NECK: At the same time when the piece measures 31-33-34-36-37-39 cm start to decrease for the V-neck. Start from the right side and work as before until there are 3 stitches left before the marker, knit 2 together and work 1 edge stitch in garter stitch. Place the remaining stitches on a thread without working them. Each shoulder is finished separately; do not cut the strand. The left shoulder is continued from here, working back from the wrong side. LEFT SHOULDER (front piece): Continue with stocking stitch and 1 edge stitch in garter stitch towards the neck, decreasing inside this edge stitch at the end of each row from the right side. Decrease every 2nd row 17-17-18-18-19-19 more times (a total of 18-18-19-19-20-20 decreases, decrease by knitting 2 together, the first decrease was made when the front piece was divided) = 14-15-15-16-16-17 stitches on the shoulder. Continue with stocking stitch and 1 edge stitch in garter stitch towards the neck until the piece measures a total of 54-56-58-60-62-64 cm. Cast off with knit from the right side. RIGHT SHOULDER (front piece): Place the stitches from the thread back on the needle. Continue with stocking stitch and 1 edge stitch in garter stitch towards the neck (the first row is worked from the right side), decreasing for the neck inside the edge stitch at the beginning of each row from the right side. Decrease every 2nd row (slipping 1 stitch, knitting 1 and passing the slipped stitch over the knitted stitch) a total of 18-18-19-19-20-20 times = 14-15-15-16-16-17 stitches left on the shoulder. NOTE! The first decrease is on the first row worked). Continue with stocking stitch and 1 edge stitch in garter stitch towards the neck until the piece measures a total of 54-56-58-60-62-64 cm. Cast off with knit from the right side. ASSEMBLY: Sew the shoulder seams with grafting stitches, inside the cast-off edges. Start under the armholes and sew the side seams inside the 1 edge stitch – leave approx. 6 cm open for the split on each side. NECK: Start from the right side, at the bottom of the V-neck using short circular needle size 3.5 mm and knit up 168 to 184 stitches (number of stitches must be divisible by 4 and the stitches are knitted up inside the 1 edge stitch), first along the right side, then around the back of the neck and down the left side. Work the first row from the wrong side as follows; 1 edge stitch in garter stitch, * purl 2, knit 2 *, work from *-* until there are 3 stitches left, purl 2 and finish with 1 edge stitch in garter stitch. Work this rib back and forth for 3 cm. Cast off with knit over knit and purl over purl. At the bottom of the V-neck, mid-front, lay the right side over the left side and sew down neatly in the outermost stitch on the neck-edge. Repeat in the same way on the inside of the neck, so the left side is sewn onto the right side. ARMHOLE-EDGE: Start from the right side by the side seam under the armhole. Using short circular needle size 3.5 mm, knit up 124 to 152 stitches around the armhole (number of stitches must be divisible by 4). Work rib in the round (knit 2, purl 2) for 3 cm. Cast off with knit over knit and purl over purl. Work the other armhole in the same way. |
|
 |
|
Have you finished this pattern?Tag your pictures with #dropspattern #audreyvest or submit them to the #dropsfan gallery. Do you need help with this pattern?You'll find 27 tutorial videos, a Comments/Questions area and more by visiting the pattern on garnstudio.com. © 1982-2026 DROPS Design A/S. We reserve all rights. This document, including all its sub-sections, has copyrights. Read more about what you can do with our patterns at the bottom of each pattern on our site. |
|


With over 40 years in knitting and crochet design, DROPS Design offers one of the most extensive collections of free patterns on the internet - translated to 17 languages. As of today we count 324 catalogues and 12290 patterns translated into English (UK/cm). 12290
We work hard to bring you the best knitting and crochet have to offer, inspiration and advice as well as great quality yarns at incredible prices! Would you like to use our patterns for other than personal use? You can read what you are allowed to do in the Copyright text at the bottom of all our patterns. Happy crafting!
Post a comment to pattern DROPS 220-43
We would love to hear what you have to say about this pattern!
If you want to leave a question, please make sure you select the correct category in the form below, to speed up the answering process. Required fields are marked *.