
Popular categories
Looking for a yarn?


Comments / Questions (31)
![]() Yasmine wrote:
Yasmine wrote:
Pour les torsades, on ne devrait pas commencer par les A4 et A5 ? car si on commence par l'A2 et l'A3, ce n'est pas possible de décaler les torsades
01.05.2020 - 19:54DROPS Design answered:
Bonjour Yasmine, les torsades et décalages de A.2 et A.3 vont permettre de décaler les torsades vers le milieu du devant et du dos (moins de mailles entre les deux), puis en tricotant A.4 et A.5 on va écarter les torsades l'une de l'autre en les rapprochant des côtés. Bon tricot!
04.05.2020 - 11:09
![]() Eva Roberg wrote:
Eva Roberg wrote:
Hei igjen. Da har jeg funnet svar på spørsmålet mitt selv! 2.avsnittet av BOL står det: På str L skal en sette merke først etter 30m, så sette et nytt merke etter 40m, så står det (=midt foran) . Det var forvirrende. Burde stå: Ved disse merkene strikkes fletter , dette blir da på hver side av forstykke. Og det samme på bakstykke. Ville forstått oppskriften bedre da. Mvh Eva
24.04.2020 - 16:49
![]() Eva Roberg wrote:
Eva Roberg wrote:
Hei. Jeg strikker str L og står nå fast da det under det andre avsnittet under BOL står at det er midt foran ved 2. Merke? Jeg teller fra merketråden ( under armen ) der jeg begynte Bol-arbeidet: 1.merke etter 30 m og 2.merke etter 40m står det. Dette blir da ikke i midten av kjolen? Midten blir da etter i alt 50m ( teller masker fra under armene der jeg har merke. Har lest mange ganger og telt og finner ikke ut av dette.
24.04.2020 - 12:01DROPS Design answered:
Hej Eva, du sætter de 2 masker så du har 40 masker midt foran, mærkerne markerer der hvor du skal lave ind og udtagninger og dem kan du se på billedet at de er et stykke ind i hver side. God fornøjelse!
29.04.2020 - 10:33
![]() Rianne Oprel wrote:
Rianne Oprel wrote:
In de legenda bij de teltekeningen staat bij het dichte bolletje dat de omslag gedraaid averecht gebreid moet worden (dat klopt), zodat er een gaatje ontstaat. Dit moet zijn, zodat er géén gaatje ontstaat!
15.04.2020 - 17:39
![]() Lucia Nascimento wrote:
Lucia Nascimento wrote:
Hei igjen Jeg er 156 høy og skal strikke størrelse M, DROPS Design: Modell cl-106 Garngruppe B . Hvor mange garn nøster av DROPS Cotton Light trenger jeg ? Mvh Lucia
15.04.2020 - 14:45DROPS Design answered:
Hei Lucia. Garnmengden finner du under MATERIALER. Når det står slik: STØRRELSE: S - M - L - XL - XXL - XXXL MATERIALER: DROPS COTTON LIGHT fra Garnstudio (tilhører garngruppe B) 650-700-800-850-950-1050 g farge 35, rust. Størrelse M er nr. 2 og da trenger du garnmenden nr. 2, altså 700 gram. God Fornøyelse!
15.04.2020 - 15:38
![]() Lucia Nascimento wrote:
Lucia Nascimento wrote:
Hvilken størrelse bruker modellen på bildet? Medium??
15.04.2020 - 11:21DROPS Design answered:
Hei Lucia. Modellen på bildet er ca 170 cm høy og bruker størrelse S eller M. Du finner en målskisse av det ferdige plagget (i cm) nederst i oppskriften. mvh DROPS design
15.04.2020 - 11:31
![]() Desiree Pierey wrote:
Desiree Pierey wrote:
Volgens mij begint de kabel bij 5cm na de splitsing. Patroon komt niet uit. Op 2cm. Is te hoog. Misschien een fout bij de vertaling. Het Is dat ik geen foto kan plaatsen.
08.04.2020 - 00:24
![]() Desiree Pierey wrote:
Desiree Pierey wrote:
Volgens mij begint de kabel bij 5cm na de splitsing. Patroon komt niet uit. Op 2cm. Is te hoog. Misschien een fout bij de vertaling. Het Is dat ik geen foto kan plaatsen.
08.04.2020 - 00:23
![]() Larissa Ecke wrote:
Larissa Ecke wrote:
Vielen Dank für die tollen Anleitungen!!!! Das Kleid ist soo schön. Ich möchte es gern ein ganzes Stück länger stricken, bis über das Knie. Kann ich einfach das Rockteil entsprechend länger sticken oder muss ich etwas beachten?
26.03.2020 - 08:18DROPS Design answered:
Liebe Frau Ecke, leider können wir jeder Anleitung nach jedem individuellen Frage anpassen und einzelne Modelle auf individuellen Wunsch hin umrechnen. Wenn sie Hilfe damit brauchen, wenden Sie sich bitte an Ihrem DROPS Laden, dort hilft man Ihnen gerne weiter. Viel Spaß beim stricken!
26.03.2020 - 10:24
![]() Viviane F wrote:
Viviane F wrote:
Très beau modèle !
19.03.2020 - 09:20
|
|||||||||||||||||||||||||||||||||||||
Barn Dance#barndancedress |
|||||||||||||||||||||||||||||||||||||
 |
 |
||||||||||||||||||||||||||||||||||||
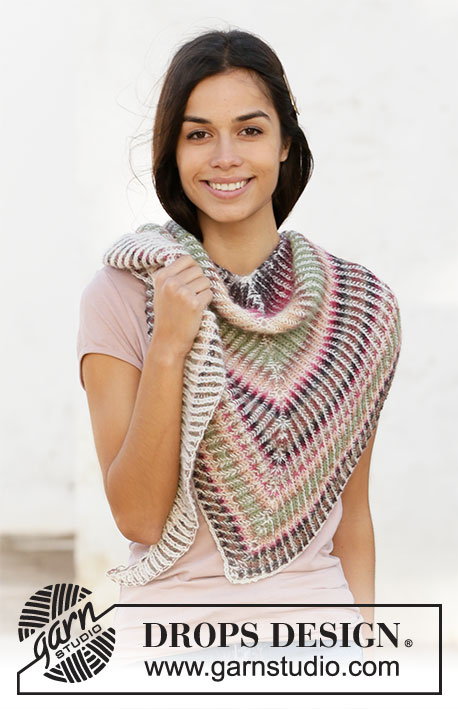
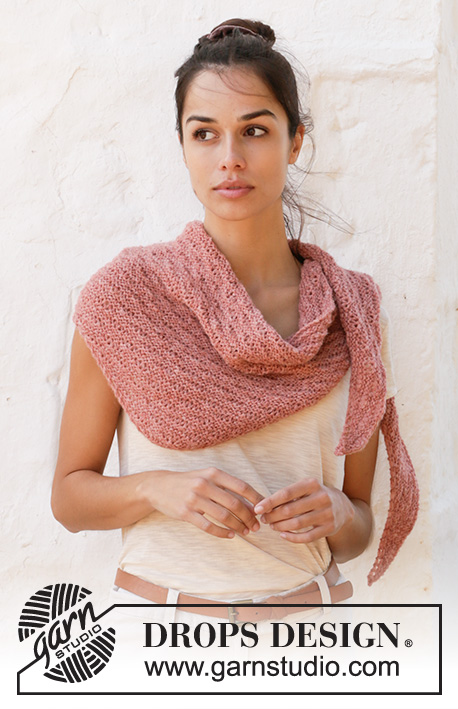
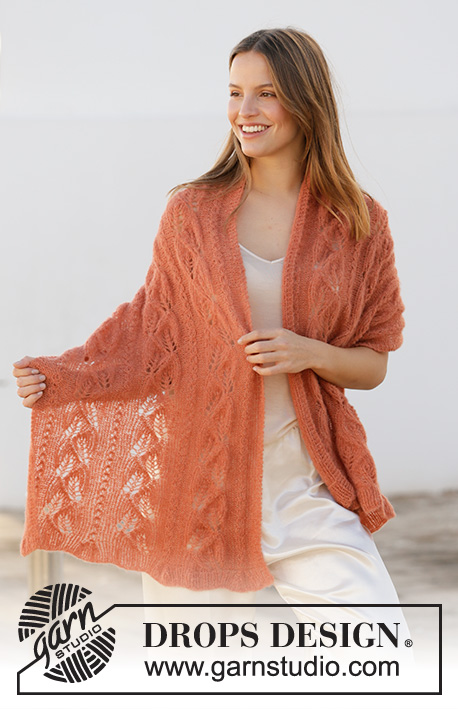
Knitted dress in DROPS Cotton Light. Piece is knitted top down with round yoke, lace pattern, cables and short sleeves. Size: S - XXXL
DROPS 211-2 |
|||||||||||||||||||||||||||||||||||||
|
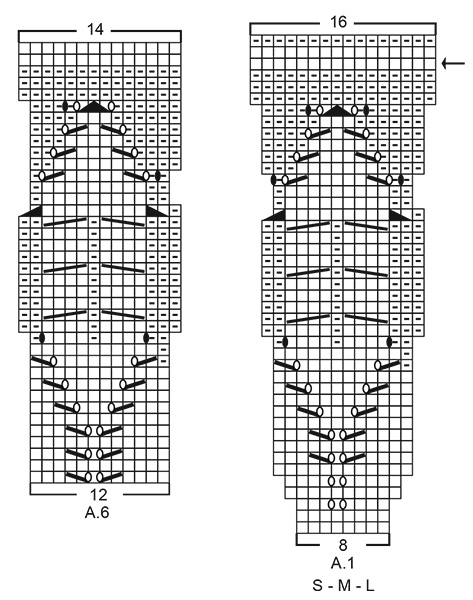
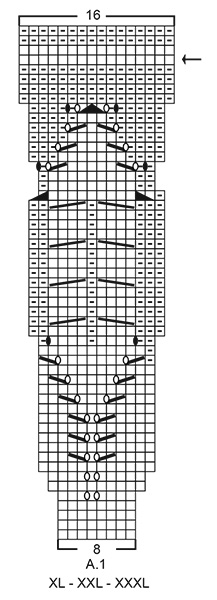
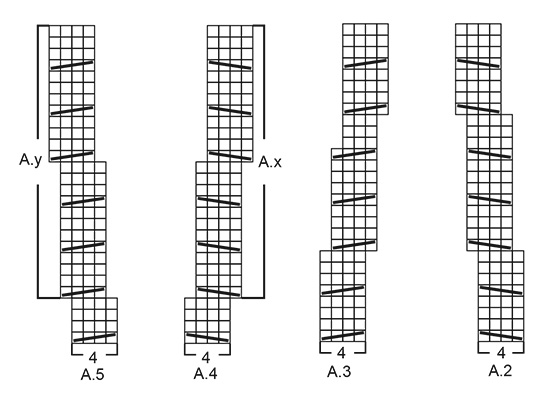
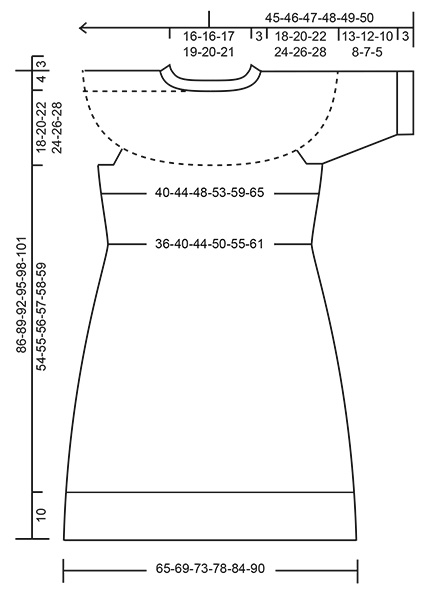
---------------------------------------------------------- EXPLANATION FOR THE PATTERN: ---------------------------------------------------------- GARTER STITCH (worked in the round): 1 ridge vertically = 2 rounds, i.e. knit 1 round and purl 1 round. PATTERN: See diagrams A.1 to A.6. RAGLAN: Increase for raglan on each side of the 4 marker threads as follows: Begin 1 stitch before marker thread, make 1 yarn over, knit 2 (marker thread is between these 2 stitches), make 1 yarn over (= 2 stitches increased at the marker thread and 8 stitches increased in total on round.) On next round knit yarn overs twisted to avoid holes. INCREASE TIP-1 (evenly): To calculate how to increase evenly, use the total number of stitches on row (e.g. 100 stitches) and divide stitches by number of increases to be done (e.g. 28) = 3.6. In this example increase by making 1 yarn over after alternately approx. every 3rd and 4th stitch. On next round knit yarn overs twisted to avoid holes. INCREASE TIP-2 (applies to waist on body): INCREASE AS FOLLOWS AFTER MARKER THREAD IN THE SIDE: Work 12-14-16-18-20-22 stitches in stocking stitch after marker thread in the side, knit 1 in loop around first stitch on left needle (i.e. in stitch from previous round) = 1 stitch increased. INCREASE AS FOLLOWS BEFORE MARKER THREAD IN THE SIDE: Work until 12-14-16-18-20-22 stitches remain in stocking stitch before marker thread in the side, knit 1 in loop around outermost stitch on right needle (i.e. in stitch from previous round) = 1 stitch increased. DECREASE TIP-1 (applies to waist of body): DECREASE AS FOLLOWS AFTER MARKER THREAD IN THE SIDE: Work 12-14-16-18-20-22 stitches in stocking stitch after marker thread in the side, slip 1 stitch knitwise, knit 1, pass slipped stitch over stitch worked = 1 stitch decreased. DECREASE AS FOLLOWS BEFORE MARKER THREAD IN THE SIDE: Work until 14-16-18-20-22-24 stitches remain before marker thread in the side, knit the next 2 stitches together = 1 stitch decreased. DECREASE TIP-2 (applies to mid under sleeves): Decrease 2 stitches mid under sleeve as follows: Work until 3 stitches remain before marker thread, knit 2 together, knit 2 stitches (marker thread is between these 2 stitches), slip 1 stitch knitwise, knit 1, pass slipped stitch over stitch worked (= 2 stitches decreased). CAST-OFF TIP: To avoid a tight cast-off edge you may use a larger needle size. If this also is too tight, work a 1 yarn over after approx. every 8th stitch while casting off (cast off yarn overs as regular stitches). ---------------------------------------------------------- START THE PIECE HERE: ---------------------------------------------------------- DRESS - SHORT OVERVIEW OF THE PIECE: Neck edge and yoke are worked in the round on circular needle, top down. Now divide yoke for body and sleeves. Body is worked in the round on circular needle, top down. Work sleeves in the round on double pointed needles/short circular needle, top down. NECK EDGE: Cast on 100-100-106-112-116-120 stitches on circular needle size 3 mm with Cotton Light. Knit 1 round. Then work rib in the round (= knit 1/purl 1) for 3 cm. Knit 1 round while increasing 28-28-30-40-44-48 stitches evenly - read INCREASE TIP-1 = 128-128-136-152-160-168 stitches. Knit 1 round where yarn overs are knitted twisted. Insert 1 marker in the middle of round (= mid front). Measure yoke from this marker! Then work yoke as explained below. YOKE: Switch to circular needle size 4 mm and work A.1 in the round (= 16-16-17-19-20-21 repetitions of 8 stitches). Continue pattern like this , and increase as shown in A.1. REMEMBER THE KNITTING TENSION! On round before row marked with arrow in A.1, there are 256-256-272-304-320-336 stitches on needle. On round marked with arrow in A.1, increase 0-8-0-8-0-0 stitches evenly = 256-264-272-312-320-336 stitches. When A.1 has been worked, yoke measures approx. 15-15-15-19-19-19 cm from marker at the neck. Now insert 4 marker threads in piece as explained below. Use marker threads when increasing for a small raglan. Count 37-39-40-46-49-53 stitches (= ½ back piece), insert 1 marker thread before next stitch, count 54-54-56-64-62-62 stitches (= sleeve), insert 1 marker thread before next stitch, count 74-78-80-92-98-106 stitches (= front piece), insert 1 marker thread before next stitch, count 54-54-56-64-62-62 stitches (= sleeve), insert 1 marker thread before next stitch. 37-39-40-46-49-53 stitches remain on back piece after last marker thread. Work in stocking stitch in the round and increase for RAGLAN on each side of the 4 marker threads - read explanation above. Increase like this every other round 2-4-6-6-8-10 times in total vertically = 272-296-320-360-384-416 stitches on needle. Continue with stocking stitch without increases until yoke measures 18-20-22-24-26-28 cm from marker by the neck. Now divide yoke for body and sleeves, i.e. work next round as follows from mid back: Work 39-43-46-52-57-63 stitches in stocking stitch (= ½ back piece), slip the next 58-62-68-76-78-82 stitches on 1 stitch holder for sleeve, cast on 6-6-8-8-10-10 new stitches on needle (= in the side under sleeve), work 78-86-92-104-114-126 stitches in stocking stitch (= front piece), slip the next 58-62-68-76-78-82 stitches on 1 stitch holder for sleeve, cast on 6-6-8-8-10-10 new stitches on needle (= in the side under sleeve) , and work the remaining 39-43-46-52-57-63 stitches in stocking stitch as before (= ½ back piece). Cut the yarn and remove the all markers/marker threads. Finish body and sleeves separately. NOW MEASURE PIECE FROM HERE! BODY: = 168-184-200-224-248-272 stitches. Insert 1 marker thread in each side on body, in the middle of the 6-6-8-8-10-10 stitches cast on under each sleeve. Begin round at one of the marker threads in side on body, and work stocking stitch in the round for 2 cm. Insert 4 markers in the piece as follows: Count 24-27-30-35-40-45 stitches, insert 1st marker before next stitch, count 36-38-40-42-44-46 stitches (= mid front), insert 2nd marker before next stitch, count 48-54-60-70-80-90 stitches, insert 3rd marker before next stitch, count 36-38-40-42-44-46 stitches (= mid back) and insert 4th marker before next stitch = 24-27-30-35-40-45 stitches remain on round after last marker. Move the marker threads and markers upwards when working. Use marker threads later when decreasing and increasing in the sides on body, and use markers when working cables at the front and back on dress. Then work waist at the same time as working cables as explained below - read both WAIST and CABLES below before continuing. WAIST: Work stocking stitch in the round and decrease 1 stitch for waist on each side of both marker threads– read DECREASE TIP -1(= 4 stitches decreased). Decrease like this every 2½ cm 4 times in total vertically = 152-168-184-208-232-256 stitches. When piece measures 16 cm from division in all sizes, increase 1 stitch for waist on each side of both marker threads - read INCREASE TIP-2 (= 4 stitches increased). Increase like this every 4th round 24-24-24-26-26-26 times in total vertically = 248-264-280-312-336-360 stitches. CABLES: AT THE SAME TIME when piece measures 2 cm from division in all sizes, work cables as follows: Work in stocking stitch until 4 stitches remain before 1st marker, work A.2 (= 4 stitches), work in stocking stitch until 2nd marker, work A.3 (= 4 stitches), work in stocking stitch until 4 stitches remain before 3rd marker, work A.2 (= 4 stitches), work in stocking stitch until 4th marker, work A.3 (= 4 stitches), and work in stocking stitch the rest of round. Continue pattern like this. When A.2 and A.3 has been worked, work A.4 over A.2 and A.5 over A.3. When A.4 and A.5 has been worked, work A.x over A.4 and A.y over A.5. When A.x and A.y has been worked, work in stocking stitch in the round over all stitches until piece measures 49-50-51-52-53-54 cm from division (approx. 15 cm remain until finished measurements, try the dress on and work to desired length). Then work an edge as explained below. EDGE WITH LACE PATTERN: Knit 1 round while increasing 4-0-8-0-0-0 stitches evenly = 252-264-288-312-336-360 stitches. Then work A.6 in the round (= 21-22-24-26-28-30 repetitions of 12 stitches). When A.6 has been worked, there are 294-308-336-364-392-420 stitches on needle. Switch to circular needle size 3 mm. Work 2 ridges in GARTER STITCH in the round over all stitches - read explanation above. Cast off by knitting– read CAST-OFF TIP. Dress measures approx. 86-89-92-95-98-101 cm from shoulder and down. SLEEVES: Slip the 58-62-68-76-78-82 stitches from stitch holder in one side of piece on double pointed needles or a short circular needle size 4 mm, and pick in addition up 1 new stitch in each of the 6-6-8-8-10-10 stitches cast on under sleeve = 64-68-76-84-88-92 stitches. Insert 1 marker thread in the middle of the 6-6-8-8-10-10 stitches and move the marker thread upwards when working, it is used for decrease mid under sleeve later. Begin round at the marker thread and work stocking stitch in the round. When sleeve measures 2 cm from division, decrease 2 stitches mid under sleeve - read DECREASE TIP-2. Decrease like this every 2-2-1-1-½-½ cm 5 times in total in all sizes = 54-58-66-74-78-82 stitches. Work until sleeve measures 13-12-10-8-7-5 cm from division (approx. 3 cm remain until finished measurements, try the dress on and work to desired length). NOTE! Shorter measurements in the larger sizes because of wider neck and longer yoke. Switch to double pointed needles size 3 mm. Work rib in the round = knit 1/purl 1 for 3 cm. Cast off with knit over knit and purl over purl - remember CAST-OFF TIP! Sleeve measures approx. 16-15-13-11-10-8 cm from division. Work the other sleeve the same way. |
|||||||||||||||||||||||||||||||||||||
Diagram explanations |
|||||||||||||||||||||||||||||||||||||
|
|||||||||||||||||||||||||||||||||||||
 |
|||||||||||||||||||||||||||||||||||||
 |
|||||||||||||||||||||||||||||||||||||
 |
|||||||||||||||||||||||||||||||||||||
 |
|||||||||||||||||||||||||||||||||||||
Have you finished this pattern?Tag your pictures with #dropspattern #barndancedress or submit them to the #dropsfan gallery. Do you need help with this pattern?You'll find 31 tutorial videos, a Comments/Questions area and more by visiting the pattern on garnstudio.com. © 1982-2026 DROPS Design A/S. We reserve all rights. This document, including all its sub-sections, has copyrights. Read more about what you can do with our patterns at the bottom of each pattern on our site. |
|||||||||||||||||||||||||||||||||||||


With over 40 years in knitting and crochet design, DROPS Design offers one of the most extensive collections of free patterns on the internet - translated to 17 languages. As of today we count 324 catalogues and 12291 patterns translated into English (UK/cm). 12291
We work hard to bring you the best knitting and crochet have to offer, inspiration and advice as well as great quality yarns at incredible prices! Would you like to use our patterns for other than personal use? You can read what you are allowed to do in the Copyright text at the bottom of all our patterns. Happy crafting!
Post a comment to pattern DROPS 211-2
We would love to hear what you have to say about this pattern!
If you want to leave a question, please make sure you select the correct category in the form below, to speed up the answering process. Required fields are marked *.