
Popular categories
Looking for a yarn?


Comments / Questions (31)
![]() Vibeke wrote:
Vibeke wrote:
Hej. Jeg har mange nøgler af Drops Muskat. Kan jeg strikke denne model Barn Dance med det garn? Hvis det er muligt, hvor mange nøgler Muskat skal jeg så bruge? Mvh Vibeke
18.02.2023 - 09:22DROPS Design answered:
Hej Vibeke, ja det kan du. Brug vores garn-omregner. Vælg DROPS Cotton Light, vælg antal gram i din størrelse og vælg 1 tråd, så ser du hvor meget DROPS Muskat du skal bruge :)
24.02.2023 - 11:24
![]() GILDA wrote:
GILDA wrote:
Salve, sto lavorando la misura S , non mi è chiaro il fatto delle diminuzioni VITA, cioè le devo concentrare diminuzioni nei segnapunto laterali? ossia le diminuzioni VITA si fanno sui fianchi?
13.09.2022 - 11:15DROPS Design answered:
Buonasera Gilda, deve procedere come descritto nel SUGGERIMENTO PER LE DIMINUZIONI-1. Buon lavoro!
14.09.2022 - 19:37
![]() Silke Sakic wrote:
Silke Sakic wrote:
Hallo Gerne würde ich dieses Kleid nach stricken, aber leider lässt sich die Anleitung nicht vollständig ausdrucken. Ab Seite 5 werden die Seiten nur noch unvollständig geladen u angezeigt. Was kann ich tun?
07.10.2021 - 13:04DROPS Design answered:
Liebe Frau Sakic, Wahrscheinlich gab es ein Problem mit den Bildern, als Sie mit dem Drucken begannen. Aktualisieren Sie die Seite und prüfen Sie, ob alle Diagramme sichtbar sind, dann versuchen Sie die Anleitung nochmal auszudrucken. Viel Spaß beim Stricken!
07.10.2021 - 15:46
![]() Sandrine wrote:
Sandrine wrote:
Sur le site n'apparaît pas les diagrammes Ax et Ay Où les trouver ?
12.01.2021 - 16:38DROPS Design answered:
Bonjour Sandrine, ces diagrammes se trouvent juste sous A.1 et juste au-dessus du schéma - actualisez votre page si besoin; vous avez peut être été victime d'un problème passager d'affichage. Bon tricot!
12.01.2021 - 17:02
![]() Liv wrote:
Liv wrote:
Takk for oppklaringen. Men ser ikke at det står i oppskriften at A4/A5 skal strikkes 7 ganger.? Anbefaler at det tydeliggjøres i oppskriften 😊
25.08.2020 - 11:58
![]() Liv wrote:
Liv wrote:
Vedr. flettene nedover kjolen: I følge mønsteret skal det bli 14 stk vridninger/ fletter til sammen på hver fletter se. Men på bildet/ modellen er det da mange flere? Får ikke bildet til å Stemme med mønsteret!
25.08.2020 - 07:40DROPS Design answered:
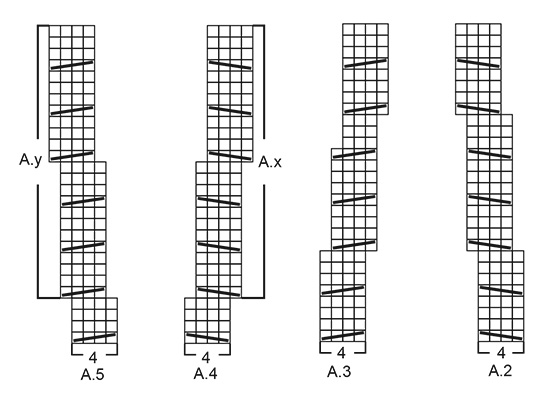
Hej Liv. Flätorna stickas genom att först sticka A.2/A.3 (=7 vridningar), A.4/A.5 (= 7 vridningar) och sedan A.x/A.y ( = 6 vridningar). Mvh DROPS Design
25.08.2020 - 10:48
![]() Aud wrote:
Aud wrote:
Hei, jeg ønsker en varmere variant. Kan du anbefale ett alternativ garn i ull, eller lignende?
18.08.2020 - 23:47DROPS Design answered:
Hej Aud, Ja du kan bruge alle garnkvaliteter fra garngruppe B (Cotton Merino, Puna, Karisma, Merino Extra Fine mfl) Prøv vores garnkalkulator, vælge Cotton Light, antal gram for din størrelse og 1 tråd, så får du masser af alternativer frem. God fornøjelse!
19.08.2020 - 11:09
![]() Am Andine wrote:
Am Andine wrote:
Donc si je comprends bien les explications des torsades A2 et A3, je vais devoir déplacer les marqueurs au fur et à mesure? Car les torsades vont se décaler vers les marqueurs, c'est bien ça ?
15.08.2020 - 17:47DROPS Design answered:
Bonjour Am Andine, les marqueurs ne sont pas décalés, vous devez toujours avoir le même nombre de mailles entre les marqueurs(entre les torsades) au milieu devant et au milieu dos - en revanche, vous devez diminuer avant ou après les marqueurs = avant ou après les torsades ce qui explique pour les diagrammes A.2 à A.5 sont décalés. Bon tricot!
17.08.2020 - 08:26
![]() Eileen Cowie wrote:
Eileen Cowie wrote:
In the increases after the waist it says increase before and after the markers, which gives 8 stitches ( not 4, increased on the round, do you do this every 8 rows instead of 4 rows, to get 96 stitches added?
16.06.2020 - 13:06DROPS Design answered:
Dear Mrs Cowie, you decfrease/increase for waist on each side of the marker threads (1 marker thread in each side of body, in the middle of the new sts cast on under sleeves) = there are only 2 thread markers, you decrease/increase 4 sts for waist. Happy knitting!
16.06.2020 - 13:42
![]() Elisa wrote:
Elisa wrote:
Buonasera vorrei adattare lo schema del bordo utilizzando i ferri lineari, non circolari , lavorando quindi dal bordo inferiore al collo. Devo lavorare seguendo lo schema dall'alto verso il basso o secondo voi posso utilizzarlo tal quale? Spero di essere stata chiara Grazie
05.06.2020 - 19:59DROPS Design answered:
Buonasera Elisa, questo modello è stato progettato per essere lavorato dall'alto in basso. Non è semplice riadattare la lavorazione dal basso verso l'alto e con i ferri dritti, ma può rivolgersi al suo rivenditore DROPS di fiducia per un aiuto personalizzato. Buon lavoro!
05.06.2020 - 22:28
|
|||||||||||||||||||||||||||||||||||||
Barn Dance#barndancedress |
|||||||||||||||||||||||||||||||||||||
 |
 |
||||||||||||||||||||||||||||||||||||
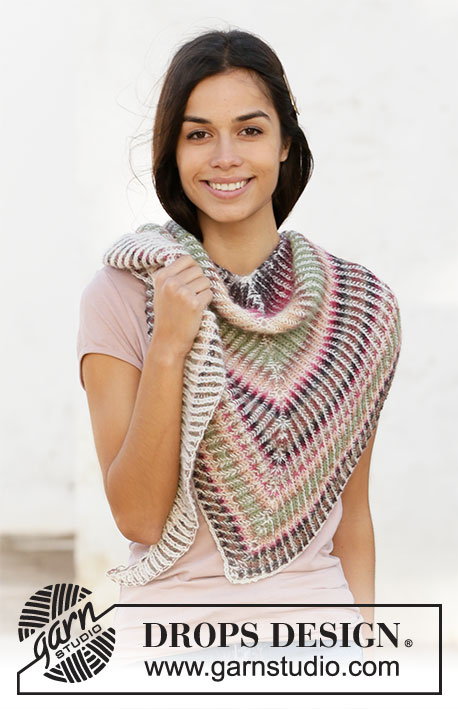
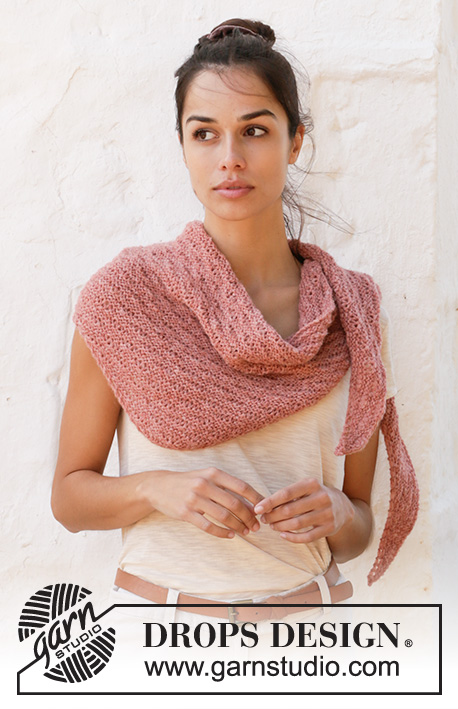
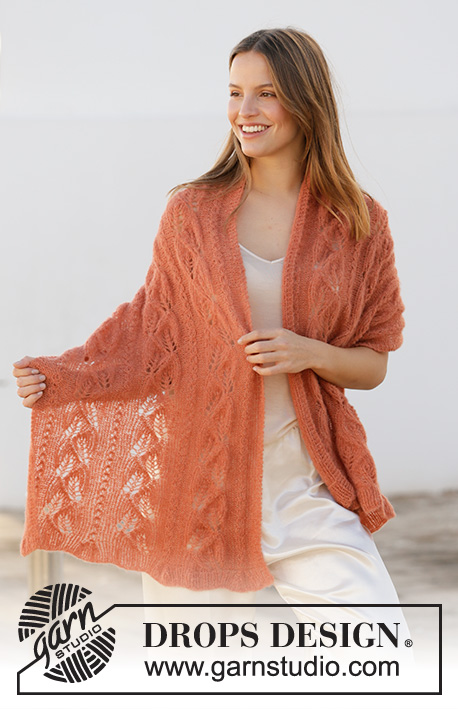
Knitted dress in DROPS Cotton Light. Piece is knitted top down with round yoke, lace pattern, cables and short sleeves. Size: S - XXXL
DROPS 211-2 |
|||||||||||||||||||||||||||||||||||||
|
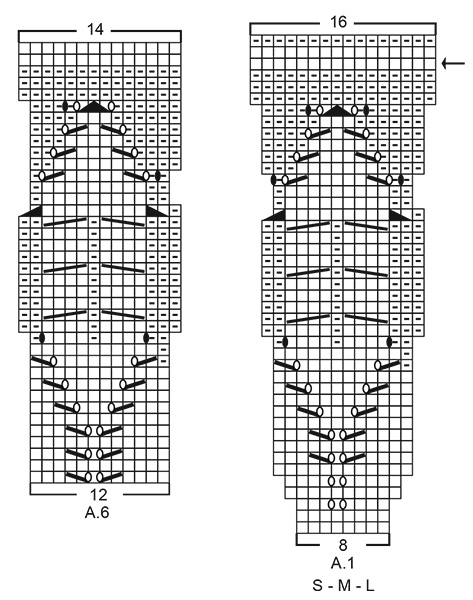
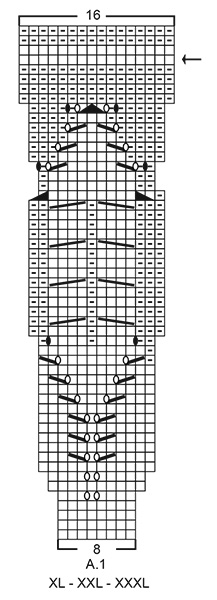
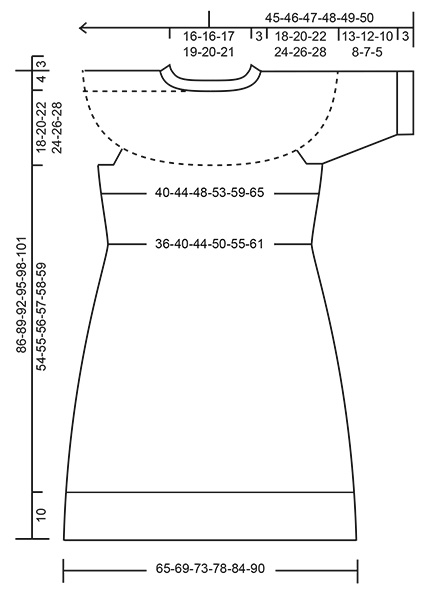
---------------------------------------------------------- EXPLANATION FOR THE PATTERN: ---------------------------------------------------------- GARTER STITCH (worked in the round): 1 ridge vertically = 2 rounds, i.e. knit 1 round and purl 1 round. PATTERN: See diagrams A.1 to A.6. RAGLAN: Increase for raglan on each side of the 4 marker threads as follows: Begin 1 stitch before marker thread, make 1 yarn over, knit 2 (marker thread is between these 2 stitches), make 1 yarn over (= 2 stitches increased at the marker thread and 8 stitches increased in total on round.) On next round knit yarn overs twisted to avoid holes. INCREASE TIP-1 (evenly): To calculate how to increase evenly, use the total number of stitches on row (e.g. 100 stitches) and divide stitches by number of increases to be done (e.g. 28) = 3.6. In this example increase by making 1 yarn over after alternately approx. every 3rd and 4th stitch. On next round knit yarn overs twisted to avoid holes. INCREASE TIP-2 (applies to waist on body): INCREASE AS FOLLOWS AFTER MARKER THREAD IN THE SIDE: Work 12-14-16-18-20-22 stitches in stocking stitch after marker thread in the side, knit 1 in loop around first stitch on left needle (i.e. in stitch from previous round) = 1 stitch increased. INCREASE AS FOLLOWS BEFORE MARKER THREAD IN THE SIDE: Work until 12-14-16-18-20-22 stitches remain in stocking stitch before marker thread in the side, knit 1 in loop around outermost stitch on right needle (i.e. in stitch from previous round) = 1 stitch increased. DECREASE TIP-1 (applies to waist of body): DECREASE AS FOLLOWS AFTER MARKER THREAD IN THE SIDE: Work 12-14-16-18-20-22 stitches in stocking stitch after marker thread in the side, slip 1 stitch knitwise, knit 1, pass slipped stitch over stitch worked = 1 stitch decreased. DECREASE AS FOLLOWS BEFORE MARKER THREAD IN THE SIDE: Work until 14-16-18-20-22-24 stitches remain before marker thread in the side, knit the next 2 stitches together = 1 stitch decreased. DECREASE TIP-2 (applies to mid under sleeves): Decrease 2 stitches mid under sleeve as follows: Work until 3 stitches remain before marker thread, knit 2 together, knit 2 stitches (marker thread is between these 2 stitches), slip 1 stitch knitwise, knit 1, pass slipped stitch over stitch worked (= 2 stitches decreased). CAST-OFF TIP: To avoid a tight cast-off edge you may use a larger needle size. If this also is too tight, work a 1 yarn over after approx. every 8th stitch while casting off (cast off yarn overs as regular stitches). ---------------------------------------------------------- START THE PIECE HERE: ---------------------------------------------------------- DRESS - SHORT OVERVIEW OF THE PIECE: Neck edge and yoke are worked in the round on circular needle, top down. Now divide yoke for body and sleeves. Body is worked in the round on circular needle, top down. Work sleeves in the round on double pointed needles/short circular needle, top down. NECK EDGE: Cast on 100-100-106-112-116-120 stitches on circular needle size 3 mm with Cotton Light. Knit 1 round. Then work rib in the round (= knit 1/purl 1) for 3 cm. Knit 1 round while increasing 28-28-30-40-44-48 stitches evenly - read INCREASE TIP-1 = 128-128-136-152-160-168 stitches. Knit 1 round where yarn overs are knitted twisted. Insert 1 marker in the middle of round (= mid front). Measure yoke from this marker! Then work yoke as explained below. YOKE: Switch to circular needle size 4 mm and work A.1 in the round (= 16-16-17-19-20-21 repetitions of 8 stitches). Continue pattern like this , and increase as shown in A.1. REMEMBER THE KNITTING TENSION! On round before row marked with arrow in A.1, there are 256-256-272-304-320-336 stitches on needle. On round marked with arrow in A.1, increase 0-8-0-8-0-0 stitches evenly = 256-264-272-312-320-336 stitches. When A.1 has been worked, yoke measures approx. 15-15-15-19-19-19 cm from marker at the neck. Now insert 4 marker threads in piece as explained below. Use marker threads when increasing for a small raglan. Count 37-39-40-46-49-53 stitches (= ½ back piece), insert 1 marker thread before next stitch, count 54-54-56-64-62-62 stitches (= sleeve), insert 1 marker thread before next stitch, count 74-78-80-92-98-106 stitches (= front piece), insert 1 marker thread before next stitch, count 54-54-56-64-62-62 stitches (= sleeve), insert 1 marker thread before next stitch. 37-39-40-46-49-53 stitches remain on back piece after last marker thread. Work in stocking stitch in the round and increase for RAGLAN on each side of the 4 marker threads - read explanation above. Increase like this every other round 2-4-6-6-8-10 times in total vertically = 272-296-320-360-384-416 stitches on needle. Continue with stocking stitch without increases until yoke measures 18-20-22-24-26-28 cm from marker by the neck. Now divide yoke for body and sleeves, i.e. work next round as follows from mid back: Work 39-43-46-52-57-63 stitches in stocking stitch (= ½ back piece), slip the next 58-62-68-76-78-82 stitches on 1 stitch holder for sleeve, cast on 6-6-8-8-10-10 new stitches on needle (= in the side under sleeve), work 78-86-92-104-114-126 stitches in stocking stitch (= front piece), slip the next 58-62-68-76-78-82 stitches on 1 stitch holder for sleeve, cast on 6-6-8-8-10-10 new stitches on needle (= in the side under sleeve) , and work the remaining 39-43-46-52-57-63 stitches in stocking stitch as before (= ½ back piece). Cut the yarn and remove the all markers/marker threads. Finish body and sleeves separately. NOW MEASURE PIECE FROM HERE! BODY: = 168-184-200-224-248-272 stitches. Insert 1 marker thread in each side on body, in the middle of the 6-6-8-8-10-10 stitches cast on under each sleeve. Begin round at one of the marker threads in side on body, and work stocking stitch in the round for 2 cm. Insert 4 markers in the piece as follows: Count 24-27-30-35-40-45 stitches, insert 1st marker before next stitch, count 36-38-40-42-44-46 stitches (= mid front), insert 2nd marker before next stitch, count 48-54-60-70-80-90 stitches, insert 3rd marker before next stitch, count 36-38-40-42-44-46 stitches (= mid back) and insert 4th marker before next stitch = 24-27-30-35-40-45 stitches remain on round after last marker. Move the marker threads and markers upwards when working. Use marker threads later when decreasing and increasing in the sides on body, and use markers when working cables at the front and back on dress. Then work waist at the same time as working cables as explained below - read both WAIST and CABLES below before continuing. WAIST: Work stocking stitch in the round and decrease 1 stitch for waist on each side of both marker threads– read DECREASE TIP -1(= 4 stitches decreased). Decrease like this every 2½ cm 4 times in total vertically = 152-168-184-208-232-256 stitches. When piece measures 16 cm from division in all sizes, increase 1 stitch for waist on each side of both marker threads - read INCREASE TIP-2 (= 4 stitches increased). Increase like this every 4th round 24-24-24-26-26-26 times in total vertically = 248-264-280-312-336-360 stitches. CABLES: AT THE SAME TIME when piece measures 2 cm from division in all sizes, work cables as follows: Work in stocking stitch until 4 stitches remain before 1st marker, work A.2 (= 4 stitches), work in stocking stitch until 2nd marker, work A.3 (= 4 stitches), work in stocking stitch until 4 stitches remain before 3rd marker, work A.2 (= 4 stitches), work in stocking stitch until 4th marker, work A.3 (= 4 stitches), and work in stocking stitch the rest of round. Continue pattern like this. When A.2 and A.3 has been worked, work A.4 over A.2 and A.5 over A.3. When A.4 and A.5 has been worked, work A.x over A.4 and A.y over A.5. When A.x and A.y has been worked, work in stocking stitch in the round over all stitches until piece measures 49-50-51-52-53-54 cm from division (approx. 15 cm remain until finished measurements, try the dress on and work to desired length). Then work an edge as explained below. EDGE WITH LACE PATTERN: Knit 1 round while increasing 4-0-8-0-0-0 stitches evenly = 252-264-288-312-336-360 stitches. Then work A.6 in the round (= 21-22-24-26-28-30 repetitions of 12 stitches). When A.6 has been worked, there are 294-308-336-364-392-420 stitches on needle. Switch to circular needle size 3 mm. Work 2 ridges in GARTER STITCH in the round over all stitches - read explanation above. Cast off by knitting– read CAST-OFF TIP. Dress measures approx. 86-89-92-95-98-101 cm from shoulder and down. SLEEVES: Slip the 58-62-68-76-78-82 stitches from stitch holder in one side of piece on double pointed needles or a short circular needle size 4 mm, and pick in addition up 1 new stitch in each of the 6-6-8-8-10-10 stitches cast on under sleeve = 64-68-76-84-88-92 stitches. Insert 1 marker thread in the middle of the 6-6-8-8-10-10 stitches and move the marker thread upwards when working, it is used for decrease mid under sleeve later. Begin round at the marker thread and work stocking stitch in the round. When sleeve measures 2 cm from division, decrease 2 stitches mid under sleeve - read DECREASE TIP-2. Decrease like this every 2-2-1-1-½-½ cm 5 times in total in all sizes = 54-58-66-74-78-82 stitches. Work until sleeve measures 13-12-10-8-7-5 cm from division (approx. 3 cm remain until finished measurements, try the dress on and work to desired length). NOTE! Shorter measurements in the larger sizes because of wider neck and longer yoke. Switch to double pointed needles size 3 mm. Work rib in the round = knit 1/purl 1 for 3 cm. Cast off with knit over knit and purl over purl - remember CAST-OFF TIP! Sleeve measures approx. 16-15-13-11-10-8 cm from division. Work the other sleeve the same way. |
|||||||||||||||||||||||||||||||||||||
Diagram explanations |
|||||||||||||||||||||||||||||||||||||
|
|||||||||||||||||||||||||||||||||||||
 |
|||||||||||||||||||||||||||||||||||||
 |
|||||||||||||||||||||||||||||||||||||
 |
|||||||||||||||||||||||||||||||||||||
 |
|||||||||||||||||||||||||||||||||||||
Have you finished this pattern?Tag your pictures with #dropspattern #barndancedress or submit them to the #dropsfan gallery. Do you need help with this pattern?You'll find 31 tutorial videos, a Comments/Questions area and more by visiting the pattern on garnstudio.com. © 1982-2026 DROPS Design A/S. We reserve all rights. This document, including all its sub-sections, has copyrights. Read more about what you can do with our patterns at the bottom of each pattern on our site. |
|||||||||||||||||||||||||||||||||||||


With over 40 years in knitting and crochet design, DROPS Design offers one of the most extensive collections of free patterns on the internet - translated to 17 languages. As of today we count 324 catalogues and 12291 patterns translated into English (UK/cm). 12291
We work hard to bring you the best knitting and crochet have to offer, inspiration and advice as well as great quality yarns at incredible prices! Would you like to use our patterns for other than personal use? You can read what you are allowed to do in the Copyright text at the bottom of all our patterns. Happy crafting!
Post a comment to pattern DROPS 211-2
We would love to hear what you have to say about this pattern!
If you want to leave a question, please make sure you select the correct category in the form below, to speed up the answering process. Required fields are marked *.