
Popular categories
Looking for a yarn?


Comments / Questions (91)
![]() Renate Steiner wrote:
Renate Steiner wrote:
Ich habe doch 60 M + 2 Randmaschen angeschlagen, also bleiben dann 2 Maschen übrig?
07.10.2021 - 08:59
![]() Renate Steiner wrote:
Renate Steiner wrote:
Liebe Wanda, ich habe begonnen die zweite Größe zu stricken. 60 M Anschlag + 2 RdM=62 M Dann: 1RdM, 1 M r/1. Markierer, 7 M/2. Markierer, 23 M/3. Mark., 8 M/4. Mark., 18 M/5. Mark., 1 M r, 1 RdM=60 M, bleiben 2 M übrig?
06.10.2021 - 08:21DROPS Design answered:
Liebe Frau Steiner, so sehen die 60 M aus: 1 RandM, 1 M, (1. Mark), 7 M (+4 = 11 M), (2. Mark), 23 M (+2= 25 M), (3. Mark), 8 M (+4 = 12 M), (4. Mark), 18 M (+ 2M), (5. Mark),1 M, 1 RandM = 1+1+7+23+8+18+1+1=60 und nach Zunahmen = 1+1+11+25+12+20+1+1=72 M. Viel Spaß beim stricken!
06.10.2021 - 16:11
![]() Françoise wrote:
Françoise wrote:
Bonjour, je ne comprends pas pourquoi si on tricote de haut en bas, on commence par le diagramme A1 avant de faire les oreilles? Merci pour votre aide
03.10.2021 - 16:00DROPS Design answered:
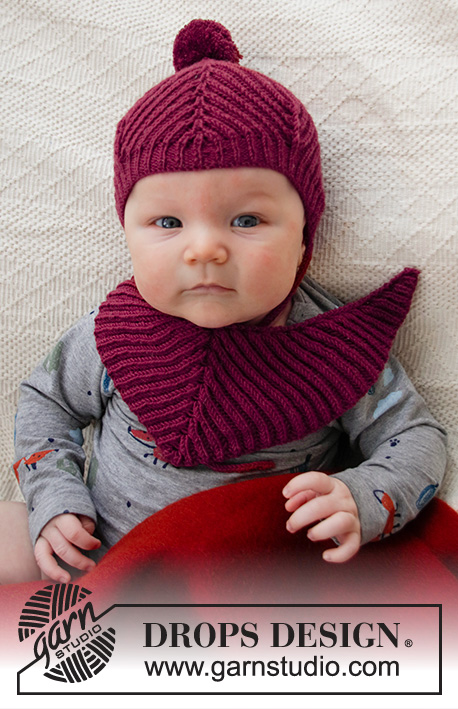
Bonjour Françoise, les oreilles ne sont pas tricotées en jacquard, mais rebrodées ensuite au point de mailles (cf ASSEMBLAGE). Bon tricot!
04.10.2021 - 08:29
![]() Gunilla Källström wrote:
Gunilla Källström wrote:
Hej! Hur gör man maskstygnen? Finns video/film? Blir inte bra när jag försöker.
23.08.2021 - 21:23DROPS Design answered:
Hej Gunilla. Du hittar en video på hur man broderar maskstygn här. Mvh DROPS Design
24.08.2021 - 09:35
![]() Vitaline wrote:
Vitaline wrote:
Bonjour, Lorsque j’augmente début et fin de rangs, chaque raglan, j’ai un côté est plus grand que l’autre. Pour la patte de boutonnage c’est compliqué. Cette différence est elle normale ?
14.07.2021 - 09:30DROPS Design answered:
Bonjour Vitaline, je ne me représente pas tout à fait correctement votre schéma; vous augmentez en début de rang après la 2ème maille (= après le marqueur-1) et en fin de rang avant les 2 dernières mailles (avant le marqueur-5). Autrement dit, vous allez augmenter au même rythme à chaque marqueur (y compris les marqueurs-2, -3 et 4). En cas de doute, montrez votre ouvrage à votre magasin (même en photo par mail), ce sera plus simple pour eux de pouvoir vous aider si besoin. Bon tricot!
15.07.2021 - 09:18
![]() Sarah wrote:
Sarah wrote:
Je parlais des augmentations décrites ainsi : Augmenter 1 maille après le marqueur-1, tricoter jusqu'à ce qu'il reste 1 maille avant les marqueurs-2, -3 et -4, 1 jeté, tricoter 2 mailles (le marqueur est entre ces 2 mailles), 1 jeté et augmenter 1 maille avant le marqueur-5 (= on augmente 8 mailles). Il est noté que le marque est entre les deux mailles à tricoter ensemble. Du coup, une fois tricotées, où place t on le marqueur ? Avant le 2e jeté ? Par avance, merci.
02.07.2021 - 08:38DROPS Design answered:
Bonjour Sarah, quand on augmente pour le raglan, on ne tricote pas de mailles ensemble, procédez ainsi: augmentez 1 m après le marqueur-1, tricotez jusqu'à ce qu'il reste 1 m avant le marqueur suivant, faites 1 jeté, tricotez 2 mailles (le marqueur-2, -3 ou -4 est entre ces 2 mailles), faites 1 jeté, tricotez jusqu'au marqueur-5 et augmentez 1 m avant ce marqueur. Vous avez augmenté 8 mailles au total, les marqueurs doivent rester exactement au même endroit qu'au début, le nombre de mailles va augmenter entre les marqueurs. Bon tricot!
02.07.2021 - 09:56
![]() Sarah wrote:
Sarah wrote:
Bonjour, où doit on disposer les marqueurs au sein des jeté, 2 mailles ensembles, jeté ? Pas après le dernier jeter car cela décalé tout le travail. Par avance, merci.
01.07.2021 - 21:54DROPS Design answered:
Bonjour Sarah, Lorsque vous augmentez pour le raglan, vous augmentez comme indiqué sous AUGMENTATIONS (les marqueurs restent en place, les jetés se feront toujours comme indiqué. Pour les manches, vous avez le marqueur entre les 2 mailles du milieu sous la manche, comme le montre cette vidéo. Si je n'ai pas répondu à votre question, n'hésitez pas à donner davantage de précisions sur votre souci, merci pour votre compréhension. Bon tricot!
02.07.2021 - 07:37
![]() Lorena wrote:
Lorena wrote:
Buonasera, vorrei sapere, per favore, come mai dopo il collo la suddivisione dei punti per le maniche non è uguale. Mi spiego meglio per la manica sinistra sono previsti 23 punti mentre per la maglia destra 18 tra i due segnapunti.Ho interpretato male io? Grazie per l’attenzione
16.06.2021 - 23:06DROPS Design answered:
Buonasera Lorena, quando posiziona i segnapunti avrà 11 maglie per la manica sinistra (tra i segnapunti 1 e 2) e 12 per quella destra (tra i segnapunti 3 e 4), gli aumenti saranno poi diversi a seconda dei segnapunti e quando separerà realmente le maniche dal corpo il numero di maglie delle 2 maniche sarà lo stesso. Buon lavoro!
17.06.2021 - 22:36
![]() Alyssa W wrote:
Alyssa W wrote:
Hello! How exactly are the eyes and nose embroidered on? Do you have any video tutorials on that? Or is it also done duplicate stitched? It doesn’t look that way to me in the photo. I can’t quite figure out how to make it look right haha. Thats!
11.06.2021 - 15:22DROPS Design answered:
Dear Alyssa W, the eyes and the noise are here embroided with a black yarn over a few knitted sts (like a flat stitch) - but you can of course embroider them as you wish to. Hope this will help.
11.06.2021 - 17:20
![]() Christa wrote:
Christa wrote:
In der StrickAnleitung steht: 1 Masche rechts, den 1. Markierer anbringen, 7 Maschen rechts stricken und dabei 2-4-2 (2-2-2-2) Maschen gleichmäßig verteilt zunehmen, Wie viele Maschen nehme ich in der Größe /9 Monate zu?
07.05.2021 - 20:16DROPS Design answered:
Liebe Christa, die Größe 6/9 Monate ist 2. Größe, dh Sie stricken diese 7 Maschen und gleichzeitig nehmen Sie 4 Maschen gleichmäßig verteilt (= jetzt sind es 11 M über diese 7 M). Viel Spaß beim stricken!
10.05.2021 - 10:39
|
|||||||||||||
Little Fox#littlefoxsweater |
|||||||||||||
 |
 |
||||||||||||
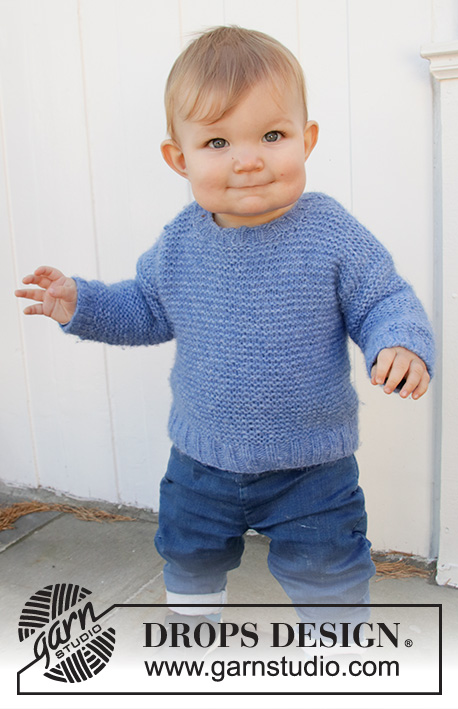
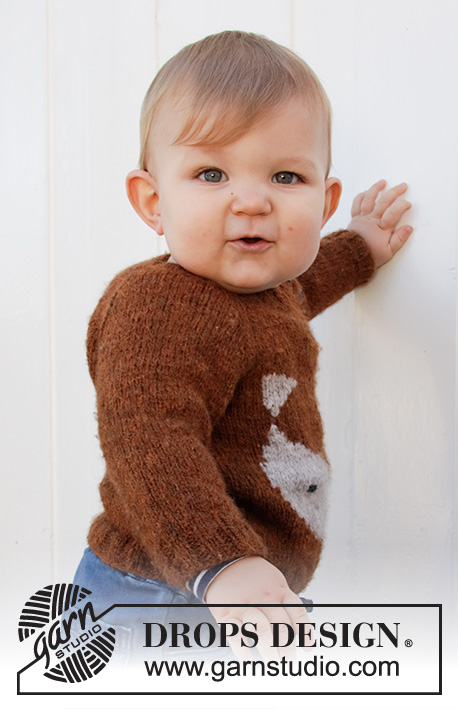
Knitted jumper with raglan for babies and kids in DROPS Sky. The piece is worked top down with fox-pattern. Sizes 1 month – 8 years.
DROPS Baby 36-14 |
|||||||||||||
|
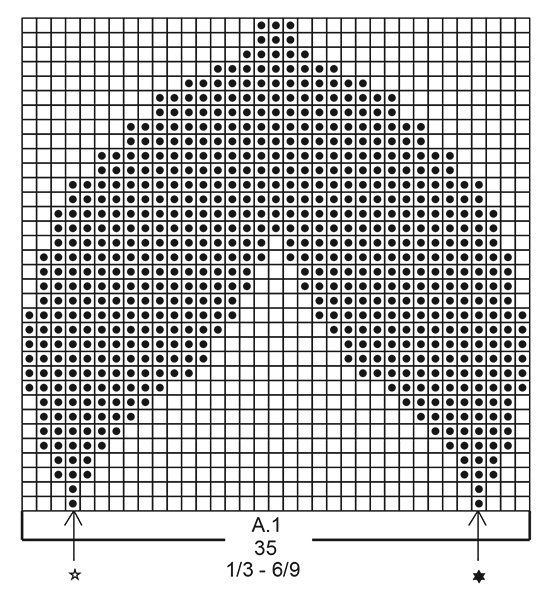
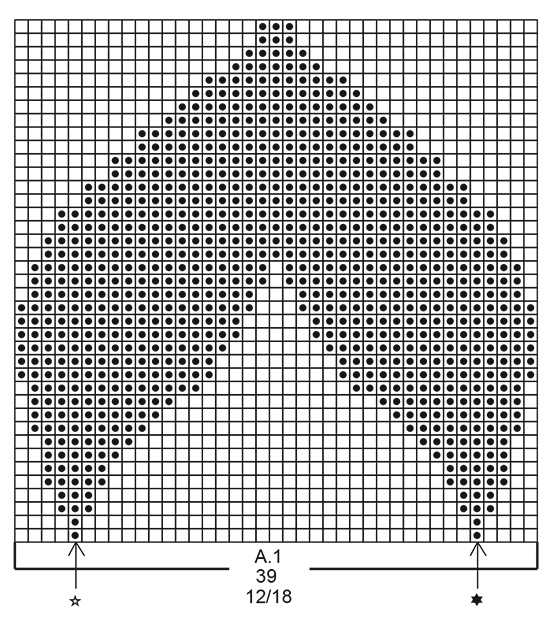
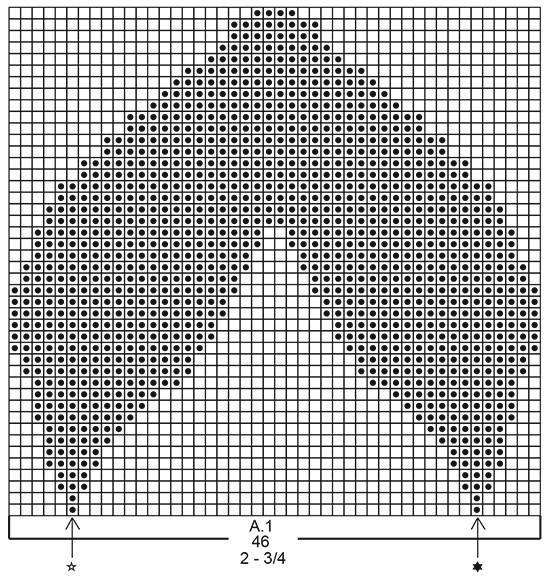
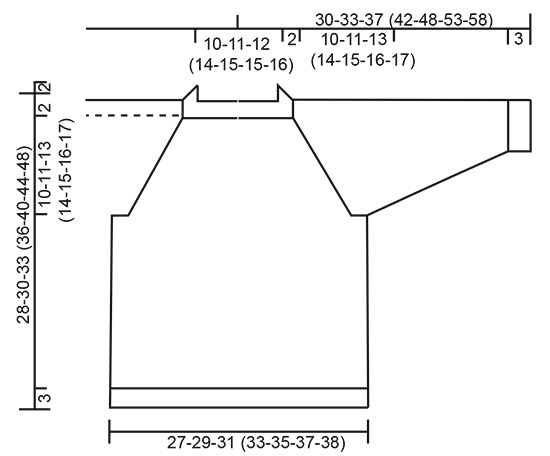
------------------------------------------------------- EXPLANATIONS FOR THE PATTERN: ------------------------------------------------------- RIDGE/GARTER STITCH (worked back and forth): Knit all rows. 1 ridge in height = Knit 2 rows. PATTERN: Diagrams A.1 to A.3 – choose diagram for your size. The whole of diagram A.1 is worked in stocking stitch. The diagrams show all rows in the pattern from the right side. When working with 2 colours, work with more than 1 strand of each colour to avoid long strands on the wrong side. You can use the strand from both the inside and outside of the ball. I.e. the first part of A.1 is knitted with 5 threads (1 thread hazelnut, 1 thread light beige, 1 thread hazelnut, 1 thread light beige, 1 thread hazelnut), the rest of A.1 is knitted with 3 threads ( 1 thread hazelnut, 1 thread light beige, 1 thread hazelnut) NOTE: To avoid holes when changing colour, twist the 2 strands together. Diagrams A.2 and A.3 show how the ears are sewn with duplicate stitches. INCREASE TIP: All increases are worked from the right side! Increase 1 stitch after marker 1, work until there is 1 stitch left before markers 2, 3 and 4, 1 yarn over, work 2 stitches (markers sit between these 2 stitches), 1 yarn over and increase 1 stitch before marker 5 (= 8 stitches increased). Increase by making 1 yarn over, which is worked twisted on the next row to avoid holes. DECREASE TIP (for sleeves): Decrease 1 stitch on each side of the marker as follows: Work until there are 3 stitches left before the marker, knit 2 together, knit 2 (marker sits between these 2 stitches), slip 1 stitch as if to knit, knit 1 and pass the slipped stitch over the knitted stitch (= 2 stitches decreased). CASTING-OFF TIP: To avoid the cast-off edge being tight you can cast off with a larger size needle. If the edge is still tight, make 1 yarn over after approx. each 4th stitch at the same time as casting off and the yarn overs are cast off as normal stitches. ------------------------------------------------------- START THE PIECE HERE: ------------------------------------------------------- JUMPER – SHORT OVERVIEW OF THE PIECE: The piece is worked top down. The yoke is worked back and forth with circular needle, before it is divided for sleeves and body. The body is continued back and forth with circular needle. The sleeves are worked in the round with double pointed needles. YOKE: Cast on 56-60-60 (68-72-72-76) stitches (including 1 edge stitch on each side) with circular needle size 3.5 mm and hazelnut. Purl 1 row from the wrong side. Then work rib as follows: Work 1 edge stitch in GARTER STITCH – read description above, * knit 2, purl 2 *, work from *-* until there are 3 stitches left, knit 2 and 1 edge stitch in garter stitch. When the rib measures 1½ to 2 cm, change to circular needle size 4.5 mm. Insert 5 markers in the piece and increase evenly from the right side as follows: Work 1 edge stitch in garter stitch, knit 1, insert marker 1, knit 7 and increase 2-4-2 (2-2-2-2) stitches evenly, insert marker 2 (= left sleeve), knit 21-23-23 (27-29-29-31) and increase 2-2-2 (1-1-2-1) stitches evenly, insert marker 3 (= back piece), knit 8 and increase 2-4-2 (2-2-2-2) stitches evenly, insert marker 4 (= right sleeve), knit 16-18-18 (22-24-24-26) and increase 2-2-2 (1-1-2-1) stitches evenly, insert marker 5, knit 1 and finish with 1 edge stitch in garter stitch = 64-72-68 (74-78-80-82) stitches. Continue with stocking stitch and 1 edge stitch in garter stitch on each side and increase to raglan on each row from the right side as follows: Increase at each marker – read INCREASE TIP, a total of 13-14-15 (16-17-18-19) times = 168-184-188 (202-214-224-234) stitches. REMEMBER THE KNITTING TENSION! Work until the piece measures 12-13-15 (16-17-18-19) cm from the cast-on edge. Now divide the piece for body and sleeves on the next row from the right side as follows: Work 1 stitch in garter stitch, place the next 36-40-40 (42-44-46-48) stitches on 1 thread for the sleeve and cast on 4-4-6 (6-6-6-6) stitches under the sleeve, knit 49-53-55 (60-64-67-70) stitches (= back piece), place the next 36-40-40 (42-44-46-48) stitches on 1 thread for the sleeve and cast on 4-4-6 (6-6-6-6) stitches under the sleeve, knit 45-49-51 (56-60-63-66) stitches, 1 stitch in garter stitch and cast on 4-4-4 (4-4-4-5) stitches at the end of the row = 108-116-124 (134-142-148-155) stitches. BODY: Continue back and forth with stocking stitch and 1 edge stitch in garter stitch on each side until the piece measures 0-0-0 (0-1-2-3) cm from the division. Now work A.1 on the front piece as follows: Work 1 edge stitch in garter stitch, stocking stitch over 62-68-72 (76-82-84-89) stitches, A.1 (= 35-35-39 (46-46-51-51) stitches), stocking stitch over 9-11-11 (10-12-11-13) stitches and 1 edge stitch in garter stitch. Continue this pattern. When A.1 has been worked 1 time in height, finish the piece with hazelnut. Work stocking stitch with 1 edge stitch in garter stitch on each side until the piece measures 13-14-15 (17-20-23-26) cm from the division. On the next row from the right side increase 2-2-2 (0-0-2-3) stitches evenly spaced = 110-118-126 (134-142-150-158) stitches. Change to circular needle size 3.5 mm. On the next row from the right side work rib as follows: 1 edge stitch in garter stitch, * knit 2, purl 2 *, work from *-* until there is 1 stitch left and finish with 1 edge stitch in garter stitch. Cast off with knit from the right side when the rib measures 3 cm – read CASTING-OFF TIP. The jumper measures approx. 28-30-33 (36-40-44-48) cm from the shoulder down. SLEEVE: Place the 36-40-40 (42-44-46-48) stitches from the thread on the one side of the piece on double pointed needles size 4.5 mm and knit up 1 stitch in each of the 4-4-6 (6-6-6-6) stitches cast on under the sleeve = 40-44-46 (48-50-52-54) stitches. Insert 1 marker in the middle of the 4-4-6 (6-6-6-6) stitches under the sleeve. Allow the marker to follow your work onwards; it will be used when decreasing under the sleeve. Work stocking stitch in the round. When the sleeve measures 2 cm from the division decrease 1 stitch on each side of the marker – read DECREASE TIP! Decrease like this every 2-2-1½ (2½-3½-4-5) cm a total of 3-4-5 (5-5-5-5) times = 34-36-36 (38-40-42-44) stitches. When the sleeve measures 10-12-13 (16-21-25-28) cm from the division decrease 2-0-0 (2-0-2-0) stitches evenly spaced = 32-36-36 (36-40-40-44) stitches. Change to double pointed needles size 3.5 mm and work rib (= knit 2, purl 2). Cast off with knit when the rib measures 3 cm. Work the other sleeve in the same way. RAGLAN-BAND: Knit up from the right side approx. 28 to 36 stitches (divisible by 4) inside the 1 edge stitch along the sleeve’s raglan-opening with circular needle size 3.5 mm and hazelnut. Work rib (= knit 2, purl 2) with 1 edge stitch in garter stitch and 2 knitted stitches on each side (seen from the right side). When the band measures 2 cm, cast off with knit over knit and purl over purl. Repeat along the raglan-opening on the front piece but when the band measures 1 cm work 4 buttonholes evenly spaced. 1 buttonhole = purl 2 together in the purled section, (seen from the right side) and make 1 yarn over. ASSEMBLY: Sew the side seam inside the 1 edge stitch. Embroider the fox’s eyes and nose on the front piece using black. The ears are sewn using duplicate stitches and light beige, according to diagrams A.2 and A.3. The stitches are sewn top down. The stitch with the arrow and a star in diagrams A.2 and A.3, is sewn approx. 2 rows above the stitch with the arrow and a star in A.1. Sew the bands at the bottom of the raglan-openings (this is where the body starts) – the band on the front piece should lie over the band on the sleeve. Sew buttons onto the band on the sleeve. |
|||||||||||||
Diagram explanations |
|||||||||||||
|
|||||||||||||
 |
|||||||||||||
 |
|||||||||||||
 |
|||||||||||||
 |
|||||||||||||
 |
|||||||||||||
 |
|||||||||||||
Have you finished this pattern?Tag your pictures with #dropspattern #littlefoxsweater or submit them to the #dropsfan gallery. Do you need help with this pattern?You'll find 30 tutorial videos, a Comments/Questions area and more by visiting the pattern on garnstudio.com. © 1982-2026 DROPS Design A/S. We reserve all rights. This document, including all its sub-sections, has copyrights. Read more about what you can do with our patterns at the bottom of each pattern on our site. |
|||||||||||||


With over 40 years in knitting and crochet design, DROPS Design offers one of the most extensive collections of free patterns on the internet - translated to 17 languages. As of today we count 324 catalogues and 12290 patterns translated into English (UK/cm). 12290
We work hard to bring you the best knitting and crochet have to offer, inspiration and advice as well as great quality yarns at incredible prices! Would you like to use our patterns for other than personal use? You can read what you are allowed to do in the Copyright text at the bottom of all our patterns. Happy crafting!
Post a comment to pattern DROPS Baby 36-14
We would love to hear what you have to say about this pattern!
If you want to leave a question, please make sure you select the correct category in the form below, to speed up the answering process. Required fields are marked *.