
Popular categories
Looking for a yarn?


Comments / Questions (91)
![]() Ingrid Widera wrote:
Ingrid Widera wrote:
Hallo, ich verstehe nicht, warum das Rumpfteil in Hin und Rückreihen gestrickt wird und nicht rund? Der Schlitz ist doch bei Teilung in Ärmel und rumpfteil fertig, oder?
15.11.2023 - 20:55DROPS Design answered:
Liebe Frau Widera, man muss hier in Reihen wegen dem Muster stricken, da das Muster A.1 nur beim Vorderteil ist, wird es in Hin- und Rückreihen weitergestrickt. Viel Spaß beim stricken!
16.11.2023 - 09:59
![]() Billie wrote:
Billie wrote:
Hi, I am knitting this jumper size 18mth. I have a question about the yoke part. I did the increase reach 188 stitches. By then the piece should be 15cm long, before dividing body and sleeves on the next row from the right side. However, my piece is 13cm long instead 15cm. Should I move on with the division anyways? Or continue knitting for 2cm while continuing the increase at each marker? Or continue knitting for 2cm with no increase? Thank you!
15.10.2023 - 12:32DROPS Design answered:
Dear Billie, as you can see in the next sentence, you haven't reached 15cm after finishing the increase; you need to work straight (with no increases) until the piece measures 15cm. Then, you will working the division. "Increase at each marker .... =168-184-188 (202-214-224-234) stitches. REMEMBER THE KNITTING TENSION! Work until the piece measures 12-13-15 (16-17-18-19) cm from the cast-on edge. " Happy knitting!
15.10.2023 - 23:16
![]() Carina Hed wrote:
Carina Hed wrote:
Ett krångligt mönster! Svårt att förstå uppläggningarna under armarna! Enligt mönstret ska jag lägga upp 4 maskor under ärmarna 3 gånger!? I början, ca på mitten och på slutet! Annars är det jag som fattar fel.
04.10.2023 - 15:44
![]() Lis Mann wrote:
Lis Mann wrote:
Hej og en. Tak for hurtigt svar, det blev jeg glad for. Vh Lis
17.03.2023 - 16:40
![]() Lis Mann wrote:
Lis Mann wrote:
Hvordan slår man de 6 masker op under ærmet? Vh Lis
16.03.2023 - 16:31DROPS Design answered:
Hej Lis, Her ser du en video hvordan man strikke oppefra og ned med raglan, vi viser også hvordan man slår masker op under ærmerne : Bluse strikket oppefra og ned
17.03.2023 - 08:56
![]() Beverley wrote:
Beverley wrote:
I still don't understand the diagrams. The A1 diagram is the face of the fox only. A2 and A3 appear to have the ear diagrams. How does this work together, when one seems to be on a different scale, and where do I begin the contrast yarn for the ears?
23.02.2023 - 22:18DROPS Design answered:
Dear Beverly, after the jumper is done, embroider A.2 and A.3 so that the stitch with an arrow in A.2/A.3 is approx. 2 rows above the stitch with an arrow and a star in A.1 - see ASSEMBLY. Happy knitting!
24.02.2023 - 10:03
![]() Beverley wrote:
Beverley wrote:
I see the instruction to begin the chart A.1 but not A.3. Do I just begin A.3 when it tells me to begin A.1? Thanks for your help
20.02.2023 - 19:00DROPS Design answered:
Dear Beverly, diagrams A.2 and A.3 are not knitted, they just show how to embroider the ears with duplicate stitches when jumper is done - see ASSEMBLY. Happy knitting!
21.02.2023 - 10:03
![]() Jonne Bremer wrote:
Jonne Bremer wrote:
Ik weet niet wat ik moet doen als er staat: cast on 4-4-6 (6-6-6-6) stitches under the sleeve. Waar komen deze steken bij? Bij de body of op de hulpnaald? I don't know what to do when it says: cast on 4-4-6 (6-6-6-6) stitches under the sleeve. Where do these stitches go? Do the join the body stitches or do they go on the thread?
22.01.2023 - 14:05DROPS Design answered:
Dag Jonne,
Als je bij het lijf bent dan komen deze tussen het voorpand en het achterpand, dus in de zijnaad. Ze zitten eigenlijk precies op het punt van de oksel. Als je de mouw breit zet je op deze plek ook een aantal steken op. Op het einde wordt deze opening in de oksel dicht genaaid.
22.01.2023 - 17:24
![]() Shilps wrote:
Shilps wrote:
I'm back with another question 😊 The pattern for the yoke says: Then work rib as follows: Work 1 edge stitch in GARTER STITCH – read description above, * knit 2, purl 2 *, work from *-* until there are 3 stitches left, knit 2 and 1 edge stitch in garter stitch. Should I follow this pattern on both the right and wrong sides?
06.01.2023 - 23:44DROPS Design answered:
Dear Shilps, this is the rib, which is worked as it's seen. For example, if you have knit 2 on the right side, when turning the work, it will look like purl 2. So, you work purl 2 over these stitches. Happy knitting!
07.01.2023 - 19:33
![]() Shilps wrote:
Shilps wrote:
♥︎ the pattern! Am I the only one who can't figure out how many skeins of yarn are needed? I'm interested in the skein requirement for the 12-18 month size. Thank you!
27.12.2022 - 22:31DROPS Design answered:
Hi Shilps, The yarn comes in skeins of 50 g, so for size 12-18 months you need 2 skeins. Happy festive season!
28.12.2022 - 11:48
|
|||||||||||||
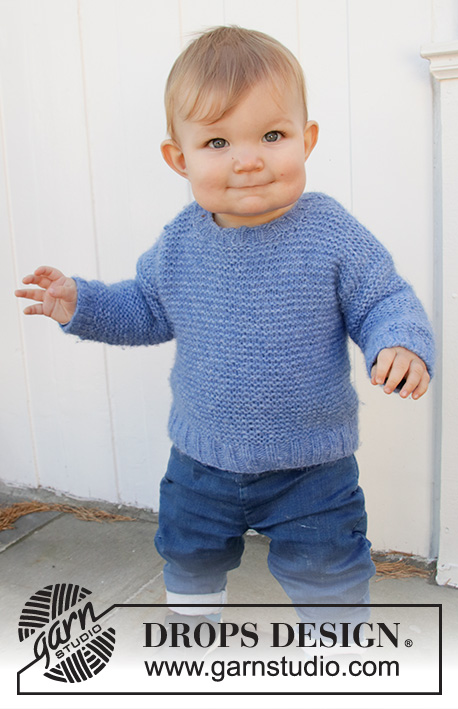
Little Fox#littlefoxsweater |
|||||||||||||
 |
 |
||||||||||||
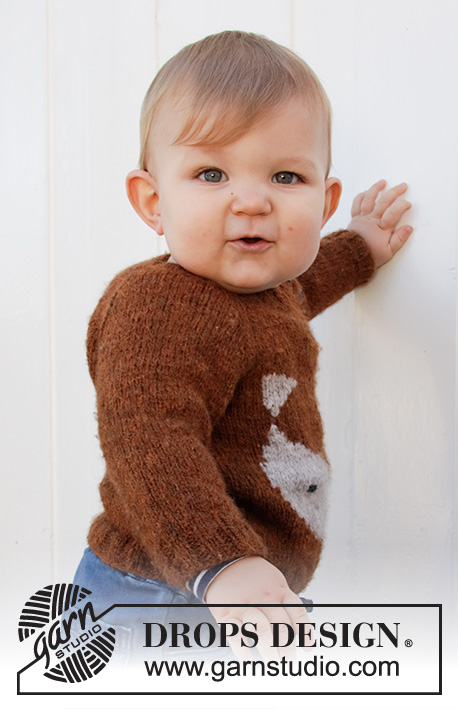
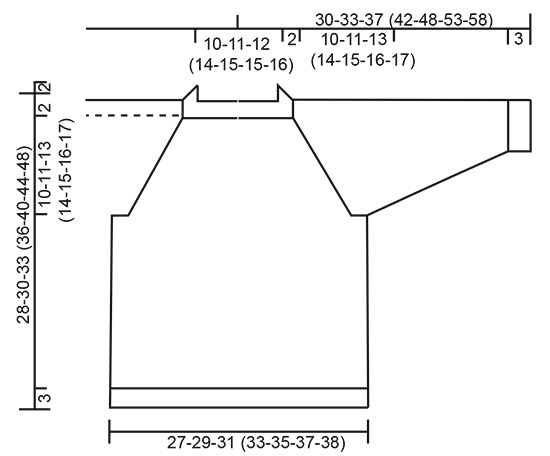
Knitted jumper with raglan for babies and kids in DROPS Sky. The piece is worked top down with fox-pattern. Sizes 1 month – 8 years.
DROPS Baby 36-14 |
|||||||||||||
|
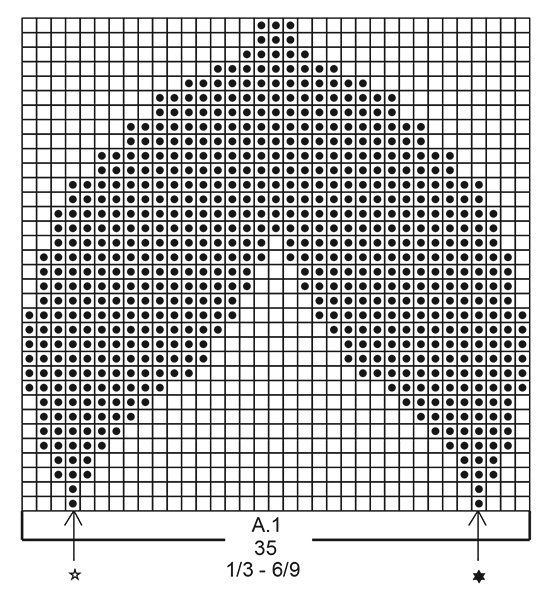
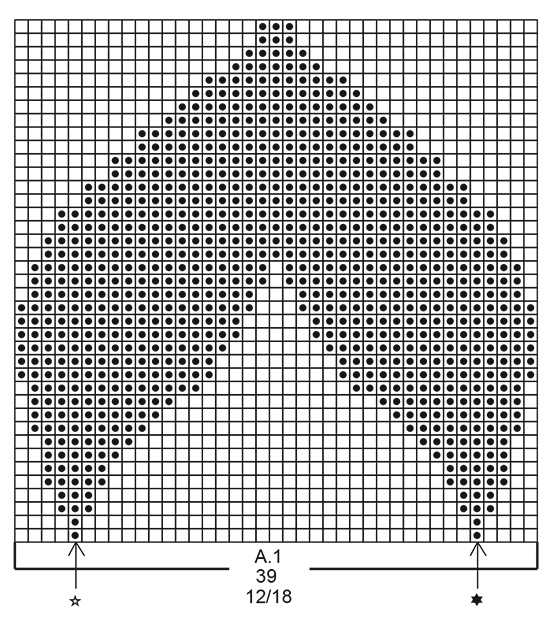
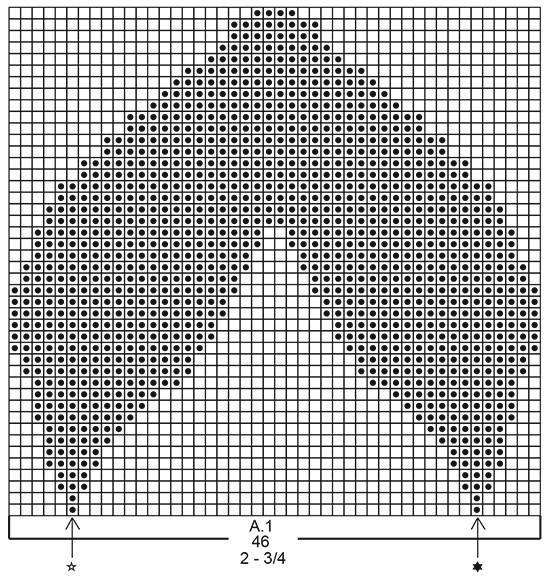
------------------------------------------------------- EXPLANATIONS FOR THE PATTERN: ------------------------------------------------------- RIDGE/GARTER STITCH (worked back and forth): Knit all rows. 1 ridge in height = Knit 2 rows. PATTERN: Diagrams A.1 to A.3 – choose diagram for your size. The whole of diagram A.1 is worked in stocking stitch. The diagrams show all rows in the pattern from the right side. When working with 2 colours, work with more than 1 strand of each colour to avoid long strands on the wrong side. You can use the strand from both the inside and outside of the ball. I.e. the first part of A.1 is knitted with 5 threads (1 thread hazelnut, 1 thread light beige, 1 thread hazelnut, 1 thread light beige, 1 thread hazelnut), the rest of A.1 is knitted with 3 threads ( 1 thread hazelnut, 1 thread light beige, 1 thread hazelnut) NOTE: To avoid holes when changing colour, twist the 2 strands together. Diagrams A.2 and A.3 show how the ears are sewn with duplicate stitches. INCREASE TIP: All increases are worked from the right side! Increase 1 stitch after marker 1, work until there is 1 stitch left before markers 2, 3 and 4, 1 yarn over, work 2 stitches (markers sit between these 2 stitches), 1 yarn over and increase 1 stitch before marker 5 (= 8 stitches increased). Increase by making 1 yarn over, which is worked twisted on the next row to avoid holes. DECREASE TIP (for sleeves): Decrease 1 stitch on each side of the marker as follows: Work until there are 3 stitches left before the marker, knit 2 together, knit 2 (marker sits between these 2 stitches), slip 1 stitch as if to knit, knit 1 and pass the slipped stitch over the knitted stitch (= 2 stitches decreased). CASTING-OFF TIP: To avoid the cast-off edge being tight you can cast off with a larger size needle. If the edge is still tight, make 1 yarn over after approx. each 4th stitch at the same time as casting off and the yarn overs are cast off as normal stitches. ------------------------------------------------------- START THE PIECE HERE: ------------------------------------------------------- JUMPER – SHORT OVERVIEW OF THE PIECE: The piece is worked top down. The yoke is worked back and forth with circular needle, before it is divided for sleeves and body. The body is continued back and forth with circular needle. The sleeves are worked in the round with double pointed needles. YOKE: Cast on 56-60-60 (68-72-72-76) stitches (including 1 edge stitch on each side) with circular needle size 3.5 mm and hazelnut. Purl 1 row from the wrong side. Then work rib as follows: Work 1 edge stitch in GARTER STITCH – read description above, * knit 2, purl 2 *, work from *-* until there are 3 stitches left, knit 2 and 1 edge stitch in garter stitch. When the rib measures 1½ to 2 cm, change to circular needle size 4.5 mm. Insert 5 markers in the piece and increase evenly from the right side as follows: Work 1 edge stitch in garter stitch, knit 1, insert marker 1, knit 7 and increase 2-4-2 (2-2-2-2) stitches evenly, insert marker 2 (= left sleeve), knit 21-23-23 (27-29-29-31) and increase 2-2-2 (1-1-2-1) stitches evenly, insert marker 3 (= back piece), knit 8 and increase 2-4-2 (2-2-2-2) stitches evenly, insert marker 4 (= right sleeve), knit 16-18-18 (22-24-24-26) and increase 2-2-2 (1-1-2-1) stitches evenly, insert marker 5, knit 1 and finish with 1 edge stitch in garter stitch = 64-72-68 (74-78-80-82) stitches. Continue with stocking stitch and 1 edge stitch in garter stitch on each side and increase to raglan on each row from the right side as follows: Increase at each marker – read INCREASE TIP, a total of 13-14-15 (16-17-18-19) times = 168-184-188 (202-214-224-234) stitches. REMEMBER THE KNITTING TENSION! Work until the piece measures 12-13-15 (16-17-18-19) cm from the cast-on edge. Now divide the piece for body and sleeves on the next row from the right side as follows: Work 1 stitch in garter stitch, place the next 36-40-40 (42-44-46-48) stitches on 1 thread for the sleeve and cast on 4-4-6 (6-6-6-6) stitches under the sleeve, knit 49-53-55 (60-64-67-70) stitches (= back piece), place the next 36-40-40 (42-44-46-48) stitches on 1 thread for the sleeve and cast on 4-4-6 (6-6-6-6) stitches under the sleeve, knit 45-49-51 (56-60-63-66) stitches, 1 stitch in garter stitch and cast on 4-4-4 (4-4-4-5) stitches at the end of the row = 108-116-124 (134-142-148-155) stitches. BODY: Continue back and forth with stocking stitch and 1 edge stitch in garter stitch on each side until the piece measures 0-0-0 (0-1-2-3) cm from the division. Now work A.1 on the front piece as follows: Work 1 edge stitch in garter stitch, stocking stitch over 62-68-72 (76-82-84-89) stitches, A.1 (= 35-35-39 (46-46-51-51) stitches), stocking stitch over 9-11-11 (10-12-11-13) stitches and 1 edge stitch in garter stitch. Continue this pattern. When A.1 has been worked 1 time in height, finish the piece with hazelnut. Work stocking stitch with 1 edge stitch in garter stitch on each side until the piece measures 13-14-15 (17-20-23-26) cm from the division. On the next row from the right side increase 2-2-2 (0-0-2-3) stitches evenly spaced = 110-118-126 (134-142-150-158) stitches. Change to circular needle size 3.5 mm. On the next row from the right side work rib as follows: 1 edge stitch in garter stitch, * knit 2, purl 2 *, work from *-* until there is 1 stitch left and finish with 1 edge stitch in garter stitch. Cast off with knit from the right side when the rib measures 3 cm – read CASTING-OFF TIP. The jumper measures approx. 28-30-33 (36-40-44-48) cm from the shoulder down. SLEEVE: Place the 36-40-40 (42-44-46-48) stitches from the thread on the one side of the piece on double pointed needles size 4.5 mm and knit up 1 stitch in each of the 4-4-6 (6-6-6-6) stitches cast on under the sleeve = 40-44-46 (48-50-52-54) stitches. Insert 1 marker in the middle of the 4-4-6 (6-6-6-6) stitches under the sleeve. Allow the marker to follow your work onwards; it will be used when decreasing under the sleeve. Work stocking stitch in the round. When the sleeve measures 2 cm from the division decrease 1 stitch on each side of the marker – read DECREASE TIP! Decrease like this every 2-2-1½ (2½-3½-4-5) cm a total of 3-4-5 (5-5-5-5) times = 34-36-36 (38-40-42-44) stitches. When the sleeve measures 10-12-13 (16-21-25-28) cm from the division decrease 2-0-0 (2-0-2-0) stitches evenly spaced = 32-36-36 (36-40-40-44) stitches. Change to double pointed needles size 3.5 mm and work rib (= knit 2, purl 2). Cast off with knit when the rib measures 3 cm. Work the other sleeve in the same way. RAGLAN-BAND: Knit up from the right side approx. 28 to 36 stitches (divisible by 4) inside the 1 edge stitch along the sleeve’s raglan-opening with circular needle size 3.5 mm and hazelnut. Work rib (= knit 2, purl 2) with 1 edge stitch in garter stitch and 2 knitted stitches on each side (seen from the right side). When the band measures 2 cm, cast off with knit over knit and purl over purl. Repeat along the raglan-opening on the front piece but when the band measures 1 cm work 4 buttonholes evenly spaced. 1 buttonhole = purl 2 together in the purled section, (seen from the right side) and make 1 yarn over. ASSEMBLY: Sew the side seam inside the 1 edge stitch. Embroider the fox’s eyes and nose on the front piece using black. The ears are sewn using duplicate stitches and light beige, according to diagrams A.2 and A.3. The stitches are sewn top down. The stitch with the arrow and a star in diagrams A.2 and A.3, is sewn approx. 2 rows above the stitch with the arrow and a star in A.1. Sew the bands at the bottom of the raglan-openings (this is where the body starts) – the band on the front piece should lie over the band on the sleeve. Sew buttons onto the band on the sleeve. |
|||||||||||||
Diagram explanations |
|||||||||||||
|
|||||||||||||
 |
|||||||||||||
 |
|||||||||||||
 |
|||||||||||||
 |
|||||||||||||
 |
|||||||||||||
 |
|||||||||||||
Have you finished this pattern?Tag your pictures with #dropspattern #littlefoxsweater or submit them to the #dropsfan gallery. Do you need help with this pattern?You'll find 30 tutorial videos, a Comments/Questions area and more by visiting the pattern on garnstudio.com. © 1982-2026 DROPS Design A/S. We reserve all rights. This document, including all its sub-sections, has copyrights. Read more about what you can do with our patterns at the bottom of each pattern on our site. |
|||||||||||||


With over 40 years in knitting and crochet design, DROPS Design offers one of the most extensive collections of free patterns on the internet - translated to 17 languages. As of today we count 324 catalogues and 12290 patterns translated into English (UK/cm). 12290
We work hard to bring you the best knitting and crochet have to offer, inspiration and advice as well as great quality yarns at incredible prices! Would you like to use our patterns for other than personal use? You can read what you are allowed to do in the Copyright text at the bottom of all our patterns. Happy crafting!
Post a comment to pattern DROPS Baby 36-14
We would love to hear what you have to say about this pattern!
If you want to leave a question, please make sure you select the correct category in the form below, to speed up the answering process. Required fields are marked *.