
Popular categories
Looking for a yarn?


Comments / Questions (29)
![]() Zornitsa wrote:
Zornitsa wrote:
Buongiorno, vorrei chiedere il numero di maglie iniziali (CO), in questo caso 109 (collo) includono già i 6 da ogni lato o le dobbiamo calcolare (109 + 12) ed aggiungerle noi? Grazie se mi risponderete e complimenti, i vostri schemi sono tutti bellissimi.
12.10.2021 - 10:37DROPS Design answered:
Buonasera Zornitsa, il numero di maglie da avviare è già comprensivo delle maglie del bordo, come indicato nel testo. Buon lavoro!
13.10.2021 - 18:19
![]() Estelle wrote:
Estelle wrote:
Wie viel Garn benötigt man für diese Jacke, wenn man lange Ärmel stricken möchte? Reichen zusätzliche 50g?
25.07.2021 - 20:50DROPS Design answered:
Liebe Estelle, leider können wir jeder Anleitung nach jedem individuellen Frage anpassen und einzelne Modelle auf individuellen Wunsch hin umrechnen. Wenn sie Hilfe damit brauchen, wenden Sie sich bitte an Ihrem DROPS Laden, dort hilft man Ihnen gerne weiter - auch telefonisch oder per E-Mail. Danke im voraus für Ihr Verständnis. Viel Spaß beim stricken!
26.07.2021 - 09:05
![]() Lori wrote:
Lori wrote:
Hei , jeg er ferdig hele A 1 og A 2 men før økes maske A 1 det blir ikke ser ut bra hvorfor
14.06.2021 - 08:51DROPS Design answered:
Hej Lori, det er svært at sige hvor det kan være gået galt... Hvis man følger hver maske i diagrammet, så skal det se ud som på billedet. Det kan være du kan se ved at kigge på billedet hvor det kan være gået galt...
15.06.2021 - 15:33
![]() Lara Aldaz wrote:
Lara Aldaz wrote:
Buenas tardes: Estoy haciendo la muestra del motivo A2 de las mangas y aunque entiendo como hacer las disminuciones de los símbolos hacia los 2 lados, y también tejer uno, hacer lazada tejer el siguiente y en el revés tejer la lazada del revés, no sé como combinar ésto con los dos tipos de disminuciones para crear el motivo de las mangas. Por favor podrían explicarme como hacerlo? Muchas gracias, un saludo
05.04.2021 - 21:13
![]() Marie-pierre Donbalak wrote:
Marie-pierre Donbalak wrote:
Je ne comprends pas où faire les augmentations passé ls 2 premiers rangs du dessin; pourriez vous me donner l'explication du troisième rang du point fantaisie , merci
08.03.2021 - 16:02DROPS Design answered:
Bonjour Mme Donbalak, les augmentations des raglans ne figurent pas dans les diagrammes, elles doivent se faire comme indiqué dans le texte, de chaque côté de chaque A.1 (= avant et après chaque A.1). Au rang suivant, vous tricotez ces jetés en jersey (devants et dos) et comme indiqué dans le diagramme A.2 (manches), ainsi, au rang 2 de A.2 vous avez 12 mailles et au rang 3: 1 m env, 1 m end, 3 m env, 2 m ens à l'end, 1 jeté, 3 m env, 1 m end, 1 m env. Bon tricot!
09.03.2021 - 07:15
![]() Barbara wrote:
Barbara wrote:
Ja, vielen Dank. Ich habe mich durch die Darstellung der rechten Maschen in die Irre führen lassen und nicht daran gedacht, dass in der Rückreihe die Maschen ja links gestrickt werden.
26.10.2020 - 11:18
![]() Barbara wrote:
Barbara wrote:
Nachdem ich das Muster ein gutes Stück, 15 cm, gestrickt habe, stellte ich fest, dass das Muster optisch nicht mit dem Bild übereinstimmt. Ich glaube, die Abnahmen in A1 und A2 müssen von der linken Seite aus gemacht werden, ansonsten stimmt das markante Lochmuster nicht.
24.10.2020 - 15:23DROPS Design answered:
Liebe Barbara, ich misverstehe vielleicht Ihre Frage (dann Entschuldigung im voraus), die 1. Reihe in A.1/A.2 ist eine Hinreihe, und das Lochmuster wird abwechslungsweise 1 Umschlag, 1 Masche wie zum Rechtsstricken abheben, 1 Masche rechts, die abgehobene Masche über die gestrickte ziehen (Reihe 1) und 2 Maschen rechts zusammen, 1 Umschlag (Reihe 3). Bei den Rückreihen werden diese 2 Maschen links gestrickt. Hilft es so?
26.10.2020 - 08:00
![]() Kristin wrote:
Kristin wrote:
Jeg har strikket 2 pinner på mønsterdelen på bærestykket nå, men når jeg begynner på 3 pinne med mønster forstår jeg ikke hvor mange masker som skal strikkes glattstrikk før «1 økemaske til raglan og A1». Er det stolpen + 11 masker eller stolpen + 12 masker nå? Økes det på dette partiet med 1 maske glattstrikk for hver rette pinne? Jeg strikke str M.
26.08.2020 - 18:04DROPS Design answered:
Hej Kristin, du øger altid på hver side af de 10 masker i A.1 - god fornøjelse! :)
01.09.2020 - 13:35
![]() Anne-Mette wrote:
Anne-Mette wrote:
Jeg forstår ikke helt : strik ret i masken under næste maske. betyder det at jeg får to masker ud af en?
23.08.2020 - 16:15DROPS Design answered:
Hei Anne-Mette. Nei. Ta en titt på videoen som ligger under oppskriften som viser hvordan det strikkes. VIDEO: Hvordan strikke 1 rett i masken fra forrige omgang. God Fornøyelse!
24.08.2020 - 13:27
![]() Esther Kusningsih wrote:
Esther Kusningsih wrote:
Thanks for pattern
06.08.2020 - 02:14
|
||||||||||||||||||||||
Evening Glow Jacket#eveningglowjacket |
||||||||||||||||||||||
 |
 |
|||||||||||||||||||||
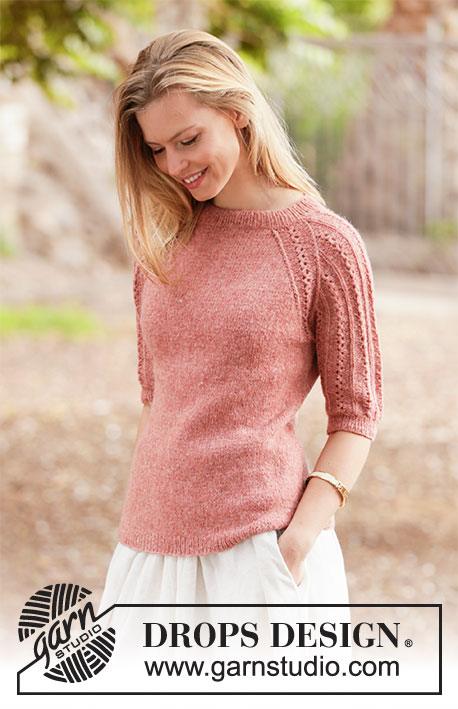
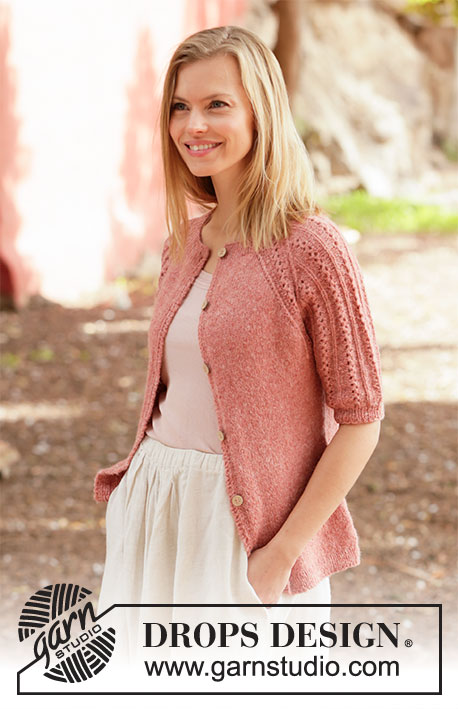
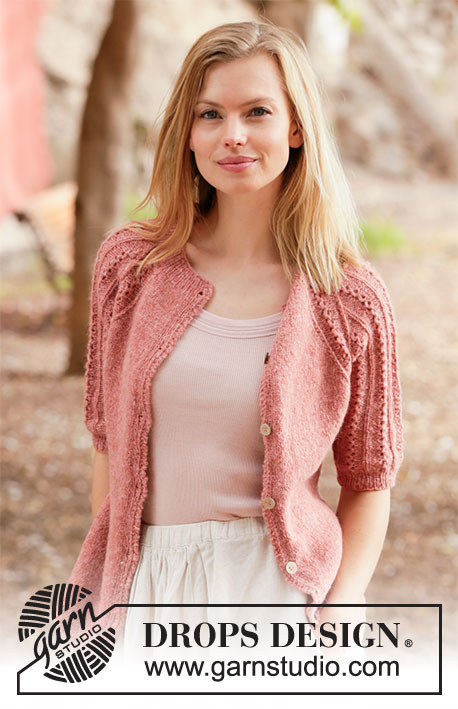
Knitted jacket in DROPS Sky. The piece is worked top down with raglan, short sleeves and lace pattern. Sizes S - XXXL.
DROPS 212-2 |
||||||||||||||||||||||
|
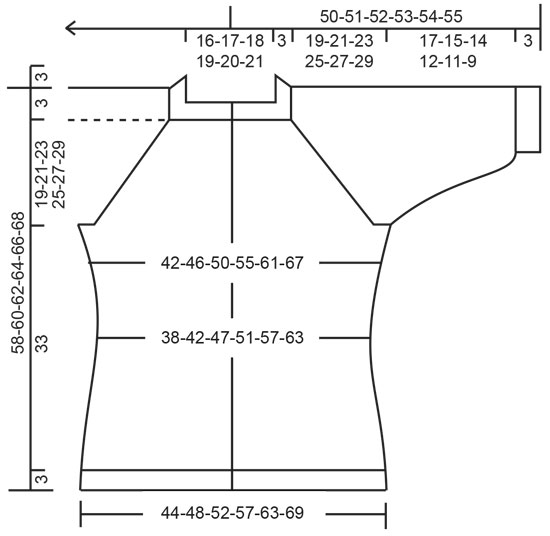
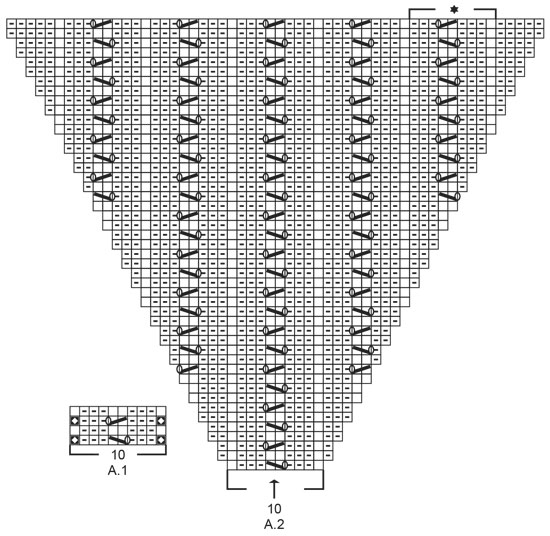
------------------------------------------------------- EXPLANATIONS FOR THE PATTERN: ------------------------------------------------------- RIDGE/GARTER STITCH (worked back and forth): Knit all rows. 1 ridge in height = Knit 2 rows. LEFT BAND (= 6 stitches): Work as follows from the right side: 2 stitches in garter stitch, 1 stitch in stocking stitch, 1 stitch in garter stitch, 1 stitch in stocking stitch, 1 stitch in garter stitch. Continue with garter stitch over garter stitch stocking stitch over stocking stitch. RIGHT BAND (= 6 stitches): Work as follows from the right side: 1 stitch in garter stitch, 1 stitch in stocking stitch, 1 stitch in garter stitch, 1 stitch in stocking stitch and 2 stitches in garter stitch. Continue with garter stitch over garter stitch and stocking stitch over stocking stitch. INCREASE/DECREASE TIP (evenly spaced): To work out how to increase/decrease evenly, count the total number of stitches on needle (e.g. 105 stitches), minus the bands (e.g. 12 stitches) and divide the remaining stitches with number of increases/decreases to be made (e.g. 3) = 31. In this example, increase by making 1 yarn over after each 31st stitch (do not increase on the bands; they are worked as before). On the next row work the yarn overs twisted to avoid holes. When decreasing, knit together each 30th and 31st stitch. PATTERN: See diagrams A.1 (raglan-line) and A.2 (pattern on sleeves). The diagrams show all rows in the pattern seen from the right side. RAGLAN: Increase 1 stitch on each side of the 10 stitches in A.1, in each transition between front/back pieces and sleeves (= 8 stitches increased on an increase-row). Increase by making 1 yarn over. On the next row (wrong side) purl the yarn overs twisted to avoid holes. Then work the new stitches in stocking stitch on the front/back pieces and in A.2 on the sleeves. DECREASE TIP-1 (for sides of body): Decrease 1 stitch on each side of the marker thread as follows: Work until there are 3 stitches left before the marker thread, knit 2 together, knit 2 (marker thread sits between these 2 stitches) slip 1 stitch as if to knit, knit 1 and pass the slipped stitch over the knitted stitch (= 2 stitches decreased). DECREASE TIP-2 (for mid under sleeves): Decrease 1 stitch on each side of the marker thread as follows: Work until there are 3 stitches left before the marker thread, purl 2 together, purl 2 (marker thread sits between these 2 stitches), purl 2 twisted together (= 2 stitches decreased). INCREASE TIP (for sides of body): All increases are worked from the wrong side! Work until there is 1 stitch left before the marker thread, make 1 yarn over, work 2 stitches in stocking stitch (marker thread sits between these 2 stitches) make 1 yarn over (= 2 stitches increased). On the next row (right side) knit the yarn overs twisted to avoid holes. Then work the new stitches in stocking stitch. BUTTONHOLES: Work buttonholes on the right band (when the garment is worn). Work from the right side when there are 4 stitches left on the row as follows: Make 1 yarn over, knit 2 together and work the last 2 stitches in garter stitch. On the next row (wrong side), knit the yarn over to leave a hole. The first buttonhole is worked when the rib on the neck measures approx. 2 cm. Then work the other 5-5-6-6-7-7 buttonholes with approx. 9-9½-8½-9-8-8 cm between each one. CASTING-OFF TIP: To avoid the cast-off edge being tight you can cast off with a larger size needle. If the edge is still tight, make 1 yarn over after approx. each 8th stitch at the same time as casting off and the yarn overs are cast off as normal stitches. ------------------------------------------------------- START THE PIECE HERE: ------------------------------------------------------- JACKET – SHORT OVERVIEW OF THE PIECE: The neck and yoke are worked back and forth with circular needle from mid front and top down. The yoke is divided for body and sleeves and the body continued back and forth. The sleeves are worked in the round with short circular needle/double pointed needles, top down. NECK: Cast on 105-109-113-119-123-127 stitches (including 6 band stitches on each side towards mid front) with circular needle size 3 mm and Sky. Purl 1 row (= wrong side). The next row is worked as follows from the right side: Work LEFT BAND (= 6 stitches) – read description above, * knit 1, purl 1 *, work from *-* until there are 7 stitches left on the row, knit 1 and finish by working RIGHT BAND (= 6 stitches) – read description above. Continue this rib for 3 cm, remember BUTTONHOLES on right band – read description above. NOTE: The bands are worked as described above to finished length. When the rib is finished, knit 1 row from the right side (bands worked as before) where you increase 3-7-7-5-1-5 stitches evenly spaced – read INCREASE/DECREASE TIP = 108-116-120-124-124-132 stitches. Insert 1 marker after the band at the beginning of the row; the yoke will be measured from this marker. Change to circular needle size 4 mm and purl 1 row from the wrong side with 6 band stitches on each side as before (yarn overs are purled twisted). Then work the yoke as described below. REMEMBER THE KNITTING TENSION! YOKE: Insert 4 marker threads in the piece as described below (without working the stitches): Count 20-22-23-24-24-26 stitches (= left front piece), insert 1 marker thread before the next stitch, count 20 stitches (= sleeve), insert 1 marker thread before the next stitch, count 28-32-34-36-36-40 stitches (= back piece), insert 1 marker thread before the next stitch, count 20 stitches (= sleeve), insert 1 marker thread before the next stitch. There are 20-22-23-24-24-26 stitches on the right needle after the last thread. On the next row begin the pattern as described below, AT THE SAME TIME increase to RAGLAN – read description above. Work the next row as follows from the right side: Work 6 band stitches as before, 9-11-12-13-13-15 stitches in stocking stitch, increase 1 stitch to raglan, work A.1 (= 10 stitches with marker thread in the middle), increase 1 stitch to raglan, work A.2 (= 10 stitches), increase 1 stitch to raglan, work A.1 (= 10 stitches with marker thread in the middle), increase 1 stitch to raglan, work 18-22-24-26-26-30 stitches in stocking stitch, increase 1 stitch to raglan, work A.1 (= 10 stitches with marker thread in the middle), increase 1 stitch to raglan, work A.2 (= 10 stitches), increase 1 stitch to raglan, work A.1 (= 10 stitches with marker thread in the middle), increase 1 stitch to raglan, work 9-11-12-13-13-15 stitches in stocking stitch and finish with 6 band stitches as before. Continue this pattern and increase to raglan every 2nd row (i.e. each row from the right side) a total of 23-25-29-33-37-40 times in height including the increase on the first row. NOTE: The increased stitches on the sleeves are worked into the pattern until there are a total of 5-5-7-7-7-7 repeats in width across the sleeve, then the next increased stitches are purled from the right side and knitted from the wrong side to finished length (A.2 shows the sleeves with all the increases in size S). After the last increase to raglan there are 292-316-352-388-420-452 stitches on the needle. Continue working without further increases until the piece measures 19-21-23-25-27-29 cm from the marker on the neck. Now divide the yoke for the body and sleeves by working the next row as follows: Work 46-50-55-60-66-72 stitches as before (= front piece), place the next 60-64-72-80-84-88 stitches on 1 thread for the sleeve, cast on 8 new stitches on the needle (= in side under the sleeve), work 80-88-98-108-120-132 stitches as before (= back piece), place the next 60-64-72-80-84-88 stitches on 1 thread for the sleeve, cast on 8 new stitches on the needle (= in side under the sleeve) and work the remaining 46-50-55-60-66-72 stitches as before (= front piece). Body and sleeves are finished separately. BODY: = 188-204-224-244-268-292 stitches. Insert 1 marker thread 50-54-59-64-70-76 stitches in from each side (= sides of body). There are 88-96-106-116-128-140 stitches between marker threads on the back piece. Allow the threads to follow your work onwards; they will be used when decreasing and increasing in the sides. Continue back and forth with stocking stitch and 6 band stitches on each side towards mid front as before. When the piece measures 3 cm from the division, decrease 1 stitch on each side of both marker threads – read DECREASE TIP-1 (= 4 stitches decreased). Decrease like this every 3 cm a total of 4 times on each side = 172-188-208-228-252-276 stitches. Continue working until the piece measures 16 cm from the division. On the next row from the wrong side increase 1 stitch on each side of both marker threads – read INCREASE TIP (= 4 stitches increased). Increase like this every 2½ cm a total of 6 times on each side = 196-212-232-252-276-300 stitches. Continue working until the piece measures 33 cm from the division (there is approx. 3 cm left to finished length; you can try the jacket on and work to desired length). Change to circular needle size 3 mm. Knit 1 row from the right side (bands worked as before) and increase at the same time 37-41-45-49-53-57 stitches evenly spaced – remember INCREASE/DECREASE TIP = 233-253-277-301-329-357 stitches. Work rib as follows from the wrong side: 6 band stitches as before, * purl 1, knit 1 *, work from *-* until there are 7 stitches left on the row, purl 1 and finish with 6 band stitches as before. Continue this rib for 3 cm. Cast off with garter stitch over garter stitch, knit over knit and purl over purl – read CASTING-OFF TIP! The jacket measures approx. 58-60-62-64-66-68 cm from the shoulder down. SLEEVES: Place the 60-64-72-80-84-88 stitches from the thread on the one side of the piece on short circular needle size 4 mm and knit up 1 stitch in each of the 8 stitches cast on under the sleeve = 68-72-80-88-92-96 stitches. Insert a marker thread in the middle of the 8 stitches under the sleeve. Allow the thread to follow your work onwards; it will be used when decreasing under the sleeve. Start the round at the marker thread and continue the pattern in the round with A.2 over the middle 46-46-64-64-64-64 stitches on top of the sleeve and the remaining 22-26-16-24-28-32 stitches purled. When the sleeve measures 2 cm from the division in all sizes, decrease 2 stitches mid under the sleeve – read DECREASE TIP-2. Decrease like this every 3-2-1½-1-½-½ cm a total of 5-6-8-10-12-13 times = 58-60-64-68-68-70 stitches. Continue working until the sleeve measures 17-15-14-12-11-9 cm from the division (there is approx. 3 cm left to finished length; you can try the jacket on and work to desired length). NOTE: Shorter measurements in larger sizes due to wider neck and longer yoke. Knit 1 row where you decrease 6-6-8-10-8-8 stitches evenly spaced – remember INCREASE/DECREASE TIP = 52-54-56-58-60-62 stitches. Change to double pointed needles size 3 mm and work rib in the round (= knit 1, purl 1) for 3 cm. Cast off with knit over knit and purl over purl – read CASTING-OFF TIP! The sleeve measures approx. 20-18-17-15-14-12 cm from the division. Work the other sleeve in the same way. ASSEMBLY: Sew buttons onto left band. |
||||||||||||||||||||||
Diagram explanations |
||||||||||||||||||||||
|
||||||||||||||||||||||
 |
||||||||||||||||||||||
 |
||||||||||||||||||||||
Have you finished this pattern?Tag your pictures with #dropspattern #eveningglowjacket or submit them to the #dropsfan gallery. Do you need help with this pattern?You'll find 30 tutorial videos, a Comments/Questions area and more by visiting the pattern on garnstudio.com. © 1982-2026 DROPS Design A/S. We reserve all rights. This document, including all its sub-sections, has copyrights. Read more about what you can do with our patterns at the bottom of each pattern on our site. |
||||||||||||||||||||||


With over 40 years in knitting and crochet design, DROPS Design offers one of the most extensive collections of free patterns on the internet - translated to 17 languages. As of today we count 324 catalogues and 12290 patterns translated into English (UK/cm). 12290
We work hard to bring you the best knitting and crochet have to offer, inspiration and advice as well as great quality yarns at incredible prices! Would you like to use our patterns for other than personal use? You can read what you are allowed to do in the Copyright text at the bottom of all our patterns. Happy crafting!
Post a comment to pattern DROPS 212-2
We would love to hear what you have to say about this pattern!
If you want to leave a question, please make sure you select the correct category in the form below, to speed up the answering process. Required fields are marked *.