Comments / Questions (111)
![]() Maria wrote:
Maria wrote:
Hallo, habe den Baby-Einteiler gestrickt, zusammengenäht und umhäkelt, mit Bindebändern. Es ist mir allerdings nicht klar, wie der Einteiler zugebunden werden soll. Das eine Band ist am linken Vorderteil und liegt unter dem überlappenden rechten Vorderteil. Normalerweise müsste das Band doch am Seitenrand herausgeführt werden, um es vorne mit dem anderen Band zu verbinden. Dafür ist jedoch keine Öffnung vorgesehen. Wie haben Sie sich das gedacht? Mit freundlichen Grüßen Maria
15.11.2021 - 16:02DROPS Design answered:
Liebe Maria, das Band am linken Vorderteil wird zusammen mit dem Band an der Innen Seite von der rechten Seite gebunden; und das Band am rechten Vorderteil wird zusammen mit dem Band an derAußen Seite von der linken Seite gebunden. Viel Spaß beim stricken!
16.11.2021 - 08:30
![]() Yrsa Saranpää wrote:
Yrsa Saranpää wrote:
Hej. jag funderar på ökningarna mitt fram (omlottsdelarna) - "öka vart 4.e varv gånger, därefter vart 6.e varv x antal gånger" = storlek 1-3 månader 11gånger. hur många cm blir omlottsdelen från grenen fram till att ökningarna är över? tycker vart 6.e varv och 11 gånger låter som det skulle bli enormt?
03.11.2021 - 20:02DROPS Design answered:
Då man räknar varven som behövs under ökningarna i storlek 1/3 månader blir det totalt 75 varv. Ifall stickfastheten stämmer blir detta ca 15-16 cm.
04.11.2021 - 17:16
![]() Heidi Wang wrote:
Heidi Wang wrote:
Hei Skjønner ikke helt hvordan jeg skal sy ben delen sammen. Ønsker en skritt for skritt forklaring hvis mulig
20.10.2021 - 20:35DROPS Design answered:
Hej Heidi, har du set videoen (du finder den nederst i opskriften), den viser ganske tydeligt hvordan det hænger sammen :)
21.10.2021 - 10:09
![]() Paula wrote:
Paula wrote:
Ich stricke meistens nach Schnitt, leider ist keine cm-Angabe vom Makierer bis zum Zubinden. Lt. Ihrer Anleitung für Gr. 2: 6 R Perlmuster, 2 R, dann 2 x in der 4. R u 11 x in der 6. R sind insgesamt 82 Reihen, die ergeben aber keine 20cm, ich muss aber eine schräge Kante haben. Wenn ich von den 53cm minus 18cm Beine minus 20cm Zubinden bleiben keine 9cm Arm/Hals übrig, sondern 15cm. Ich möchte wissen, ab wieviel cm Länge muss ich abnehmen und wieviel Maschen habe ich dann.
08.09.2021 - 17:57DROPS Design answered:
Liebe Paula, stimmt Ihre Maschenprobe? Damit alle Maßen wie in der Skizze stimmen, sollen Sie 24 M und 48 Reihen im Perlmuster = 10 x 10 cm haben. Leider können wir aber jeder Anleitung nicht nach jedem individuellen Frage bzw Maschenpnrobe anpassen und einzelne Modelle auf individuellen Wunsch hin umrechnen. Wenn sie Hilfe damit brauchen, wenden Sie sich bitte an dem Laden wo Sie die Wolle gekauft haben, dort hilft man Ihnen gerne weiter. Danke im voraus für Ihr Verständnis. Viel Spaß beim stricken!
09.09.2021 - 08:31
![]() Inger W wrote:
Inger W wrote:
Hei, har strikket bena og satt sammen. Det blir et hull midt foran. Har felt 5 masker., strikket 6 pinner og lagt opp 3 nye masker. Det skal vel ikke være sånn ? Hva er feil? \\r\\nHåper å få hjelp, har kjøpt garn på nett. \\r\\nMvh. Inger
06.07.2021 - 18:42
![]() Renate wrote:
Renate wrote:
Vielen lieben Dank 🤗 jetzt ist mir alles klar
25.06.2021 - 12:50
![]() Renate wrote:
Renate wrote:
Wunderschönen guten Tag. Habe baby talk angefangen, ist sehr gut erklärt, nur beim Teil "EINTEILER" bin ich verunsichert. Es steht geschrieben : in jeder 6. Reihe bei Grösse 68/74 17x 2 Maschen beidseitig zunehmen und maschen beidseitig zugenommen 54. Insgesamt maschen 176. (Ursprünglich 142 maschen) bei mir stimmt die rechnung nicht... bitte sind es nun nur 34 statt 54 Maschen zugenommen? Danke im voraus
24.06.2021 - 17:54DROPS Design answered:
Liebe Renata, es wurden 17 Maschen beidseitig zugenommen (= 1 M + 16 M in jeder6. Reihe = 17) - es waren davor 142 M + 17 +17 = 176 Maschen. Für jedes Vorderteil haben Sie jetzt insgesamt 54 Maschen (37 M vor den Zunahmen + 17 = 54 M) - (beim Rückenteil haben Sie immer noch 88 M wie zuvor). Viel Spaß beim stricken!
25.06.2021 - 07:20
![]() Rebecca Bryce wrote:
Rebecca Bryce wrote:
Can i get this pattern in stocking stitch. Thank you
05.06.2021 - 14:31DROPS Design answered:
Dear Rebecca, please understand, that we cannot modify our patterns to each individual request. We do have a number of patterns for baabyl overals, look through them, and you might find something similar to what you are looking for. Happy Knitting!
07.06.2021 - 03:43
![]() Cécile wrote:
Cécile wrote:
Auch ich verstehe nicht, wie man das ganze im Schritt zusammennähet, besonders nicht, wie man den Schlitz zu den 3 Blendemaschen schließt. Ich habe mir die Erklärungen aus den vorangegangenen Fragen mehrfach durchgelesen, aber nicht verstanden. Haben Sie vielleicht Bilder, ein Video oder eine andere Formulierung? Mit den bisherigen Formulierungen bin ich nicht weitergekommen.
17.05.2021 - 08:22DROPS Design answered:
Liebe Cécile, Sie nähen ja zuerst jedes Bein bis zu den abgeketteten Maschen zusammen, sodass Sie jeweils eine "Röhre" als Bein haben. Die je 5 Maschen, die Sie an beiden Seiten des Beins abgekettet haben, ergeben dann zusammen am oberen Ende des Beins 10 abgekettete Maschen. Es ist nun ein Schlitz zwischen den Beinen vorhanden, der von der Vorderseite des Einteilers zur Rückseite reicht. Diesen Schlitz nähen Sie nun zusammen, d.h. die 10 abgeketteten Maschen des einen Beins nähen Sie an die 10 abgeketteten Maschen des anderen Beins.
17.05.2021 - 22:27
![]() Cecile wrote:
Cecile wrote:
Ich habe noch eine Frage. Ich weiß nicht genau, wo ich das linke Vorderteil beginne. Wenn ich vom Rand zur Markierung an der Seite stricke, fehlt mir ja quasi ein Stück von der Hinreihe, und ich stricke zwei Rückreihen aufeinander. Und auf welcher Seite beginne ich das Rückenteil? Liebe Grüße!
17.05.2021 - 08:07DROPS Design answered:
Liebe Cécile, Sie können das linke Vorderteil ab dem Markierer mit der Hin-Reihe weiterstricken (den Maschenanschlag für den Ärmel machen Sie am Ende der nächsten Rück-Reihe) und können auch beim Rückenteil mit der Hin-Reihe weiterstricken (die Ärmelmaschen werden am Ende jeder Reihe angeschlagen). Möglich ist es aber auch, beim linken Vorderteil ab der Rück-Reihe zu stricken - Hauptsache, Sie bleiben weiter korrekt im Perlmuster und schlagen die Maschen am Ende der Rück-Reihen an. Weiterhin gutes Gelingen!
17.05.2021 - 22:36
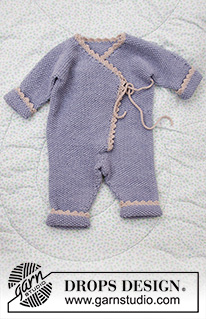
Baby Talk#babytalkonesie |
||||
 |
 |
|||
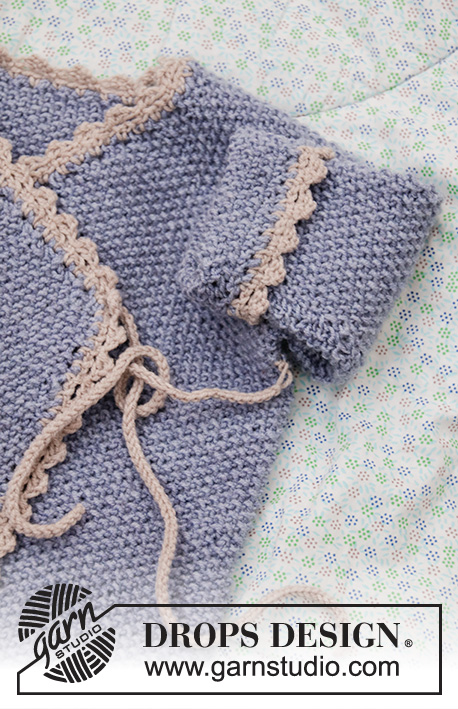
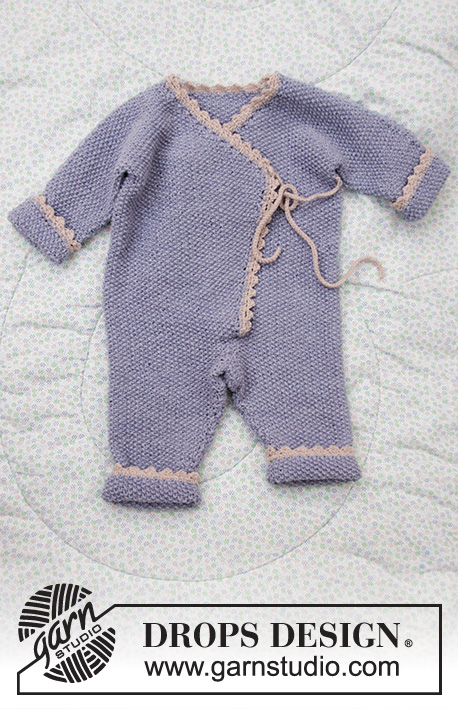
Knitted overall and hat for baby with moss stitch, garter stitch and crochet edge. The set is knitted in DROPS BabyMerino. Size overall: 1 month to 2 years Size hat: Premature to 4 years
DROPS Baby 33-30 |
||||
|
---------------------------------------------------------- EXPLANATION FOR THE PATTERN: ---------------------------------------------------------- GARTER STITCH (in the round - applies to hat): 1 ridge vertically = 2 rounds. Knit 1 round and purl 1 round. MOSS STITCH: Row 1: * Knit 1, purl 1 *, repeat from *-*. Row 2: Knit over purl and purl over knit. Repeat 2nd row upwards. INCREASE TIP (applies to overall): Increase inside 1 edge stitch. All increases are done from the right side. Increase by making 1 yarn over. Knit yarn over twisted on next row, it should not make holes. DECREASE TIP (applies to overall): Decrease inside 1 edge stitch. All decreases are done from the right side. Decrease as follows after 1 edge stitch: Slip 1 stitch knitwise, knit 1, pass slipped stitch over. Decrease as follows before 1 edge stitch: Knit 2 together. ---------------------------------------------------------- BEGIN PIECE FOR OVERALL HERE: ---------------------------------------------------------- OVERALL - SHORT OVERVIEW OF THE PIECE: Work from bottom up. First work 2 legs, then work the legs together and knit back and forth up to sleeve. Cast on stitches for sleeve in each side of piece, and work front and back piece separately until finished. Sew shoulder and sleeve seams and crochet an edge around the opening on overall at the end. Work entire overall in moss stitch. LEG: Worked back and forth on circular needle to make room for all the stitches. Cast on 46-50-54-58 (66-70) stitches (including 1 edge stitch in each side) on circular needle size 3 mm with light lavender. Work in MOSS STITCH over all stitches - see explanation above. REMEMBER THE KNITTING TENSION! When piece measures 6 cm, increase 1 stitch in each side of piece inside 1 edge stitch (= 2 stitches increased). Increase like this every 3rd-4th-5th-5th (8th-8th) row 11-11-12-14 (13-16) times in total = 68-72-78-86 (92-102) stitches. When piece measures 15-18-21-24 (29-34) cm, cast off 5 stitches at the beginning of the 2 next rows for gusset (i.e. cast off stitches in each side of piece) = 58-62-68-76 (82-92) stitches. Put piece aside and knit another leg the same way. OVERALL: Slip both legs on to same circular needle size 3 mm, with cast off stitches towards each other = 116-124-136-152 (164-184) stitches. Insert 1 marker thread in the piece. NOW MEASURE PIECE FROM HERE! Work 6 rows moss stitch back and forth, begin mid front. Then work as follows: Cast on 3 stitches at the end of the next 2 rows (for front bands) = 122-130-142-158 (170-190) stitches. Insert 1 marker after 32-34-37-41 (44-49) stitches in from each side. Move the markers upwards when working, they mark front pieces and back piece. Now increase stitches mid front (i.e. in each side of piece) so that the front pieces overlap. Increase 1 stitch inside 1 edge stitch in each side of piece (= 2 stitches increased) - read INCREASE TIP! Increase on every 4th row 3-2-0-3 (2-13) more times, then on every 6th row 8-11-16-17 (21-15) times (= 12-14-17-21 (24-29) stitches increased in total in each side of piece) = 44-48-54-62 (68-78) stitches on each front piece = 146-158-176-200-218-248 stitches in total. READ ALL OF THE FOLLOWING SECTION BEFORE CONTINUING! DECREASE MID FRONT FOR NECK INSIDE 1 EDGE STITCH WHILE AT THE SAME TIME DIVIDING THE PIECE AND CASTING ON STITCHES FOR SLEEVE. DECREASE MID FRONT FOR NECK AS FOLLOWS: Work over all stitches until piece measures 17-20-25-28 (32-34) cm from marker thread. Then decrease 1 stitch inside 1 edge stitch for neck in each side of piece (= 2 stitches decreased) - read DECREASE TIP! Decrease like this on every other row 20-24-27-31 (35-41) more times, then on every 4th row 2 times (= 23-27-30-34 (38-44) stitches decreased in total in each side of piece). DIVIDE THE PIECE AND CAST ON STITCHES FOR SLEEVE AS FOLLOWS: RIGHT FRONT PIECE: When piece measures 21-26-30-35 (40-43) cm from marker thread, divide piece at the 2 markers and finish front and back piece separately. Adjust so that next row is from right side. Now work over stitches until first marker (= right front piece). Slip the remaining stitches on a stitch holder. Now cast on stitches for sleeve at the end of every row from right side as follows (NOTE: Continue to decrease inside 1 edge stitch at the beginning of row as before): Cast on 4-6-6-6 (6-6) stitches in 4-4-5-6 (7-8) times in total, then 17-17-16-16 (18-20) stitches 1 time in total (= 33-41-46-52 (60-68) stitches cast on in total for sleeve). When all stitches are cast on and all decreases are done, there are 54-62-70-80 (90-102) stitches on needle. Work until piece measures 45-53-62-70 (81-90) cm in total, measured from leg to shoulder. Cast off. LEFT FRONT PIECE: Work over the last stitches slipped on a stitch holder, until marker. Work as right front piece but reversed - i.e. cast on stitches for sleeve at the end of row from wrong side. Continue to decrease inside 1 edge stitch at the end of row as before for neck. BACK PIECE: = 58-62-68-76 (82-92) stitches. Cast on new stitches at the end of every row in each side for sleeves as follows: Cast on 4-6-6-6 (6-6) stitches in 4-4-5-6 (7-8) times in total, then 17-17-16-16 (18-20) stitches 1 time in total (= 33-41-46-52 (60-68) stitches cast on in total for sleeve in each side of piece) = 124-144-160-180 (202-228) stitches. When piece measures 44-52-61-69 (80-89) cm in total, cast off the middle 16-20-20-20 (22-24) stitches for neck and finish each shoulder/sleeve separately (= 54-62-70-80 (90-102) stitches remain on each shoulder). Work like this until piece measures 45-53-62-70 (81-90) cm in total, measured from leg to shoulder, adjust according to front pieces. Cast off. Work the other shoulder the same way. ASSEMBLY: Sew overarm/shoulder seams with grafting/kitchener stitches from right side. Sew underarm seams together edge to edge in front loop of outermost stitches. Sew legs together inside 1 edge stitch, and sew the 5 stitches cast off between legs together. Sew vent up to where the 3 new stitches were cast on in each side for band stitches and sew the 3 band stitches in each side of piece to overall. CROCHET EDGE: Crochet on hook size 2.5 mm with light beige around the entire opening mid front on overall as follows: ROW 1 (= from wrong side): Begin mid front at the bottom of left front piece, work 1 double crochet in first stitch where 3 band stitches were cast on, * 1 chain stitch, skip approx. 1 cm, 1 double crochet in next stitch *, repeat from *-* (make sure to avoid a tight edge), continue crochet edge around overall until corner where decrease for neck began on left front piece, work tie as follows: 1 double crochet in tip, then work chain stitches for approx. 20-25 cm, turn and work 1 slip stitch in every chain stitch, then work 1 double crochet in tip on front piece again, work in the round until next tip (i.e. on right front piece), work tie, continue as before around the rest of overall down to where 3 band stitches were cast on, adjust to finish with 1 double crochet. ROW 2 (= from right side): Work 1 chain stitch, 1 double crochet around first chain stitch, * 4 chain stitches, 1 treble crochet in 4th chain stitch from hook, skip 1 double crochet + 1 chain stitch + 1 double crochet, work 1 double crochet around next chain stitch *, repeat from *-* (make sure to work over ties so that the ties are under the edge, i.e. do not work in stitch in tie), finish with 1 slip stitch in first double crochet on previous row. Cut and fasten the yarn. Crochet on hook size 2.5 mm with light beige mix at the bottom around both legs as follows: ROUND 1: Begin at the seam. Work 1 double crochet in first stitch, * 1 chain stitch, skip 2 stitches, 1 double crochet in next stitch *, repeat from *-* and finish with 1 slip stitch in first double crochet at beginning of round. ROUND 2: Work 1 chain stitch, 1 double crochet around first chain stitch, * 4 chain stitches, 1 treble crochet in 4th chain stitch from hook, skip 1 double crochet + 1 chain stitch + 1 double crochet, work 1 double crochet around next chain stitch *, repeat from *-* the entire round, finish with 1 slip stitch in first double crochet at beginning of round. Crochet on hook size 2.5 mm with light beige mix at the edge around both sleeves as follows: ROUND 1: Work 1 double crochet in first stitch at the bottom of sleeve, * 1 chain stitch, skip approx. 1 cm, 1 double crochet in next stitch *, repeat from *-* (make sure to avoid a tight edge) and finish with 1 slip stitch in first double crochet at beginning of round. ROUND 2: Work 1 chain stitch, 1 double crochet around first chain stitch, * 4 chain stitches, 1 treble crochet in 4th chain stitch from hook, skip 1 double crochet + 1 chain stitch + 1 double crochet, work 1 double crochet around next chain stitch *, repeat from *-* the entire round, finish with 1 slip stitch in first double crochet at beginning of round. Then work 1 tie like the one in the tip on right and left front piece, on the outside of left front piece, under sleeve (i.e. in the side) and on the inside of right front piece – make sure that the ties are at the same hight as tips on front piece. ---------------------------------------------------------- BEGIN PIECE FOR HAT HERE: ---------------------------------------------------------- HAT: Worked in the round on double pointed needles. Loosely cast on (68) 80-92-96-104 (112-116) stitches on double pointed needles size 2.5 mm with light lavender. Work rib = knit 2/purl 2 for (2) 2-3-3-3 (4-4) cm. Switch to double pointed needles size 3 mm and knit 1 round while AT THE SAME TIME decreasing 8 stitches evenly = (60) 72-84-88-96 (104-108) stitches. Continue with MOSS STITCH - see explanation above. When piece measures (9) 10-11-11-13 (13-14) cm, work in GARTER STITCH - see explanation above. On next knit round decrease (6) 8-7-8-8 (8-9) stitches evenly. Repeat decrease every other round (i.e. every knit round) (5) 5-5-5-5 (6-6) more times (= (6) 6-6-6-6 (7-7) decrease rounds in total) = (24) 24-42-40-48 (48-45) stitches. On next round knit all stitches together 2 by 2. Purl 1 round and repeat decrease on next knit round in size 1/3, 6/9 and 12/18 months and (2 - 3/4) years (do not decrease in the other sizes) = (12) 12-11-10-12 (12-12) stitches. Pull a double yarn through the remaining stitches and fasten tightly. |
||||
Diagram explanations |
||||
|
||||
 |
||||
Have you finished this pattern?Tag your pictures with #dropspattern #babytalkonesie or submit them to the #dropsfan gallery. Do you need help with this pattern?You'll find 31 tutorial videos, a Comments/Questions area and more by visiting the pattern on garnstudio.com. © 1982-2025 DROPS Design A/S. We reserve all rights. This document, including all its sub-sections, has copyrights. Read more about what you can do with our patterns at the bottom of each pattern on our site. |
||||






Post a comment to pattern DROPS Baby 33-30
We would love to hear what you have to say about this pattern!
If you want to leave a question, please make sure you select the correct category in the form below, to speed up the answering process. Required fields are marked *.