
Popular categories
Looking for a yarn?


Comments / Questions (58)
![]() Mirko wrote:
Mirko wrote:
The sleeve pattern is moss stitch (rather than double moss as mentioned in the description at the very top), right?
26.12.2025 - 23:45
![]() Lena:0) wrote:
Lena:0) wrote:
Guten Tag, leider komme ich immer noch nicht weiter... Kommt das Muster von den Ärmeln versetzt aus, obwohl im Diagramm immer 2 Runden übereinander gleich sind? Ansonsten müsste ich die Raglanlinie mit 2 Maschen auf jeder Seite vom Markierer stricken (1 Umschlag, 1 rechts, nächste Runde beide rechts). Irgendwie komme ich da nicht ins Muster, es sei denn, in jeder Runde und nicht in jeder 2. soll das Muster versetzt sein. Vielen Dank im Voraus!
17.11.2025 - 20:56DROPS Design answered:
Liebe Lena, wir haben heute morgen beantwortet, Verzeihung für die verspäte Antwort. Kann das Ihnen helfen?
18.11.2025 - 17:00
![]() Lena wrote:
Lena wrote:
Guten Tag, leider komme ich immer noch nicht weiter... Kommt das Muster von den Ärmeln versetzt aus, obwohl im Diagramm immer 2 Runden übereinander gleich sind? Ansonsten müsste ich die Raglanlinie mit 2 Maschen auf jeder Seite vom Markierer stricken (1 Umschlag, 1 rechts, nächste Runde beide rechts). Irgendwie komme ich da nicht ins Muster, es sei denn, in jeder Runde und nicht in jeder 2. soll das Muster versetzt sein. Vielen Dank im Voraus!
17.11.2025 - 20:55
![]() Linn wrote:
Linn wrote:
Diagrammet, vart är det någonstans? Förklaring till diagrammet om rät eller avig maska finns men inte själva diagrammet?
15.11.2025 - 17:10DROPS Design answered:
Hei Linn. Joda, det er 2 diagrammer, se under ermet på målskissen. mvh DROPS Design
17.11.2025 - 09:48
![]() Lena wrote:
Lena wrote:
Guten Tag, Kommt das Muster von den Ärmeln versetzt aus, obwohl im Diagramm immer 2 Runden übereinander gleich sind? Ansonsten müsste ich die Raglanlinie mit 2 Maschen auf jeder Seite vom Markierer stricken (1 Umschlag, 1 rechts, nächste Runde beide rechts). Irgendwie komme ich da nicht ins Muster, es sei denn, in jeder Runde und nicht in jeder 2. soll das Muster versetzt sein. Vielen Dank im Voraus!
23.09.2025 - 22:50DROPS Design answered:
Liebe Lena, die neuen Maschen stricken Sie am Anfang der Ärmel je nach der nächsten Masche: sollten Sie die nächste Masche links stricken, dann stricken Sie die Zunahme rechts, sollten Sie die nächste Masche rechts stricken, dann stricken Sie die Zunahme links, gleichfalls am Ende Ärmel: sollte die letzte Masche links sein, dann stricken Sie die Zunahme rechts, sollte sie rechts sein, dann stricken Sie die Zunahme links, so forsetzt das Muster weiter. Viel Spaß beim Stricken!
18.11.2025 - 09:27
![]() Vigdis wrote:
Vigdis wrote:
Stemmer det at det skal økes 8 masker omgangen før man begynner på bråtet på bolen? Er det nødvendig?
22.09.2025 - 22:34DROPS Design answered:
Hei Vigdis, Vi har økningen slik at vrangbord ikke er stram. Det er selvfølgelig mulig å la være å øke og få en strammere vrangbord. Hilsen Drops Team.
23.09.2025 - 06:35
![]() Wilmi Friesen wrote:
Wilmi Friesen wrote:
Ik ga voor de eerste keer een top to down kindertrui brrien
16.09.2025 - 22:03
![]() Christel wrote:
Christel wrote:
Ook ik heb problemen met het patroon. Ik begin met r, omslag en dan het patroon - r, a 5x, r - omslag, r. De volgende naald: r, r (omslag), dan het patroon - (r, a) 5x, r - r (omslag), r. Hierna wordt het onduidelijk. Als ik het patroon blijf volgen begin ik nu met r, omslag, (a, r) 6x, a, omslag, r. Dit betekent dat de rechte steken telkens boven elkaar komen. Ik neem aan dat ik in plaats hiervan het volgende moet doen r, omslag, (r, a) 6x, r, omslag, r. Zo komt averecht boven recht.
10.09.2025 - 19:58DROPS Design answered:
Dag Christel,
Het is de bedoeling dat het patroon symmetrisch op de mouw komt, dus je breit tussen de raglansteken herhalingen van A.1A en je breit de laatste steek in A.1B. Hierdoor heb je steeds aan het begin en eind van de mouw dezelfde steek (een averechte of een rechte). Het meerderen voor de raglan doe je vlak voor/na de raglansteek en je breit de gemeerderde steek gelijk mee in patroon op de mouwen op zo'n manier dat het patroon zich voorzet.
22.10.2025 - 20:39
![]() Karine wrote:
Karine wrote:
A1A på hele omgangen skriver dere som svar på mitt forrige spørsmål, men er da omgang 1 = a1a omgang 2=a1b osv?
09.09.2025 - 11:12DROPS Design answered:
Hei Karine. Du strikker kun A.1A på ermet. Du starter på diagram A.1A der det passer inn med A.1A fra bærestykket (usikker på hva du mener med: omgang 1 = a1a omgang 2=a1b). mvh DROPS Design
22.09.2025 - 11:22
![]() Karine wrote:
Karine wrote:
Jeg forstår ikke helt hvordan jeg skal strikke ermene med mønsteret. A1 a of a1 b, hvordan funker dette på ermene? A1a først så a1b eller annenhver eller hvordan er det tenkt?
08.09.2025 - 17:28DROPS Design answered:
Hei Karine, Mønsteret på ermene fortsetter fra bærestykke, og du starter med neste rad i diagram slik at mønsteret fortsetter pent. Du strikker kun A.1A på hele omgangen. Hilsen Drops team.
09.09.2025 - 06:46
|
|||||||
Blue August#blueaugustsweater |
|||||||
 |
 |
||||||
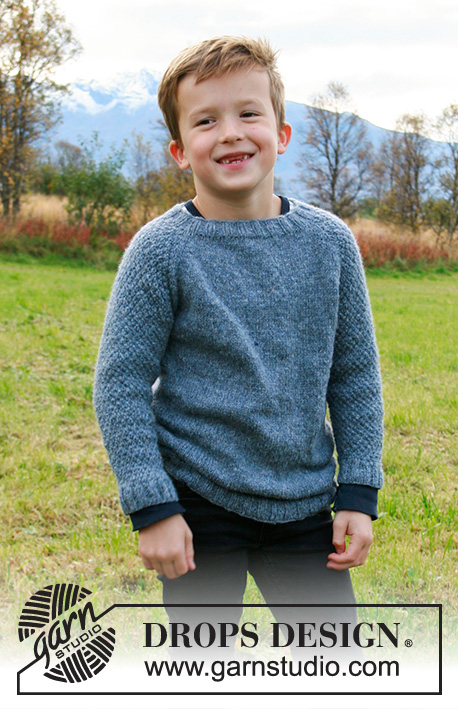
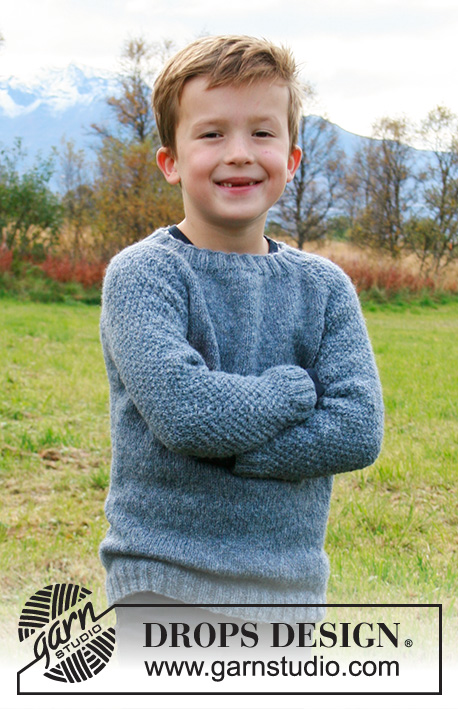
Knitted jumper for children in DROPS Sky. The piece is worked top down with raglan and double moss stitch on sleeves. Sizes 2-12 years.
DROPS Children 34-17 |
|||||||
|
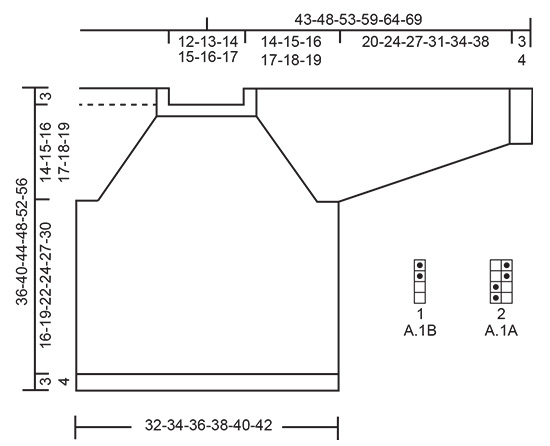
------------------------------------------------------- EXPLANATIONS FOR THE PATTERN: ------------------------------------------------------- INCREASE TIP: To work out how to increase evenly, count the total number of stitches on the needle (e.g. 76 stitches) and divide by the number of increases to be made (e.g. 14) = 5.4. In this example, increase by making 1 yarn over after alternately each 5th and 6th stitch. On the next round work the yarn overs twisted to avoid holes PATTERN (for sleeves): See diagram A.1. RAGLAN: Increase for raglan in every transition between front/back piece and sleeves as explained below: Increase after the marker like this: knit 1, make 1 yarn over. Increase before the marker thread like this: work until 1 stich remain before the marker, make 1 yarn over, knit 1. You increase 2 stitches at each marked, and a total of 8 stitches on the round. On the next round work the yarn overs twisted to avoid holes. Then work the new stitches in stocking stitch on front and back pieces and in A.1 on both sleeves. DECREASE TIP (for mid under sleeves): Decrease 1 stitch on each side of the marker thread as follows: Work until there are 2 stitches left before the marker thread, slip 1 stitch as if to knit, knit 1 and pass the slipped stitch over the knitted stitch, marker thread, knit 2 together (2 stitches decreased). ------------------------------------------------------- START THE PIECE HERE: ------------------------------------------------------- JUMPER - SHORT OVERVIEW OF THE PIECE: Neck and yoke are worked in the round with circular needle, top down. The yoke is divided for body and sleeves. The body is continued in the round with circular needle. The sleeves are worked in the round with double pointed needles, top down. NECK: Cast on 76-80-84-88-92-96 stitches with short circular needle size 3 mm and jeans blue. Knit 1 round then work rib in the round (knit 2/ purl 2) for 3 cm. Knit 1 round where you increase 14 stitches evenly spaced in all sizes – read INCREASE TIP = 90-94-98-102-106-110 stitches. Then work the yoke as described below. YOKE: Change to circular needle size 4 mm. Insert 4 markers in the piece as described below (without working the stitches). The markers will be used when increasing to raglan. Insert 1 marker at the beginning of the round, count 13 stitches (= sleeve), insert 1 marker before the next stitch, count 32-34-36-38-40-42 stitches (= front piece), insert 1 marker before the next stitch, count 13 stitches (= sleeve) and insert 1 marker before the next stitch. There are 32-34-36-38-40-42 stitches left after the last marker on the back piece. The first round is worked as follows: increase for RAGLAN after marker – read explanation above, work A.1A over the next 10 stitches (= 5 repeats of 2 stitches), A.1B (= 1 stitch), increase to raglan on each side of marker, work stocking stitch on front piece until there is 1 stitch left before the marker, increase to raglan on each side of marker, work A.1A over the next 10 stitches (= 5 repeats of 2 stitches), work A.1B (= 1 stitch), increase to raglan on each side of marker, work stocking stitch on back piece until 1 stitch remains before marker thread at beginning of round and increase for raglan before the marker (= 8 stitches increased). Continue this pattern with A.1 on both sleeves, stocking stitch on front and back pieces and 2 stitches in stocking stitch along each raglan-line (1 stitch on each side of each marker). REMEMBER THE KNITTING TENSION! AT THE SAME TIME increase to raglan every 2nd round a total of 16-17-18-19-20-21 times on both sides of the 4 markers (including the first increase described above) = 218-230-242-254-266-278 stitches. Continue the pattern without increasing until the piece measures 14-15-16-17-18-19 cm from the cast-on edge. Now divide the yoke for body and sleeves on the next round as follows: Start 1 stitch before the marker at the beginning of the round (i.e. slip the first stitch on right needle onto left needle), place the first 47-49-51-53-55-57 stitches on 1 thread for sleeve (the 2 stitches in stocking stitch in the raglan line are now part of the sleeve), cast on 6 new stitches on needle (= in side under sleeve), work 62-66-70-74-78-82 stitches in stocking stitch (= front piece), place the next 47-49-51-53-55-57 stitches on 1 thread for sleeve, cast on 6 new stitches on needle (= in side under sleeve) and work 62-66-70-74-78-82 stitches in stocking stitch (= back piece). Body and sleeves are finished separately. THE PIECE IS NOW MEASURED FROM HERE! BODY: = 136-144-152-160-168-176 stitches. Work stocking stitch in the round until the piece measures 16-19-22-24-27-30 cm from the division (or to desired length; there is approx. 3-3-3-4-4-4 cm left to finished length). Knit 1 round where you increase 8 stitches evenly spaced in all sizes = 144-152-160-168-176-184 stitches. Change to circular needle size 3 mm and work rib in the round (= knit 2/ purl 2) for 3-3-3-4-4-4 cm. Loosely cast off with knit over knit and purl over purl. The jumper measures approx. 36-40-44-48-52-56 cm from the shoulder down. SLEEVE: Place the 47-49-51-53-55-57 stitches from the thread on the one side of the piece on double pointed needles size 4 mm and knit up 1 stitch in each of the 6 stitches cast on under the sleeve = 53-55-57-59-61-63 stitches. Insert 1 marker thread in the middle of these 6 stitches. Allow the marker thread to follow your work onwards; it will be used when decreasing mid under sleeve. Start the round by the marker thread and work A.1 in the round (make sure you start on the right row in the diagram to match where you stopped on the yoke). When the sleeve measures 3 cm from the division decrease 2 stitches mid under sleeve – read DECREASE TIP. Decrease like this every 2-2½-3-3½-4-4½ cm a total of 8 times in all sizes = 37-39-41-43-45-47 stitches. Continue A.1 until the sleeve measures 20-24-27-31-34-38 cm from the division (or to required length; there is approx. 3-3-3-4-4-4 cm left to finished length). Knit 1 round where you increase 3-5-3-5-3-5 stitches evenly spaced = 40-44-44-48-48-52 stitches. Change to double pointed needles size 3 mm and work rib in the round (= knit 2/ purl 2) for 3-3-3-4-4-4 cm. Loosely cast off with knit over knit and purl over purl. The sleeve measures approx. 23-27-30-35-38-42 cm from the division. Work the other sleeve in the same way. |
|||||||
Diagram explanations |
|||||||
|
|||||||
 |
|||||||
Have you finished this pattern?Tag your pictures with #dropspattern #blueaugustsweater or submit them to the #dropsfan gallery. Do you need help with this pattern?You'll find 25 tutorial videos, a Comments/Questions area and more by visiting the pattern on garnstudio.com. © 1982-2026 DROPS Design A/S. We reserve all rights. This document, including all its sub-sections, has copyrights. Read more about what you can do with our patterns at the bottom of each pattern on our site. |
|||||||


With over 40 years in knitting and crochet design, DROPS Design offers one of the most extensive collections of free patterns on the internet - translated to 17 languages. As of today we count 324 catalogues and 12290 patterns translated into English (UK/cm). 12290
We work hard to bring you the best knitting and crochet have to offer, inspiration and advice as well as great quality yarns at incredible prices! Would you like to use our patterns for other than personal use? You can read what you are allowed to do in the Copyright text at the bottom of all our patterns. Happy crafting!
Post a comment to pattern DROPS Children 34-17
We would love to hear what you have to say about this pattern!
If you want to leave a question, please make sure you select the correct category in the form below, to speed up the answering process. Required fields are marked *.