
Popular categories
Looking for a yarn?


Comments / Questions (13)
![]() Ute wrote:
Ute wrote:
Guten Tag, warum kann man die Dateien nicht mehr in den eigenen Dateien sichern?
21.01.2025 - 12:02DROPS Design answered:
Liebe Ute, wenn Sie die Druckfunktion suchen, schauen Sie oben rechts neben dem Namen des Modells (d.h. neben der "Überschrift"), dort finden Sie drei Symbole, darunter ein Drucksymbol (daneben ein Pfeil nach rechts, daneben ein Herz). Über das Drucksymbol können Sie die Anleitung als pdf speichern. Wenn Sie die Anleitung als Favorit unter Ihrer E-Mail-Adresse speichern möchten, klicken Sie auf das Herz und geben dann Ihre E-Mail-Adresse an. Beachten Sie, dass Sie nur 200 Anleitungen unter einer E-Mail-Adresse speichern können.
21.01.2025 - 23:10
![]() Emilia wrote:
Emilia wrote:
Hur mycket väger koftan i storlek S -M - L?
07.10.2023 - 09:43DROPS Design answered:
Hej Emilia, Hvis du vil strikke den i 2 tråde i samme farve, kan du udgå fra natur x 2 :)
13.10.2023 - 14:16
![]() Ninon wrote:
Ninon wrote:
Bonjour madame est ce possible de tricoter la manche mois bouffante?
22.04.2023 - 23:51DROPS Design answered:
Bonjour Ninon, fort probablement, il vous suffirait sans doute de diminuer au milieu sous la manche comme on le fait pour une manche traditionnelle. Vous pouvez vous aider à cette fin d'un modèle similaire de tension identique. Bon tricot!
24.04.2023 - 10:03
![]() Claudia wrote:
Claudia wrote:
Hallo liebes Drops Team! Gibt es ein Video zur raglan Zunahme? Vielen lieben Dank
28.11.2021 - 15:34DROPS Design answered:
Liebe Claudia, diese Lektion zeigt, wie man einen Pullover von oben nach unten strickt, in diese Lektion werden die Umschläge (Raglanzunahmen) rechts verschränkt gestrickt, für diese Jacke stricken Sie die Umschläge bei der Rückreihe links, damit Löcher entstehen. Hoffentlich kann das Ihnen helfen. Viel Spaß beim stricken!
29.11.2021 - 07:56
![]() Hery wrote:
Hery wrote:
Bij het proeflapje staat dat je bij teveel steken een grotere naald moet nemen en bij te weinig steken een kleinere. Dit moet omgekeerd zijn. Bij teveel steken een kleinere naald en bij te weinig steken een grotere naald.
31.07.2020 - 10:01
![]() Yulia wrote:
Yulia wrote:
Hi! BODY description says: "When the piece measures 30-30-31-30-30-30 cm from the division knit 1 row from the right side where you increase 34-42-42-46-50-54 stitches evenly spaced – read INCREASE/DECREASE TIP = 220-244-256-276-296-320 stitches." Please help me to understand why an increase is needed just before the end of the garment? Thank you!
23.09.2019 - 14:01DROPS Design answered:
Dear Yulia, The rib edge is more elastic and will contract slightly compared to, for example, stocking stitch. By increasing before the rib edge, you avoid a visible difference in width between the rib edge and the rest of the body. Happy knitting!
23.09.2019 - 15:23
![]() Mia wrote:
Mia wrote:
Tråkigt att inte få svar på min fråga om 200-9
25.05.2019 - 11:08DROPS Design answered:
Hej Mia. Om du lägger din fråga som "fråga" istället för "kommentar" så ser vi den mycket fortare och kan svara dig. Vi har inga uppgifter om detta, men jag tänker att eftersom hela koftan stickas med 1 tråd natur + 1 tråd annan färg så borde garnmängden bli det dubbla av natur om den stickas enfärgad. Lycka till!
27.05.2019 - 10:40
![]() Mia wrote:
Mia wrote:
Hur mycket garn går det åt om man gör koftan enfärgad?
15.05.2019 - 14:19
![]() Susanne wrote:
Susanne wrote:
Er garnmængden beregnet ud fra den lange model? hvor meget skal der til den korte?
10.03.2019 - 20:37DROPS Design answered:
Hej Susanne, Der er kun én model, du finder garnforbruget øverst i opskriften som svarer til målene i måleskitsen nederst i opskriften. God fornøjelse!
12.03.2019 - 14:06
![]() Denolf wrote:
Denolf wrote:
Is kid's silk in kleur vanillegeel reeds te verkrijgen?
28.02.2019 - 15:16DROPS Design answered:
Dag Denolf,
Als het goed is, is deze gewoon verkrijgbaar. Je kunt je verkooppunt vragen of ze deze kleur op voorraad hebben.
07.03.2019 - 22:05
|
|
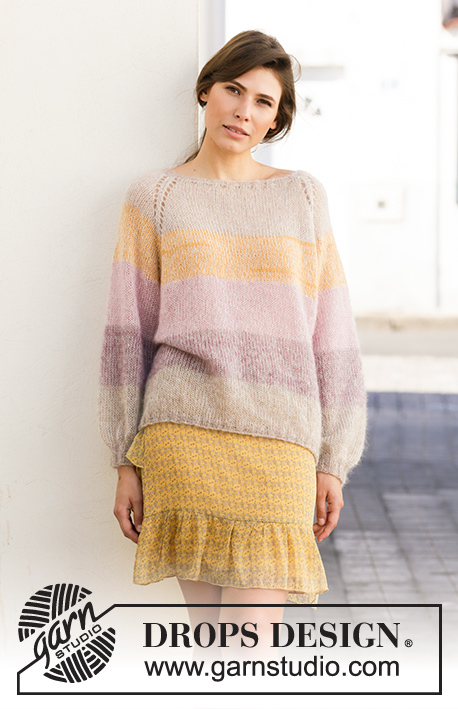
Bring Spring Cardigan#bringspringcardigan |
|
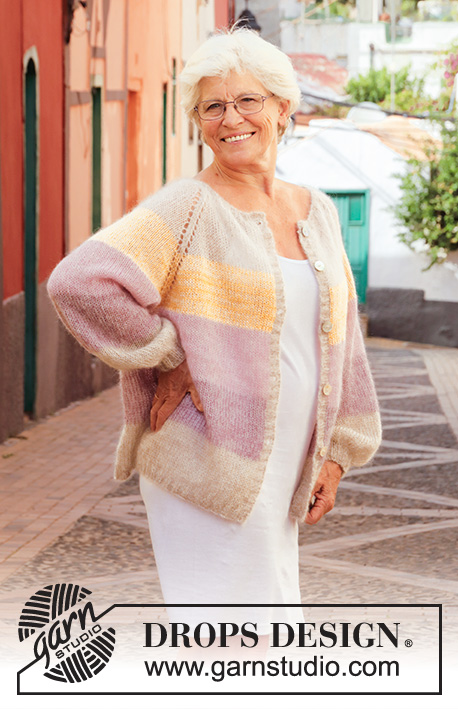 |
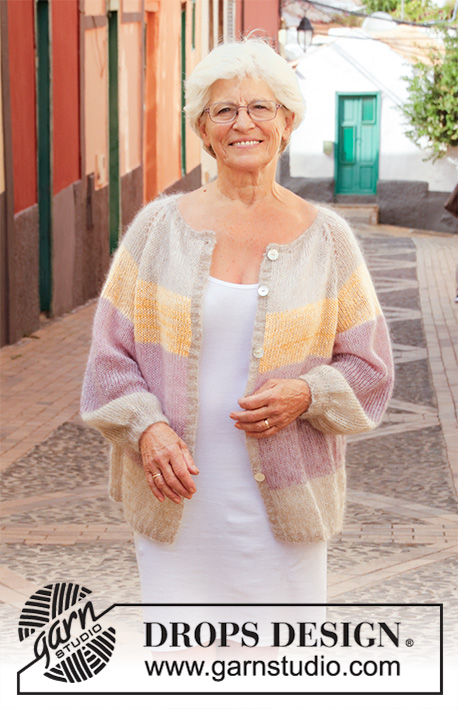 |
Knitted jacket in 2 strands DROPS Kid-Silk. The piece is worked top down with raglan, balloon sleeves and stripes. Sizes S - XXXL.
DROPS 200-9 |
|
|
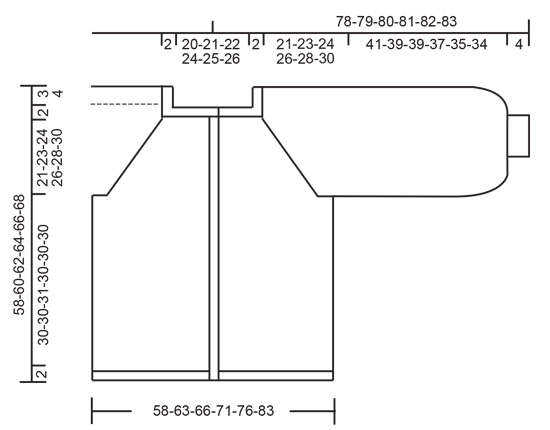
------------------------------------------------------- EXPLANATIONS FOR THE PATTERN: ------------------------------------------------------- STRIPES-1 (for yoke and body): 10-11-12-12-12-13 cm with 1 strand off-white + 1 strand light beige (= 2 strands). 11-11-11-12-12-12 cm with 1 strand off-white + 1 strand yellow (= 2 strands). 11-11-11-12-12-12 cm with 1 strand off-white + 1 strand old pink (= 2 strands). 11-11-11-12-12-12 cm with 1 strand off-white + 1 strand heather (= 2 strands). Then work with 1 strand off-white + 1 strand beige (= 2 strands). RIDGE/GARTER STITCH (worked back and forth): Knit all rows. 1 ridge in height = Knit 2 rows. RAGLAN: All increases are worked from the right side! Increase to raglan in each transition between body and sleeves as follows: Work until there is 1 stitch left before marker thread, 1 yarn over, knit 2 (marker thread sits between these 2 stitches), 1 yarn over (= 2 stitches increased). On the next row (wrong side) purl the yarn overs to leave holes. Then work the new stitches in stocking stitch. There are a total of 8 stitches increased on each increase-row INCREASE/DECREASE TIP (evenly spaced): To work out how to increase/decrease evenly, count the total number of stitches on needle (e.g. 88 stitches), minus edge stitches (e.g. 2 stitches) and divide the remaining stitches with number of increases/decreases to be made (e.g. 16) = 5.4. In this example, increase by making 1 yarn over after alternately each 5th and 6th stitch. On the next row work the yarn overs twisted to avoid holes. When decreasing, work together (alternately) each 4th and 5th and each 5th and 6th stitch. STRIPES-2 (for yoke and sleeves): Continue until you have worked a total of 12-12-12-13-13-13 cm with 1 strand off-white + 1 strand old pink (= 2 strands) from the previous stripe on yoke. 12-12-12-13-13-13 cm with 1 strand off-white + 1 strand heather (= 2 strands). Then work with 1 strand off-white + 1 strand beige (= 2 strands). ------------------------------------------------------- START THE PIECE HERE: ------------------------------------------------------- JACKET - SHORT OVERVIEW OF THE PIECE: The yoke and body are worked back and forth with circular needle from mid front, top down. The sleeves are worked in the round with short circular needle/ double pointed needles, top down. The bands are worked mid front and the neck worked to finish. The whole piece is worked in stocking stitch and stripes, with ribbed edges. YOKE: Cast on 102-122-122-130-126-136 stitches (including 1 edge stitch on each side towards mid front) with circular needle size 5.5 mm and 1 strand off-white + 1 strand light beige (= 2 strands). Purl 1 row from the wrong side. Insert 4 marker threads in the piece as follows (without working the stitches): First marker thread is inserted after the first 20-25-25-26-25-27 stitches (= front piece), 2nd marker thread after the next 12-12-12-14-14-15 stitches (= sleeve), 3rd marker thread is inserted after the next 38-48-48-50-48-52 stitches (= back piece) and 4th marker thread after the next 12-12-12-14-14-15 stitches (= sleeve). There are 20-25-25-26-25-27 stitches left on row after the last marker thread (= front piece). Continue with stocking stitch and STRIPES-1 with 1 edge stitch in GARTER STITCH – read description above, on each side towards mid front – AT THE SAME TIME on the first row from the right side increase to RAGLAN in each transition between body and sleeves – read description above. Continue this increase to raglan every 2nd row (i.e. each row from the right side) until you have increased a total of 21-23-24-26-28-30 times on each side of all 4 marker threads. REMEMBER THE KNITTING TENSION! After the last increase there are 270-306-314-338-350-376 stitches on the needle and the piece measures approx. 21-23-24-26-28-30 cm from the cast-on edge mid front. If the measurement is not right, continue working stocking stitch, without increasing to the correct length. The next row is worked as follows from the right side: Work 43-47-49-53-56-61 stitches as before (= front piece), place the next 50-60-60-64-64-67 stitches on 1 thread for sleeve, cast on 8-8-10-10-12-12 new stitches on the needle (= in side under sleeve), work 84-92-96-104-110-120 stitches as before (= back piece), place the next 50-60-60-64-64-67 stitches on 1 thread for sleeve, cast on 8-8-10-10-12-12 new stitches on the needle (= in side under sleeve) and work the remaining 43-47-49-53-56-61 stitches as before (= front piece). Body and sleeves are finished separately. THE PIECE IS NOW MEASURED FROM HERE! BODY: = 186-202-214-230-246-266 stitches. Continue with stocking stitch and stripes with 1 edge stitch in garter stitch on each side (first row worked from the wrong side). When the piece measures 30-30-31-30-30-30 cm from the division knit 1 row from the right side where you increase 34-42-42-46-50-54 stitches evenly spaced – read INCREASE/DECREASE TIP = 220-244-256-276-296-320 stitches. Change to circular needle size 3.5 mm. The next row is worked as follows from the wrong side: 1 edge stitch in garter stitch * purl 2, knit 2 * work from *-* until there are 3 stitches left on row, purl 2 and finish with 1 edge stitch in garter stitch. Continue this rib for 2 cm. Loosely cast off with knit over knit and purl over purl. To avoid the cast-off edge being tight, you can cast off with needle size 5.5 mm. The jacket measures approx. 58-60-62-64-66-68 cm from the shoulder down. SLEEVE: Place the 50-60-60-64-64-67 stitches from the thread on the one side of the piece on short circular needle/double pointed needles size 5.5 mm and knit up 1 stitch in each of the 8-8-10-10-12-12 stitches cast on under the sleeve = 58-68-70-74-76-79 stitches. Insert 1 marker thread in the middle of the 8-8-10-10-12-12 stitches under the sleeve and start the round here. Work stocking stitch and STRIPES-2. When the piece measures 40-38-38-36-34-33 cm from the division (shorter measurements in larger sizes due to longer yoke) knit 1 round where the number of stitches is adjusted to 56-64-64-72-72-80 stitches (by increasing/decreasing the right number of stitches). On the next round knit all stitches together 2 and 2 = 28-32-32-36-36-40 stitches. Change to double pointed needles size 3.5 mm and work rib (= knit 2 purl 2) for 4 cm. Loosely cast off with knit over knit and purl over purl. To avoid the cast-off edge being tight, you can cast off with needle size 5.5 mm. The sleeve measures approx. 45-43-43-41-39-38 cm from the division. Work the other sleeve in the same way. LEFT BAND: Knit up from the right side, inside the 1 edge stitch in garter stitch, approx. 101-105-109-113-117-121 stitches along the left front piece with circular needle size 3.5 mm and 1 strand off-white + 1 strand beige (= 2 strands). The number of stitches needs to be divisible by 4 + 1. The first row is worked as follows from the wrong side: 2 edge stitches in garter stitch, * purl 2, knit 2 *, work from *-* until there are 3 stitches left on row, purl 2 and 1 edge stitch in garter stitch. Continue this rib for 2 cm. Loosely cast off with garter stitch over garter stitch, knit over knit and purl over purl. RIGHT BAND: Knit up from the right side, inside the 1 edge stitch in garter stitch, approx. 101-105-109-113-117-121 stitches along the right front piece with circular needle size 3.5 mm and 1 strand off-white + 1 strand beige (= 2 strands). The number of stitches needs to be divisible by 4 + 1. The first row is worked as follows from the wrong side: 1 edge stitch in garter stitch, * purl 2. knit 2 *, work from *-* until there are 4 stitches left on the row, purl 2 and finish with 2 stitches in garter stitch. Continue this rib, but after 1 cm work 4-4-4-5-5-5 buttonholes evenly spaced. The bottom buttonhole should be approx. 13-15-17-14-15-15 cm from the bottom edge and the top buttonhole approx. 9 cm from the neck edge. 1 buttonhole = knit 2 together and make 1 yarn over – NOTE: It is neatest if you work the buttonholes in the purled sections (seen from the right side). Continue the rib until it is the same width as the left band. Loosely cast off with garter stitch over garter stitch, knit over knit and purl over purl. NECK: Knit up from the right side approx. 112-132-132-140-136-146 stitches along the whole neck with circular needle size 3.5 mm and 1 strand off-white + 1 strand beige (= 2 strands). Purl 1 row from the wrong side where you decrease the number of stitches to 94-94-102-106-110-114 stitches – remember INCREASE/DECREASE TIP. The next row is worked as follows from the right side: 2 edge stitches in garter stitch, * knit 2, purl 2 *, work from *-* until there are 4 stitches left on row, knit 2 and finish with 2 edge stitches in garter stitch. Continue this rib, but after approx. ½ cm work 1 buttonhole over the others on the right band. Continue working until the rib measures 2 cm and loosely cast off with knit over knit and purl over purl. ASSEMBLY: Sew buttons onto left band. |
|
 |
|
Have you finished this pattern?Tag your pictures with #dropspattern #bringspringcardigan or submit them to the #dropsfan gallery. Do you need help with this pattern?You'll find 30 tutorial videos, a Comments/Questions area and more by visiting the pattern on garnstudio.com. © 1982-2026 DROPS Design A/S. We reserve all rights. This document, including all its sub-sections, has copyrights. Read more about what you can do with our patterns at the bottom of each pattern on our site. |
|


With over 40 years in knitting and crochet design, DROPS Design offers one of the most extensive collections of free patterns on the internet - translated to 17 languages. As of today we count 324 catalogues and 12290 patterns translated into English (UK/cm). 12290
We work hard to bring you the best knitting and crochet have to offer, inspiration and advice as well as great quality yarns at incredible prices! Would you like to use our patterns for other than personal use? You can read what you are allowed to do in the Copyright text at the bottom of all our patterns. Happy crafting!
Post a comment to pattern DROPS 200-9
We would love to hear what you have to say about this pattern!
If you want to leave a question, please make sure you select the correct category in the form below, to speed up the answering process. Required fields are marked *.