
Popular categories
Looking for a yarn?


Comments / Questions (127)
![]() Dominique wrote:
Dominique wrote:
Bonjour Il est dommage que les commentaires ne soient pas traduits en français ça nous aiderait surement J adore vos modeles
07.04.2026 - 14:40DROPS Design answered:
Bonjour Dominique, nous ne sommes malheureusement pas en mesure de pouvoir proposer une traduction de toutes les langues dans toutes les langues; vous pouvez éventuellement utiliser un traducteur en ligne pour vous donner une idée des questions/réponses ou commentaires, ou bien simplement utiliser cet espace pour poser votre propre question pour que nous puissions vous aider. Bon tricot!
08.04.2026 - 13:48
![]() Houx wrote:
Houx wrote:
Bonjour Je fait ce modèle et je ne arrive pas à avoir le nombre de mailles données à la fin du diagramme j ai refait trois fois déjà y a t il une erreur? Merci de votre retour
06.04.2026 - 19:07DROPS Design answered:
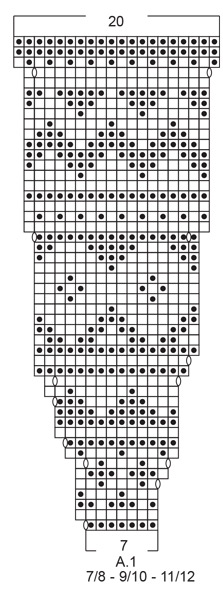
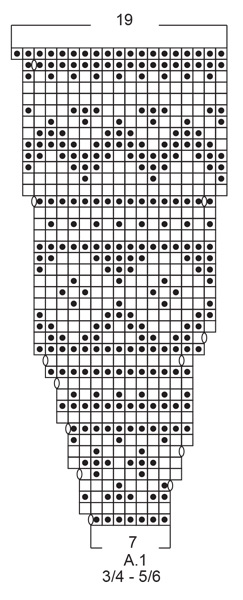
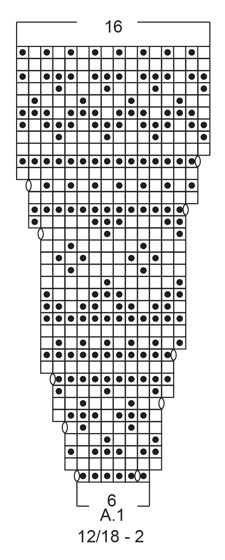
Bonjour Mme Houx, mettez bien un marqueur entre chaque motif à répéter tout le tour pour pouvoir bien vérifier les augmentations et n'en omettre aucune; vous devez commencer par 6-6-7-7-7-7-7 mailles au début de A.1 et augmenter comme indiqué dans le diagramme 10-10-12-12-13-13-13 m dans chaque A.1 pour terminer le diagramme avec 16-16- 19-19-20-20-20 m dans chaque A.1. Bon tricot!
08.04.2026 - 12:33
![]() Annelie wrote:
Annelie wrote:
Har försökt ett otal ggr att sticka strl 3-4. Enligt beskr 77 maskor, 11 rapporter. Varv 1 på A1 öka 1 maska 11 ggr blir 88 maskor. Varv 2 stämmer men varv 3 går inte att få så rapporterna stämmer. Är det meningen att rapporterna inte ska löpa in i varandra på baksidan. Har stickat och repat upp ett antal ggr nu.
12.02.2026 - 21:17DROPS Design answered:
Hei Annelie. Når du starter på varv 3 starter du med 2 sennep og avslutter rapporten med 1 sennep, så da skal rapporten stemme (du får 3 sennepsgule masker etterhverandre), men når du starter på 4 varv vil du få 1 kast (økning) på annenhvert felt med 3 rett masker i natur, og det skal det være. mvh DROPS Design
13.02.2026 - 09:42
![]() Erna wrote:
Erna wrote:
Heel leuk truitje, maar ik kan bij dit patroon de meerdering niet vinden.
02.02.2026 - 15:51DROPS Design answered:
Dag Erna,
De meerderingen voor de pas zijn opgenomen in het telpatroon. Dus als je gewoon het telpatroon breit op de pas, dan meerder je automatisch.
03.02.2026 - 21:38
![]() Philippa Carey wrote:
Philippa Carey wrote:
I am having trouble setting the pattern here. How do you incorporate the increased stitches into the pattern. The diagram doesn’t show that. When referring to background colour using your mustard and off white I assume mustard is the background colour. Please confirm
02.02.2026 - 15:34DROPS Design answered:
Hi Philippa, The increases are the yarn overs at the beginning and end of each increase-row in diagram A.1 and the diagram is repeated on the round the correct number of times for your size. The diagram also shows you how to continue the pattern above each yarn over (all yarn overs are worked through the back loop on the next round to avoid holes). The background colour in the pattern is Mustard. Regards, Drops Team.
03.02.2026 - 07:38
![]() Erika wrote:
Erika wrote:
Hej! När jag ska göra omslag på en rad som bara har färgen natur, ska omslaget trots detta göras i bottenfärgen (senap)?
01.02.2026 - 16:39DROPS Design answered:
Hej Erika, hvis du strikker i natur, laver du omslaget i natur, hvis du strikker i mønsterfarve, så laver du omslaget i mønsterfarve :)
02.02.2026 - 15:07
![]() Ek wrote:
Ek wrote:
Hei! Eikös tuo niskaan tulevan korotuksen neulominen ole neuvottu väärinpäin? Eli kun neulotaan paitaa ylhäältä alaspäin, korotus aloitetaan lyhyellä kierroksella, seuraava on vähän pidempi jne.
26.01.2026 - 10:02DROPS Design answered:
Hei, tarkistamme tämän ohjeen ja teemme siihen tarvittaessa korjauksen.
03.02.2026 - 17:56
![]() Dörte wrote:
Dörte wrote:
Liebes Drops Design, ich hätte zwei Fragen zu dem schönen Pullover in Größe 92. 1. In Reihe 14, wo die Rauten beginnen, soll ich Maschen innerhalb des Musters aufnehmen. Dann passt es aber nicht mehr zusammen. Auch die Aufnahmen davor sind zu wenig für die erste Reihe des Musters. 2. Dann komme ich beim Überschlagen der Aufnahmen nicht von 72 auf 192 sondern auf 200. Kann dies sein? Vielen Dank.
10.01.2026 - 17:10DROPS Design answered:
Liebe Dörte, die Zunahmen sollen Sie genau so wie im Diagram stricken, dh entweder am Anfang von jedem A.1 (bei der 1. Runde z.B) oder am Ende von jedem A.1 (1. Runde z.B.) - (bnur bei der 1. Reihe wird man jeweils 2 Maschen zunehmen, dann wird nur 1 M in jedem Diagram zugenommen). Setzen Sie Markierer zwischen jedem A.1 so folgen Sie am besten das Muster, das dann genauso wie beim Diagram aussehen wird. Viel Spaß beim Stricken!
12.01.2026 - 10:19
![]() Ailika wrote:
Ailika wrote:
Ich habe den wunderschönen Pullover in der Größe 9/10 mit dem angegebenen Garn und passender Maschenprobe gestrickt. Die Angabe zum Garnbedarf stimmt nicht: Er war (knapp) 350 in der Hauptfarbe und (knapp) 100 in der Musterfarbe.
20.12.2025 - 21:03
![]() Monika wrote:
Monika wrote:
Förstår inte hur man gör efter att man satt 46 m på en tråd för ärm. Det står att man ska lägga upp 8 m och sticka 53 m. Gör storlek 2 år
30.11.2025 - 21:41DROPS Design answered:
Hi Monika, at the and of yoke, you have to slip 46 stitches on 1 thread for sleeve and cast on 8 new stitches, there are 54 sts for 1 sleeve. How to proceed when dividing sts you will find in the video HERE. Happy knitting!
01.12.2025 - 16:44
|
||||||||||
Little Missy#littlemissysweater |
||||||||||
 |
 |
|||||||||
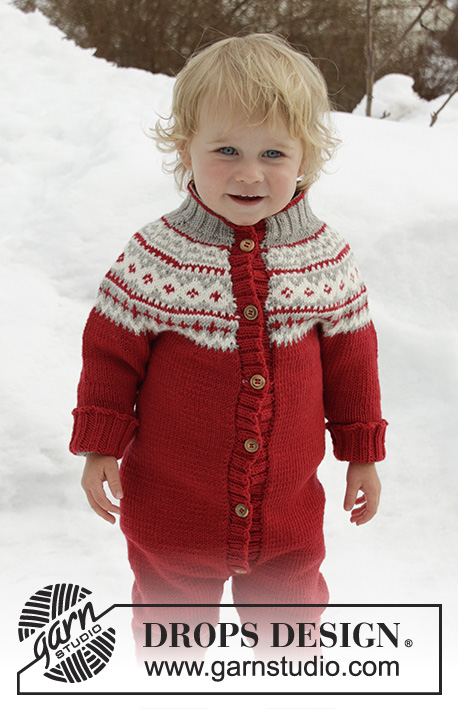
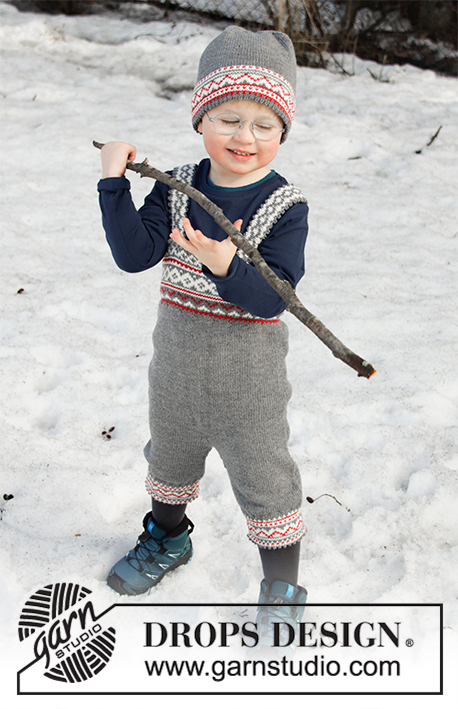
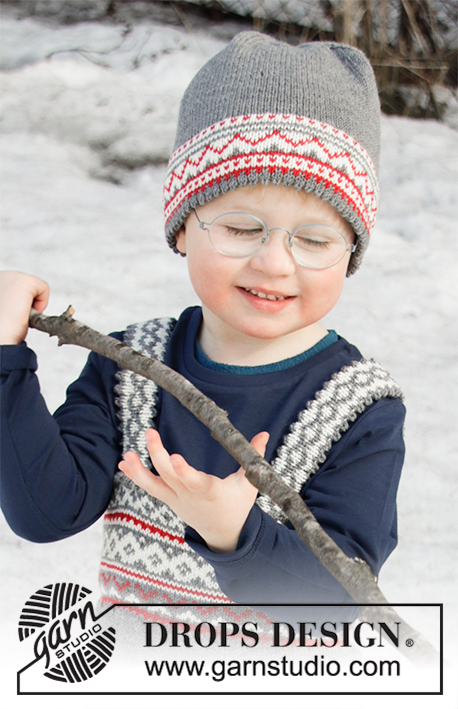
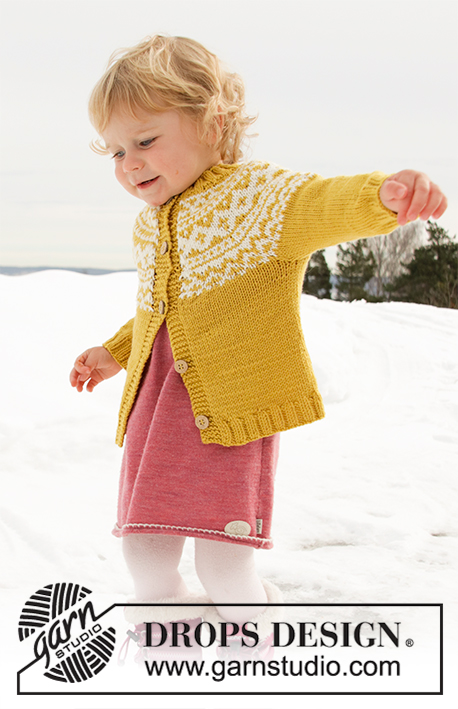
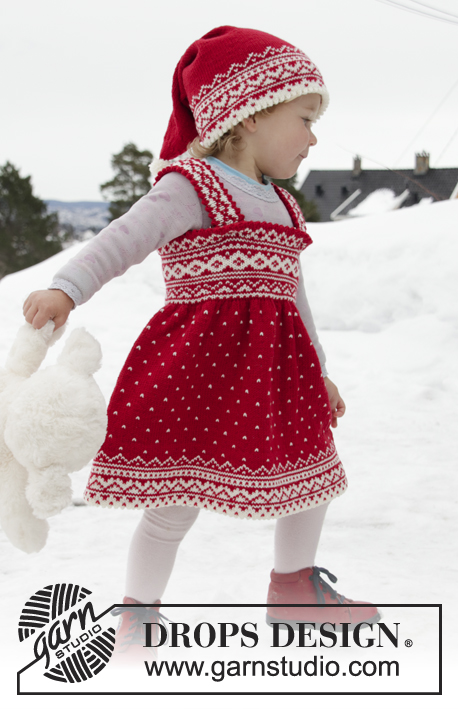
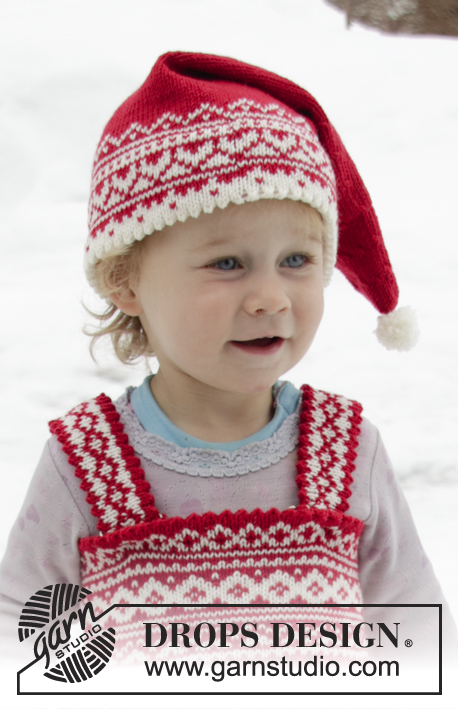
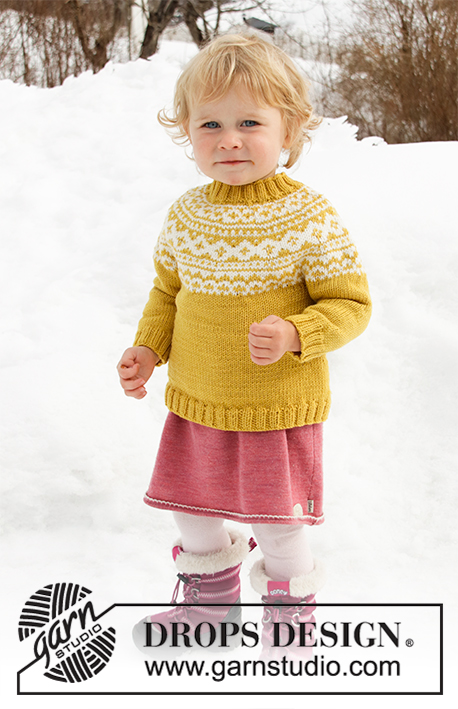
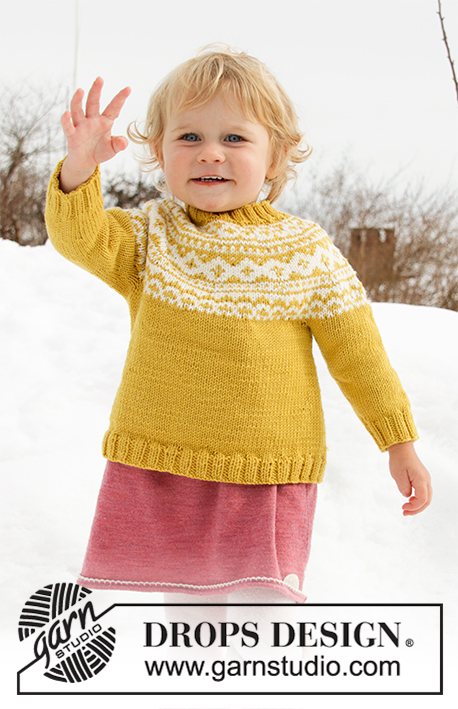
Knitted jumper for babies and children with round yoke in DROPS Merino Extra Fine. The piece is worked top down with Nordic pattern. Sizes 12 months – 12 years.
DROPS Children 32-7 |
||||||||||
|
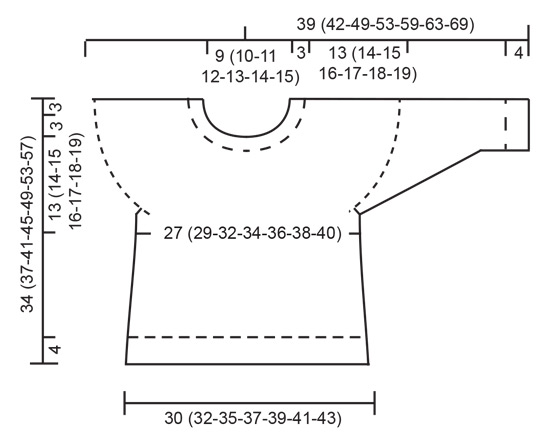
EXPLANATIONS FOR THE PATTERN: ------------------------------------------------------- PATTERN: See diagram A.1. Choose diagram for your size. The whole pattern is worked in stocking stitch. DECREASE/INCREASE TIP: To work out when to decrease/increase evenly, count the total number of stitches on the needle (e.g. 72 stitches) and divide by the number of decreases/increases to be made (e.g. 6) = 12. In this example, decrease by working together each 11th and12th stitch, or increase after each 12th stitch by making 1 yarn over (the yarn overs are worked twisted on the next row to avoid holes). INCREASE TIP (for sides of body): Increase 1 stitch on each side of the marker thread as follows: Start 2 stitches before the marker thread, make 1 yarn over, knit 4 (marker thread sits in the middle of these 4 stitches), make 1 yarn over (= 2 stitches increased). Increase like this by both marker threads (4 stitches increased). On the next row work the yarn overs twisted to avoid holes. DECREASE TIP (for mid under sleeve): Decrease 1 stitch on each side of the marker thread as follows: Start 3 stitches before the marker thread, knit 2 together, knit 2 (marker thread sits between these 2 stitches), slip 1 stitch as if to knit, knit 1 and pass the slipped stitch over the knitted stitch (= 2 stitches decreased). ELEVATION (back of neck): Skip this section if you do not want an elevation. Insert 1 marker at the beginning of the round (= mid back). Knit 6 stitches, turn, tighten the strand and purl 12 stitches, turn, tighten the strand and continue by working 8 (8-8-10-10-10-10) stitches more than previous turn each time you turn 3 more times in each side (= 4 times in total in each side), after last turn, knit to mid back. ------------------------------------------------------- START THE PIECE HERE: ------------------------------------------------------- JUMPER - SHORT OVERVIEW OF THE PIECE: The piece is worked in the round, top down. You work the yoke first which is then divided into sleeves and body. The round starts approx. mid back. The body is worked in the round with circular needle. The sleeves are worked in the round with double pointed needles. NECK: Cast on 72 (76-80-84-88-96-100) stitches with double pointed needles/short circular needle size 3 mm and mustard (in the 2 smallest sizes, you need to cast on with double pointed needles until you have enough stitches, the other sizes can be cast on and worked with short circular needle). Knit 1 round. Then work rib (= knit 2 / purl 2). Continue this rib for 3 cm. YOKE: Change to double pointed needles/circular needle size 4 mm. Knit 1 round where you decrease 6 (4-3-0-4-5-9) stitches evenly on round – read DECREASE/INCREASE TIP = 66 (72-77-84-84-91-91) stitches. You can now work an elevation in back of neck so that the yoke in slightly higher at the back. This elevation can be left out; the neck is then the same front and back – work ELEVATION – read description above, or just continue. Work pattern according to A.1 - NOTE: Choose diagram for your size (= 11 (12-11-12-12-13-13) repeats of 6 (6-7-7-7-7-7) stitches). Continue and increase as shown in diagram. REMEMBER THE KNITTING TENSION! When A.1 has been completed there are 176 (192-209-228-240-260-260) stitches on the needle. Continue with stocking stitch and mustard. On the next round increase 7 (7-10-7-3-0-11) stitches evenly on round = 183 (199-219-235-243-260-271) stitches. When the piece measures 13 (14-15-16-17-18-19) cm mid front (measured without the neck), divide the piece as follows: Work 25 (27-30-32-34-36-38) stitches, place the next 42 (46-50-54-54-58-60) stitches on 1 thread for sleeve (without working them), cast on 8 new stitches, work 49 (53-59-63-67-72-75) stitches, place the next 42 (46-50-54-54-58-60) stitches on 1 thread for sleeve (without working them), cast on 8 new stitches and work the remaining 25 (27-30-32-34-36-38) stitches as before = 115 (123-135-143-151-160-167) stitches. BODY: Insert 1 marker thread in the middle of the 8 stitches cast on under each sleeve (= 57 (61-67-71-75-80-83) stitches between marker threads on front piece). THE PIECE IS NOW MEASURED FROM HERE! When the piece measures 3 cm from where body and sleeves were divided, increase on each side of both marker threads – read INCREASE TIP. Repeat the increase when the piece measures 6 and 9 cm from where body and sleeves were divided = 127 (135-147-155-163-172-179) stitches. When the piece measures 11 (13-16-19-22-25-28) cm from where body and sleeves were divided, increase 9 (9-9-9-9-8-9) stitches on next round = 136 (144-156-164-172-180-188) stitches. Change to circular needle size 3. Work rib (= knit 2 / purl 2) for 4 cm. Then cast off with knit over knit and purl over purl. The whole jumper measures approx. 34 (37-41-45-49-53-57) cm, measured from the shoulder. SLEEVE: Place the stitches from the one thread on double pointed needles size 4 mm and knit up 1 stitch in each of the 8 stitches cast on under the sleeve = 50 (54-58-62-62-66-68) stitches. Insert 1 marker thread in the middle of the 8 stitches (= mid under sleeve). THE PIECE IS NOW MEASURED FROM HERE! Work stocking stitch in the round with mustard. When the sleeve measures 1 cm from where sleeve and body were divided, decrease 2 stitches mid under sleeve – read DECREASE TIP. Decrease like this every 1½ (2-2-2½-3-3½-3½) cm a total of 6 (6-8-8-8-8-9) times = 38 (42-42-46-46-50-50) stitches. When the sleeve measures 14 (16-21-24-28-31-35) cm from where it was divided from the body, decrease 2 stitches evenly on round = 36 (40-40-44-44-48-48) stitches. Change to double pointed needles size 3 mm and work rib in the round (= knit 2 / purl 2) for 4 cm or to desired length. Then cast off with knit over knit and purl over purl. The sleeve measures a total of approx.18 (20-25-28-32-35-39) cm from where it was divided from the body. Work the other sleeve in the same way. |
||||||||||
Diagram explanations |
||||||||||
|
||||||||||
 |
||||||||||
 |
||||||||||
 |
||||||||||
 |
||||||||||
Have you finished this pattern?Tag your pictures with #dropspattern #littlemissysweater or submit them to the #dropsfan gallery. Do you need help with this pattern?You'll find 29 tutorial videos, a Comments/Questions area and more by visiting the pattern on garnstudio.com. © 1982-2026 DROPS Design A/S. We reserve all rights. This document, including all its sub-sections, has copyrights. Read more about what you can do with our patterns at the bottom of each pattern on our site. |
||||||||||


With over 40 years in knitting and crochet design, DROPS Design offers one of the most extensive collections of free patterns on the internet - translated to 17 languages. As of today we count 324 catalogues and 12290 patterns translated into English (UK/cm). 12290
We work hard to bring you the best knitting and crochet have to offer, inspiration and advice as well as great quality yarns at incredible prices! Would you like to use our patterns for other than personal use? You can read what you are allowed to do in the Copyright text at the bottom of all our patterns. Happy crafting!
Post a comment to pattern DROPS Children 32-7
We would love to hear what you have to say about this pattern!
If you want to leave a question, please make sure you select the correct category in the form below, to speed up the answering process. Required fields are marked *.