
Popular categories
Looking for a yarn?


Comments / Questions (216)
![]() Claudette wrote:
Claudette wrote:
How can y print this patern
25.04.2026 - 23:13DROPS Design answered:
Dear Claudette, you can find the print button next to the pattern's title and heading. Happy knitting!
27.04.2026 - 01:59
![]() Jytte wrote:
Jytte wrote:
Drops baby 31-3. Findes video der viser hvordan kanten hækles om jakken ? Vh Jytte
12.04.2026 - 22:10DROPS Design answered:
Hei Jytte. Beklager, det har vi ikke. mvh DROPS Design
13.04.2026 - 14:45
![]() Annet wrote:
Annet wrote:
Heeft het patroon een video op YouTube?
11.04.2026 - 23:27DROPS Design answered:
Dag Annet,
De video's die bij dit patroon horen, kun je vinden via de link 'video's' bovenaan de beschrijving van het patroon.
12.04.2026 - 10:14
![]() Chantal wrote:
Chantal wrote:
Comment faire le croisement des côtés avec les cordons ? en lisant les explications c'est pas claire
02.04.2026 - 18:17DROPS Design answered:
Bonjour Chantal, le 1er cordon se fait à la pointe du devant droit, en même temps que la bordure au crochet (cf rang 1), vous crochetez un cordon identique à la pointe du devant gauche , puis vous crochetez 2 autres cordons séparément: 2 chaînettes d'environ 20-25 cm avec 1 rang de mailles serrées, et vous cousez 1 cordon sur le côté gauche du gilet, à l'extérieur (il sera attaché avec le cordon du devant droit) et le 2ème cordon à l'intérieur du gilet, côté droit, il sera attache avec le cordon du devant gauche. En espérant que ce soit plus clair ainsi, sinon n'hésitez pas à revenir. Bon tricot!
07.04.2026 - 17:14
![]() Suzanne wrote:
Suzanne wrote:
Hi, Ik maak de slofjes in maat 1-3 mnd. Ik loop vast op het stuk: "Work the stitches from the one thread in the one side back onto the double pointed needles, knit up (7) 9-10-11-13 (16-21)..... other thread back onto the double pointed needles = (44) 48-54-60-64 (74-84) stitches on the needles" Is er misschien een video waarin dit uitgelegd wordt? Bedankt!
26.03.2026 - 18:35DROPS Design answered:
Dag Suzanne,
Je hebt op een gegeven moment (11) 11-12-13-13 (15-15) steken aan het begin en einde van de naald apart gezet op een hulpdraad en het middelste gedeelte verder gebreid. In het midden is dus een extra lapje ontstaan. Als je de apart gezette steken weer op de naald zet, neem je ook steken op over dat lapje in het midden, eerst langs de ene zijkant, dan de bovenkant, dan de andere zijkant en tot slot de laatste steken die je apart had gezet. Voor zover ik weet is daar geen video van.
11.04.2026 - 10:30
![]() Kattie wrote:
Kattie wrote:
This pattern is EXTREMELY confusing. Even chat gpt couldn’t understand. I’m making the size 2. I’ve ripped out this whole section twice now and I still did it wrong. At the bottom of the page, I have 55 marker 72 marker 55. What I’ve gathered from the other comments I should decrease on both ends 1 time per right side row. It says every second row, but the right side rows would be the odd numbers… and the 28 times decrease but also every 4th row? This is confusing.
11.03.2026 - 15:27DROPS Design answered:
Dear Kattie, when decreasing on every other row you decrease every row from RS (= 1 row from RS with decreases, 1 row from WS without decrases), when decreasing on every 4th row you decrease on every other row from RS (= 1 row from RS with decreases, 3 rows without decreases); you decrease in 2 years a total of 28 times every other row then 2 times every 4th row, but note that you will divide piece for armholes before all decreases for neck are done. Hope this can help. Happy knitting!
12.03.2026 - 09:20
![]() Marina wrote:
Marina wrote:
Waarom het vestje heen en wéér breien op een rondbreinaald? Dan kun je tòch net zo goed op 2 naalden breien?
13.02.2026 - 13:57DROPS Design answered:
Dag Marina,
De reden hiervoor is dat je heel veel steken op de naald en dan past het beter als je een rondbreinaald gebruikt.
15.02.2026 - 14:10
![]() Natalie wrote:
Natalie wrote:
Hello I am doing the second size. After working the body to 15 cm I ended up with 30 stitches on each side of the body with 50 still in the middle. In the pattern it says I should have 37 stitches still (even though I’ve been doing decreases) and then with the cast ons for the sleeve I should end up with 52. How am I supposed to end up with 52 if I’ve been doing the decreases (and should continue and I do the front right and left pieces)?
22.01.2026 - 18:35DROPS Design answered:
Dear Natalie, you had 37 sts for front piece and decrease a total of 20 sts for neck (1 st 18 times every other row + 1 stitch 2 times every 4th row), and at the same time as decreasing for neck you will cast on for sleeve: 4 sts 4 times and 19 sts 1 time, so you have: 37 sts - 20 sts (neck) + 16+19 (sleeve) = 52 sts for shoulder/sleeve. Happy knitting!
27.02.2026 - 14:25
![]() Brigitte wrote:
Brigitte wrote:
Bonjour, pour les chaussons je rabat 42 mailles restantes pour la taille 1/3 mois où il faut diminuer jusqu'à la fin ? Merci
15.01.2026 - 17:12DROPS Design answered:
Bonjour Brigitte, vous rabattez les 42 mailles restant à la fin du chausson/des diminutions. Pliez en double et faites la couture sous le pied (les mailles rabattues entre elles) et remontez le long de la tige pour fermer le chausson. Bon tricot!
16.01.2026 - 08:30
![]() Martina Stange wrote:
Martina Stange wrote:
Hallo, möchte die Odeta Jacke stricken. Ich verstehe nicht das Diagramm A1. 1Hinreihe rechts Rückreihe links Hinreihe rechts Rückreihe links Aber das Muster sieht dann nicht kraus rechts aus? Auf dem Diagramm sind doch Hin und Rückreihe dargestellt?
13.01.2026 - 21:33DROPS Design answered:
Liebe Frau Stange, alle Reihen sind in den Diagrammen gezeichnet, die Hin- sowie die Rückreihen, so beginnt A.1 mit 3 Krausrippen - siehe 2. Foto, wo man sie erkennen kann. Viel Spaß beim Stricken!
15.01.2026 - 08:31
|
|||||||||||||||||||
Odeta#odetajacket |
|||||||||||||||||||
 |
 |
||||||||||||||||||
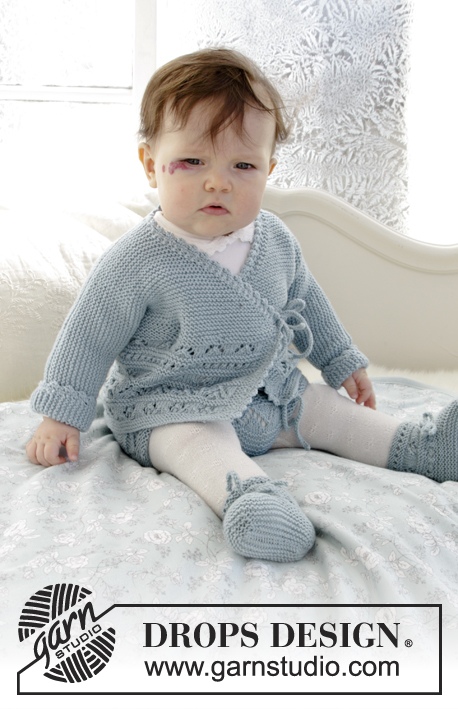
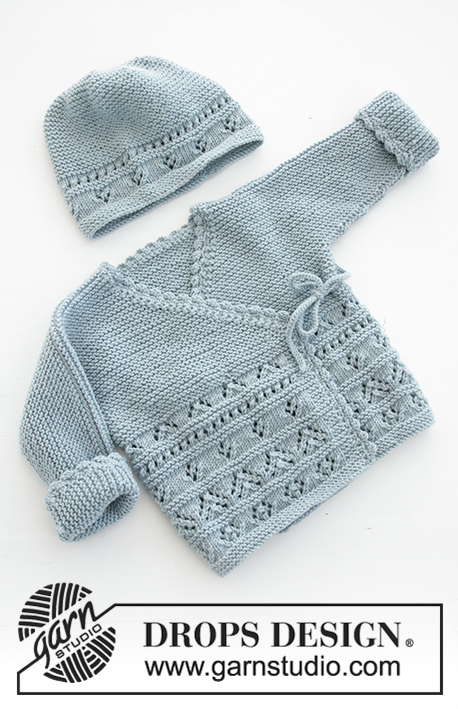
The set consists of: Knitted baby jacket and slippers with lace pattern and garter stitch. Sizes premature - 4 years. The set is worked in DROPS BabyMerino.
DROPS Baby 31-3 |
|||||||||||||||||||
|
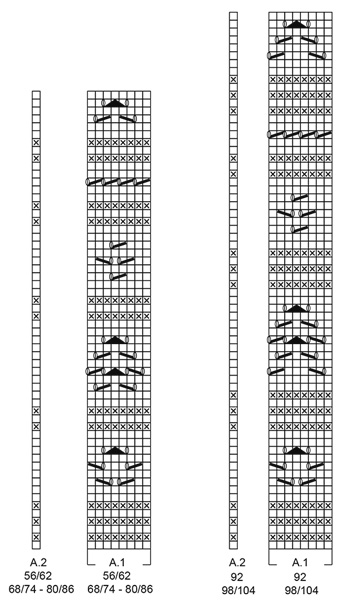
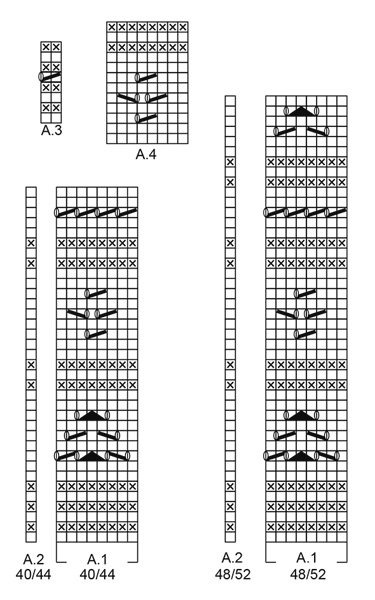
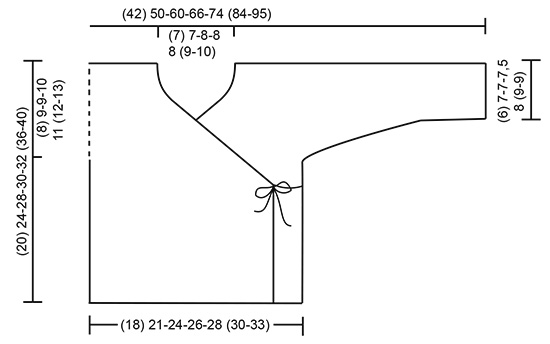
INFORMATION FOR THE PATTERN: RIDGE/GARTER STITCH (worked back and forth): 1 ridge = Knit 2 rows. PATTERN: Jacket: See diagrams A.1 and A.2. Choose diagram for your size. Slippers: See diagrams A.3 and A.4. The diagrams show all the rows in the pattern seen from the right side. DECREASE TIP (for jacket): Decrease inside the 1 band stitch in garter stitch. All decreases are made from the right side! Decrease as follows after the 1 band stitch: Slip 1 stitch as if to knit, knit 1, pass the slipped stitch over. Decrease as follows before the 1 band stitch: Knit 2 together. ---------------------------------------------------------- JACKET: The piece is worked back and forth with circular needle. The body is worked first, then stitches are cast on for sleeves and the front and back pieces are finished separately. BODY: Cast on (111) 125-145-157-173 (181-205) stitches with circular needle size 3 mm and BabyMerino. Work as follows from the right side: Work (3) 2-4-2-2 (2-2) stitches GARTER STITCH – see description above – (= band), work A.1 (= 8 stitches) over the next (104) 120-136-152-168 (176-200) stitches (= (13) 15-17-19-21 (22-25) times in width), work A.2 (= 1 stitch) and finish with (3) 2-4-2-2 (2-2) stitches garter stitch. REMEMBER THE KNITTING TENSION! On the last row in A.1 adjust the number of stitches to (112) 124-146-158-172 (182-204) stitches. When A.1 has been worked 1 time in height, continue in garter stitch to finished length. The piece measures approx. (10) 12-16-16-16 (19-19) cm. Insert 1 marker (34) 37-44-48-52 (55-62) stitches in from each side. Allow the markers to follow your work onwards, they mark the front and back pieces = (44) 50-58-62-68 (72-80) stitches on back piece. READ THE WHOLE OF THE NEXT SECTION BEFORE CONTINUING! DECREASE FOR NECK INSIDE 1 BAND STITCH IN EACH SIDE OF THE PIECE AT THE SAME TIME AS THE PIECE IS DIVIDED AND STITCHES ARE CAST ON FOR SLEEVES. DECREASE MID FRONT AS FOLLOWS: When the piece measures (10) 12-16-16-17 (20-23) cm – adjust so that the next row is worked from the right side, decrease 1 stitch for the neck inside the 1 band stitch in each side of the piece (= 2 stitches decreased) – read DECREASE TIP. Decrease like this every 2nd row a total of (18) 18-22-24-26 (28-32) times, then every 4th row a total of 2 times. THE PIECE IS NOW DIVIDED AND STITCHES ARE CAST ON FOR THE SLEEVES AS FOLLOWS: RIGHT FRONT PIECE: When the piece measures (12) 15-19-20-21 (24-27) cm, divide the piece at the 2 markers and the front and back pieces are finished separately. Adjust so that the next row is from the right side. Now work over all the stitches as far as the first marker (= right front piece). Place the remaining stitches on a thread. Cast on new stitches at the end of each row from the right side (= towards the side) for the sleeve as follows: Cast on (3) 4-6-6-6 (6-6) stitches a total of (4) 4-4-5-6 (7-8) times and then (16) 19-19-18-19 (23-26) stitches 1 time. When all the stitches are cast on for the sleeve and the decreases to neck are finished, there are (42) 52-63-70-79 (90-102) stitches on the needle for shoulder/sleeve. Work garter stitch until the piece measures (20) 24-28-30-32 (36-40) cm. Cast off. LEFT FRONT PIECE: Work over the last stitches which were placed on the thread, as far as the marker in the side. Work as for the right front piece, but in reverse. In other words, cast on stitches for the shoulder/sleeve at the end of each row from the wrong side. Continue to decrease inside the 1 band stitch at the end of each row from the right side as before (towards neck). BACK PIECE: = (44) 50-58-62-68 (72-80) stitches. Cast on new stitches at the end of each row in each side of the piece for the sleeves as follows: Cast on (3) 4-6-6-6 (6-6) stitches a total of (4) 4-4-5-6 (7-8) times and then (16) 19-19-18-19 (23-26) stitches 1 time = (100) 120-144-158-178 (202-228) stitches. When the piece measures (19) 23-27-29-31 (35-39) cm cast off the middle (16) 16-18-18-20 (22-24) stitches for neck and each shoulder/sleeve is finished separately = (42) 52-63-70-79 (90-102) stitches left on each shoulder/sleeve. Work until the piece measures (20) 24-28-30-32 (36-40) cm, adjust to match the front pieces. Cast off. Work the other shoulder/sleeve in the same way. ASSEMBLY: Sew the seams on top of sleeve with grafting stitches from the right side. Sew the seams under the sleeves edge to edge in the outermost loop of the outermost stitch. CROCHET EDGE: Crochet with hook size 2.5 mm and BabyMerino around the whole jacket opening (i.e. work from the right front piece, up along the jacket opening, around the neck and down the opening to the cast on edge on the left front piece) as follows: ROW 1: Work 1 slip stitch in the cast on edge on the right front piece, * 1 chain stitch, skip approx. 2 stitches/rows, 1 double crochet in the next stitch/row *, work from *-* to the corner where the decreases for neck started. Work the cord as follows: 1 double crochet in the tip, then work chain stitches for approx. 20-25 cm, turn and work back with 1 slip stitch in each chain stitch, then work 1 double crochet in the tip of the front piece again, continue the crochet edge around the jacket and neck to the tip on the left front piece, work cord as on the right front piece, continue working down the left front piece and finish with 1 slip stitch in the cast on edge. ROW 2: Work 1 chain stitch, 1 double crochet around the first chain stitch on the previous row, * 4 chain stitches, 1 treble crochet in the 4th chain stitch from the hook, skip 1 double crochet + 1 chain stitch + 1 double crochet, work 1 double crochet around the next chain stitch *, work from *-* (make sure you work over the cords so the cords lie underneath), finish with 1 slip stitch in the last stitch. Work rows 1 and 2 in the same way around the bottom of both sleeves (the rounds start with 1 chain stitch and finish with 1 slip stitch in the first chain stitch). Work 2 loose cords: Work chain stitches for approx. 20-25 cm, turn and work back with 1 slip stitch in each chain stitch. Cut the strand and work 1 more cord in the same way. Sew 1 cord to the inside of the right side in the side and 1 cord on the outside of the left side in the side. Make sure the two cords are at the same height on each side. ---------------------------------------------------------- SLIPPER: The slipper is worked back and forth with circular needle from mid back, top down; i.e. you first work the leg then the foot. Cast on (36) 38-40-44-48 (52-56) stitches with circular needle size 2.5 mm and BabyMerino. Work 1 stitch in GARTER STITCH – see above, A.3 (= 2 stitches) until 1 stitch remains, work 1 stitch in garter stitch . When A.3 has been worked 1 time in height, work the next row from the right side as follows: Work (2) 3-0-2-0 (2-0) stitches stocking stitch, A.4 (= 8 stitches) a total of (4) 4-5-5-6 (6-7) times in width and finish with (2) 3-0-2-0 (2-0) stitches stocking stitch. REMEMBER THE KNITTING TENSION! When A.4 has been completed 1 time in height continue with A.3 as follows: work 1 stitch in garter stitch, A.3 until 1 stitch remains, and work 1 stitch in garter stitch (the cord is later thread through this row of holes). When A.3 has been completed in height, work 2 RIDGES – see description above and decrease (6) 8-6-6-6- (10-14) stitches evenly on the last row from the right side = (30) 30-34-38-38 (42-42) stitches. Cut the strand. Now place the first (11) 11-12-13-13 (15-15) stitches and the last (11) 11-12-13-13 (15-15) stitches on two separate threads. The piece is now worked in garter stitch to finished length. Work (3) 3½-4-4½-5½ (6½-8) cm, over the middle (8) 8-10-12-12 (12-12) stitches (= mid top of slipper), cut the strand. The next row is worked as follows from the right side: Work the stitches from the one thread in the one side back onto the double pointed needles, knit up (7) 9-10-11-13 (16-21) stitches in the outermost loop of the outermost stitch along the side of the middle piece, work the (8) 8-10-12-12 (12-12) stitches on the needle (= front), knit up (7) 9-10-11-13 (16-21) stitches in the outermost loop of the outermost stitch along the other side of the middle piece and work the stitches from the other thread back onto the double pointed needles = (44) 48-54-60-64 (74-84) stitches on the needles. THE PIECE IS NOW MEASURED FROM HERE! Work a total of (2½) 3-3-4-5 (5-5) cm garter stitch over all stitches AT THE SAME TIME when you have worked approx. (1) 1½-1½-2-3 (3-3) cm, insert 1 marker (22) 24-27-30-32 (37-42) stitches in (= middle of slipper). Now decrease every 2nd row to finished length as follows: Knit 1 stitch, knit the next 2 stitches together (= 1 stitch decreased), knit until there are 2 stitches left before the marker, knit together the next 4 stitches, 2 and 2 (= 2 stitches decreased), knit until there are 3 stitches left, knit the next 2 stitches together (= 1 stitch decreased), knit 1 stitch (= 4 stitches decreased every 2nd row) = approx. (32) 36-42-48-52 (62-72) stitches. Cast off and sew the seam under the foot and up mid back in the outermost loop of the outermost stitch so the seam is flat. Work 1 more slipper in the same way. CORD: Work a cord as follows: Work chain stitches with hook size 2.5 mm and BabyMerino for approx. 30-40 cm, turn and work back with 1 slip stitch in each chain stitch. Cut and fasten the strand. Thread the cord in and out of the row of holes on the slipper (start and finish mid front of slipper). ---------------------------------------------------------- For shorts see DROPS number 31-4. ---------------------------------------------------------- |
|||||||||||||||||||
Diagram explanations |
|||||||||||||||||||
|
|||||||||||||||||||
 |
|||||||||||||||||||
 |
|||||||||||||||||||
 |
|||||||||||||||||||
Have you finished this pattern?Tag your pictures with #dropspattern #odetajacket or submit them to the #dropsfan gallery. Do you need help with this pattern?You'll find 27 tutorial videos, a Comments/Questions area and more by visiting the pattern on garnstudio.com. © 1982-2026 DROPS Design A/S. We reserve all rights. This document, including all its sub-sections, has copyrights. Read more about what you can do with our patterns at the bottom of each pattern on our site. |
|||||||||||||||||||


With over 40 years in knitting and crochet design, DROPS Design offers one of the most extensive collections of free patterns on the internet - translated to 17 languages. As of today we count 324 catalogues and 12290 patterns translated into English (UK/cm). 12290
We work hard to bring you the best knitting and crochet have to offer, inspiration and advice as well as great quality yarns at incredible prices! Would you like to use our patterns for other than personal use? You can read what you are allowed to do in the Copyright text at the bottom of all our patterns. Happy crafting!
Post a comment to pattern DROPS Baby 31-3
We would love to hear what you have to say about this pattern!
If you want to leave a question, please make sure you select the correct category in the form below, to speed up the answering process. Required fields are marked *.