
Popular categories
Looking for a yarn?


Comments / Questions (19)
![]() Guðríður wrote:
Guðríður wrote:
Hvernig næ ég að hala niður fríum uppskriftum eins og þessari?
29.04.2026 - 13:38DROPS Design answered:
Blessuð Guðríður. Þú getur alltaf nálgast uppskriftina ef þú ert nettengd, einnig getur þú prentað hana út, afritað hlekkinn, eða smellt á hjartað efst á síðunni þá fer uppskriftin í þín uppáhalds. Einnig getur þú tekið skjáskot af uppskriftinni. Gangi þér vel.
30.04.2026 - 10:35
![]() Jeannette K wrote:
Jeannette K wrote:
Bonjour, je souhaite tricoter ce joli gilet, mais mon échantillon aig 4 de 10x10 est de 24 mailles et 32 rangs. Puis je tricoter la taille xxl au lieu du xl ?
31.07.2023 - 17:03DROPS Design answered:
Bonjour Jeannette K, vous devez d'abord recalculer si les explications correspondront aux bonnes mesures avec votre propre échantillon; il sera plus simple de vous tourner vers un modèle correspondant à votre tension - retrouvez ici tous les gilets et les vestes avec une tension de 25-23 mailles. Bon tricot!
01.08.2023 - 08:54
![]() Alejandra wrote:
Alejandra wrote:
Hola, para hacer las vueltas de revés sigo el patrón empezando por el lado izquierdo o hago punto revés sin seguir el diagrama?
29.09.2022 - 20:26DROPS Design answered:
Hola Alejandra, a no ser que se diga lo contrario, al comenzar a trabajar un patrón en la fila por el lado derecho, cuando trabajas la siguiente fila por el lado revés continuas con el patrón. Por lo tanto, comenzarías a trabajar la 2ª fila del patrón, desde el lado izquierdo del diagrama.
30.09.2022 - 13:14
![]() Inger Forsberg wrote:
Inger Forsberg wrote:
I detta mönster sid 4 ärm. Ärmlängden är omvänd från minsta stl 26 cm till största 18 cm!! Hoppas ni ändrar detta
14.07.2022 - 19:04DROPS Design answered:
Hej Inger. I de större storlekarna kommer den totala vidden (från handled till handled) att vara större än i de mindre storlekarna, även om själva ärmen är kortare. De större storlekarna har längre ärmkupa samt bredare axelvidd. Detta resulterar i en bra passform i alla storlekar. (Se gärna måttskissen) Mvh DROPS Design
15.07.2022 - 09:39
![]() Anna wrote:
Anna wrote:
Hi! What are the measurement (S, M, L) for the finished garment? I can't find it.
05.07.2021 - 06:58DROPS Design answered:
Dear Anna, you will find all finished measurements for each size in the chart at the end of the patttern - measure a similar garment you have and like the shape to find ou the matching size - read more here. Happy knitting!
05.07.2021 - 08:47
![]() Nathania Christabel wrote:
Nathania Christabel wrote:
Hello! Does this "Work from the right side until there are 3 stitches left at the end of the row, make 1 yarn over, knit the next 2 stitches together and knit the last stitch." mean the 5 band stitches? So it will be: k2, yo, k2tog, k1 is this correct?
03.07.2021 - 10:11DROPS Design answered:
Dear Nathania, yes, you are correct, the last 5 stitches are K2, YO, K2TOG and the edge stitch. Happy Knitting!
04.07.2021 - 00:32
![]() Målfrid Høgstavoll wrote:
Målfrid Høgstavoll wrote:
Det gjelder oppskrift på ermer, både fellingene og lengden på ermene. Skal et erme i største str. være 18 cm? Skal det felles mye hurtigere i den minste str enn i den største? Jeg leste i den engelske versjonen her - samme som i den norske
20.08.2020 - 15:27
![]() Målfrid Høgstavoll wrote:
Målfrid Høgstavoll wrote:
Oppskriften må være feil når det gjelder erme - i allefall hva lengde angår. Kan noen se på det?
18.08.2020 - 14:56DROPS Design answered:
Hej Målfrid, beskriv gerne hvad du anser er fejl og hvilken størrelse det gælder, så skal vi se på det. :)
20.08.2020 - 15:23
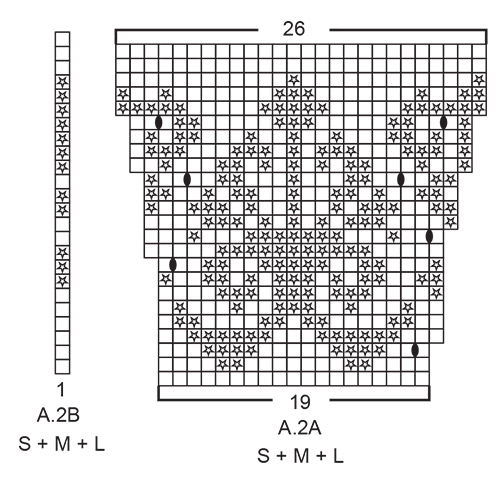
![]() Ayse wrote:
Ayse wrote:
Hi, on the wrong side of A2.A should I begin with A2.B? I'm really confused. Thanks
17.05.2020 - 00:27DROPS Design answered:
Dear Ayse, from RS you repeat A.2A and finish with A.2B - from WS you work A.2B and repeat A.2A reading from the left towards the right. Read more about diagrams here. Happy knitting!
18.05.2020 - 08:24
![]() Elisabeth Sebald wrote:
Elisabeth Sebald wrote:
Hallo, ich beginne jetzt mit dem stricken, habe aber keinen Hinweis darauf gefunden, wie die Randmaschen zu stricken sind?ein glatter Rand oder besser ein Knötchenrand? Freue mich über eine Antwort, Elisabeth
14.07.2019 - 19:33DROPS Design answered:
Liebe Frau Sebald, bei dieser Jacke werden die 5 ersten und 5 letzten Maschen krausrechts (= Krausrippe) gestrickt, dh es sind keine Randmasche dazu. Viel Spaß beim stricken!
15.07.2019 - 10:58
|
||||||||||||||||||||||
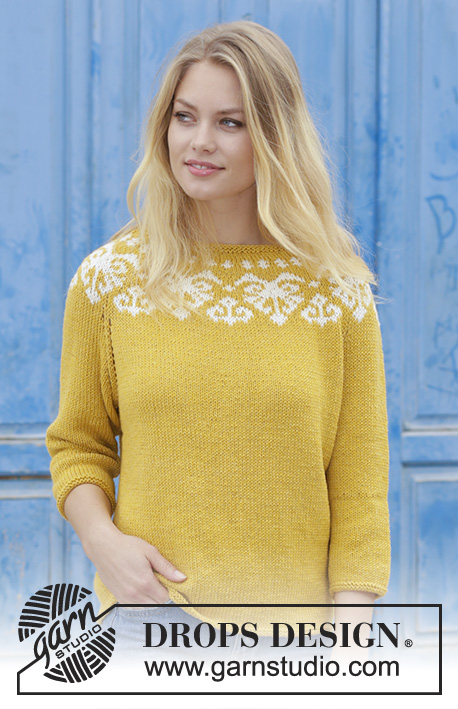
Golden Heart Jacket#goldenheartjacket |
||||||||||||||||||||||
 |
 |
|||||||||||||||||||||
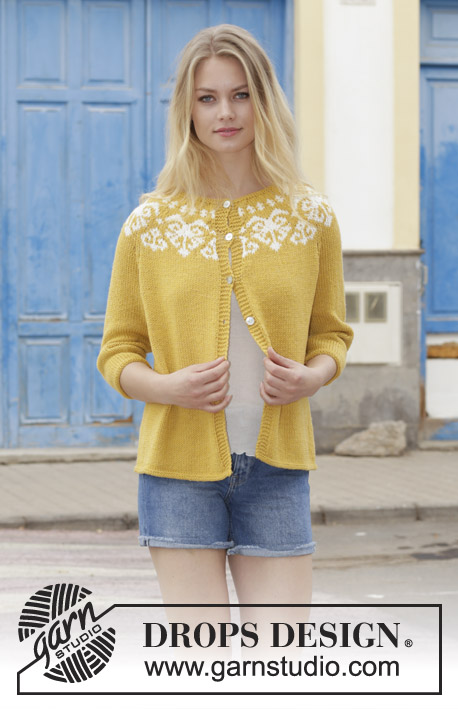
Knitted jacket with round yoke, multi-coloured Norwegian pattern and ¾-length sleeves, worked top down. Sizes S - XXXL. The piece is worked in DROPS Cotton Merino.
DROPS 187-11 |
||||||||||||||||||||||
|
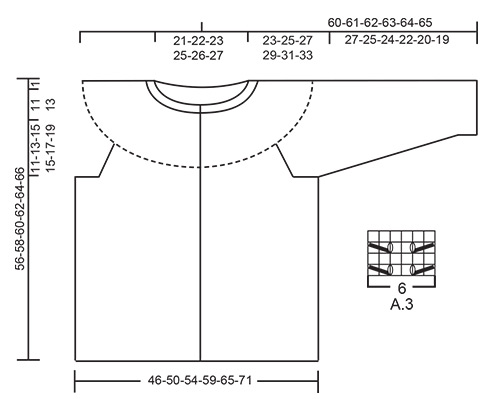
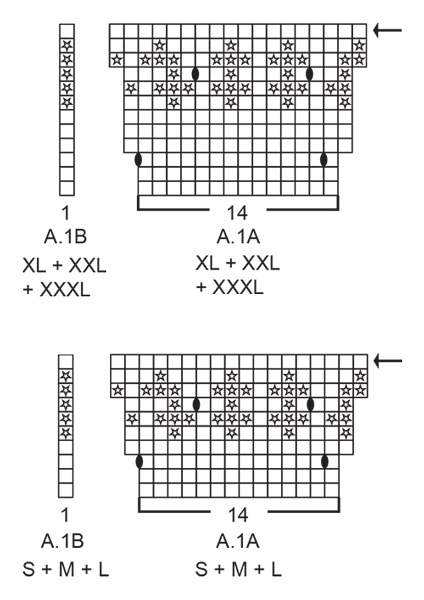
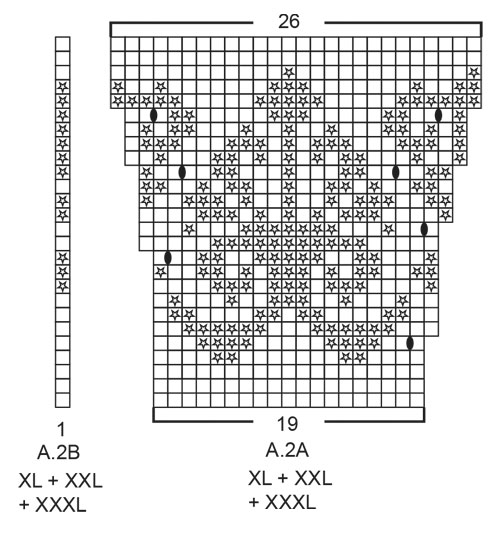
INFORMATION FOR THE PATTERN: RIDGE/GARTER STITCH (worked in the round): 1 ridge = 2 rounds. Knit 1 round and purl 1 round. RIDGE/GARTER STITCH (worked back and forth): 1 ridge = Knit 2 rows. INCREASE TIP(for round yoke): To work out how to increase evenly, count the total number of stitches on the needle (e.g. 110 stitches), minus the bands (e.g. 10 stitches) and divide the remaining stitches by the number of increases to be made (e.g. 13) = 7.7. In this example, increase by making 1 yarn over after approx. every 8th stitch; on the next round knit the yarn overs twisted to avoid holes. Do not increase over the bands. PATTERN: See diagrams A.1 to A.3. Choose diagram for your size (applies to A.1 and A.2). The diagrams show all the rows in the pattern seen from the right side. The whole pattern is worked in stocking stitch. RAGLAN: All increases are made from the right side! Increase 1 stitch on each side of the 4 marker threads in each transition between body and sleeves as follows: Start 1 stitch before the marker thread, make 1 yarn over, knit 2 (the marker thread sits in the middle of these 2 stitches), make 1 yarn over (= 2 stitches increased). On the next row (the wrong side) purl the yarn overs to leave holes. DECREASE TIP (for mid under sleeve): Start 3 stitches before the marker thread, knit 2 together, knit 2 (the marker thread sits in the middle of these 2 stitches), slip 1 stitch as if to knit, knit 1 and pass the slipped stitch over the knitted stitch (= 2 stitches decreased). BUTTONHOLES: Work buttonholes on the right band (when the garment is worn): Work from the right side until there are 3 stitches left at the end of the row, make 1 yarn over, knit the next 2 stitches together and knit the last stitch. On the next row (the wrong side) knit the yarn over to leave a hole. The first buttonhole is worked on the first row from the right side after the garter stitch edge in the neck. Then work the other 5-5-5-6-6-6 buttonholes with approx. 8-8½-8½-8-8-8½ cm between each one . ---------------------------------------------------------- JACKET: The piece is worked back and forth on circular needle from mid front and worked top down. The sleeves are worked in the round on short circular needle, top down. Change to double pointed needles when necessary. NECK: Cast on 110-114-120-126-130-136 stitches (including 5 band stitches in each side towards mid front) with circular needle size 3 mm and mustard. Work 2 RIDGES – see description above. Knit 1 row from the right side where you increase 13-23-17-25-21-29 stitches evenly on row – read INCREASE TIP and remember BUTTONHOLES on the right band – see description above = 123-137-137-151-151-165 stitches. Change to circular needle size 4 mm and purl 1 row from the wrong side with 5 knitted stitches in each side for bands. Then continue the yoke as described below. REMEMBER THE KNITTING TENSION! YOKE: The first row is worked as follows from the right side: 5 band stitches in garter stitch, work A.1A until there are 6 stitches left on the row (= 8-9-9-10-10-11 repeats of 14 stitches), work A.1B (= 1 stitch) and finish with 5 band stitches in garter stitch. Continue the pattern in this way and increase as shown in A.1A. AT THE SAME TIME on the last row in A.1 (wrong side) increase 8-9-9-10-10-11 stitches evenly on row. When A.1 has been completed there are 163-182-182-201-201-220 stitches on the needle. The next row is worked as follows from the right side: 5 band stitches in garter stitch, work A.2A until there are 6 stitches left on the row (= 8-9-9-10-10-11 repeats of 19 stitches), work A.2B (= 1 stitch) and finish with 5 band stitches in garter stitch. Continue the pattern in this way and increase as shown in A.2. When A.2 has been completed there are 219-245-245-271-271-297 stitches on the needle and the piece measures approx. 12-12-12-14-14-14 cm from the cast on edge mid front. Then work with mustard to finished length. Knit 1 row from the right side where you increase 7-5-1-3-3-5 stitches evenly on row = 226-250-246-274-274-302 stitches. Purl 1 row from the wrong side with 5 knitted stitches in each side. Now insert 4 marker threads in the piece without working the stitches: The first marker thread is inserted after the first 39-42-42-47-49-55 stitches (= front piece), 2nd marker thread is inserted after the next 40-46-44-48-44-46 stitches (= sleeve), 3rd marker thread is inserted after the next 68-74-74-84-88-100 stitches (= back piece) and the 4th marker thread is inserted after the next 40-46-44-48-44-46 stitches (= sleeve). There are now 39-42-42-47-49-55 stitches after the last marker thread on the front piece. Continue with stocking stitch and 5 band stitches in garter stitch in each side towards mid front. AT THE SAME TIME on the first row from the right side increase to RAGLAN – see description above (= 8 stitches increased). Continue the increases to raglan every 2nd row (i.e. every row from the right side) until you have increased a total of 11-12-16-16-19-19 times on each side of the 4 marker threads = 314-346-374-402-426-454 stitches on needle. Continue working as before without increases to raglan, but to avoid stopping the line of holes along each raglan line, work A.3 in each transition between body and sleeves (the marker threads sit in the middle of A.3). When the piece measures 23-25-27-29-31-33 cm, work the next row as follows from the wrong side: Work as before over the first 50-54-58-63-68-74 stitches (= front piece), place the next 62-70-76-80-82-84 stitches on 1 thread for sleeve, cast on 6-6-8-8-10-12 new stitches on the needle (= in side under the sleeve), purl 90-98-106-116-126-138 stitches (= back piece), place the next 62-70-76-80-82-84 stitches on 1 thread for sleeve, cast on 6-6-8-8-10-12 new stitches on needle (=in side under the sleeve) and work as before over the remaining 50-54-58-63-68-74 stitches (= front piece). Body and sleeves are finished separately. THE PIECE IS NOW MEASURED FROM HERE! BODY: = 202-218-238-258-282-310 stitches. Continue with stocking stitch and 5 band stitches in garter stitch in each side towards mid front. When the piece measures 32-32-32-32-32-32 cm from the separation, change to circular needle size 3 mm. Work 2 ridges back and forth. Change back to circular needle size 4 mm and cast off with knit from the right side. The jacket measures approx. 56-58-60-62-64-66 cm from the shoulder down. SLEEVE: Place the stitches from the thread in the one side of the piece on short circular needle size 4 mm and, in addition, knit up 1 stitch in each of the 6-6-8-8-10-12 stitches cast on under the sleeve = 68-76-84-88-92-96 stitches. Insert 1 marker thread in the middle of the 6-6-8-8-10-12 stitches. Work stocking stitch in the round. When the piece measures 2 cm from the separation, decrease 2 stitches mid under sleeve – read DECREASE TIP. Decrease like this a total of 9-12-15-15-16-17 times in Size S: Every 8th round, in Size M: Every 5th round, in Size L: Every 4th round, in Size XL: Alternately every 3rd and 4th round, in Size XXL: Every 3rd round and in Size XXXL: Alternately every 2nd and 3rd round = 50-52-54-58-60-62 stitches. Continue working until the sleeve measures 26-24-23-21-19-18 cm from the separation. Change to double pointed needles size 3mm and work 2 ridges in the round. Change back to double pointed needles size 4 mm and cast off with knit. Work the other sleeve in the same way. ASSEMBLY: Sew on the buttons. |
||||||||||||||||||||||
Diagram explanations |
||||||||||||||||||||||
|
||||||||||||||||||||||
 |
||||||||||||||||||||||
 |
||||||||||||||||||||||
 |
||||||||||||||||||||||
 |
||||||||||||||||||||||
Have you finished this pattern?Tag your pictures with #dropspattern #goldenheartjacket or submit them to the #dropsfan gallery. Do you need help with this pattern?You'll find 28 tutorial videos, a Comments/Questions area and more by visiting the pattern on garnstudio.com. © 1982-2026 DROPS Design A/S. We reserve all rights. This document, including all its sub-sections, has copyrights. Read more about what you can do with our patterns at the bottom of each pattern on our site. |
||||||||||||||||||||||


With over 40 years in knitting and crochet design, DROPS Design offers one of the most extensive collections of free patterns on the internet - translated to 17 languages. As of today we count 324 catalogues and 12290 patterns translated into English (UK/cm). 12290
We work hard to bring you the best knitting and crochet have to offer, inspiration and advice as well as great quality yarns at incredible prices! Would you like to use our patterns for other than personal use? You can read what you are allowed to do in the Copyright text at the bottom of all our patterns. Happy crafting!
Post a comment to pattern DROPS 187-11
We would love to hear what you have to say about this pattern!
If you want to leave a question, please make sure you select the correct category in the form below, to speed up the answering process. Required fields are marked *.