
Popular categories
Looking for a yarn?


Comments / Questions (44)
![]() Charo wrote:
Charo wrote:
Buenos días, el error que había en un principio ya está corregido en la página? Pulsó en el comentario en rojo y solo indica la fecha en la que se actualizó
03.04.2024 - 13:07DROPS Design answered:
Hola Charo, la nota de corrección en rojo solo indica que se ha hecho una corrección en una fecha específica, por si alguien tiene el patrón impreso desde antes. El patrón publicado online está ya corregido; las correcciones ya han sido aplicadas al texto, así que es la versión correcta.
07.04.2024 - 23:28
![]() Ula wrote:
Ula wrote:
Chiałabym zapytać czy jest wzór pasującego beretu do tego szala jak np ten pokazany na zdjęciu poniżej? Nie znalazłam linku do niego. Dziekuje z góry
08.03.2023 - 21:15DROPS Design answered:
Witaj Ulu, klientka pisze, że beret jest zbitką kilku wzorów :) Także nie ma w naszej bazie wzoru na ten konkretny beret. W wyszukiwarce przejrzyj nasze berety, może coś Ci się rzuci w oko. Pozdrawiamy serdecznie i dziękujemy za zainteresowanie naszymi produktami!
09.03.2023 - 08:25
![]() Ula wrote:
Ula wrote:
Prułam kilkukrotnie aż do dwóch rzedów przed wzorem fantazyjnym. Rzeczywiście w trakcie kilku pierwszych rzędów wydaje sie ze piony podziału z dodawaniem oczek nie wypadają w połowie listków ale zaryzykowałam i poszłam dalej i jest okej. Czyli taka specyfika wzoru. Dziękuję za sprawdzenie i pozdrawiam serdecznie
08.03.2023 - 21:14DROPS Design answered:
Bardzo się cieszę. Koniecznie zamieść zdjęcie gotowego szala w mediach społecznościowych albo w galerii DropsFan na naszej stronie, chętnie go zobaczymy :) Pozdrawiamy
09.03.2023 - 08:18
![]() Ula wrote:
Ula wrote:
Dzień dobry. Napotkałam na problem.. W miejscu gdzie rozpoczyna sie wzor schemat A 6, jeden z 'listkow' wzoru wypada za wcześnie, jest przesuniety wzgledem środka chusty. Liczba oczek sie zgadza. Nie wiem co zrobic aby to 'naprawic'. Prosze o pomoc. Pozdrawiam serdecznie
04.03.2023 - 12:54DROPS Design answered:
Witaj Ulu, nie widzę innej opcji jak tylko spruć ten fragment, gdyż prawdopodobnie zdarzył się jakiś błąd po drodze. Sprawdziłam komentarze, ale nikt nie zgłasza problemu z tym schematem. Zobacz jeszcze kurs jak czytać schematy TUTAJ 06.03.2023 - 16:05
![]() Rosita wrote:
Rosita wrote:
Buonasera grazie per la vostra risposta ma non è servita a risolvere il problema, ho capito che devo seguire lo schema ax con le 51 maglie, ma essendo tutti aumenti, ma alla fine del ferro rimangono maglie in più che non si sa come lavorare, in più i forellini vengono sfalzati, in quanto il vostro schema è basato su un numero di maglie precedente alle 51,prego di essere più chiari nelle risposte, grazie
06.01.2023 - 00:25DROPS Design answered:
Buonasera Rosita, può inserire i segnapunti per delimitare i diagrammi: gli aumenti si lavorano a maglia rasata. Buon lavoro!
06.01.2023 - 22:25
![]() Rosita wrote:
Rosita wrote:
Buonasera, dopo le 51 maglie ri eseguendo lo schema ax compreso a2 con i quattro aumenti oltre a ritrovarsi a fine giro con maglie in più che non si capisce come bisogna lavorarle i segna punti naturalmente vengono spostati di ferro in ferro così i fori non risulteranno più allineati come dovrebbero essere! C'è qualche fortunata che ha passato questi ostacoli e mi sappia spiegare bene come proseguire? Grazie
04.01.2023 - 20:36DROPS Design answered:
Buonasera Rosica, dopo aver raggiunto le 51 maglie, deve proseguire lavorando solo su A.X e con gli aumenti come prima. Buon lavoro!
05.01.2023 - 23:16
![]() Rosica wrote:
Rosica wrote:
Buonasera, potreste gentilmente chiarire lo schema, in quanto dopo aver eseguito da a1ad a5 rimangono le famose 51 maglie, ma quando si ri esegue lo schema per gli aumenti alternati, già dal primo ferro (eseguendo ancora da a1 a 5 compreso a. 2 , mi avanzano delle maglie in più che non so come lavorare! E se dovessi aggiungere come dite voi anche gli altri aumenti di 8m.alla fine del ferro dopo lo schema me ne ritroverai ancora di più come devo lavorarle? Grazie
04.01.2023 - 19:02DROPS Design answered:
Buonasera Rosica, dopo aver raggiunto le 51 maglie, deve proseguire lavorando solo su A.X e con gli aumenti come prima. Buon lavoro!
05.01.2023 - 23:15
![]() Leila Müller wrote:
Leila Müller wrote:
Guten Abend Bei den 51 Maschen bin ich stehen geblieben. In der nächsten Musterreihe: Wenn ich A.x einmal durchstricke, sind natürlich ein paar Maschen übrig.. Wie genau gehe ich da also vor? Danke Gruss Leila
08.05.2022 - 22:40DROPS Design answered:
Liebe Frau Müller, nehmen Sie wie zuvor zu, dh: am Anfang A.1x und A.4x, in der Mitte jedes A.2 und am Ende A.3x + A.5x. Viel Spaß beim stricken!
09.05.2022 - 08:43
![]() Maud wrote:
Maud wrote:
I cannot see the diagram for the lace - please advise
01.10.2021 - 13:41DROPS Design answered:
Dear Maud, you should see all diagrams under diagram text, if needed refresh the page and/or empy the cache can help. Happy knitting !
01.10.2021 - 16:13
![]() Susanne Egede wrote:
Susanne Egede wrote:
Hej jeg kan gennemskue denne tekst. Gentag udtagningerne som vist i A.x. Der tages skiftevis 4 og 8 masker ud på hver pind fra retsiden (dvs 12 masker for hver gentagelse i højden), de nye masker strikkes i glatstrik på hver side af hver A.2. Lad mærkerne følge med i arbejdet for at markere midt-masken og midten af A.2. Kan i forklare mig? Mvh Susanne,
28.09.2021 - 15:23DROPS Design answered:
Hej Susanne, jo på første udtagningspind ifølge A.x tager du 4 masker ud (fra retsiden), på næste udtagningspind (fra retsiden) tager du 8 masker ud, sådan skifter du med 4 og 8 masker ifølge A.x. God fornøjelse!
06.10.2021 - 14:00
|
|||||||||||||||||||
Fuego de Dragon#fuegodedragonshawl |
|||||||||||||||||||
 |
 |
||||||||||||||||||
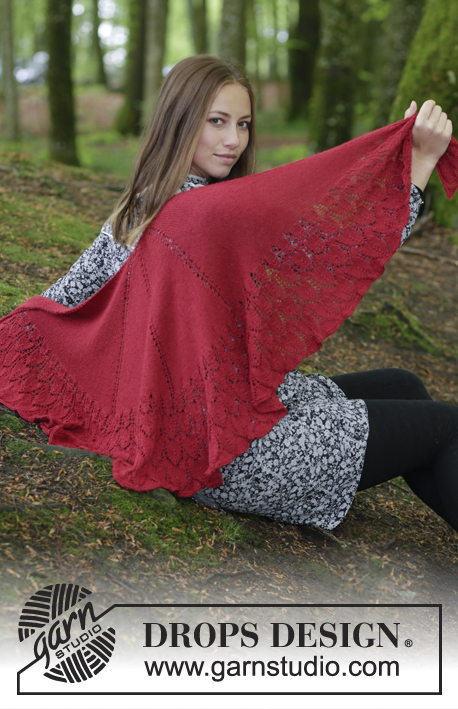
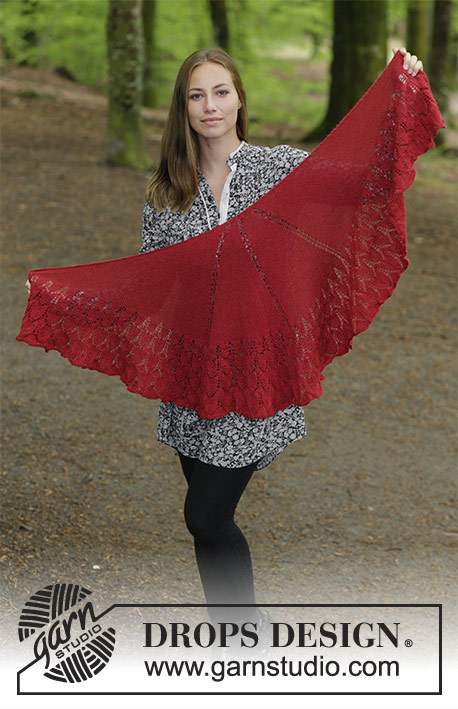
Knitted shawl with edge in lace pattern. Piece is knitted in DROPS BabyAlpaca Silk.
DROPS 183-17 |
|||||||||||||||||||
|
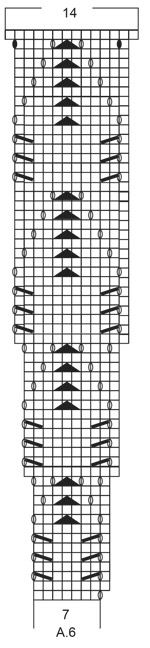
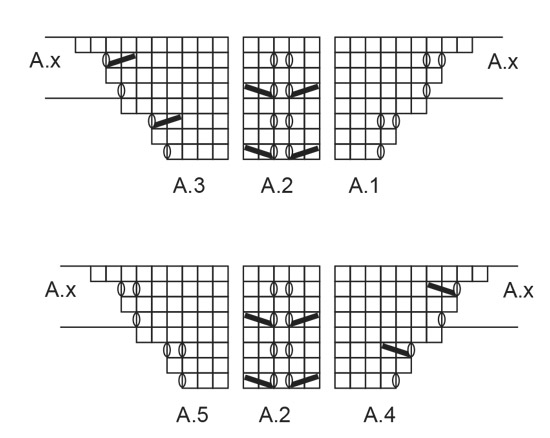
INFORMATION FOR PATTERN: GARTER STITCH (back and forth): 1 ridge = knit 2 rows. PATTERN: See diagrams A.1 to A.6. Diagrams show all rows in pattern seen from the right side. ---------------------------------------------------------- SHAWL: Cast on 3 stitches on circular needle size 3 mm with BabyAlpaca Silk. Work and increase as follows: ROW 1: Work 1 edge stitch in GARTER STITCH - see explanation above, 1 yarn over, knit 1, 1 yarn over, 1 edge stitch in garter stitch = 5 stitches. Insert a marker in the middle stitch. ROW 2 and all rows from wrong side: Work 1 edge stitch in garter stitch in each side (knit from wrong side) and purl all stitches and yarn overs. ROW 3: 1 edge stitch in garter stitch, knit 1, 1 yarn over, knit 1, 1 yarn over, knit 1 and 1 edge stitch in garter stitch = 7 stitches. ROW 5: 1 edge stitch in garter stitch, 1 yarn over, knit 1, 1 yarn over, knit 3, 1 yarn over, knit 1, 1 yarn over and 1 edge stitch in garter stitch = 11 stitches. ROW 7: 1 edge stitch in garter stitch, 1 yarn over, knit 3, 1 yarn over, knit 3, 1 yarn over, knit 3, 1 yarn over and 1 edge stitch in garter stitch = 15 stitches. ROW 9: 1 edge stitch in garter stitch, 1 yarn over, knit 1, 1 yarn over, knit 3 and insert a marker in the middle stitch of these stitches, 1 yarn over, knit 1, 1 yarn over, knit 3 (in the middle of these stitches there is already a marker = middle stitch), 1 yarn over, knit 1, 1 yarn over, knit 3 and insert a marker in the middle stitch of these stitches, 1 yarn over, knit 1, 1 yarn over and 1 edge stitch in garter stitch = 23 stitches. ROW 11: 1 edge stitch in garter stitch, 1 yarn over, knit until middle stitch, 1 yarn over, knit 1 (= middle stitch), 1 yarn over and knit until 1 edge stitch, 1 yarn over and 1 edge stitch in garter stitch = 27 stitches. Work PATTERN according to diagram A.1 to A.5 from right side as follows: Work 1 edge stitch in garter stitch, A.1 over 3 stitches, A.2 over 5 stitches (first marker is in the middle of A.2), A.3 over 4 stitches, 1 stitch in stocking stitch (second marker is this stitch = middle stitch), A.4 over 4 stitches, A.2 over 5 stitches (third marker is in the middle of A.2), A.5 over 3 stitches and 1 edge stitch in garter stitch = 31 stitches. REMEMBER THE KNITTING TENSION! When A.1 to A.5 have been worked 1 time vertically, there are 51 stitches on row. Repeat increases as shown in A.x. Increase alternately 4 and 8 stitches on every row from right side (i.e. 12 stitches for every repetition vertically), work the increased stitches in stocking stitch on each side of every A.2. Move the markers upwards when working to mark middle stitch and middle of A.2. Repeat as shown in A.x 24 times in total vertically, there are 339 stitches in total on needle. Piece measures approx. 36 cm. EDGE: Now work an edge in lace pattern as follows: 1 edge stitch in garter stitch, A.6 (= 48 repetitions of 7 stitches on first row) until 2 stitches remain on row, 1 stitch in stocking stitch, 1 edge stitch in garter stitch. Continue pattern back and forth like this until entire diagram has been worked vertically. There are now 675 stitches on needle. Work 2 ridges. Cast off. To avoid a tight cast-off edge use a larger needle or make a yarn over that is casted off after approx. every 4th stitch. Fasten off. |
|||||||||||||||||||
Diagram explanations |
|||||||||||||||||||
|
|||||||||||||||||||
 |
|||||||||||||||||||
 |
|||||||||||||||||||
Have you finished this pattern?Tag your pictures with #dropspattern #fuegodedragonshawl or submit them to the #dropsfan gallery. Do you need help with this pattern?You'll find 18 tutorial videos, a Comments/Questions area and more by visiting the pattern on garnstudio.com. © 1982-2026 DROPS Design A/S. We reserve all rights. This document, including all its sub-sections, has copyrights. Read more about what you can do with our patterns at the bottom of each pattern on our site. |
|||||||||||||||||||


With over 40 years in knitting and crochet design, DROPS Design offers one of the most extensive collections of free patterns on the internet - translated to 17 languages. As of today we count 324 catalogues and 12291 patterns translated into English (UK/cm). 12291
We work hard to bring you the best knitting and crochet have to offer, inspiration and advice as well as great quality yarns at incredible prices! Would you like to use our patterns for other than personal use? You can read what you are allowed to do in the Copyright text at the bottom of all our patterns. Happy crafting!
Post a comment to pattern DROPS 183-17
We would love to hear what you have to say about this pattern!
If you want to leave a question, please make sure you select the correct category in the form below, to speed up the answering process. Required fields are marked *.