
Popular categories
Looking for a yarn?


Comments / Questions (19)
![]() Aurore G wrote:
Aurore G wrote:
Merci infiniment pour votre réponse. Je n'avais effectivement pas vu les augmentations entre les mailles envers. :) C'est un très beau modèle.
25.03.2019 - 09:29
![]() Aurore G wrote:
Aurore G wrote:
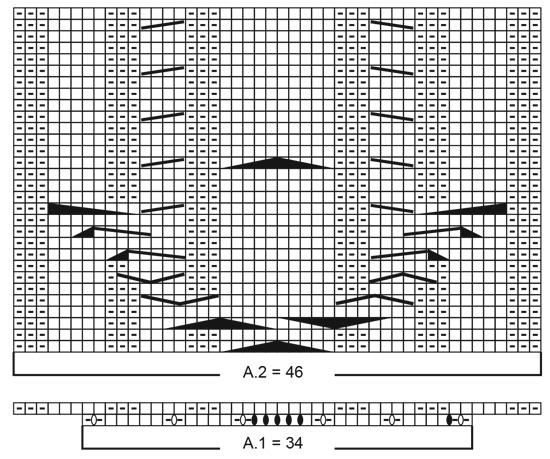
Bonjour, Votre diagramme pour A1 n'est-il pas incomplet ? A la fin de A1, nous devons avoir douze mailles de plus et vous n'en ajoutez que six... Merci d'avance pour votre réponse.
23.03.2019 - 09:50DROPS Design answered:
Bonjour Aurore, on augmente bien 12 m dans A.1, à l'aide des 2 derniers symboles de la légende, l'avant-dernier est peut-être un peu moins visible mais vous le retrouvez entre les mailles envers (on va tricoter ces 2 m env ainsi: 1 m env, 1 jeté, 1 m env) à 6 reprises + les 6 autres jetés = on augmente bien 12 m. Bon tricot!
25.03.2019 - 08:53
![]() Linn Silje wrote:
Linn Silje wrote:
Hei! Jeg forstår ikke hvordan oppskriften på ermene skal gå opp. Jeg strikker str. S, og hvis jeg skal øke 2 masker hver 16. cm. 3 ganger er ermet 48 cm når jeg øker siste gang. Siden jeg skal begynne å felle av når ermet måler 46 cm. synes jeg det virker litt rart. Jeg vil gjerne ha hjelp til å skjønne den hvis jeg har lest noe feil!
29.03.2018 - 10:17DROPS Design answered:
Hei Linn. Du skal øke totalt 3 ganger, inkludert den første gangen du øker – når arbeidet måler 12 cm. Økingen blir derfor slik: strikk 12 cm, øk 2 masker, strikk 16 cm, øk 2 masker, strikk 16 cm, øk 2 masker. Arbeidet måler nå 44 cm og du har 54 masker på pinnen. God fornøyelse
18.04.2018 - 07:53
![]() Reinhard Ingrid wrote:
Reinhard Ingrid wrote:
Wie hoch soll A 1 gestrickt werden?
26.01.2018 - 09:33DROPS Design answered:
Liebe Frau Sandström, A.1 wird nur einmal in der Höhe gestrickt. Viel Spaß beim stricken!
26.01.2018 - 13:24
![]() Paola wrote:
Paola wrote:
Ho una domanda sulle taglie. Io ho una taglia L da donna, ma ho paura che la vostra taglia L di questo modello sia troppo larga. 68 cm per lato alla base, moltiplicati per due fanno 136 cm, che sono tantissimi! Che taglia faccio per me?
19.01.2018 - 01:04DROPS Design answered:
Buongiorno Paola. Le taglie Drops vestono comodo. Il modello stesso prevede di non essere aderente. Per scegliere la taglia, può misurare un suo maglione le cui misure la soddisfano e confrontarlo con le misure indicate nello schema, scegliendo poi la taglia che più si avvicina alle sue misure. Buon lavoro!
19.01.2018 - 08:17
![]() Kari wrote:
Kari wrote:
Dere burde kommentere i oppskriften at det også skal økes mellom kryssene. Dette er (tilnærmet) umulig å se når vi ser på mønsteret.
03.12.2017 - 12:44
![]() Carmen Ulloasanzo wrote:
Carmen Ulloasanzo wrote:
El delantero no me queda bien. La 1a línea del a1 esta bien e iincremento los 12 pero luego cuando tengo q hacer la 2a línea sale raro. Cuantos puntos tengo q hacer antes de empezar la segunda línea porq no cuadran los puntos? Tb, la 1a línea del a2 dice coger 5 puntos y hacer del dicho pero esa vuelta siempre toca del revés, y el resultado si lo hiciera así sería q el ocho sale del revés en el drcho... ayuda!! Gracias
02.12.2017 - 09:01
![]() Guylaine Ferland wrote:
Guylaine Ferland wrote:
Je ne suis pas capable d'imprimer le diagramme merci!
28.09.2017 - 03:34DROPS Design answered:
Bonjour Mme Ferland, un test a été réussi avec succès, vérifiez bien les paramètres de votre imprimante et imprimez bien toutes les pages pour ne pas manquer celle du diagramme. Pour toute assistance complémentaire, n'hésitez pas à demander de l'aide à votre magasin DROPS. Bon tricot!
28.09.2017 - 10:31
![]() Laura Blonk wrote:
Laura Blonk wrote:
In het patroon komt volgens mij een fout voor. Alleen in het voorpand komt volgens het patroon de kabel. In A-1 worden volgens mij 6 steken gemeerderd en geen 12, Het aantal steken is dan toch 222?
20.09.2017 - 16:13DROPS Design answered:
Hallo Laura, Als je goed kijkt zitten er in telpatroon A.1, naast de dichte symbolen voor de omslagen, ook 'open' symbolen. Deze zijn helaas niet zo duidelijk, maar ze zitten tussen de kruisjes. Hierdoor kom je op 12 meerderingen in A.1
27.09.2017 - 21:13
|
|||||||||||||||||||||||||||||||||||||||||||||||||
Winter Love#winterlovesweater |
|||||||||||||||||||||||||||||||||||||||||||||||||
 |
 |
||||||||||||||||||||||||||||||||||||||||||||||||
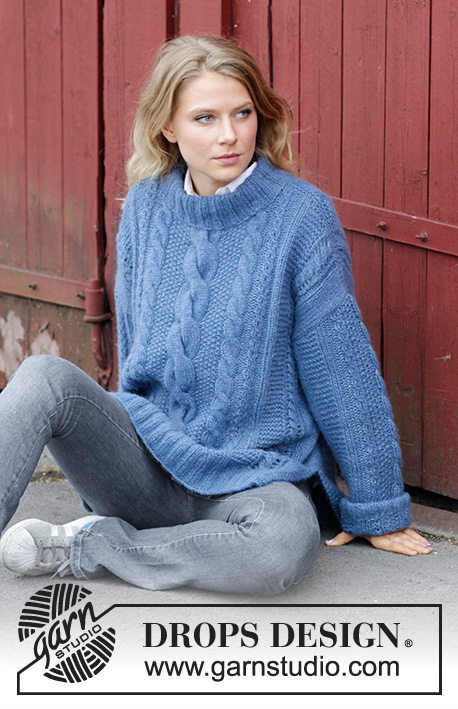
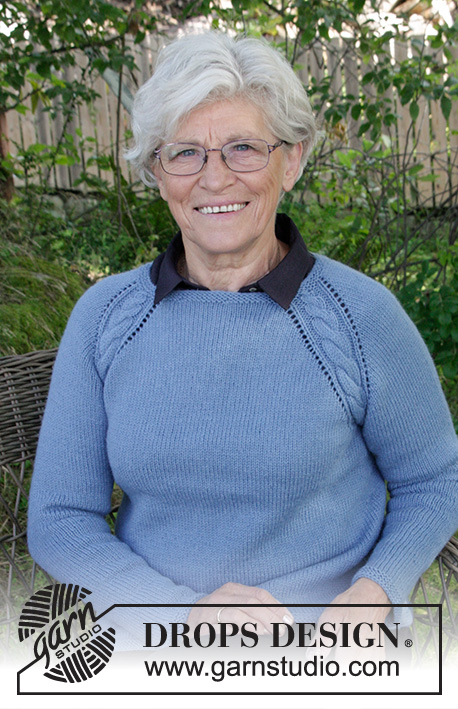
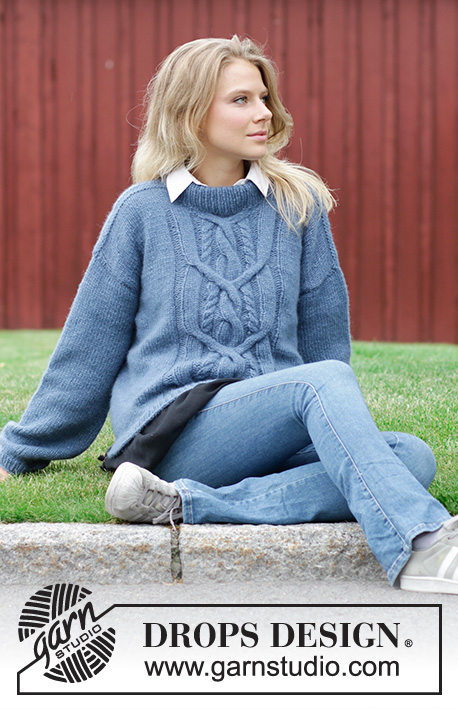
Knitted jumper with cable on front. Sizes S - XXXL. The piece is worked in DROPS Air.
DROPS 184-11 |
|||||||||||||||||||||||||||||||||||||||||||||||||
|
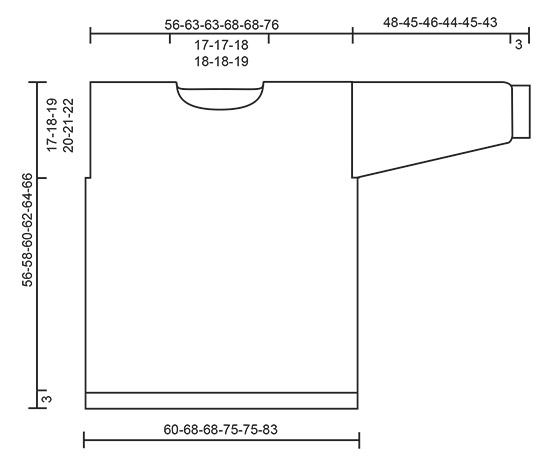
INFORMATION FOR THE PATTERN: RIDGE/GARTER STITCH (worked back and forth): 1 ridge = Knit 2 rows. PATTERN: See diagrams A.1 and A.2. The diagrams show all the rows in the pattern seen from the right side. DECREASE/INCREASE TIP: To work out how to decrease/increase evenly, count the total number of stitches on the needle (e.g. 228 stitches) and divide by the number of decreases/increases to be made (e.g. 36) = 6.3. In this example, knit approx. every 5th and 6th stitch together. If you are increasing evenly, make 1 yarn over after approx. every 6th stitch. On the next round knit the yarn overs twisted to prevent holes. INCREASE TIP (for mid under sleeve): Start 1 stitch before the marker, make 1 yarn over, knit 2 (the marker sits in the middle of these stitches), make 1 yarn over. On the next round, work the yarn overs twisted and work in pattern. CAST-OFF TIP: To avoid a tight cast-off edge, you can cast off with a ½ size larger needle. ---------------------------------------------------------- JUMPER: The piece is worked in the round with circular needle as far as the armholes, then the front and back pieces are worked separately back and forth. The sleeves are worked in the round with double pointed needles/ short circular needle. BODY: Cast on 228-258-258-282-282-312 stitches with circular needle size 4.5 mm and Air. Knit 1 round. Then work rib (= knit 1 / purl 1) for 3 cm. Change to circular needle size 5.5 mm and knit 1 round where you decrease 36-42-42-42-42-48 stitches evenly on round - read DECREASE/INCREASE TIP above = 192-216-216-240-240-264 stitches. Insert 1 marker at the beginning of the round and 1 marker after 96-108-108-120-120-132 stitches (= the sides) and allow the markers to follow your work upwards. Then work as follows: Work 31-37-37-43-43-49 stitches stocking stitch, A.1 (= 34 stitches), work stocking stitch over the remaining 127-145-145-163-163-181 stitches. When A.1 has been completed in height there are 204-228-228-252-252-276 stitches on the last round. REMEMBER THE KNITTING TENSION! Then work as follows: Work 31-37-37-43-43-49 stitches stocking stitch, A.2 (= 46 stitches), work stocking stitch over the remaining 127-145-145-163-163-181 stitches. Continue the pattern in this way, A.2 is repeated in height to finished length. When the piece measures 39-40-41-42-43-44 cm cast off for the armholes as follows: Cast off 5-5-5-9-9-9 stitches in each side for the armholes (= 2-2-2-4-4-4 stitches before/3-3-3-5-5-5 stitches after both markers). Front and back pieces are continued back and forth separately. BACK PIECE: = 91-103-103-111-111-123 stitches (including 1 edge stitch in each side). Continue with stocking stitch as before, with 1 edge stitch in GARTER STITCH - see description above, in each side. When the piece measures 53-55-57-59-61-63 cm cast off the middle 25-25-27-27-27-29 stitches for neck and each shoulder is finished separately. Cast off 1 stitch on the next row from the neck = 32-38-37-41-41-46 stitches left on shoulder. Continue working until the piece measures 55-57-59-61-63-65 cm. Work 1 ridge and cast off - read CAST-OFF TIP. Work the other shoulder in the same way. FRONT PIECE: = 103-115-115-123-123-135 stitches (including 1 edge stitch in each side). Continue the pattern as before, with 1 edge stitch in garter stitch in each side. When the piece measures 50-52-54-55-57-59 cm decrease 12 stitches evenly over A.2 = 91-103-103-111-111-123 stitches. On the next row, place the middle 13-13-15-15-15-17 stitches on 1 thread for neck and each shoulder is finished separately in stocking stitch, edge stitch is worked as before. Cast off for the neck at the beginning of every row from the neck as follows: 2 stitches 2 times and 1 stitch 3 times = 32-38-37-41-41-46 stitches left on the shoulder. Continue working until the piece measures 55-57-59-61-63-65 cm. Work 1 ridge and cast off. Work the other shoulder in the same way. SLEEVE: The sleeve is worked in the round with double pointed needles/short circular needle. Cast on 36-38-40-42-44-46 stitches with double pointed needles size 4.5 mm and Air. Knit 1 round. Then work rib (= knit 1 / purl 1) for 3 cm. Change to double pointed needles size 5.5 mm and knit 1 round where you increase 12-14-12-14-14-14 stitches evenly on round = 48-52-52-56-58-60 stitches. Insert 1 marker at the beginning of the round (= mid under sleeve) and allow the marker to follow your work upwards. Continue by working stocking stitch. When the piece measures 12 cm increase 2 stitches mid under the sleeve - read INCREASE TIP. Increase in this way every 16-14-10-9-7-6 cm a total of 3-3-4-4-5-5 times = 54-58-60-64-68-70 stitches. When the piece measures 46-43-44-42-43-41 cm cast off the middle 8-8-8-10-10-10 stitches (= 4-4-4-5-5-5 stitches on each side of the marker) and work a small sleeve cap back and forth on the circular needle. Work stocking stitch and cast off at the beginning of each row in each side as follows: Cast off 5-5-6-5-6-6 stitches 2 times and cast off the remaining stitches. The sleeve measures approx. 48-45-46-44-45-43 cm. Work one more sleeve in the same way. ASSEMBLY: Sew the shoulder seams inside the cast-off edges so that you get 2 ridges on top of the shoulder. Sew the sleeve seams inside the 1 edge stitch in garter stitch. NECK: Knit up from the right side approx. 78-90 stitches around the neck (including the stitches on the thread at the front) with short circular needle size 4.5 mm. Purl 1 round. Knit 1 round where you adjust the number of stitches to 78-78-84-84-90-90 stitches. Continue by working rib (= knit 1 / purl 1) for 12 cm. Then purl 1 round, cast off. Turn the collar down on the inside so that it is 6 cm high, fasten with small neat stitches on the inside of the jumper. |
|||||||||||||||||||||||||||||||||||||||||||||||||
Diagram explanations |
|||||||||||||||||||||||||||||||||||||||||||||||||
|
|||||||||||||||||||||||||||||||||||||||||||||||||
 |
|||||||||||||||||||||||||||||||||||||||||||||||||
 |
|||||||||||||||||||||||||||||||||||||||||||||||||
Have you finished this pattern?Tag your pictures with #dropspattern #winterlovesweater or submit them to the #dropsfan gallery. Do you need help with this pattern?You'll find 34 tutorial videos, a Comments/Questions area and more by visiting the pattern on garnstudio.com. © 1982-2026 DROPS Design A/S. We reserve all rights. This document, including all its sub-sections, has copyrights. Read more about what you can do with our patterns at the bottom of each pattern on our site. |
|||||||||||||||||||||||||||||||||||||||||||||||||


With over 40 years in knitting and crochet design, DROPS Design offers one of the most extensive collections of free patterns on the internet - translated to 17 languages. As of today we count 324 catalogues and 12290 patterns translated into English (UK/cm). 12290
We work hard to bring you the best knitting and crochet have to offer, inspiration and advice as well as great quality yarns at incredible prices! Would you like to use our patterns for other than personal use? You can read what you are allowed to do in the Copyright text at the bottom of all our patterns. Happy crafting!
Post a comment to pattern DROPS 184-11
We would love to hear what you have to say about this pattern!
If you want to leave a question, please make sure you select the correct category in the form below, to speed up the answering process. Required fields are marked *.