
Popular categories
Looking for a yarn?


Comments / Questions (28)
![]() Ivonne wrote:
Ivonne wrote:
Het telpatroon klopt niet. Hoe kun je 14 steken minderen, terwijl je maar 12 steken aanmaakt. Ik maak nu 12 x 2 omslagen in plaats van 14 in de 10e regel van het telpatroon en dan komt het wel goed uit.
18.02.2026 - 11:02
![]() Torill wrote:
Torill wrote:
Skulle gjerne sett en video av hvordan mønster A1 strikkes når 14 masker skal bli til 1 maske. Det ligger en video her som ikke fungerer.
04.09.2025 - 18:53
![]() Berbett wrote:
Berbett wrote:
Bonjour, Les boutonnières sur photos ressemblent à des arceaux ajoutés sur le bord que je trouve jolis mais comment faire ? puisque les explications de ce modèle sont donnés avec une ouverture classique que je souhaite éviter. Merci d'avance.
06.11.2022 - 17:13DROPS Design answered:
Bonjour Berbett, nous avons effectivement modifié les boutonnières suite à de nombreux retours de clientes qui préfèrent avoir de vraies boutonnières, mais vous pouvez tout à fait les faire ainsi en crochetant quelques mailles en l'air (correspondant à la taille des boutons), sautez 1 ou 2 côtes mousse de la bordure et attachez avec 1 mc. Bon tricot!
18.11.2022 - 11:53
![]() Marcia wrote:
Marcia wrote:
Hi. For the shawl collar, the pattern says "Increase like this every 4th row (i.e. every other row from right side)". I don't understand this because every other row means every 2nd row, not every 4th row. I understand how to make the yarn over on each side on the RS and then work the yarn overs twisted on the WS. That makes 2 rows. Do I work another 2 rows before I increase again?
11.01.2021 - 05:58DROPS Design answered:
Dear Marcia, you have to increase on on every other 4th row (= increase on next RS row, work 3 rows = 1 row from WS, 1 row from RS, 1 row from WS) - this means the same as on every other row from RS (= increase on next row from RS, do not increase on next row from RS and repeat). Hope that helps. Happy knitting!
11.01.2021 - 10:43
![]() Vera wrote:
Vera wrote:
Ik heb een probleem met minderen voor de hals. Volgens het patroon moet je minderen na de 2 steken voor het ivy patroon maar dan ga je minderen in het patroon zelf???
13.01.2019 - 11:10DROPS Design answered:
Dag Vera,
Op het rechter voorpand (dus het rechter voorpand als je het draagt) minder je ná A.2 en dit is dus in het tricotsteek gedeelte. Op het linker voorpand minder je ook in het tricotsteekgedeelte. (zie TIP VOOR HET MINDEREN-2 voor hoe je de minderingen maakt op het linker/rechter voorpand).
23.01.2019 - 11:33
![]() Ma wrote:
Ma wrote:
Hoi, Ik heb t vestje gemaakt maar in tegenstelling tot eerder vesten valt t vrij klein. Loopt t nog uit door t patroon of kan ik t beter in n maat groter gaan maken?
12.08.2018 - 18:30DROPS Design answered:
Dag Ma, Het vest zou met dit garen, gewoon in model moeten blijven dus het loopt niet uit door het patroon. Je kunt de stekenverhouding aanhouden en kijken naar de maattabel voor de juiste maat/afmetingen. Vergelijk de afmetingen in de maattekening eventueel met een bestaand kledingstuk dat je goed past. Succes!
14.08.2018 - 10:28
![]() Marieke Schoutsen wrote:
Marieke Schoutsen wrote:
Goedemiddag, Het lukt mij niet het knoopsgat te maken. Ik kan helaas geen filmpje vinden. Ik brei tot de voorlaatste steek maak de 2 omslagen brei de laatste steek. Na het keren brei ik de omslagen samen met de andere steken en vervolg mijn naald, maar er onstaat geen knoopsgat? Wat doe ik verkeerd?
21.03.2018 - 15:46DROPS Design answered:
Hallo Marieke, Zoals je het beschrijft doe je het goed en zou er wel een knoopsgat moeten ontstaan, dus de eerste steek recht samen breien met de eerste omslag en dan de volgende omslag recht samen breien met de volgende steek. Helaas kan ik vanaf hier niet meekijken, maar je kunt evt. ook altijd hulp vragen bij de winkel waar je het garen hebt gekocht
21.03.2018 - 21:00Fiona wrote:
I am a bit confused about the length of the sleeves. I am making size xl. If I measure from the 4cm marker, garter 4cm, stocking stitch 5cm,then increase 2 stitches every 2cm 21 times that makes 51cm ... but the instructions say to work until piece measures 46cm before decreasing for the sleeve cap. Are the measurements correct?
11.03.2018 - 17:41DROPS Design answered:
Dear Fiona, starting the inc mid under sleeve when piece measures 5 cm (= 4 cm garter st + 1 cm stocking st) you will dec at the fisrt time at 5 cm, then at 7 cm, ... and the last inc will be worked when piece measures 45 cm. Happy knitting!
12.03.2018 - 10:14Lynette Stakenburg wrote:
Good morning/afternoon I would like to know if there is a written pattern for the sweet ivy leaves cardigan. Thank you Lynette Stakenburg
03.05.2017 - 05:37DROPS Design answered:
Dear Lynette, for the lace pattern in the Sweet Ivy Leaves cardigan you have to follow the charts. Beside the charts there are explanations for the symbols, and everything else is witten out. I hope this helps. Happy knitting!
06.05.2017 - 10:57
![]() Anja wrote:
Anja wrote:
Nach 23cm kommen die Anbnahmen für den Halsauschnitt. Werden diese nicht in den Blendenmaschen vorgenommen, vor dem Mustersatz? In der Anleitung werden die Abnahmen nach dem Mustersatz abgenommen, das wäre ja fast unterm Arm. Bitte um Überprüfung.
15.04.2017 - 17:50DROPS Design answered:
Liebe Anja, die Abnahmen für den Halsausschnitt sind im Glatt-rechts Teil gestrickt, siehe ABNAHMETIPP-2 (gilt für den Halsausschnitt vorne). Viel Spaß beim stricken!
18.04.2017 - 10:43
|
|||||||||||||||||||||||||
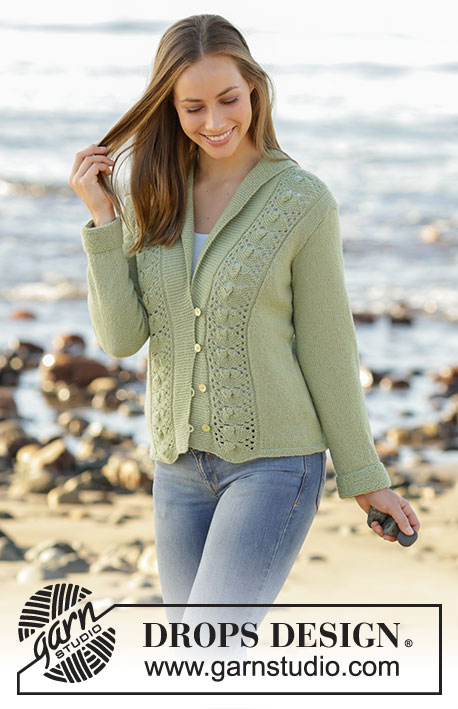
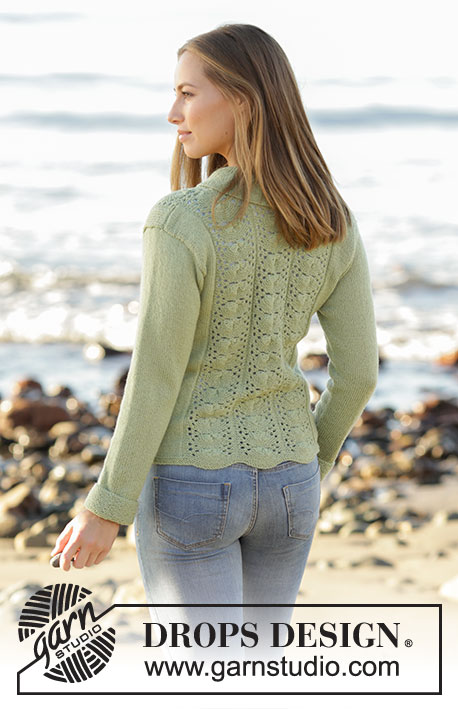
Sweet Ivy Leaves#sweetivyleavescardigan |
|||||||||||||||||||||||||
 |
 |
||||||||||||||||||||||||
Knitted jacket with lace pattern and shawl collar in DROPS Flora. Size: S - XXXL
DROPS 175-25 |
|||||||||||||||||||||||||
|
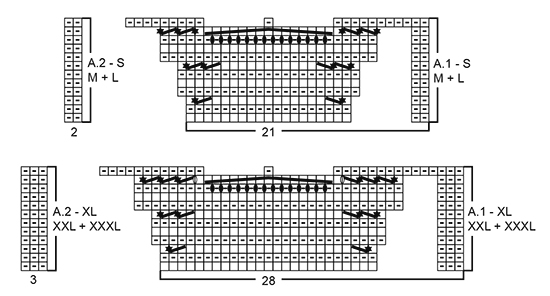
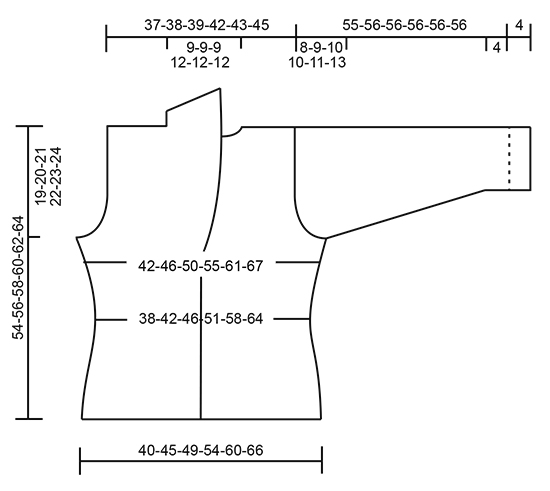
GARTER STITCH (worked back and forth): 1 ridge = knit 2 rows. GARTER STITCH (worked in the round): 1 ridge = 2 rounds. Knit 1 round and purl 1 round. PATTERN: See diagrams A.1 and A.2. Diagrams show all rows in pattern seen from the right side. Choose diagram for your size. KNITTING INFO: Because of the pattern in A.1 number of stitches on needle will vary. Where number of stitches is given in pattern the numbers are given without increases in pattern (i.e. with number of stitches A.1/A.2 have at the beginning of 1 repetition vertically). SHORT ROWS: To avoid the bands from contracting vertically work short rows over band in each side as follows: * Knit 2 rows back and forth only over the outermost 10-10-12-12-14-14 band stitches in one side of piece (or over as many stitches as there are in band after increase for shawl collar), work 1 row over all stitches on needle, turn piece and knit 2 row back and forth over the 10-10-12-12-14-14 band stitches in the other side of piece *, repeat from *-* every 4 cm until finished measurements. DECREASE TIP-1 (applies to sides of body): All decreases are done from the right side. Begin 4 stitches before marker and knit 2 together, knit 4 (marker is between the 4 stitches), slip 1 stitch knitwise, knit 1, pass slipped stitch over stitch worked (= 2 stitches decreased). DECREASE TIP-2 (applies to neck at the front): All decreases are done from the right side. RIGHT FRONT PIECE (= after A.2): Slip 1 stitch knitwise, knit 1, pass slipped stitch over stitch worked (= 1 stitch decreased). LEFT FRONT PIECE (= 2 stitches before A.1): Knit 2 together (= 1 stitch decreased). INCREASE TIP-1 (applies to sides on body and mid under sleeve): All increases are done from the right side. Work until 3 stitches remain before marker, make 1 yarn over, knit 6 (marker is in the middle of these 6 stitches), make 1 yarn over (= 2 stitches increased). On next row work yarn overs twisted to avoid holes. INCREASE TIP-2 (applies to shawl collar): Increase 1 stitch by making 1 yarn over needle inside the 2 outermost stitches in each side towards mid front. On next row knit yarn over twisted to avoid holes. BUTTONHOLES: Decrease for buttonhole at the edge on right band when piece measures 4, 10, 16 and 22 cm in all sizes. 1 buttonhole = begin from wrong side and work until 1 stitch remains on needle towards mid front, make 2 yarn overs and knit last stitch. Turn piece, knit first stitch together with the first yarn over, knit the second yarn over together with next stitch, then continue as before. -------------------------------------------------------- JACKET: Worked back and forth on circular needle from mid front. Work sleeves in the round on double pointed needles/a short circular needle. BODY: Cast on 215-235-255-279-311-339 stitches on circular needle size 2.5 mm with Flora. Work 3 ridges in GARTER STITCH - see explanation above. Switch to circular needle size 3 mm and work next row from right side as follows: 10-10-12-12-14-14 band stiches in garter stitch, A.1 (= 21-21-21-28-28-28 stitches), A.2 (= 2-2-2-3-3-3 stitches), 26-31-34-32-38-45 stitches in stocking stitch, insert 1 marker thread (= in the side), 16-21-26-21-29-36 stitches in stocking stitch, A.1 over the next 63-63-63-84-84-84 stitches (= 3 repetitions of 21-21-21-28-28-28 stitches), A.2 (= 2-2-2-3-3-3 stitches), 16-21-26-21-29-36 stitches in stocking stitch, insert 1 marker thread (= in the side), 26-31-34-32-38-45 stitches in stocking stitch, A.1 (= 21-21-21-28-28-28 stitches), A.2 (= 2-2-2-3-3-3 stitches) and finish with 10-10-12-12-14-14 band stitches in garter stitch. Continue pattern like this. REMEMBER THE KNITTING TENSION READ ALL OF THE FOLLOWING SECTION BEFORE CONTINUING! BAND: When piece measures 3-3-3-3-4-4 cm, work SHORT ROWS over band in each side - see explanation above. BUTTONHOLES: When piece measures 4 cm, work BUTTONHOLES on right band - see explanation above. DECREASE IN THE SIDES: When piece measures 5 cm in all sizes, decrease 1 stitch on each side of both markers - READ DECREASE TIP-1 (= 4 stitches decreased). Decrease like this every 5 cm 3 times in total in each side = 203-223-243-267-299-327 stitches. INCREASE IN THE SIDES: When piece measures 22 cm in all sizes, increase 1 stitch on each side of both markers - READ INCREASE TIP-1 (= 4 stitches increased). Increase like this every 2-2-3-3-4-4 cm 5-5-5-5-4-4 times in total in each side. NECK: When piece measures 23 cm in all sizes, decrease 1 stitch for V-neck inside A.1 and A.2 on each front piece – READ DECREASE TIP-2. Decrease like this every 8th-8th-10th-10th-10th-10th row 11-11-10-10-9-9 times in total in each side. SHAWL COLLAR: When piece measures 30 cm in all sizes, increase 1 stitch in each side - READ INCREASE TIP-2! Increase like this every 4th row (i.e. every other row from right side) 12-13-13-14-14-15 times in total and then every 6th row 2 times in total in all sizes. ARMHOLES: When piece measures 35-36-37-38-39-40 cm, cast off 6 stitches for armholes in each side (3 stitches on each side of both markers). Then finish front and back piece separately. BACK PIECE: = 95-105-115-127-141-155 stitches. Continue pattern as before and cast off for armholes at the beginning of every row in each side as follows: 3 stitches 0-0-1-1-2-3 times, 2 stitches 1-2-2-3-4-4 times and 1 stitch 1-3-4-4-5-6 times = 89-91-93-101-103-109 stitches – READ KNITTING INFO. When piece measures 52-54-56-58-60-62 cm, cast off the middle 17-17-17-25-25-25 stitches for neck and finish each shoulder separately. Continue with stocking stitch and pattern and cast off 2 stitches on next row from neck = 34-35-36-36-37-40 stitches remain on shoulder (22-22-22-29-29-29 stitches pattern and 12-13-14-7-8-11 stitches stocking stitch. Cast off when piece measures 54-56-58-60-62-64 cm. Work the other shoulder the same way. LEFT FRONT PIECE: Continue pattern as before with decrease for neck and increase for shawl collar as before. AT THE SAME TIME cast off for armhole in the side the same way as on back piece. After all increases and decreases, there are 58-60-62-67-69-73 stitches on needle. When piece measures 54-56-58-60-62-64 cm, cast off the outermost 34-35-36-36-37-40 stitches on shoulder = 24-25-27-28-30-31 stitches remain on needle for shawl collar. Work the rest of row. Then work short rows over shawl collar as follows (begin from wrong side): * 1 ridge back and forth over the outermost 14-15-15-16-16-17 stitches towards mid front, 1 ridge back and forth over all stitches *, repeat from *-* until piece measures approx. 6-6-6-8-8-8 cm on the shortest (measures from shoulder). Cast off. RIGHT FRONT PIECE: Continue the same way as on left front piece but with increases and decreases in the opposite side. SLEEVE: Cast on 48-50-52-56-58-60 stitches on double pointed needles size 2.5 mm with Flora. Work in GARTER STITCH - see explanation above. When piece measures 4 cm, insert 1 marker - NOW MEASURE PIECE FROM HERE! Continue in garter stitch for 4 cm (piece measures 8 cm in total). Switch to double pointed needles size 3 mm. Insert 1 marker thread at beginning of round (= mid under sleeve). Work in stocking stitch. When piece measures 8-5-6-5-7-5 cm, increase 2 stitches mid under sleeve - READ INCREASE TIP-1. Increase like this every 2½-2½-2-2-1½-1½ cm 15-17-19-21-24-25 times in total = 78-84-90-98-106-110 stitches. When piece measures 47-47-46-46-45-43 cm (shorter measurements in the larger sizes because of longer sleeve cap and wider shoulders), cast off 6 stitches mid under sleeve (3 stitches on each side of marker). Then work sleeve cap back and forth on circular needle until finished measurements. Work stocking stitch and cast off at beginning of row in each side as follows: 2 stitches 3-3-4-4-5-6 times and 1 stitch 5-6-6-6-7-8 times, then cast off 2 stitches in each side until piece measures 54-55-55-55-55-55 cm before casting off 3 stitches 1 time in each side. Cast off the remaining stitches. Sleeve measures approx. 55-56-56-56-56-56 cm from the top and down to marker (59-60-60-60-60-60 cm from top and down to cast-on edge). Knit another sleeve the same way. ASSEMBLY: Sew the shoulder seams. Sew in sleeves. Fold up half the edge in garter stitch at the bottom of sleeves and fasten with a couple of stitches mid under sleeve. Sew collar tog mid back (seam mid back should be inwards when collar is folded). Sew collar to neckline in the back of neck. Sew on buttons. |
|||||||||||||||||||||||||
Diagram explanations |
|||||||||||||||||||||||||
|
|||||||||||||||||||||||||
 |
|||||||||||||||||||||||||
 |
|||||||||||||||||||||||||
Have you finished this pattern?Tag your pictures with #dropspattern #sweetivyleavescardigan or submit them to the #dropsfan gallery. Do you need help with this pattern?You'll find 31 tutorial videos, a Comments/Questions area and more by visiting the pattern on garnstudio.com. © 1982-2026 DROPS Design A/S. We reserve all rights. This document, including all its sub-sections, has copyrights. Read more about what you can do with our patterns at the bottom of each pattern on our site. |
|||||||||||||||||||||||||


With over 40 years in knitting and crochet design, DROPS Design offers one of the most extensive collections of free patterns on the internet - translated to 17 languages. As of today we count 324 catalogues and 12290 patterns translated into English (UK/cm). 12290
We work hard to bring you the best knitting and crochet have to offer, inspiration and advice as well as great quality yarns at incredible prices! Would you like to use our patterns for other than personal use? You can read what you are allowed to do in the Copyright text at the bottom of all our patterns. Happy crafting!
Post a comment to pattern DROPS 175-25
We would love to hear what you have to say about this pattern!
If you want to leave a question, please make sure you select the correct category in the form below, to speed up the answering process. Required fields are marked *.