
Popular categories
Looking for a yarn?


Comments / Questions (284)
![]() Anne Light wrote:
Anne Light wrote:
Making small back piece, row 13: "work the next 27sts AT THE SAME TIME dec 11sts evenly in sections with P" I can't figure out how to distribute the decreases. Do you continue with the P3, K2 pattern but change the P to p2tog? There are 5 P sections where I have to add 11 decreases so won't it be asymmetrical? How does that match up with the below row?
28.02.2022 - 14:58DROPS Design answered:
Dera Mrs Light, the next 27 sts were previously worked in rib - you will decrease with P2 together in these sections, work the K stitches from the K-sections as before. Make sure you decrease a total of 11 sts to get the correct total of sts at the end of the row. Happy knitting!
28.02.2022 - 16:31
![]() Katia wrote:
Katia wrote:
Bonjour. Ca y est, je suis enfin en train de commencer le col châle. Je ne suis pas sure de comprendre les explications pour les rangs raccourcis : on tricote bien 2 rangs au point mousse sur toute la longueur de l'ouvrage, tous les 14 rangs ??? J'ai comme un doute... Merci pour votre aide.
06.02.2022 - 21:33DROPS Design answered:
Bonjour Katia, pas exactement, vous tricotez 2 rangs sur toutes les mailles point mousse uniquement (pas toutes les mailles du rang), autrement dit: les mailles de la bordure devant + les mailles augmentées pour le col (mais pas celles des différents diagrammes pour ne pas modifier les points fantaisie) - tricotez 12 rangs comme avant et répétez ces 2 rangs sur toutes les mailles point mousse de nouveau et continuez ainsi. Bon tricot!
07.02.2022 - 10:39
![]() Lise wrote:
Lise wrote:
Bonjour, je suis rendu à faire le col châle, et je ne comprend pas comment faire, car vous parler de faire les rangs raccourcir en même temps?j ai beau relire et relire et je n arrive pas à comprendre svp aidez moi. Merci
19.01.2022 - 21:27DROPS Design answered:
Bonjour lise, à quel niveau en êtes vous exactement? Vous commencez les augmentations ou bien vous avez déjà rabattu les mailles de l'épaule? Si je résume, vous décalez d'abord A.1 puis augmentez pour le col, tricotez A.7 au lieu des points fantaisie (mais toujours A.1 et le point mousse du col); rabattez les mailles de l'épaule et alors tricotez les mailles du col en rangs raccourcis. En espérant que ceci puisse vous aider. Bon tricot!
20.01.2022 - 09:52
![]() Susan Coleman wrote:
Susan Coleman wrote:
Please clarify the A1 displacement for the shawl collar. I do the it every 1/4 in” 4 times, followed by every 3/8” 24 times(largest size) or start the 3/8 “displacement at the same time as the 1/4” ? Total 10 inches knit? What are the inc stitches mentioned? After short row do I pick up pattern row I would have been on ? At end of shoulder instructions it says continue until finished measurements. What are the measurements? Thank you
19.01.2022 - 16:58DROPS Design answered:
Dear Mrs Coleman, you first start displacing A.1 (increase with 1 yarn over inside 1st stitch and decrease 1 stitch after A.1 = no increase, number of sts remain the same) on ever 1,5 cm (= 0.59 inch) at total of 4 times then on every 1 cm (= 0.39 inch) a total of 24 times = a total of 10.74 cm between first and last displacement. Cast off for shoulder when piece measures 20" and when piece measures 22¾'', work collar sts as before (= garter stitch and A.1) and work only A.7 over all remaining stitches increasing 13 sts evenly. (finished measurements are the height when you cast off all sts) Happy knitting!
20.01.2022 - 08:59
![]() Izzy wrote:
Izzy wrote:
Hi, I have a follow up question for the back part. A.3-A.6 I believe is 68 stitches. This means (I think) that the back part I am on would be 176 stitches (A.3-A.6 on each side, plus 40 stitches of A.8 in the middle). However, in the step just before, I decreased over the purl down to 154 stitches. This is partly the source of my previous confusion. Could you possibly help me understand this, or am I still missing something? Thank you!
18.01.2022 - 02:59DROPS Design answered:
Dear Izzy, after you have 154 sts work the diagrams as before: 1 edge st, A.6 (= 12 sts), A.4 (=8 sts), A.3 (= 34 sts), P2, A.8 over the next 40 sts, P2, A.3, A.4, A.5, 1 edge st = 1+12+8+34+2+40+2+34+8+12+1= 154 sts. Can this help?
18.01.2022 - 10:33
![]() Izzy wrote:
Izzy wrote:
Hi;I am working on the back piece and just about to start the work on the US6 and am a totally lost after that! Is it P2,A3, A4,A5,A.8 over middle 40, then A3,A4,A5? I'm worried I'm not getting the symmetry of the piece right and struggling to sync up the pattern description with the image, if that makes sense. Many thanks!
17.01.2022 - 03:21DROPS Design answered:
Dear Izzy, work the diagrams just as before, ie A.3 over A.3, A.4 over A.4, A.5 over A.5 and A.6 over A.6 with just A.8 over the middle stitches. You will now work A.3 to A.6 to the end, then repeat them from the arrow. Happy knitting!
17.01.2022 - 09:27
![]() Susan Coleman wrote:
Susan Coleman wrote:
I am working on the left front piece and am ready to start the shawl collar. I do not understand the directions. I understand the displacement over A1 and I think I understand the short rows. Then the instructions become unclear to me. Am I supposed to be increasing stitches over the rest of the rows? I am making the largest size so I have 101 stitches. That would give 125 stitches. But then that doesn’t work with the shoulder decreases. I am clearly confused! Help, please
06.01.2022 - 21:39DROPS Design answered:
Dear Mrs Coleman, you cast off 4 sts 2 times for armhole (= 8 sts) = 101-8=93 sts. Decrease then 13 sts = 80 sts remain. When increasing for collar, you are not getting more stitches since you are displacing A.1 (= 1 increase inside 1st stitch + 1 decrease after A.1 = number of sts remains the same). Happy knitting!
07.01.2022 - 07:17
![]() Maria Leister wrote:
Maria Leister wrote:
Angående lomme: Det er ikke logisk å felle 2 masker på siden av to fletter og det er tre fletter i alt. Ser at rillekanten ikke ligger pent, men bretter seg på bildet. Det blir pent hvis man strikker sammen 2 og 2 masker over alle flettemaskene, 3 fletter.
27.12.2021 - 11:34
![]() Josie wrote:
Josie wrote:
Bonjour, après avoir lavé et bloqué mon échantillon je trouve 20m au lieu de 21m, est ce que je peux continuer avec aig numéro 4 ? Le nombre de rangs ne correspond pas non plus mais c'est moins ennuyeux puisque l'on peut mesurer pour se conformer au modèle initial. Bonne journée à vous tous.
23.11.2021 - 09:17DROPS Design answered:
Bonjour Josie, le souci est que vos mesures seront alors différentes, vous devez avoir 21 mailles jersey = 10 cm pour obtenir les bonnes mesures pour chacune des tailles indiquées dans le schéma. Il vaudrait mieux recommencer votre échantillon avec une aiguille plus grande pour vérifier si vous avez cette fois les 21 mailles - et pensez à vous rapprocher le plus possible du nombre de rangs pour ne pas manquer de laine. Retrouvez ici quelques explications complémentaires. Bon tricot!
23.11.2021 - 16:13
![]() Patricia wrote:
Patricia wrote:
Love the pattern, and I am making it for my husband. I do have a question, though. What is the range of measurements for each size. My husband has lost weight and I am not sure what size to make. Thanks!
20.11.2021 - 17:07DROPS Design answered:
Dear Patricia, you can find the finished measurements of the piece on the shcematic drawing , below the pattern. We suggest you take a garment that fits the intended user, and compare those measurements. Happy Sitching!
21.11.2021 - 14:56
|
|||||||||||||||||||
Finnley |
|||||||||||||||||||
 |
 |
||||||||||||||||||
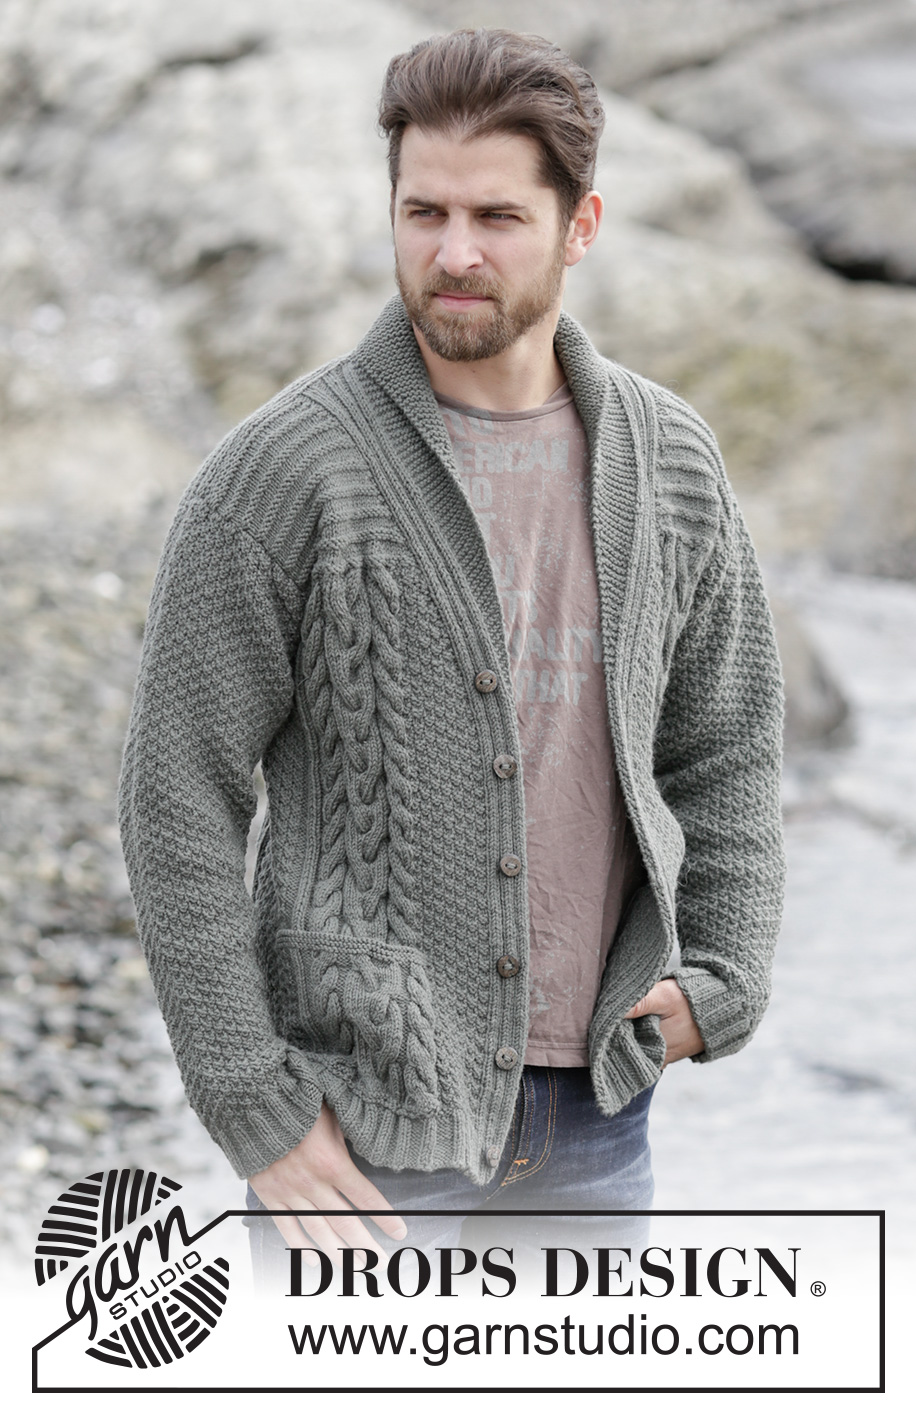
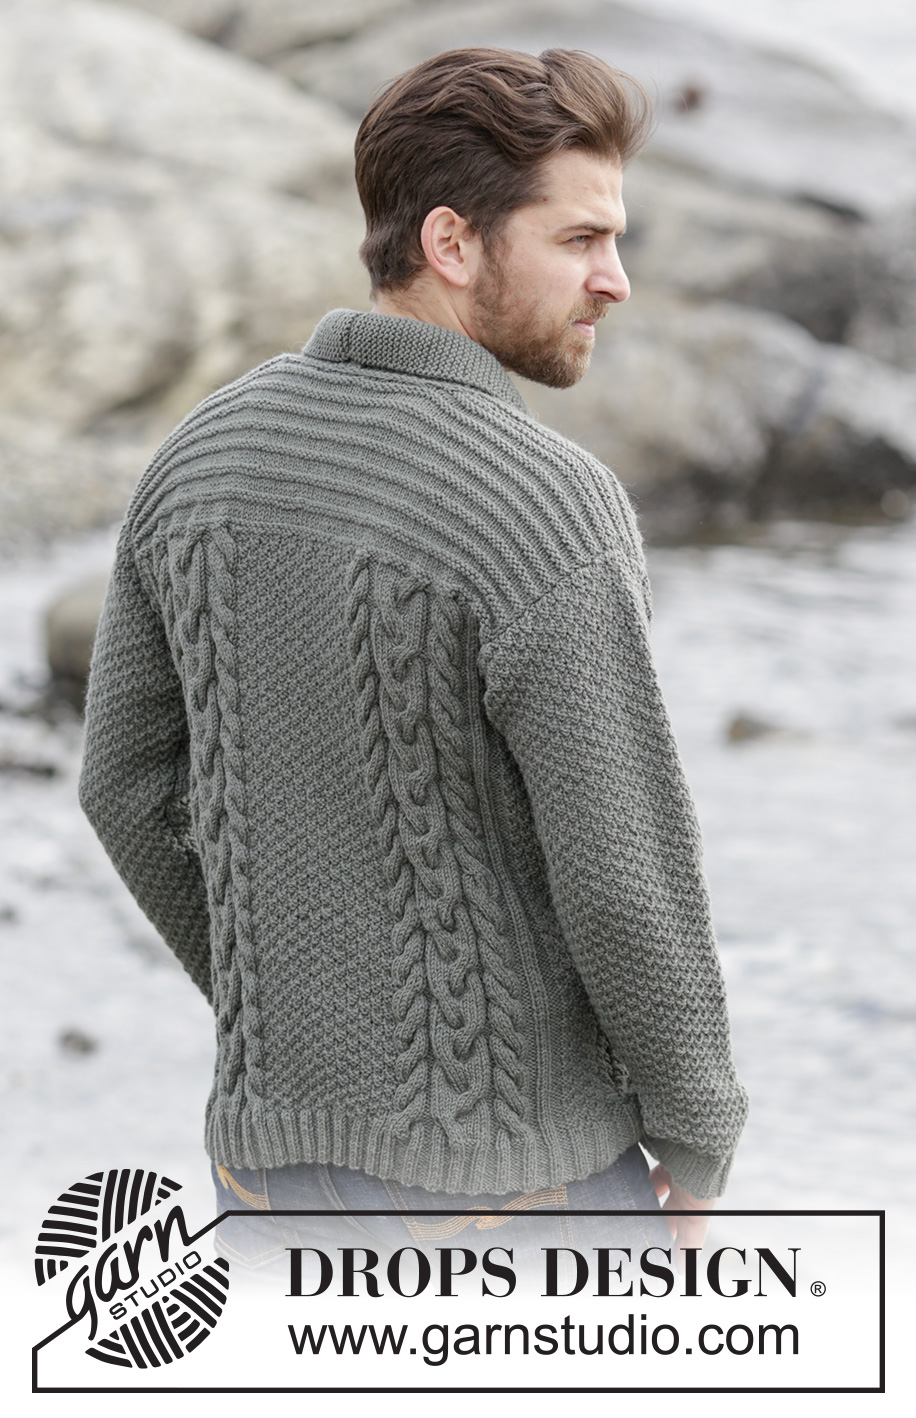
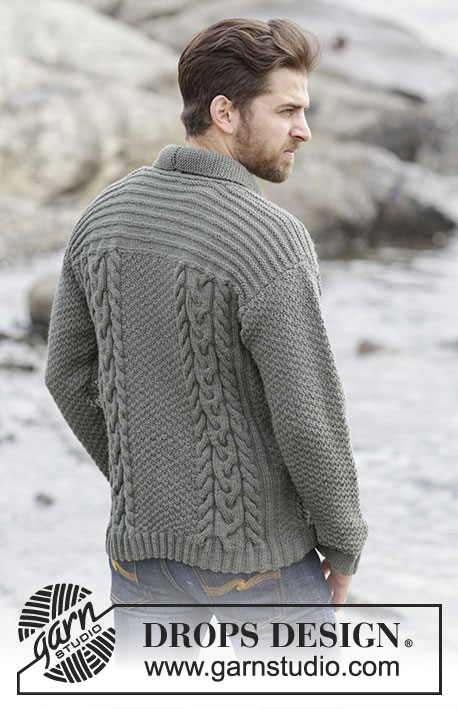
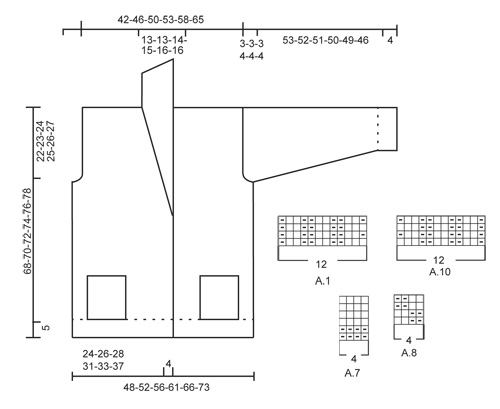
Men's knitted jacket in DROPS Lima, with cables and shawl collar. Size: S - XXXL.
DROPS Extra 0-1132 |
|||||||||||||||||||
|
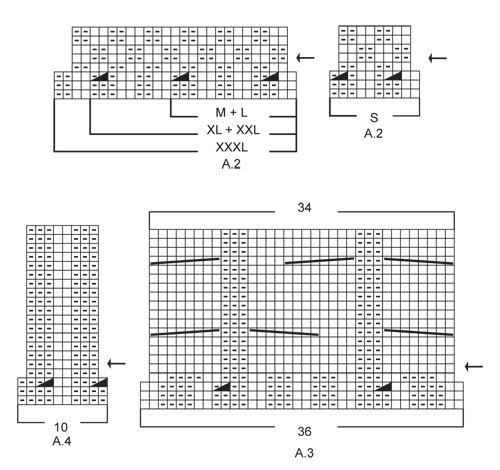
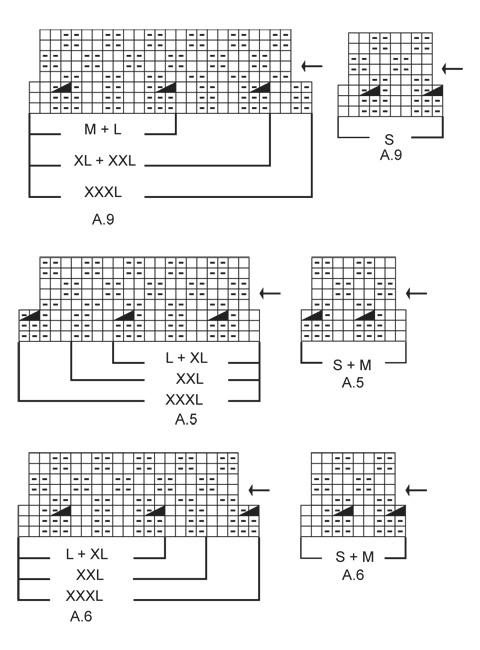
GARTER ST (back and forth): K all rows. 1 ridge = 2 rows K. PATTERN: See diagrams A.1-A.10. The diagrams show all rows in pattern seen from RS. INCREASE TIP: Inc 1 st by making 1 YO, on next row work YO twisted (i.e. work in the back loop of st instead front) to avoid holes. DECREASE TIP: All dec are done from RS! Dec as follows after A.1: P 2 tog Dec as follows before A.1: Work until 2 sts remain before A.1, P 2 tog. BUTTONHOLES: Dec for buttonholes on left band. 1 buttonhole = K tog sixth and seventh st from edge and make 1 YO. Dec for buttonholes when piece measures: SIZE S: 2, 9, 17, 25, 33 and 41 cm. SIZE M: 2, 10, 18, 26, 34 and 42 cm. SIZE L: 3, 11, 19, 27, 35 and 43 cm. SIZE XL: 3, 12, 20, 28, 36 and 44 cm. SIZE XXL: 4, 13, 21, 29, 37 and 45 cm. SIZE XXXL: 5, 14, 22, 30, 38 and 46 cm. SHORT ROWS (applies to shawl collar): Work short rows over sts in garter st from mid front as follows: For every 14th row work as follows (beg from RS): Work over all sts in garter st, turn piece, tighten yarn and K back, turn piece and work as before over all sts. That way the ridges in collar will not contract as much. On left front piece work reversed, i.e. beg short rows from WS. ---------------------------------------------------------- JACKET: Worked back and forth and sewn tog when finished. BACK PIECE: Cast on 145-150-158-178-186-206 sts on circular needle size 3.5 mm with Lima. Work rib as follows: 1 edge st in GARTER ST - see explanation above, A.6 (find diagram for correct size), A.4, A.3, P 2, K 2, * P 3, K 2 *, repeat from *-* 4-5-5-9-9-11 more times, P 2, A.3, A.4, A.5 (find diagram for correct size), 1 edge st in garter st. Continue like this and repeat the first 2 rows in A.3-A.6 until 12 rows have been worked. Now continue pattern from 3rd row in diagram and work as follows: Work the first 59-59-63-63-67-72 sts as before, work the next 27-32-32-52-52-62 sts AT THE SAME TIME dec 11-8-8-12-12-14 sts evenly in sections with P, continue as before over the remaining 59-59-63-63-67-72 sts = 122-130-138-154-162-178 sts. Work 1 row. Now switch to circular needle size 4 mm and continue with pattern but work A.8 over the middle 16-24-24-40-40-48 sts. NOTE: Now repeat A.3- A.6 from arrow in diagram. REMEMBER THE KNITTING TENSION When piece measures 46-47-48-49-50-51 cm, cast off 3-3-3-4-4-4 sts at beg of the next 4 rows for armholes = 110-118-126-138-146-162 sts on needle. When piece measures 53-54-55-56-57-58 cm, work A.7 over all sts inside 1 edge st in garter st in each side AT THE SAME TIME on first row dec 20-20-18-24-22-24 sts evenly in all sizes = 90-98-108-114-124-138 sts. Repeat A.7 until finished measurements. When piece measures 66-68-70-72-74-76 cm, work as follows: Work the first 32-36-40-42-46-53 sts, cast off the next 26-26-28-30-32-32 sts and work the remaining 32-36-40-42-46-53 sts. Then finish each shoulder separately as follows: On next row from the neck, dec 1 st = 31-35-39-41-45-52 sts remain on each shoulder. When piece measures 68-70-72-74-76-78 cm, work 1 ridge over all sts. Cast off. Work the other shoulder the same way. RIGHT FRONT PIECE: Cast on 81-85-89-98-102-111 sts on circular needle size 3.5 mm with Lima. Work rib as follows: A.1 (= 12 sts), A.2 (find diagram for correct size), P 2, A.3, A.4, A.5 (find diagram for correct size), 1 edge st in garter st. Continue like this and repeat the first 2 rows in A.2-A.5 until 12 rows have been worked. Switch to circular needle size 4 mm and continue with pattern = 73-77-81-89-93-101 sts. NOTE: Now repeat diagram from arrow. When piece measures 40-41-42-43-44-46 cm, beg shawl collar while AT THE SAME TIME working shoulder as explained below: READ ALL OF THE FOLLOWING SECTION BEFORE CONTINUING! SHAWL COLLAR: Work first st in A.1, 1 YO, work the remaining 11 sts in A.1, dec 1 st - READ DECREASE TIP, continue over the remaining sts on needle as before. Repeat displacement over A.1 every 1½ cm 0-2-3-3-3-4 times in total and every cm 26-24-23-24-25-24 times = 26-26-26-27-28-28 sts (incl the first st in A.1). Work the inc sts towards mid front in garter st, AT THE SAME TIME work SHORT ROWS - see explanation above. SHOULDER: When piece measures 46-47-48-49-50-51 cm, cast off 3-3-3-4-4-4 sts at beg of the next 2 rows from WS = 67-71-75-81-85-93 sts on needle. When piece measures 53-54-55-56-57-58 cm, work collar sts in garter st and A.1 as before, then work A.7 over the remaining sts on needle, AT THE SAME TIME dec 10-10-10-13-12-13 sts evenly = 57-61-65-68-73-80 sts. Continue pattern until finished measurements. Then work as follows from RS: When piece measures 68-70-72-74-76-78 cm - adjust after back piece - work the first 26-26-26-27-28-28 sts before slipping them on a stitch holder, then work a ridge over the remaining 31-35-39-41-45-52 sts. Cast off. Slip sts back on needle. Then work short rows in garter st as follows, beg from WS: Work over all 26-26-26-27-28-28 sts, * 2 rows back and forth over the first 13-13-14-14-15-15 sts, 2 rows over all sts *, repeat from *-* until piece measures 7-7-7-8-8-8 cm on the shortest. Cast off. LEFT FRONT PIECE: Work as right front piece but reversed. I.e. work A.10 instead of A.1, A.9 instead of A.2 and A.6 instead of A.5. Remember BUTTONHOLES on left band - see explanation above. SLEEVE: The sleeve is worked back and forth on circular needle. Cast on 59-64-64-69-69-74 sts (incl 1 edge st in garter st in each side) on circular needle size 3.5 mm with Lima. Work rib as follows: 1 edge st in garter st, * K 2, P 3 *, repeat from *-* until 3 sts remain, K 2, 1 edge st in garter st. Continue like this until rib measures 4 cm. Switch to circular needle size 4 mm and work 1 row in stocking st while AT THE SAME TIME dec 9-10-10-11-11-12 sts evenly = 50-54-54-58-58-62 sts. Continue with A.8 inside 1 edge st in garter st in each side. When piece measures 14-13-8-8-13-11 cm, inc 1 st inside edge st in garter st in each side - read INCREASE TIP. Repeat inc approx. every 2-2-1½-1½-1½-1½ cm 20-20-22-22-25-25 more times = 92-96-100-104-110-114 sts. When piece measures 57-56-55-54-53-50 cm, cast off at beg of every row in each side: 3 sts 1-1-1-2-2-2 times, 2 sts 1 time and 3 st 2-2-2-3-3-3 times. Cast off. Sleeve measures approx. 60-59-58-58-57-54 cm. Knit another sleeve. POCKETS: Worked back and forth on circular needle. Cast on 42 sts on circular needle size 4 mm with Lima. Work 1 ridge in garter st AT THE SAME TIME inc 6 sts evenly on row from RS = 48 sts. On next row from RS work pattern as follows: NOTE: Beg and repeat pattern in A.3 and A.4 from 5th row in A.3 and A.4. 1 edge sts in garter st, A.3, A.4, A.8, 1 edge st in garter st. Continue like this back and forth until A.3 and A.4 have been worked 2 times vertically. Then continue with the first 6 rows from arrows in diagram 1 more time. Then work and dec as follows: 1 edge st in garter st, K the next 4 sts tog 2 by 2 (= 2 sts dec), continue as before over the next 7 sts, K the next 4 sts tog 2 by 2, continue with pattern as before over the next 15 sts, K the next 4 sts tog 2 by 2, Work remaining sts as before and finish with 1 edge st in garter st. Then switch to needle 3.5 mm and work 2 ridges over all sts, beg from WS. Cast off from WS. Work another pocket the same way but reversed. ASSEMBLY: Sew the shoulder seams tog. Sew sleeves in body. Sew underarm and side seams in one inside 1 edge st in garter st. Sew the buttons on to the right band. Sew cast-off edge on collars tog mid back, sew collar to the back of neck. Fasten pockets on front pieces so that pattern on pocket is placed over pattern on front piece. Sew pocket neatly through both layers in edge st in garter st in each side and at the bottom of pocket. Cut the yarn and fasten. |
|||||||||||||||||||
Diagram explanations |
|||||||||||||||||||
|
|||||||||||||||||||
 |
|||||||||||||||||||
 |
|||||||||||||||||||
 |
|||||||||||||||||||
Have you finished this pattern?Tag your pictures with #dropspattern or submit them to the #dropsfan gallery. Do you need help with this pattern?You'll find 24 tutorial videos, a Comments/Questions area and more by visiting the pattern on garnstudio.com. © 1982-2026 DROPS Design A/S. We reserve all rights. This document, including all its sub-sections, has copyrights. Read more about what you can do with our patterns at the bottom of each pattern on our site. |
|||||||||||||||||||


With over 40 years in knitting and crochet design, DROPS Design offers one of the most extensive collections of free patterns on the internet - translated to 17 languages. As of today we count 324 catalogues and 12290 patterns translated into English (UK/cm). 12290
We work hard to bring you the best knitting and crochet have to offer, inspiration and advice as well as great quality yarns at incredible prices! Would you like to use our patterns for other than personal use? You can read what you are allowed to do in the Copyright text at the bottom of all our patterns. Happy crafting!
Post a comment to pattern DROPS Extra 0-1132
We would love to hear what you have to say about this pattern!
If you want to leave a question, please make sure you select the correct category in the form below, to speed up the answering process. Required fields are marked *.